EFK Stack on Kubernetes (Part 1)
Join the DZone community and get the full member experience.
Join For FreeThis is the first post of the 2 part series where we will set-up production grade Kubernetes logging for applications deployed in the cluster and the cluster itself. We will be using Elasticsearch as the logging backend for this. The Elasticsearch set-up will be extremely scalable and fault tolerant.
1. Deployment Architecture
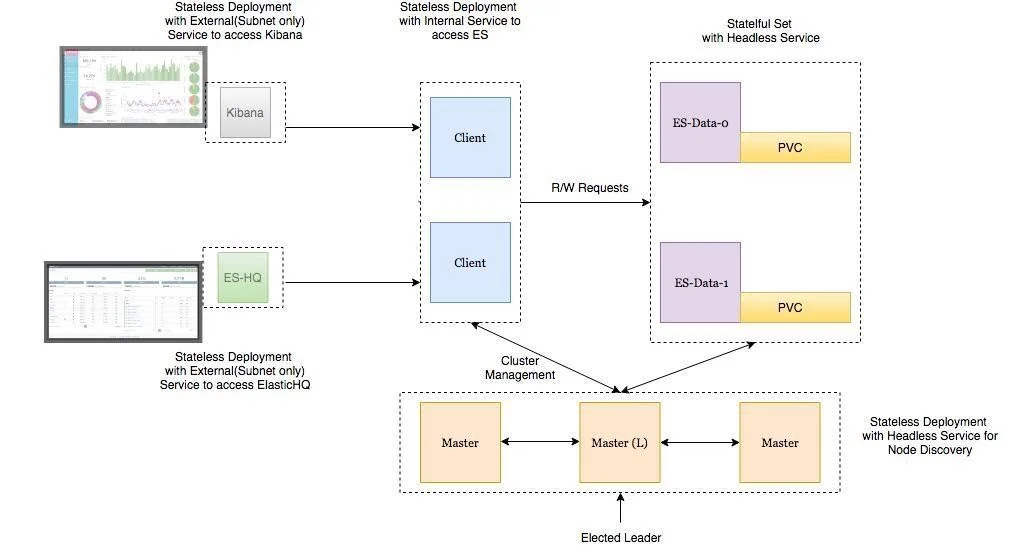
- Elasticsearch Data Node Pods are deployed as a Stateful Set with a headless service to provide Stable Network Identities.
- Elasticsearch Master Node Pods are deployed as a Replica Set with a headless service which will help in Auto-discovery.
- Elasticsearch Client Node Pods are deployed as a Replica Set with an internal service which will allow access to the Data Nodes for R/W requests.
- Kibana and ElasticHQ Pods are deployed as Replica Sets with Services accessible outside the Kubernetes cluster but still internal to your Subnetwork (not publicly exposed unless otherwise required). HPA (Horizontal Pod Auto-scaler) deployed for Client Nodes to enable auto-scaling under high load.
Important things to keep in mind:
- Setting ES_JAVA_OPTS env variable.
- Setting CLUSTER_NAME env variable.
- Setting NUMBER_OF_MASTERS (to avoid split-brain problem) env variable for master deployment. In case of 3 masters we have set it as 2.
- Setting correct Pod-AntiAffinity policies among similar pods in order to ensure HA if a worker node fails.
Let’s jump right at deploying these services to our GKE cluster.
1.1 Deployment and Headless Service for Master Nodes
Deploy the following manifest to create master nodes and the headless service.
apiVersion: v1
kind: Namespace
metadata:
name: elasticsearch
---
apiVersion: apps/v1beta1
kind: Deployment
metadata:
name: es-master
namespace: elasticsearch
labels:
component: elasticsearch
role: master
spec:
replicas: 3
template:
metadata:
labels:
component: elasticsearch
role: master
spec:
affinity:
podAntiAffinity:
preferredDuringSchedulingIgnoredDuringExecution:
- weight: 100
podAffinityTerm:
labelSelector:
matchExpressions:
- key: role
operator: In
values:
- master
topologyKey: kubernetes.io/hostname
initContainers:
- name: init-sysctl
image: busybox:1.27.2
command:
- sysctl
- -w
- vm.max_map_count=262144
securityContext:
privileged: true
containers:
- name: es-master
image: quay.io/pires/docker-elasticsearch-kubernetes:6.2.4
env:
- name: NAMESPACE
valueFrom:
fieldRef:
fieldPath: metadata.namespace
- name: NODE_NAME
valueFrom:
fieldRef:
fieldPath: metadata.name
- name: CLUSTER_NAME
value: my-es
- name: NUMBER_OF_MASTERS
value: "2"
- name: NODE_MASTER
value: "true"
- name: NODE_INGEST
value: "false"
- name: NODE_DATA
value: "false"
- name: HTTP_ENABLE
value: "false"
- name: ES_JAVA_OPTS
value: -Xms256m -Xmx256m
- name: PROCESSORS
valueFrom:
resourceFieldRef:
resource: limits.cpu
resources:
limits:
cpu: 2
ports:
- containerPort: 9300
name: transport
volumeMounts:
- name: storage
mountPath: /data
volumes:
- emptyDir:
medium: ""
name: "storage"
---
apiVersion: v1
kind: Service
metadata:
name: elasticsearch-discovery
namespace: elasticsearch
labels:
component: elasticsearch
role: master
spec:
selector:
component: elasticsearch
role: master
ports:
- name: transport
port: 9300
protocol: TCP
clusterIP: None
If you follow the logs of any of the master-node pods, you will witness the master election among them. This is when the master-node pods choose which one is the leader of the group. When following the logs of the master-nodes, you will also see when new data and client nodes are added.
xxxxxxxxxx
root$ kubectl -n elasticsearch logs -f po/es-master-594b58b86c-9jkj2 | grep ClusterApplierService
[2018-10-21T07:41:54,958][INFO ][o.e.c.s.ClusterApplierService] [es-master-594b58b86c-9jkj2] detected_master {es-master-594b58b86c-bj7g7}{1aFT97hQQ7yiaBc2CYShBA}{Q3QzlaG3QGazOwtUl7N75Q}{10.9.126.87}{10.9.126.87:9300}, added {{es-master-594b58b86c-lfpps}{wZQmXr5fSfWisCpOHBhaMg}{50jGPeKLSpO9RU_HhnVJCA}{10.9.124.81}{10.9.124.81:9300},{es-master-594b58b86c-bj7g7}{1aFT97hQQ7yiaBc2CYShBA}{Q3QzlaG3QGazOwtUl7N75Q}{10.9.126.87}{10.9.126.87:9300},}, reason: apply cluster state (from master [master {es-master-594b58b86c-bj7g7}{1aFT97hQQ7yiaBc2CYShBA}{Q3QzlaG3QGazOwtUl7N75Q}{10.9.126.87}{10.9.126.87:9300} committed version [3]])
It can be seen above that the es-master pod named es-master-594b58b86c-bj7g7 was elected as the leader and the other 2 pods were added to the cluster. The headless service named elasticsearch-discovery is set by default as an env variable in the docker image and is used for discovery among the nodes. This can of course be overridden.
1.2 Data Nodes Deployment
We will use the following manifest to deploy Stateful Set and Headless Service for Data Nodes:
xxxxxxxxxx
apiVersion: v1
kind: Namespace
metadata:
name: elasticsearch
---
apiVersion: storage.k8s.io/v1beta1
kind: StorageClass
metadata:
name: fast
provisioner: kubernetes.io/gce-pd
parameters:
type: pd-ssd
fsType: xfs
allowVolumeExpansion: true
---
apiVersion: apps/v1beta1
kind: StatefulSet
metadata:
name: es-data
namespace: elasticsearch
labels:
component: elasticsearch
role: data
spec:
serviceName: elasticsearch-data
replicas: 3
template:
metadata:
labels:
component: elasticsearch
role: data
spec:
affinity:
podAntiAffinity:
preferredDuringSchedulingIgnoredDuringExecution:
- weight: 100
podAffinityTerm:
labelSelector:
matchExpressions:
- key: role
operator: In
values:
- data
topologyKey: kubernetes.io/hostname
initContainers:
- name: init-sysctl
image: busybox:1.27.2
command:
- sysctl
- -w
- vm.max_map_count=262144
securityContext:
privileged: true
containers:
- name: es-data
image: quay.io/pires/docker-elasticsearch-kubernetes:6.2.4
env:
- name: NAMESPACE
valueFrom:
fieldRef:
fieldPath: metadata.namespace
- name: NODE_NAME
valueFrom:
fieldRef:
fieldPath: metadata.name
- name: CLUSTER_NAME
value: my-es
- name: NODE_MASTER
value: "false"
- name: NODE_INGEST
value: "false"
- name: HTTP_ENABLE
value: "false"
- name: ES_JAVA_OPTS
value: -Xms256m -Xmx256m
- name: PROCESSORS
valueFrom:
resourceFieldRef:
resource: limits.cpu
resources:
limits:
cpu: 2
ports:
- containerPort: 9300
name: transport
volumeMounts:
- name: storage
mountPath: /data
volumeClaimTemplates:
- metadata:
name: storage
annotations:
volume.beta.kubernetes.io/storage-class: "fast"
spec:
accessModes: [ "ReadWriteOnce" ]
storageClassName: fast
resources:
requests:
storage: 10Gi
---
apiVersion: v1
kind: Service
metadata:
name: elasticsearch-data
namespace: elasticsearch
labels:
component: elasticsearch
role: data
spec:
ports:
- port: 9300
name: transport
clusterIP: None
selector:
component: elasticsearch
role: data
The headless service in the case of data nodes provides stable network identities to the nodes and also helps with the data transfer among them.It is important to format the persistent volume before attaching it to the pod. This can be done by specifying the volume type when creating the storage class. We can also set a flag to allow volume expansion on the fly. More can be read about that here.
xxxxxxxxxx
...
parameters:
type: pd-ssd
fsType: xfs
allowVolumeExpansion: true
...
1.3 Client Nodes Deployment
We will use the following manifest to create the Deployment and External Service for the Client Nodes
xxxxxxxxxx
apiVersion: apps/v1beta1
kind: Deployment
metadata:
name: es-client
namespace: elasticsearch
labels:
component: elasticsearch
role: client
spec:
replicas: 2
template:
metadata:
labels:
component: elasticsearch
role: client
spec:
affinity:
podAntiAffinity:
preferredDuringSchedulingIgnoredDuringExecution:
- weight: 100
podAffinityTerm:
labelSelector:
matchExpressions:
- key: role
operator: In
values:
- client
topologyKey: kubernetes.io/hostname
initContainers:
- name: init-sysctl
image: busybox:1.27.2
command:
- sysctl
- -w
- vm.max_map_count=262144
securityContext:
privileged: true
containers:
- name: es-client
image: quay.io/pires/docker-elasticsearch-kubernetes:6.2.4
env:
- name: NAMESPACE
valueFrom:
fieldRef:
fieldPath: metadata.namespace
- name: NODE_NAME
valueFrom:
fieldRef:
fieldPath: metadata.name
- name: CLUSTER_NAME
value: my-es
- name: NODE_MASTER
value: "false"
- name: NODE_DATA
value: "false"
- name: HTTP_ENABLE
value: "true"
- name: ES_JAVA_OPTS
value: -Xms256m -Xmx256m
- name: NETWORK_HOST
value: _site_,_lo_
- name: PROCESSORS
valueFrom:
resourceFieldRef:
resource: limits.cpu
resources:
limits:
cpu: 1
ports:
- containerPort: 9200
name: http
- containerPort: 9300
name: transport
volumeMounts:
- name: storage
mountPath: /data
volumes:
- emptyDir:
medium: ""
name: storage
---
apiVersion: v1
kind: Service
metadata:
name: elasticsearch
namespace: elasticsearch
labels:
component: elasticsearch
role: client
spec:
selector:
component: elasticsearch
role: client
ports:
- name: http
port: 9200
type: LoadBalancer
The purpose of the service deployed here is to access the ES Cluster from outside the Kubernetes cluster but still internal to our subnet. The annotation “cloud.google.com/load-balancer-type: Internal” ensures this.
However, if the application reading/writing to our ES cluster is deployed within the cluster then the Elasticsearch service can be accessed by http://elasticsearch.elasticsearch:9200.
Once all components are deployed we should verify the following
- Elasticsearch deployment from inside the Kubernetes cluster using an Ubuntu container.
xxxxxxxxxx
root$ kubectl run my-shell --rm -i --tty --image ubuntu -- bash
root@my-shell-68974bb7f7-pj9x6:/# curl http://elasticsearch.elasticsearch:9200/_cluster/health?pretty
{
"cluster_name" : "my-es",
"status" : "green",
"timed_out" : false,
"number_of_nodes" : 7,
"number_of_data_nodes" : 2,
"active_primary_shards" : 0,
"active_shards" : 0,
"relocating_shards" : 0,
"initializing_shards" : 0,
"unassigned_shards" : 0,
"delayed_unassigned_shards" : 0,
"number_of_pending_tasks" : 0,
"number_of_in_flight_fetch" : 0,
"task_max_waiting_in_queue_millis" : 0,
"active_shards_percent_as_number" : 100.0
}
2. Elasticsearch deployment from outside the cluster using the GCP Internal Load balancer IP (in this case 10.9.120.8). When we check the health using curl http://10.9.120.8:9200/_cluster/health?pretty the output should be the same as above.
3. Anti-Affinity Rules for our ES-Pods
xxxxxxxxxx
root$ kubectl -n elasticsearch get pods -o wide
NAME READY STATUS RESTARTS AGE IP NODE
es-client-69b84b46d8-kr7j4 1/1 Running 0 10m 10.8.14.52 gke-cluster1-pool1-d2ef2b34-t6h9
es-client-69b84b46d8-v5pj2 1/1 Running 0 10m 10.8.15.53 gke-cluster1-pool1-42b4fbc4-cncn
es-data-0 1/1 Running 0 12m 10.8.16.58 gke-cluster1-pool1-4cfd808c-kpx1
es-data-1 1/1 Running 0 12m 10.8.15.52 gke-cluster1-pool1-42b4fbc4-cncn
es-master-594b58b86c-9jkj2 1/1 Running 0 18m 10.8.15.51 gke-cluster1-pool1-42b4fbc4-cncn
es-master-594b58b86c-bj7g7 1/1 Running 0 18m 10.8.16.57 gke-cluster1-pool1-4cfd808c-kpx1
es-master-594b58b86c-lfpps 1/1 Running 0 18m 10.8.14.51 gke-cluster1-pool1-d2ef2b34-t6h9
1.4 Scaling Considerations
We can deploy autoscalers for our client nodes depending on our CPU thresholds. A sample HPA for client node might look something like this
xxxxxxxxxx
apiVersion: autoscaling/v1
kind: HorizontalPodAutoscaler
metadata:
name: es-client
namespace: elasticsearch
spec:
maxReplicas: 5
minReplicas: 2
scaleTargetRef:
apiVersion: extensions/v1beta1
kind: Deployment
name: es-client
targetCPUUtilizationPercentage: 80
Whenever the autoscaler kicks in, we can watch the new client-node pods being added to the cluster by observing the logs of any of the master-node pods.
In case of Data-Node Pods all we have to do is increase the number of replicas using the K8 Dashboard or GKE console. The newly created data node will be automatically added to the cluster and will start replicating data from other nodes. Master-Node Pods do not require auto scaling as they only store cluster-state information. In case you want to add more data nodes make sure there is not an even number of master nodes in the cluster. Also, make sure the environment variable NUMBER_OF_MASTERS is updated accordingly.
xxxxxxxxxx
#Check logs of es-master leader pod
root$ kubectl -n elasticsearch logs po/es-master-594b58b86c-bj7g7 | grep ClusterApplierService
[2018-10-21T07:41:53,731][INFO ][o.e.c.s.ClusterApplierService] [es-master-594b58b86c-bj7g7] new_master {es-master-594b58b86c-bj7g7}{1aFT97hQQ7yiaBc2CYShBA}{Q3QzlaG3QGazOwtUl7N75Q}{10.9.126.87}{10.9.126.87:9300}, added {{es-master-594b58b86c-lfpps}{wZQmXr5fSfWisCpOHBhaMg}{50jGPeKLSpO9RU_HhnVJCA}{10.9.124.81}{10.9.124.81:9300},}, reason: apply cluster state (from master [master {es-master-594b58b86c-bj7g7}{1aFT97hQQ7yiaBc2CYShBA}{Q3QzlaG3QGazOwtUl7N75Q}{10.9.126.87}{10.9.126.87:9300} committed version [1] source [zen-disco-elected-as-master ([1] nodes joined)[{es-master-594b58b86c-lfpps}{wZQmXr5fSfWisCpOHBhaMg}{50jGPeKLSpO9RU_HhnVJCA}{10.9.124.81}{10.9.124.81:9300}]]])
[2018-10-21T07:41:55,162][INFO ][o.e.c.s.ClusterApplierService] [es-master-594b58b86c-bj7g7] added {{es-master-594b58b86c-9jkj2}{x9Prp1VbTq6_kALQVNwIWg}{7NHUSVpuS0mFDTXzAeKRcg}{10.9.125.81}{10.9.125.81:9300},}, reason: apply cluster state (from master [master {es-master-594b58b86c-bj7g7}{1aFT97hQQ7yiaBc2CYShBA}{Q3QzlaG3QGazOwtUl7N75Q}{10.9.126.87}{10.9.126.87:9300} committed version [3] source [zen-disco-node-join[{es-master-594b58b86c-9jkj2}{x9Prp1VbTq6_kALQVNwIWg}{7NHUSVpuS0mFDTXzAeKRcg}{10.9.125.81}{10.9.125.81:9300}]]])
[2018-10-21T07:48:02,485][INFO ][o.e.c.s.ClusterApplierService] [es-master-594b58b86c-bj7g7] added {{es-data-0}{SAOhUiLiRkazskZ_TC6EBQ}{qirmfVJBTjSBQtHZnz-QZw}{10.9.126.88}{10.9.126.88:9300},}, reason: apply cluster state (from master [master {es-master-594b58b86c-bj7g7}{1aFT97hQQ7yiaBc2CYShBA}{Q3QzlaG3QGazOwtUl7N75Q}{10.9.126.87}{10.9.126.87:9300} committed version [4] source [zen-disco-node-join[{es-data-0}{SAOhUiLiRkazskZ_TC6EBQ}{qirmfVJBTjSBQtHZnz-QZw}{10.9.126.88}{10.9.126.88:9300}]]])
[2018-10-21T07:48:21,984][INFO ][o.e.c.s.ClusterApplierService] [es-master-594b58b86c-bj7g7] added {{es-data-1}{fiv5Wh29TRWGPumm5ypJfA}{EXqKGSzIQquRyWRzxIOWhQ}{10.9.125.82}{10.9.125.82:9300},}, reason: apply cluster state (from master [master {es-master-594b58b86c-bj7g7}{1aFT97hQQ7yiaBc2CYShBA}{Q3QzlaG3QGazOwtUl7N75Q}{10.9.126.87}{10.9.126.87:9300} committed version [5] source [zen-disco-node-join[{es-data-1}{fiv5Wh29TRWGPumm5ypJfA}{EXqKGSzIQquRyWRzxIOWhQ}{10.9.125.82}{10.9.125.82:9300}]]])
[2018-10-21T07:50:51,245][INFO ][o.e.c.s.ClusterApplierService] [es-master-594b58b86c-bj7g7] added {{es-client-69b84b46d8-v5pj2}{MMjA_tlTS7ux-UW44i0osg}{rOE4nB_jSmaIQVDZCjP8Rg}{10.9.125.83}{10.9.125.83:9300},}, reason: apply cluster state (from master [master {es-master-594b58b86c-bj7g7}{1aFT97hQQ7yiaBc2CYShBA}{Q3QzlaG3QGazOwtUl7N75Q}{10.9.126.87}{10.9.126.87:9300} committed version [6] source [zen-disco-node-join[{es-client-69b84b46d8-v5pj2}{MMjA_tlTS7ux-UW44i0osg}{rOE4nB_jSmaIQVDZCjP8Rg}{10.9.125.83}{10.9.125.83:9300}]]])
The logs of the leading master pod clearly depict when each node gets added to the cluster. It is extremely useful in case of debugging issues.
2. Deploying Kibana and ES-HQ
Kibana is a simple tool to visualize ES-data and ES-HQ helps in the administration and monitoring of Elasticsearch clusters. For our Kibana and ES-HQ deployment we keep the following things in mind:
- We must provide the name of the ES-Cluster as an environment variable to the docker image.
- The service to access the Kibana/ES-HQ deployment is internal to our organisation only, i.e. No public IP is created. We will need to use a GCP Internal load balancer.
2.1 Kibana Deployment
We will use the following manifest to create Kibana Deployment and Service
xxxxxxxxxx
apiVersion: apps/v1
kind: Deployment
metadata:
namespace: logging
name: kibana
labels:
component: kibana
spec:
replicas: 1
selector:
matchLabels:
component: kibana
template:
metadata:
labels:
component: kibana
spec:
containers:
- name: kibana
image: docker.elastic.co/kibana/kibana-oss:6.2.2
env:
- name: CLUSTER_NAME
value: my-es
- name: ELASTICSEARCH_URL
value: http://elasticsearch.elasticsearch:9200
resources:
limits:
cpu: 200m
requests:
cpu: 100m
ports:
- containerPort: 5601
name: http
---
apiVersion: v1
kind: Service
metadata:
namespace: logging
name: kibana
annotations:
cloud.google.com/load-balancer-type: "Internal"
labels:
component: kibana
spec:
selector:
component: kibana
ports:
- name: http
port: 5601
type: LoadBalancer
2.2 ES-HQ Deployment
We will use the following manifest to create ES-HQ Deployment and Service
xxxxxxxxxx
apiVersion: apps/v1beta1
kind: Deployment
metadata:
name: es-hq
namespace: elasticsearch
labels:
component: elasticsearch
role: hq
spec:
replicas: 1
template:
metadata:
labels:
component: elasticsearch
role: hq
spec:
containers:
- name: es-hq
image: elastichq/elasticsearch-hq:release-v3.4.0
env:
- name: HQ_DEFAULT_URL
value: http://elasticsearch:9200
resources:
limits:
cpu: 0.5
ports:
- containerPort: 5000
name: http
---
apiVersion: v1
kind: Service
metadata:
name: hq
namespace: elasticsearch
labels:
component: elasticsearch
role: hq
spec:
selector:
component: elasticsearch
role: hq
ports:
- name: http
port: 5000
type: LoadBalancer
We can access both these services using the newly created Internal LoadBalancers.
Go to http://<External-Ip-Kibana-Service>/app/kibana#/home?_g=()
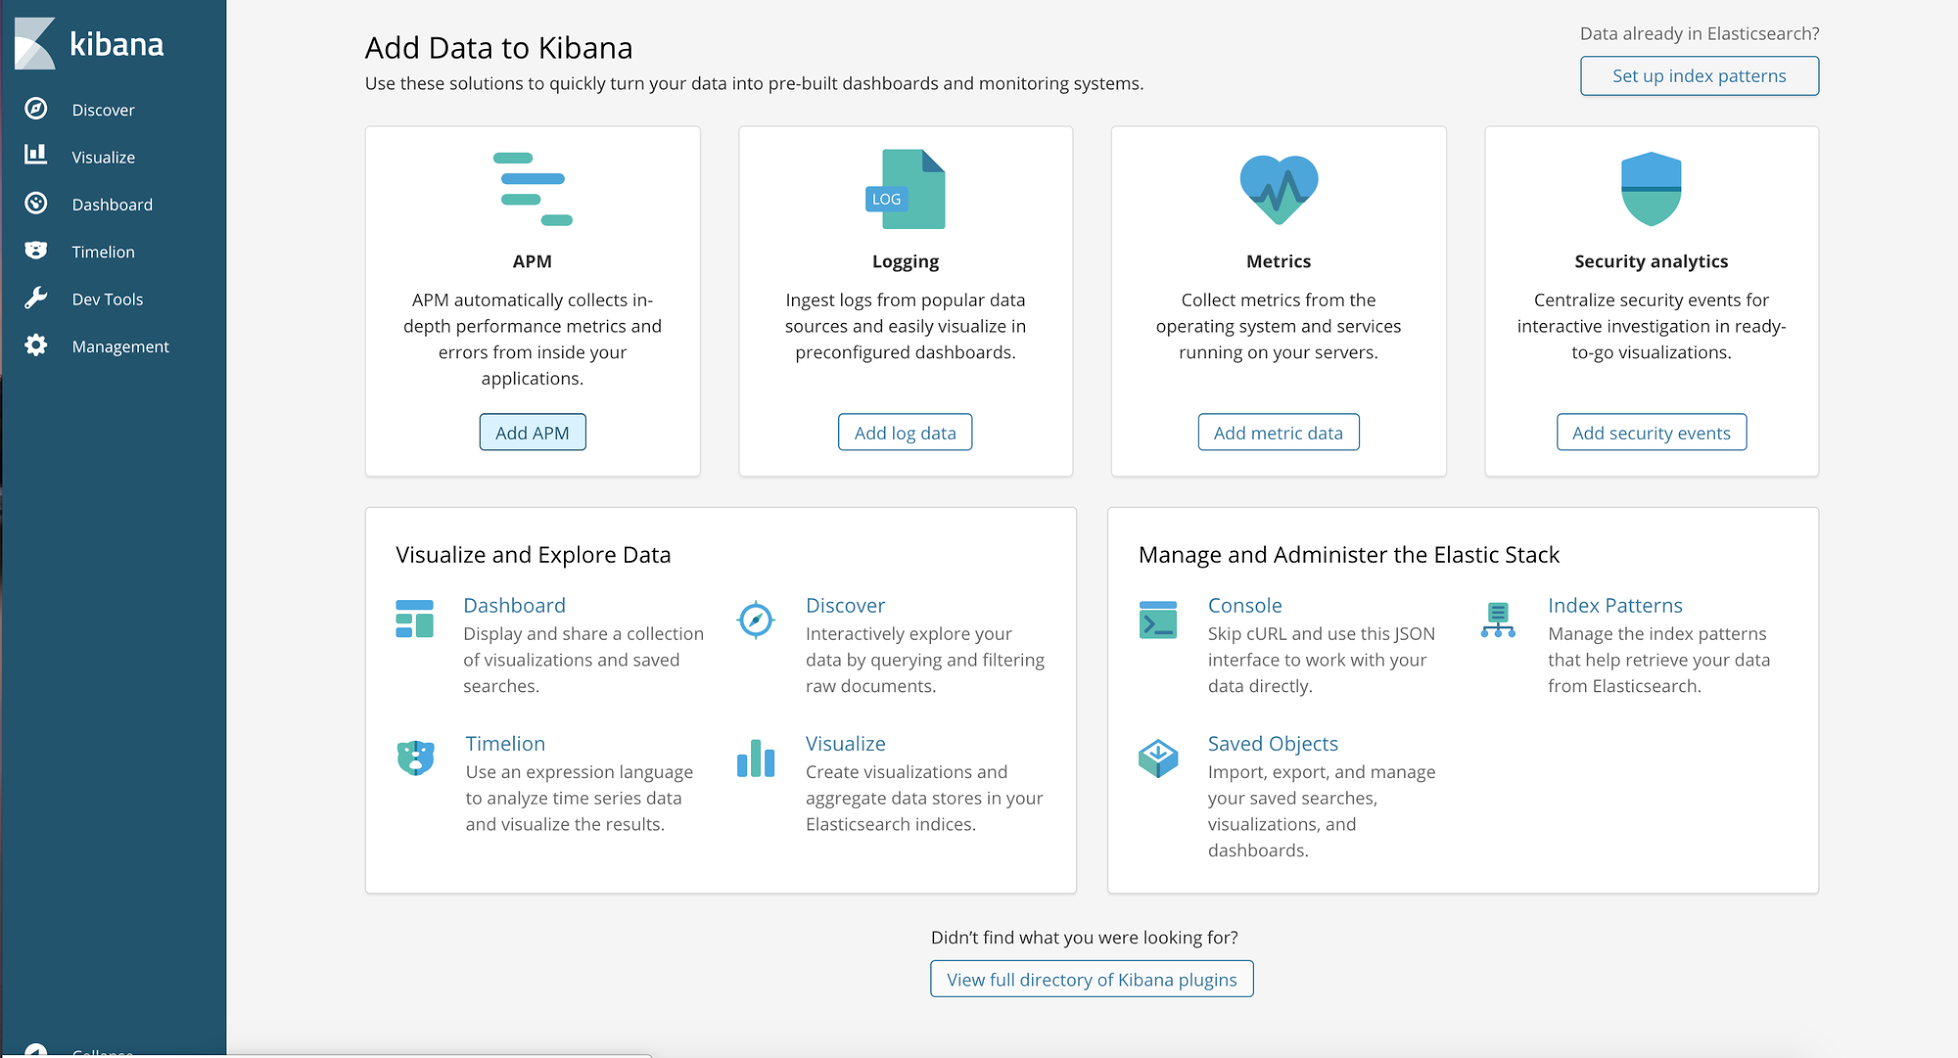 Kibana Dashboard
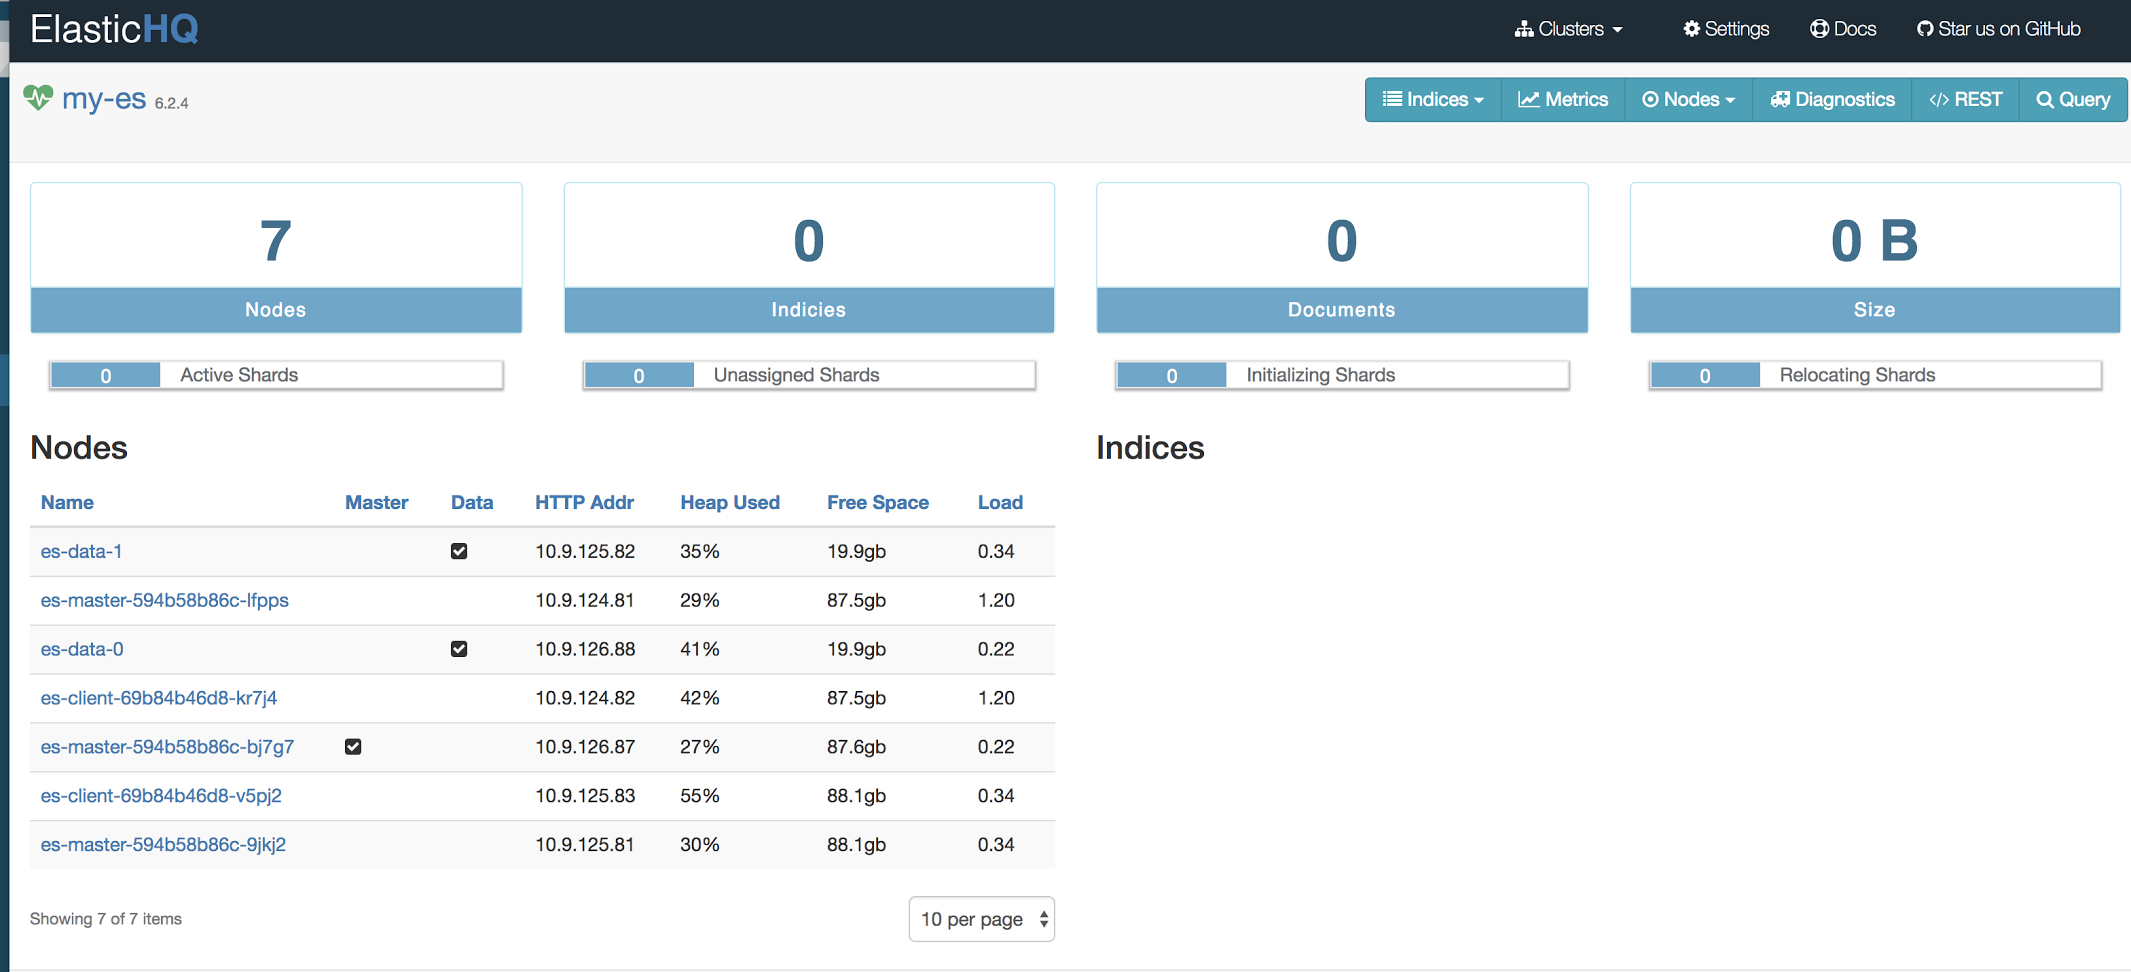
Go to http://<External-Ip-ES-Hq-Service>/#!/clusters/my-es.
3. Conclusion
This concludes deploying ES backend for logging. The Elasticsearch we deployed can be used by other applications as well. The client nodes should scale automatically under high load and data nodes can be added by incrementing the replica count in the statefulset. We will also have to tweak a few env vars but it is fairly straightforward. In the next blog we will learn about deploying Filebeat DaemonSet to send logs to the Elasticsearch backend. Stay tuned :)
Opinions expressed by DZone contributors are their own.
Comments