Building Microservices Using Spring Boot and Docker
This step-by-step guide helps full-stack developers build components in microservices using Spring Boot and employ them in Docker.
Join the DZone community and get the full member experience.
Join For FreeIn this tutorial, I will show you how to build microservices using Spring Boot and its different components, and in the last section, I will show you the deployment using Docker containers.
We will learn about:
Implementing different components of Microservices.
Deployment of services through containerization.
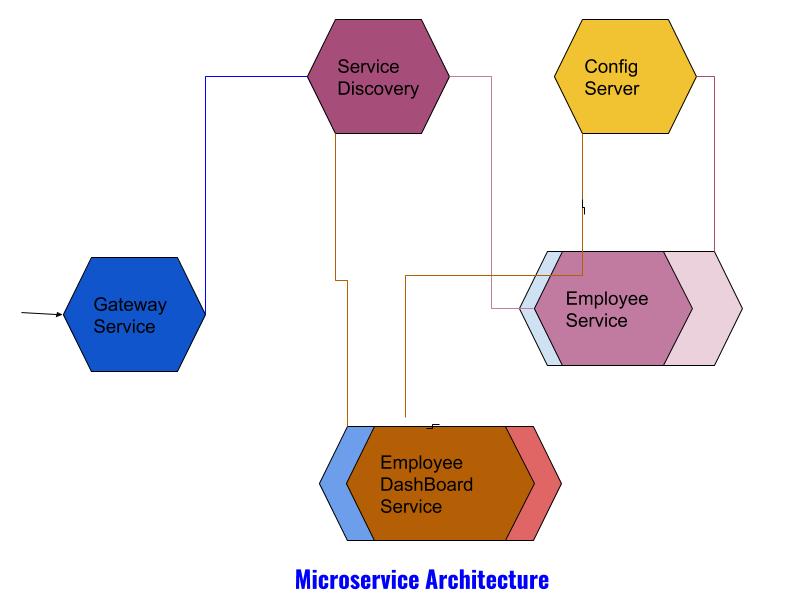
Components of Microservice Architecture
1. Config Servers
To keep the Properties file centralized and shared by all Microservices, we will create a config server which is itself a Microservice, and manages all microservices properties files and those files are versioned controlled; any change in the properties will automatically publish to all microservices without restarting the services. One thing to remember is that every microservice communicates with the config server to get properties values, so the config server must be a highly available component; if it fails, then all microservices fail because it can't resolute the properties values! So, we should take care of the scenario - the config server should not be an SPF (single point of failure), so we will spin up more than one container for the config server.
2. Eureka Discovery Server
The main goal of Microservices is decentralizing the different components based on the business features, so that each component - aka microservice - can be scaled as per need, so for a particular microservice, there are multiple instances and we can add and remove instances as per the need, so the way monoliths do load balancing is not going to work in a microservice paradigm. As it spawns containers on the fly, containers have dynamic IP addresses, so to track all instances of a service, a manager service will be needed, so when the containers are spawned, it registers itself to the manager and the manager keeps track of the instances; if a service is removed, the manager removes it from the manager's service registry. If other services need to communicate with each other, it contacts a discovery service to get the instance of another service. Again, this is a highly available component; if the discovery service is down, microservices can't communicate with each other, so the discovery service must have multiple instances.
3. Components, a.k.a. Services
Components are the key ingredients in Microservice architecture. By component, I mean a utility or business feature which can be managed or updated independently. It has a predefined boundary and it exposes an API by which other components can communicate with this service. The idea of microservices is breaking down a complete business functionality into several independent small features which will communicate with each other to produce the total business functionality. If any portion of the functionality changes in the future, we can update or remove that component and add a new component to the architecture. So, Microservice architecture produces a proper modular architecture with proper encapsulation and properly defined boundaries.
4. Gateway Service
A microservice is a collection of independent services which collectively produces a business functionality. Every microservice publishes an API, generally a REST API, so as a client, it is cumbersome to manage so many endpoint URLs to communicate with. Also, think about another perspective: if some application wants to build an authentication framework or security checking, they have to implement it across all services, so that would be repeating itself against DRY. If we have a Gateway service, which is internet-facing, the client will call only one endpoint and it delegates the call to an actual microservice, and all the authentication or security checking will be done in the gateway service.
Now we have a basic understanding of how different parts of a microservice work together. In this tutorial, I will create an employee search service that will return employee information, an EmployeeDashBoard Service which will invoke the search service and show the results, a Eureka server so that these services can register themselves, and a gateway service to reach out to these services from outside. Then we will deploy our services in the Docker container and use DockerCompose to spawn the Docker containers. I will use Spring Boot for this tutorial.
Let's start to build our microservice project, as we have to create five individual services:
1. Config Server
2. Eureka server
3. Employee service
4. Employee Dashboard service
5. Zuul Proxy
The best place to start is by going to Spring Initializr, shopping the required modules, and hitting "generate project."

For this tutorial, we will use Spring Boot 1.5.4.
Creating the Config Server
To create the config server, first we need to check the config server module from starts.spring.io, and also check the actuator to see the endpoints. Then, download the zip file and open it in Eclipse.
The pom file looks like this:
<?xml version="1.0" encoding="UTF-8"?>
<project xmlns="http://maven.apache.org/POM/4.0.0" xmlns:xsi="http://www.w3.org/2001/XMLSchema-instance" xsi:schemaLocation="http://maven.apache.org/POM/4.0.0 http://maven.apache.org/xsd/maven-4.0.0.xsd">
   <modelVersion>4.0.0</modelVersion>
   <groupId>com.example</groupId>
   <artifactId>MicroserviceConfigServer</artifactId>
   <version>0.0.1-SNAPSHOT</version>
   <packaging>jar</packaging>
   <name>MicroserviceConfigServer</name>
   <description>Demo project for Spring Boot</description>
   <parent>
      <groupId>org.springframework.boot</groupId>
      <artifactId>spring-boot-starter-parent</artifactId>
      <version>1.5.4.RELEASE</version>
      <relativePath />
      <!-- lookup parent from repository -->
   </parent>
   <properties>
      <project.build.sourceEncoding>UTF-8</project.build.sourceEncoding>
      <project.reporting.outputEncoding>UTF-8</project.reporting.outputEncoding>
      <java.version>1.8</java.version>
      <spring-cloud.version>Dalston.SR1</spring-cloud.version>
   </properties>
   <dependencies>
      <dependency>
         <groupId>org.springframework.boot</groupId>
         <artifactId>spring-boot-starter-actuator</artifactId>
      </dependency>
      <dependency>
         <groupId>org.springframework.cloud</groupId>
         <artifactId>spring-cloud-config-server</artifactId>
      </dependency>
      <dependency>
         <groupId>org.springframework.boot</groupId>
         <artifactId>spring-boot-starter-test</artifactId>
         <scope>test</scope>
      </dependency>
   </dependencies>
   <dependencyManagement>
      <dependencies>
         <dependency>
            <groupId>org.springframework.cloud</groupId>
            <artifactId>spring-cloud-dependencies</artifactId>
            <version>${spring-cloud.version}</version>
            <type>pom</type>
            <scope>import</scope>
         </dependency>
      </dependencies>
   </dependencyManagement>
   <build>
      <plugins>
         <plugin>
            <groupId>org.springframework.boot</groupId>
            <artifactId>spring-boot-maven-plugin</artifactId>
         </plugin>
      </plugins>
   </build>
</project>
It downloads the spring-cloud-config-server artifacts.
Next, we have to create a bootstrap.properties file where we mention from which location the config server reads the property. In production mode, it should be the URL of the Git repository, but as this is a demo, I'll use my local disk. All properties files will be placed there, and the config server reads those property files.
Let's see the bootstrap.properties file:
server.port=9090
spring.cloud.config.server.native.searchLocations=file://${user.home}/MicroService/centralProperties/
SPRING_PROFILES_ACTIVE=native
Here, I instruct Spring Boot to spawn the embedded server in port 9090 and use a centralProperties folder as a folder to search all properties files. Note that in our Docker container, you have to create a central properties folder and place all the properties files there.
Now let's see the Java part:
package com.example.MicroserviceConfigServer;
import org.springframework.boot.SpringApplication;
import org.springframework.boot.autoconfigure.SpringBootApplication;
import org.springframework.cloud.config.server.EnableConfigServer;

@EnableConfigServer
@SpringBootApplication
public class ConfigServer {

 public static void main(String[] args) {
  SpringApplication.run(ConfigServer.class, args);
 }
}
Here I use the @EnableConfigserver annotation, with which we instruct Spring Boot to consider this service as a config server application.
Now place a few test properties files in centralProperties folder.
We are all set for the config server now. If we run this service and hit the http://localhost:9090/config/default URL, we see the following response:
{
   "name": "config",
   "profiles": [
      "default"
   ],
   "label": null,
   "version": null,
   "state": null,
   "propertySources": [
      {
         "name": "file:///home/shamik/MicroService/centralProperties/config.properties",
         "source": {
            "application.message": "Hello Shamik"
         }
      },
      {
         "name": "file:///home/shamik/MicroService/centralProperties/application.properties",
         "source": {
            "welcome.message": "Hello Spring Cloud"
         }
      }
   ]
}
It shows the all file names and keys and values I placed in the centralProperties folder.
Implementing Service Discovery
The next step is to create a Eureka server for service discovery. We will use Netflix's Eureka server for service discovery. To do that I am selecting the Eureka server module from start.spring.io and downloading the project.
The pom.xml looks like this:
<?xml version="1.0" encoding="UTF-8"?>
<project xmlns="http://maven.apache.org/POM/4.0.0" xmlns:xsi="http://www.w3.org/2001/XMLSchema-instance" xsi:schemaLocation="http://maven.apache.org/POM/4.0.0 http://maven.apache.org/xsd/maven-4.0.0.xsd">
   <modelVersion>4.0.0</modelVersion>
   <groupId>com.example</groupId>
   <artifactId>EmployeeEurekaServer</artifactId>
   <version>0.0.1-SNAPSHOT</version>
   <packaging>jar</packaging>
   <name>EmployeeEurekaServer</name>
   <description>Demo project for Spring Boot</description>
   <parent>
      <groupId>org.springframework.boot</groupId>
      <artifactId>spring-boot-starter-parent</artifactId>
      <version>1.5.4.RELEASE</version>
      <relativePath />
      <!-- lookup parent from repository -->
   </parent>
   <properties>
      <project.build.sourceEncoding>UTF-8</project.build.sourceEncoding>
      <project.reporting.outputEncoding>UTF-8</project.reporting.outputEncoding>
      <java.version>1.8</java.version>
      <spring-cloud.version>Dalston.SR1</spring-cloud.version>
   </properties>
   <dependencies>
      <dependency>
         <groupId>org.springframework.boot</groupId>
         <artifactId>spring-boot-starter-actuator</artifactId>
      </dependency>
      <dependency>
         <groupId>org.springframework.cloud</groupId>
         <artifactId>spring-cloud-starter-config</artifactId>
      </dependency>
      <dependency>
         <groupId>org.springframework.cloud</groupId>
         <artifactId>spring-cloud-starter-eureka-server</artifactId>
      </dependency>
      <dependency>
         <groupId>org.springframework.boot</groupId>
         <artifactId>spring-boot-starter-test</artifactId>
         <scope>test</scope>
      </dependency>
   </dependencies>
   <dependencyManagement>
      <dependencies>
         <dependency>
            <groupId>org.springframework.cloud</groupId>
            <artifactId>spring-cloud-dependencies</artifactId>
            <version>${spring-cloud.version}</version>
            <type>pom</type>
            <scope>import</scope>
         </dependency>
      </dependencies>
   </dependencyManagement>
   <build>
      <plugins>
         <plugin>
            <groupId>org.springframework.boot</groupId>
            <artifactId>spring-boot-maven-plugin</artifactId>
         </plugin>
      </plugins>
   </build>
</project>
Now create the bootstrap.properties:
spring.application.name=EmployeeEurekaServer
eureka.client.serviceUrl.defaultZone:http://localhost:9091/
server.port=9091
eureka.client.register-with-eureka=false
eureka.client.fetch-registry=false
Here, I give a logical name EmployeeEurekaServer to this application, and the location of the Eureka server is http://localhost:9091; the embedded server will start on port 9091. Please note that the Eureka server itself can be a Eureka client; because there may be multiple instances of Eureka servers, it needs to be in sync with others. With this eureka.client.register-with-eureka=false, I explicitly instruct Spring Boot to not treat Eureka server as a client, because I created only one Eureka server, so it does not require to register itself as a client.
Now I will create the Java file:
package com.example.EmployeeEurekaServer;

import org.springframework.boot.SpringApplication;
import org.springframework.boot.autoconfigure.SpringBootApplication;
import org.springframework.cloud.netflix.eureka.server.EnableEurekaServer;

@EnableEurekaServer
@SpringBootApplication
public class EmployeeEurekaServerApplication {

 public static void main(String[] args) {
  SpringApplication.run(EmployeeEurekaServerApplication.class, args);
 }
}
With the @EnableEurekaServer annotation, Spring Boot spawns this service as Eureka server. We are all set now; if I run the service and hit the http://localhost:9091/ in the browser, we will see the following screen: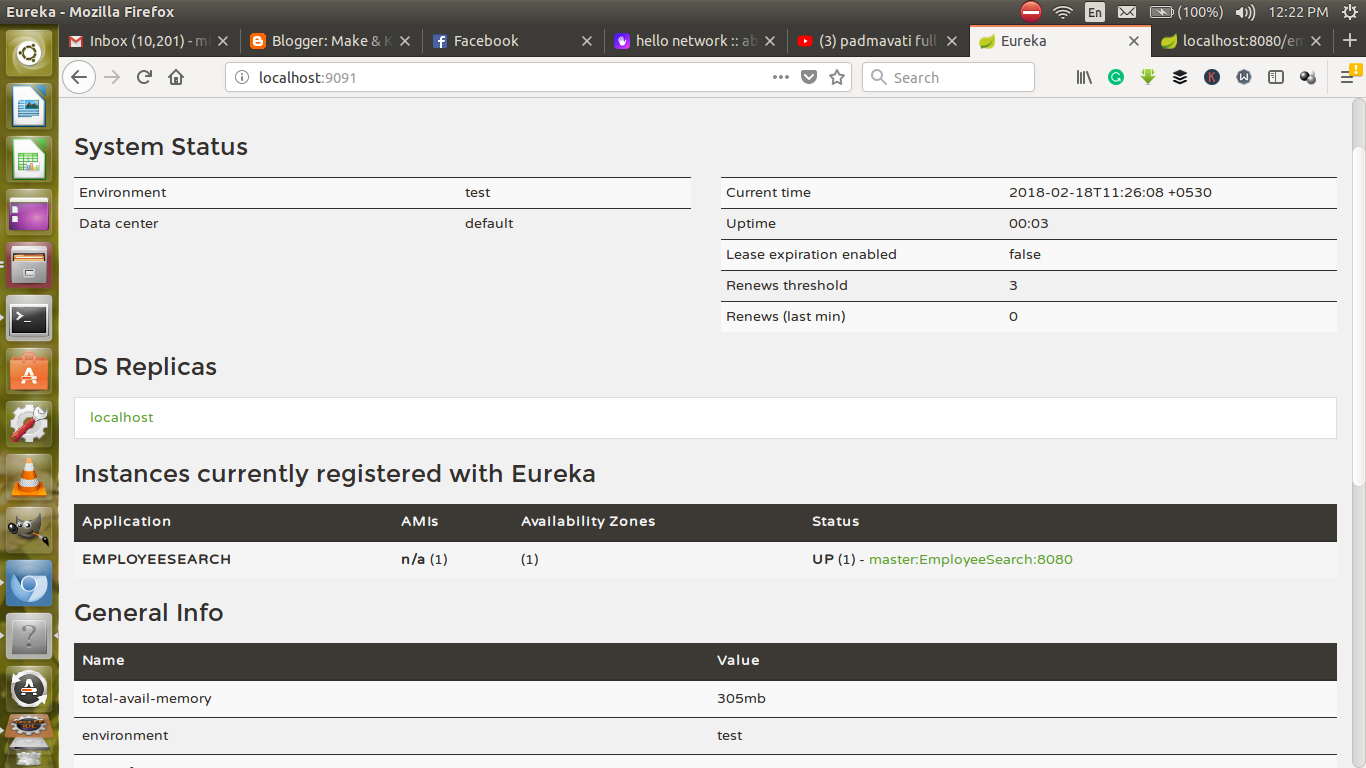
Creating the Employee Search Service
Now we will create a tiny microservice that actually returns the Employee info based on the ID passed. Also, it can return all the Employee information. I will expose a REST API and register this Microservice with the Eureka server so other Microservices can find it.
We choose EurekaClient from start.spring.io.
Let's see the pom.xml for this:
<?xml version="1.0" encoding="UTF-8"?>
<project xmlns="http://maven.apache.org/POM/4.0.0" xmlns:xsi="http://www.w3.org/2001/XMLSchema-instance" xsi:schemaLocation="http://maven.apache.org/POM/4.0.0 http://maven.apache.org/xsd/maven-4.0.0.xsd">
   <modelVersion>4.0.0</modelVersion>
   <groupId>com.example</groupId>
   <artifactId>EmployeeSearchService</artifactId>
   <version>0.0.1-SNAPSHOT</version>
   <packaging>jar</packaging>
   <name>EmployeeSearchService</name>
   <description>Demo project for Spring Boot</description>
   <parent>
      <groupId>org.springframework.boot</groupId>
      <artifactId>spring-boot-starter-parent</artifactId>
      <version>1.5.4.RELEASE</version>
      <relativePath />
      <!-- lookup parent from repository -->
   </parent>
   <properties>
      <project.build.sourceEncoding>UTF-8</project.build.sourceEncoding>
      <project.reporting.outputEncoding>UTF-8</project.reporting.outputEncoding>
      <java.version>1.8</java.version>
      <spring-cloud.version>Dalston.SR1</spring-cloud.version>
   </properties>
   <dependencies>
      <dependency>
         <groupId>org.springframework.boot</groupId>
         <artifactId>spring-boot-starter-actuator</artifactId>
      </dependency>
      <dependency>
         <groupId>org.springframework.cloud</groupId>
         <artifactId>spring-cloud-starter-config</artifactId>
      </dependency>
      <dependency>
         <groupId>org.springframework.boot</groupId>
         <artifactId>spring-boot-starter-jersey</artifactId>
      </dependency>
      <dependency>
         <groupId>org.springframework.boot</groupId>
         <artifactId>spring-boot-starter-web</artifactId>
      </dependency>
      <dependency>
         <groupId>org.springframework.boot</groupId>
         <artifactId>spring-boot-starter-test</artifactId>
         <scope>test</scope>
      </dependency>
      <dependency>
         <groupId>org.springframework.cloud</groupId>
         <artifactId>spring-cloud-starter-eureka</artifactId>
      </dependency>
   </dependencies>
   <dependencyManagement>
      <dependencies>
         <dependency>
            <groupId>org.springframework.cloud</groupId>
            <artifactId>spring-cloud-dependencies</artifactId>
            <version>${spring-cloud.version}</version>
            <type>pom</type>
            <scope>import</scope>
         </dependency>
      </dependencies>
   </dependencyManagement>
   <build>
      <plugins>
         <plugin>
            <groupId>org.springframework.boot</groupId>
            <artifactId>spring-boot-maven-plugin</artifactId>
         </plugin>
      </plugins>
   </build>
</project>
Let's look at the bootstrap.properties:
spring.application.name=EmployeeSearch
spring.cloud.config.uri=http://localhost:9090
eureka.client.serviceUrl.defaultZone:http://localhost:9091/eureka
server.port=8080
security.basic.enable: false
management.security.enabled: false
Here, I give a logical name of the service EmployeeSearch, all the instances of this service registered with this name in Eureka server this is the common logical name for all EmployeeSerach Service instances. Also, I give the URL of the config server (Please note, when we deploy it in docker we should change the localhost to Docker container IP of Config server in order to find the config server).
Also, I mention the Eureka server location (Please note, when we deploy it in docker we should change the localhost to Docker container IP of Eureka in order to find the Eureka server).
Now create the controller and service file.
package com.example.EmployeeSearchService.service;

import java.util.Collection;
import java.util.HashMap;
import java.util.Map;
import java.util.stream.Collectors;
import java.util.stream.Stream;

import org.springframework.stereotype.Service;

import com.example.EmployeeSearchService.domain.model.Employee;

@Service
public class EmployeeSearchService {

 private static Map < Long, Employee > EmployeeRepsitory = null;

 static {

  Stream < String > employeeStream = Stream.of("1,Shamik  Mitra,Java,Architect", "2,Samir  Mitra,C++,Manager",
   "3,Swastika  Mitra,AI,Sr.Architect");

  EmployeeRepsitory = employeeStream.map(employeeStr -> {
   String[] info = employeeStr.split(",");
   return createEmployee(new Long(info[0]), info[1], info[2], info[3]);
  }).collect(Collectors.toMap(Employee::getEmployeeId, emp -> emp));

 }

 private static Employee createEmployee(Long id, String name, String practiceArea, String designation) {
  Employee emp = new Employee();
  emp.setEmployeeId(id);
  emp.setName(name);
  emp.setPracticeArea(practiceArea);
  emp.setDesignation(designation);
  emp.setCompanyInfo("Cognizant");
  return emp;
 }

 public Employee findById(Long id) {
  return EmployeeRepsitory.get(id);
 }

 public Collection < Employee > findAll() {
  return EmployeeRepsitory.values();
 }

}
Controller file:
package com.example.EmployeeSearchService.controller;

import java.util.Collection;

import org.springframework.beans.factory.annotation.Autowired;
import org.springframework.cloud.context.config.annotation.RefreshScope;
import org.springframework.web.bind.annotation.PathVariable;
import org.springframework.web.bind.annotation.RequestMapping;
import org.springframework.web.bind.annotation.RestController;

import com.example.EmployeeSearchService.domain.model.Employee;
import com.example.EmployeeSearchService.service.EmployeeSearchService;

@RefreshScope
@RestController
public class EmployeeSearchController {

 @Autowired
 EmployeeSearchService employeeSearchService;

 @RequestMapping("/employee/find/{id}")
 public Employee findById(@PathVariable Long id) {
  return employeeSearchService.findById(id);
 }

 @RequestMapping("/employee/findall")
 public Collection < Employee > findAll() {
  return employeeSearchService.findAll();
 }
}
package com.example.EmployeeSearchService.domain.model;
public class Employee {
private Long employeeId;
private String name;
private String practiceArea;
private String designation;
private String companyInfo;
public Long getEmployeeId() {
return employeeId;
}
public void setEmployeeId(Long employeeId) {
this.employeeId = employeeId;
}
public String getName() {
return name;
}
public void setName(String name) {
this.name = name;
}
public String getPracticeArea() {
return practiceArea;
}
public void setPracticeArea(String practiceArea) {
this.practiceArea = practiceArea;
}
public String getDesignation() {
return designation;
}
public void setDesignation(String designation) {
this.designation = designation;
}
public String getCompanyInfo() {
return companyInfo;
}
public void setCompanyInfo(String companyInfo) {
this.companyInfo = companyInfo;
}
@Override
public String toString() {
return "Employee [employeeId=" + employeeId + ", name=" + name + ", practiceArea=" + practiceArea + ", designation=" + designation + ", companyInfo=" + companyInfo + "]";
}
}Nothing fancy here; I just create a few Employees and map them to Rest URL.
Let’s see the Spring Boot file now:
package com.example.EmployeeSearchService;

import org.springframework.boot.SpringApplication;
import org.springframework.boot.autoconfigure.SpringBootApplication;
import org.springframework.cloud.client.discovery.EnableDiscoveryClient;
import org.springframework.cloud.netflix.eureka.EnableEurekaClient;

@EnableDiscoveryClient
@SpringBootApplication
public class EmployeeSearchServiceApplication {

 public static void main(String[] args) {
  SpringApplication.run(EmployeeSearchServiceApplication.class, args);
 }
}
Here, I use the@EnableDiscoveryClientto register this service as a eureka client.
Now If I hit this http://localhost:8080/employee/find/1 I can see the following output:
{
   "employeeId":1,
   "name":"Shamik  Mitra",
   "practiceArea":"Java",
   "designation":"Architect",
   "companyInfo":"Cognizant"
}
Creating the Employee DashBoard Service
Now I will create another service that uses Employee Search Service to fetch Employee information to communicate with the Employee Search service. I will use Feign client and also use Hystrix as a circuit breaker, so if the Employee search service is down, it can give default data.
Pom.xml:
<?xml version="1.0" encoding="UTF-8"?>
<project xmlns="http://maven.apache.org/POM/4.0.0" xmlns:xsi="http://www.w3.org/2001/XMLSchema-instance" xsi:schemaLocation="http://maven.apache.org/POM/4.0.0 http://maven.apache.org/xsd/maven-4.0.0.xsd">
   <modelVersion>4.0.0</modelVersion>
   <groupId>com.example</groupId>
   <artifactId>EmployeeDashBoardService</artifactId>
   <version>0.0.1-SNAPSHOT</version>
   <packaging>jar</packaging>
   <name>EmployeeDashBoardService</name>
   <description>Demo project for Spring Boot</description>
   <parent>
      <groupId>org.springframework.boot</groupId>
      <artifactId>spring-boot-starter-parent</artifactId>
      <version>1.5.4.RELEASE</version>
      <relativePath />
      <!-- lookup parent from repository -->
   </parent>
   <properties>
      <project.build.sourceEncoding>UTF-8</project.build.sourceEncoding>
      <project.reporting.outputEncoding>UTF-8</project.reporting.outputEncoding>
      <java.version>1.8</java.version>
      <spring-cloud.version>Dalston.SR1</spring-cloud.version>
   </properties>
   <dependencies>
      <dependency>
         <groupId>org.springframework.boot</groupId>
         <artifactId>spring-boot-starter-actuator</artifactId>
      </dependency>
      <dependency>
         <groupId>org.springframework.cloud</groupId>
         <artifactId>spring-cloud-starter-config</artifactId>
      </dependency>
      <dependency>
         <groupId>org.springframework.cloud</groupId>
         <artifactId>spring-cloud-starter-eureka</artifactId>
      </dependency>
      <dependency>
         <groupId>org.springframework.boot</groupId>
         <artifactId>spring-boot-starter-jersey</artifactId>
      </dependency>
      <dependency>
         <groupId>org.springframework.boot</groupId>
         <artifactId>spring-boot-starter-web</artifactId>
      </dependency>
      <dependency>
         <groupId>org.springframework.boot</groupId>
         <artifactId>spring-boot-starter-test</artifactId>
         <scope>test</scope>
      </dependency>
      <dependency>
         <groupId>org.springframework.cloud</groupId>
         <artifactId>spring-cloud-starter-feign</artifactId>
      </dependency>
      <dependency>
         <groupId>org.springframework.cloud</groupId>
         <artifactId>spring-cloud-starter-ribbon</artifactId>
      </dependency>
      <dependency>
         <groupId>org.springframework.cloud</groupId>
         <artifactId>spring-cloud-starter-hystrix</artifactId>
      </dependency>
   </dependencies>
   <dependencyManagement>
      <dependencies>
         <dependency>
            <groupId>org.springframework.cloud</groupId>
            <artifactId>spring-cloud-dependencies</artifactId>
            <version>${spring-cloud.version}</version>
            <type>pom</type>
            <scope>import</scope>
         </dependency>
      </dependencies>
   </dependencyManagement>
   <build>
      <plugins>
         <plugin>
            <groupId>org.springframework.boot</groupId>
            <artifactId>spring-boot-maven-plugin</artifactId>
         </plugin>
      </plugins>
   </build>
</project>
bootstrap.properties:
spring.application.name=EmployeeDashBoard
spring.cloud.config.uri=http://localhost:9090
eureka.client.serviceUrl.defaultZone:http://localhost:9091/eureka
server.port=8081
security.basic.enable: false
management.security.enabled: false
Feign client:
package com.example.EmployeeDashBoardService.controller;

import java.util.Collection;

import org.springframework.cloud.netflix.feign.FeignClient;
import org.springframework.cloud.netflix.ribbon.RibbonClient;
import org.springframework.web.bind.annotation.PathVariable;
import org.springframework.web.bind.annotation.RequestMapping;

import com.example.EmployeeDashBoardService.domain.model.EmployeeInfo;


@FeignClient(name = "EmployeeSearch")
@RibbonClient(name = "EmployeeSearch")
public interface EmployeeServiceProxy {

 @RequestMapping("/employee/find/{id}")
 public EmployeeInfo findById(@PathVariable(value = "id") Long id);

 @RequestMapping("/employee/findall")
 public Collection < EmployeeInfo > findAll();

}
Controller:
package com.example.EmployeeDashBoardService.controller;

import java.util.Collection;

import org.springframework.beans.factory.annotation.Autowired;
import org.springframework.cloud.context.config.annotation.RefreshScope;
import org.springframework.web.bind.annotation.PathVariable;
import org.springframework.web.bind.annotation.RequestMapping;
import org.springframework.web.bind.annotation.RestController;

import com.example.EmployeeDashBoardService.domain.model.EmployeeInfo;

@RefreshScope
@RestController
public class FeignEmployeeInfoController {

 @Autowired
 EmployeeServiceProxy proxyService;

 @RequestMapping("/dashboard/feign/{myself}")
 public EmployeeInfo findme(@PathVariable Long myself) {
  return proxyService.findById(myself);

 }

 @RequestMapping("/dashboard/feign/peers")
 public Collection < EmployeeInfo > findPeers() {
  return proxyService.findAll();
 }

}
Spring boot starter service:
package com.example.EmployeeDashBoardService;

import org.springframework.boot.SpringApplication;
import org.springframework.boot.autoconfigure.SpringBootApplication;
import org.springframework.boot.web.client.RestTemplateBuilder;
import org.springframework.cloud.client.circuitbreaker.EnableCircuitBreaker;
import org.springframework.cloud.client.discovery.EnableDiscoveryClient;
import org.springframework.cloud.netflix.feign.EnableFeignClients;
import org.springframework.context.annotation.Bean;
import org.springframework.web.client.RestTemplate;

@EnableDiscoveryClient
@EnableFeignClients
@SpringBootApplication
public class EmployeeDashBoardService {

 public static void main(String[] args) {
  SpringApplication.run(EmployeeDashBoardService.class, args);
 }

 @Bean
 public RestTemplate restTemplate(RestTemplateBuilder builder) {
  return builder.build();
 }
}
We are ready now. If I hit the url http://localhost:8081/dashboard/feign/1, I will see the following response:
{
   "employeeId":1,
   "name":"Shamik  Mitra",
   "practiceArea":"Java",
   "designation":"Architect",
   "companyInfo":"Cognizant"
}
Creating the Gateway Service
pom.xml:
<?xml version="1.0" encoding="UTF-8"?>
<project xmlns="http://maven.apache.org/POM/4.0.0" xmlns:xsi="http://www.w3.org/2001/XMLSchema-instance" xsi:schemaLocation="http://maven.apache.org/POM/4.0.0 http://maven.apache.org/xsd/maven-4.0.0.xsd">
   <modelVersion>4.0.0</modelVersion>
   <parent>
      <groupId>org.springframework.boot</groupId>
      <artifactId>spring-boot-dependencies</artifactId>
      <version>1.5.6.RELEASE</version>
      <relativePath>../../spring-boot-dependencies</relativePath>
   </parent>
   <artifactId>spring-boot-starter-parent</artifactId>
   <packaging>pom</packaging>
   <name>Spring Boot Starter Parent</name>
   <description>Parent pom providing dependency and plugin management for applications
built with Maven</description>
   <url>http://projects.spring.io/spring-boot/</url>
   <organization>
      <name>Pivotal Software, Inc.</name>
      <url>http://www.spring.io</url>
   </organization>
   <properties>
      <java.version>1.6</java.version>
      <resource.delimiter>@</resource.delimiter>
      <!-- delimiter that doesn't clash with Spring ${} placeholders -->
      <project.build.sourceEncoding>UTF-8</project.build.sourceEncoding>
      <project.reporting.outputEncoding>UTF-8</project.reporting.outputEncoding>
      <maven.compiler.source>${java.version}</maven.compiler.source>
      <maven.compiler.target>${java.version}</maven.compiler.target>
   </properties>
   <dependencyManagement>
      <dependencies>
         <dependency>
            <groupId>org.springframework</groupId>
            <artifactId>spring-core</artifactId>
            <version>${spring.version}</version>
            <exclusions>
               <exclusion>
                  <groupId>commons-logging</groupId>
                  <artifactId>commons-logging</artifactId>
               </exclusion>
            </exclusions>
         </dependency>
      </dependencies>
   </dependencyManagement>
   <build>
      <!-- Turn on filtering by default for application properties -->
      <resources>
         <resource>
            <directory>${basedir}/src/main/resources</directory>
            <filtering>true</filtering>
            <includes>
               <include>**/application*.yml</include>
               <include>**/application*.yaml</include>
               <include>**/application*.properties</include>
            </includes>
         </resource>
         <resource>
            <directory>${basedir}/src/main/resources</directory>
            <excludes>
               <exclude>**/application*.yml</exclude>
               <exclude>**/application*.yaml</exclude>
               <exclude>**/application*.properties</exclude>
            </excludes>
         </resource>
      </resources>
      <pluginManagement>
         <plugins>
            <!-- Apply more sensible defaults for user projects -->
            <plugin>
               <groupId>org.apache.maven.plugins</groupId>
               <artifactId>maven-failsafe-plugin</artifactId>
               <executions>
                  <execution>
                     <goals>
                        <goal>integration-test</goal>
                        <goal>verify</goal>
                     </goals>
                  </execution>
               </executions>
            </plugin>
            <plugin>
               <groupId>org.apache.maven.plugins</groupId>
               <artifactId>maven-jar-plugin</artifactId>
               <configuration>
                  <archive>
                     <manifest>
                        <mainClass>${start-class}</mainClass>
                        <addDefaultImplementationEntries>true</addDefaultImplementationEntries>
                     </manifest>
                  </archive>
               </configuration>
            </plugin>
            <plugin>
               <groupId>org.apache.maven.plugins</groupId>
               <artifactId>maven-surefire-plugin</artifactId>
               <configuration>
                  <includes>
                     <include>**/*Tests.java</include>
                     <include>**/*Test.java</include>
                  </includes>
                  <excludes>
                     <exclude>**/Abstract*.java</exclude>
                  </excludes>
               </configuration>
            </plugin>
            <plugin>
               <groupId>org.apache.maven.plugins</groupId>
               <artifactId>maven-war-plugin</artifactId>
               <configuration>
                  <failOnMissingWebXml>false</failOnMissingWebXml>
                  <archive>
                     <manifest>
                        <mainClass>${start-class}</mainClass>
                        <addDefaultImplementationEntries>true</addDefaultImplementationEntries>
                     </manifest>
                  </archive>
               </configuration>
            </plugin>
            <plugin>
               <groupId>org.codehaus.mojo</groupId>
               <artifactId>exec-maven-plugin</artifactId>
               <configuration>
                  <mainClass>${start-class}</mainClass>
               </configuration>
            </plugin>
            <plugin>
               <groupId>org.apache.maven.plugins</groupId>
               <artifactId>maven-resources-plugin</artifactId>
               <version>2.6</version>
               <configuration>
                  <delimiters>
                     <delimiter>${resource.delimiter}</delimiter>
                  </delimiters>
                  <useDefaultDelimiters>false</useDefaultDelimiters>
               </configuration>
            </plugin>
            <plugin>
               <groupId>pl.project13.maven</groupId>
               <artifactId>git-commit-id-plugin</artifactId>
               <executions>
                  <execution>
                     <goals>
                        <goal>revision</goal>
                     </goals>
                  </execution>
               </executions>
               <configuration>
                  <verbose>true</verbose>
                  <dateFormat>yyyy-MM-dd'T'HH:mm:ssZ</dateFormat>
                  <generateGitPropertiesFile>true</generateGitPropertiesFile>
                  <generateGitPropertiesFilename>${project.build.outputDirectory}/git.properties</generateGitPropertiesFilename>
               </configuration>
            </plugin>
            <!-- Support our own plugin -->
            <plugin>
               <groupId>org.springframework.boot</groupId>
               <artifactId>spring-boot-maven-plugin</artifactId>
               <executions>
                  <execution>
                     <goals>
                        <goal>repackage</goal>
                     </goals>
                  </execution>
               </executions>
               <configuration>
                  <mainClass>${start-class}</mainClass>
               </configuration>
            </plugin>
            <!-- Support shade packaging (if the user does not want to use our plugin) -->
            <plugin>
               <groupId>org.apache.maven.plugins</groupId>
               <artifactId>maven-shade-plugin</artifactId>
               <dependencies>
                  <dependency>
                     <groupId>org.springframework.boot</groupId>
                     <artifactId>spring-boot-maven-plugin</artifactId>
                     <version>1.5.6.RELEASE</version>
                  </dependency>
               </dependencies>
               <configuration>
                  <keepDependenciesWithProvidedScope>true</keepDependenciesWithProvidedScope>
                  <createDependencyReducedPom>true</createDependencyReducedPom>
                  <filters>
                     <filter>
                        <artifact>*:*</artifact>
                        <excludes>
                           <exclude>META-INF/*.SF</exclude>
                           <exclude>META-INF/*.DSA</exclude>
                           <exclude>META-INF/*.RSA</exclude>
                        </excludes>
                     </filter>
                  </filters>
               </configuration>
               <executions>
                  <execution>
                     <phase>package</phase>
                     <goals>
                        <goal>shade</goal>
                     </goals>
                     <configuration>
                        <transformers>
                           <transformer implementation="org.apache.maven.plugins.shade.resource.AppendingTransformer">
                              <resource>META-INF/spring.handlers</resource>
                           </transformer>
                           <transformer implementation="org.springframework.boot.maven.PropertiesMergingResourceTransformer">
                              <resource>META-INF/spring.factories</resource>
                           </transformer>
                           <transformer implementation="org.apache.maven.plugins.shade.resource.AppendingTransformer">
                              <resource>META-INF/spring.schemas</resource>
                           </transformer>
                           <transformer implementation="org.apache.maven.plugins.shade.resource.ServicesResourceTransformer" />
                           <transformer implementation="org.apache.maven.plugins.shade.resource.ManifestResourceTransformer">
                              <mainClass>${start-class}</mainClass>
                           </transformer>
                        </transformers>
                     </configuration>
                  </execution>
               </executions>
            </plugin>
         </plugins>
      </pluginManagement>
   </build>
</project>
bootstrap.properties:
spring.application.name=EmployeeAPIGateway
eureka.client.serviceUrl.defaultZone:http://localhost:9091/eureka
server.port=8084
security.basic.enable: false
management.security.enabled: false
zuul.routes.employeeUI.serviceId=EmployeeDashBoard
zuul.host.socket-timeout-millis=30000
Here, notice the property zuul.routes.employeeUI.serviceId=EmployeeDashBoard. With this, we instruct Zuul that any URL containing employeeUI should redirect to the EmployeeDashboard service.
Spring Boot file:
package com.example.EmployeeZuulService;

import org.springframework.boot.SpringApplication;
import org.springframework.boot.autoconfigure.SpringBootApplication;
import org.springframework.cloud.client.discovery.EnableDiscoveryClient;
import org.springframework.cloud.netflix.zuul.EnableZuulProxy;

@EnableZuulProxy
@EnableDiscoveryClient
@SpringBootApplication
public class EmployeeZuulServiceApplication {

 public static void main(String[] args) {
  SpringApplication.run(EmployeeZuulServiceApplication.class, args);
 }
}
Now if I run the service and hit http://localhost:8084/employeeUI/dashboard/feign/1, it gives us this response:
{
   "employeeId":1,
   "name":"Shamik  Mitra",
   "practiceArea":"Java",
   "designation":"Architect",
   "companyInfo":"Cognizant"
}
Deployment in Docker Containers
Enough of coding now. Let's see how our application is running. By this time, all our services are ready and running perfectly on the local machine. But, we do not want our code to end up running in your local setup only. Rather, we want to see it running with flying colors in production. (We love our code as our baby and we want to see it successful all the time.) But as we send our babies to school or guide them on the right path to success, we need to guide our application too. So let's take a ride to the DevOps world and try giving our source code the correct path to production.
Welcome to the Docker World
Docker needs no introduction. If you feel you still need a guide, feel free to take a look here.
Going forward, I will assume that you have Docker CE installed on your machine. The concepts that we will be using here for deployment are as follows:
Dockerfile: This is a text document that contains all the instructions needed to build a Docker image. Using the instruction set of a Dockerfile, we can write steps that will copy files, do installation, etc. For more references, please visit this link.
Docker Compose: This is a tool that can create and spawn multiple containers. It helps to build the required environment with a single command.
As shown in the microservice architecture diagram, we will be creating an individual container for each service. Below is the list of containers for our example:
Config Server
EmployeeService
Employee Board Service
Employee Dashboard Service
Gateway Service
Docker Configuration for the Config Server
The container should contain the config server jar file. Here, we will pick the jar file from the local machine. In a real-life scenario, we should be pushing the jar file to an Artifact Repository Manager system such as Nexus or Artifactory and the container should download the file from the repo manager.
The config server should be available on the port 8888 as per bootstrap.properties.
As mentioned above, we will have the config server read the configuration from a file location, so we will make sure that those properties files can be retrieved even if the container goes down.
Create a folder called config-repo which will contain the required properties file. We will make sure of the following for the Config Server container.
 # mkdir config-repo
 # cd config-repo
 # echo "service.employyesearch.serviceId=EmployeeSearch" > EmployeeDashBoard.properties
 # echo "user.role=Dev" > EmployeeSearch.properties
Come back to the parent folder and create a Docker file called Dockerfile. This Dockerfile will create our base image, which contains Java.
 # cd ../
 # vi Dockerfile
Place in the below content:
FROM alpine:edge
MAINTAINER javaonfly
RUN apk add --no-cache openjdk8
FROM: This keyword tells Docker to use a given image with its tag as build-base.
MAINTAINER: A MAINTAINER is the author of an image
RUN: This command will install openjdk8 in the system.
Execute the below command to create the base Docker image:
docker build --tag=alpine-jdk:base --rm=true
After the base image is built successfully, it is time to create the Docker image for the Config Server.
Create a folder called files and place the config server jar file in the directory. Then, create a file called Dockerfile-configserver with the below content:
FROM alpine-jdk:base
MAINTAINER javaonfly
COPY files/MicroserviceConfigServer.jar /opt/lib/
RUN mkdir /var/lib/config-repo
COPY config-repo /var/lib/config-repo
ENTRYPOINT ["/usr/bin/java"]
CMD ["-jar", "/opt/lib/MicroserviceConfigServer.jar"]
VOLUME /var/lib/config-repo
EXPOSE 9090
Here, we have mentioned building the image from the previously created alpine-jdk image. We will copy the jar file named employeeconfigserver.jar in the /opt/lib location and also copy the config-repo to the /root directory. When the container starts up, we want the config server to start running, hence the ENTRYPOINT and CMD is set to run the Java command. We need to mount a volume to share the configuration files from outside the container; the VOLUME command helps us to achieve that. The config server should be accessible to the outside world with the port 9090; that's why we have EXPOSE 9090.
Now let us build the Docker image and tag it as config-server:
# docker build --file=Dockerfile-configserver --tag=config-server:latest --rm=true .Now let us create a Docker volume:
# docker volume create --name=config-repo
# docker run --name=config-server --publish=9090:9090 --volume=config-repo:/var/lib/config-repo config-server:latest
Once we run the above command, we should be able to see a Docker container up and be running. If we go to the browser and hit the URL http://localhost:9090/config/default/, we should be able to access the properties as well.
EurekaServer
Similarly, we need to create a Docker file for EurekaServer, which will be running on port 9091. The Dockerfile for Eureka Server should be as below:
FROM alpine-jdk:base
MAINTAINER javaonfly
COPY files/MicroserviceEurekaServer.jar /opt/lib/
ENTRYPOINT ["/usr/bin/java"]
CMD ["-jar", "/opt/lib/MicroserviceEurekaServer.jar"]
EXPOSE 9091
To build the image, use this command:
docker build --file=Dockerfile-EurekaServer --tag=eureka-server:latest --rm=true .
docker run --name=eureka-server --publish=9091:9091 eureka-server:latest
Microservices
Now it’s time to deploy our actual Microservices. The steps should be similar; the only thing we need to remember is our microservices are dependent on ConfigServer and EurekaServer, so we always need to make sure that before we start our microservices, the above two are up and running. There are dependencies involved among containers, so it is time to explore Docker Compose. It's a beautiful way to make sure that containers are being spawned are maintaining a certain order.
To do that, we should write up a Dockerfile for the rest of the containers. Below is the Dockerfile:
Dockerfile-EmployeeSearch.
================================
FROM alpine-jdk:base
MAINTAINER javaonfly
RUN apk --no-cache add netcat-openbsd
COPY files/EmployeeSearchService.jar /opt/lib/
COPY EmployeeSearch-entrypoint.sh /opt/bin/EmployeeSearch-entrypoint.sh
RUN chmod 755 /opt/bin/EmployeeSearch-entrypoint.sh
EXPOSE 8080

Dockerfile-EmployeeDashboard
====================================
FROM alpine-jdk:base
MAINTAINER javaonfly
RUN apk --no-cache add netcat-openbsd
COPY files/EmployeeDashBoardService.jar /opt/lib/
COPY EmployeeDashBoard-entrypoint.sh /opt/bin/EmployeeDashBoard-entrypoint.sh
RUN chmod 755 /opt/bin/EmployeeDashBoard-entrypoint.sh
EXPOSE 8080

Dockerfile-ZuulServer
=========================================
FROM alpine-jdk:base
MAINTAINER javaonfly
COPY files/EmployeeZuulService.jar /opt/lib/
ENTRYPOINT ["/usr/bin/java"]
CMD ["-jar", "/opt/lib/EmployeeZuulService.jar"]
EXPOSE 8084
One thing to notice here is that I've created two shell scripts for the Employee and Employee Dashboard services. It instructs Dockercompose not to start Employee and Employee Dashboard service until Config server and Eureka server started.
Employee dashBoard Script
==================================
#!/bin/sh

while ! nc -z config-server 9090 ; do
    echo "Waiting for the Config Server"
    sleep 3
done
while ! nc -z eureka-server 9091 ; do
    echo "Waiting for the Eureka Server"
    sleep 3
done

java -jar /opt/lib/EmployeeDashBoardService.jar
==================================
Employee service Script
==================================
#!/bin/sh

while ! nc -z config-server 9090 ; do
    echo "Waiting for the Config Server"
    sleep 3
done
while ! nc -z eureka-server 9091 ; do
    echo "Waiting for the Eureka Server"
    sleep 3
done

java -jar /opt/lib/EmployeeSearchService.jar
Now let us create a file called docker-compose.yml, which will use all these Dockerfiles to spawn our required environments. It will also make sure that the required containers being spawned are maintaining correct order and that they are interlinked.
version: '2.2'
services:
    config-server:
        container_name: config-server
        build:
            context: .
            dockerfile: Dockerfile-configserver
        image: config-server:latest
        expose:
            - 9090
        ports:
            - 9090:9090
        networks:
            - emp-network
        volumes:
            - config-repo:/var/lib/config-repo

    eureka-server:
        container_name: eureka-server
        build:
            context: .
            dockerfile: Dockerfile-EurekaServer
        image: eureka-server:latest
        expose:
            - 9091
        ports:
            - 9091:9091
        networks:
            - emp-network

    EmployeeSearchService:
        container_name: EmployeeSearch
        build:
            context: .
            dockerfile: Dockerfile-EmployeeSearch
        image: employeesearch:latest
        environment:
            SPRING_APPLICATION_JSON: '{"spring": {"cloud": {"config": {"uri": "http://config-server:9090"}}}}'

        entrypoint: /opt/bin/EmployeeSearch-entrypoint.sh
        expose:
            - 8080
        ports:
            - 8080:8080
        networks:
            - emp-network
        links:
            - config-server:config-server
            - eureka-server:eureka-server
        depends_on:
            - config-server
            - eureka-server
        logging:
            driver: json-file
    EmployeeDashboardService:
        container_name: EmployeeDashboard
        build:
            context: .
            dockerfile: Dockerfile-EmployeeDashboard
        image: employeedashboard:latest
        environment:
            SPRING_APPLICATION_JSON: '{"spring": {"cloud": {"config": {"uri": "http://config-server:9090"}}}}'

        entrypoint: /opt/bin/EmployeeDashBoard-entrypoint.sh
        expose:
            - 8081
        ports:
            - 8081:8081
        networks:
            - emp-network
        links:
            - config-server:config-server
            - eureka-server:eureka-server
        depends_on:
            - config-server
            - eureka-server
        logging:
            driver: json-file
    ZuulServer:
        container_name: ZuulServer
        build:
            context: .
            dockerfile: Dockerfile-ZuulServer
        image: zuulserver:latest
        expose:
            - 8084
        ports:
            - 8084:8084
        networks:
            - emp-network
        links:
            - eureka-server:eureka-server
        depends_on:
            - eureka-server
        logging:
            driver: json-file
networks:
    emp-network:
        driver: bridge
volumes:
    config-repo:
        external: true
In the Docker compose file below are a few important entries:
version: a mandatory field where we need to maintain the version of the Docker Compose format.
services: each entry defines the container we need to spawn.
build: if mentioned, then Docker Compose should build an image from the given Dockerfile.
image: the name of the image which will be created.
networks: the name of the network to be used. This name should be present in the networks section.
links: this will create an internal link between the service and the mentioned service. Here, the EmployeeSearch service needs to access the config and Eureka server.
depends: this is needed to maintain the order. The EmployeeSearch container depends on the Eureka and Config Server. Hence, Docker makes sure that the Eureka and Config Server containers are spawned before the EmployeeSearch Container is spawned.
After creating the file, let us build our images, create the required containers, and start with a single command:
docker-compose up --build
To stop the complete environment, we can use this command:
docker-compose down
The complete documentation for Docker Compose can be found at this link.
To summarize, writing the Dockerfile and Docker Compose file is a one-time activity, but it allows you to spawn a complete environment on demand at any time.
Conclusion
This is the complete guide on how to build different components in microservices and deploy them in Docker. In production, there should be CI/CD involved so you don't need to know all the Docker commands for building images, but as a full stack developer, it is important to learn how you can create and build an image in Docker.
Opinions expressed by DZone contributors are their own.
Comments