Bootstrapping Java Kubernetes Apps With Spring Initializr and K8s Initializer
Build a Spring Boot app and deploy to K8s without writing a single line of YAML
Join the DZone community and get the full member experience.
Join For FreeI chat to a lot to Java and Spring developers looking to get started quickly with deploying applications on Kubernetes. While there’s no substitute for doing the research and reading the books/articles etc, I’m a big fan of learning by doing.
In this tutorial, I’m going to show you how to bootstrap a Spring Boot web application, containerize this using the latest Spring buildpacks, and deploy this onto an application-ready Kubernetes cluster with the app exposed to users via the Ambassador API gateway.
And you’ll be able to complete this in ~30 minutes without writing a single line of YAML, thanks to the power of the Spring Initializr and the K8s Initializer websites, which create all of the boilerplate code and config for you!
Bring the Spring (Initializr)!
The Spring team has done fantastic work on the Spring Initializr. If you are getting started with Spring or looking to bootstrap a skeleton of a Spring app this is my go-to recommendation.
I remember first seeing Josh Long demo the Spring Initializr live at a Devoxx event many years ago, and now I regularly see Stéphane Nicoll and the team discussing the evolution of the Initalizr functionality and UX.
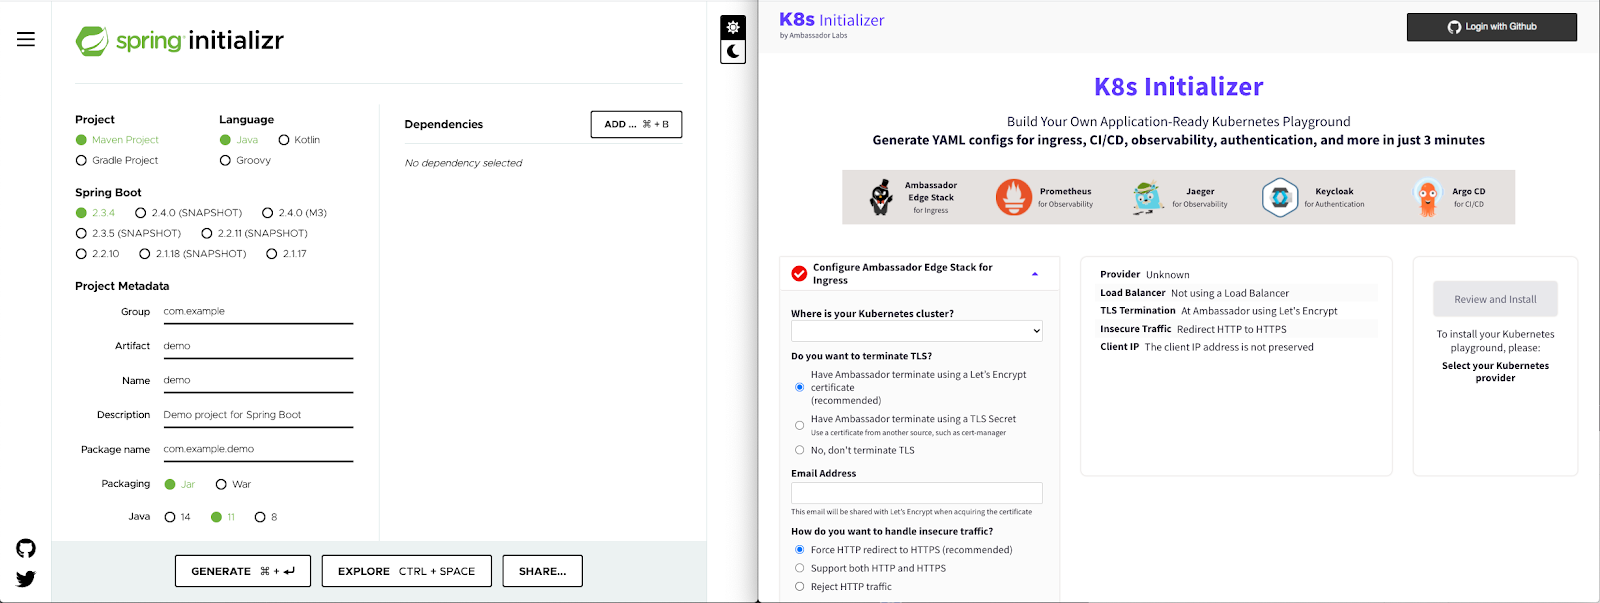
For today’s tutorial you can head over to start.spring.io, have a quick look around, and then add the “Spring Web” dependency (by clicking on the “ADD DEPENDENCIES” button on the right). Now click “GENERATE” (via the button at the bottom of the page).
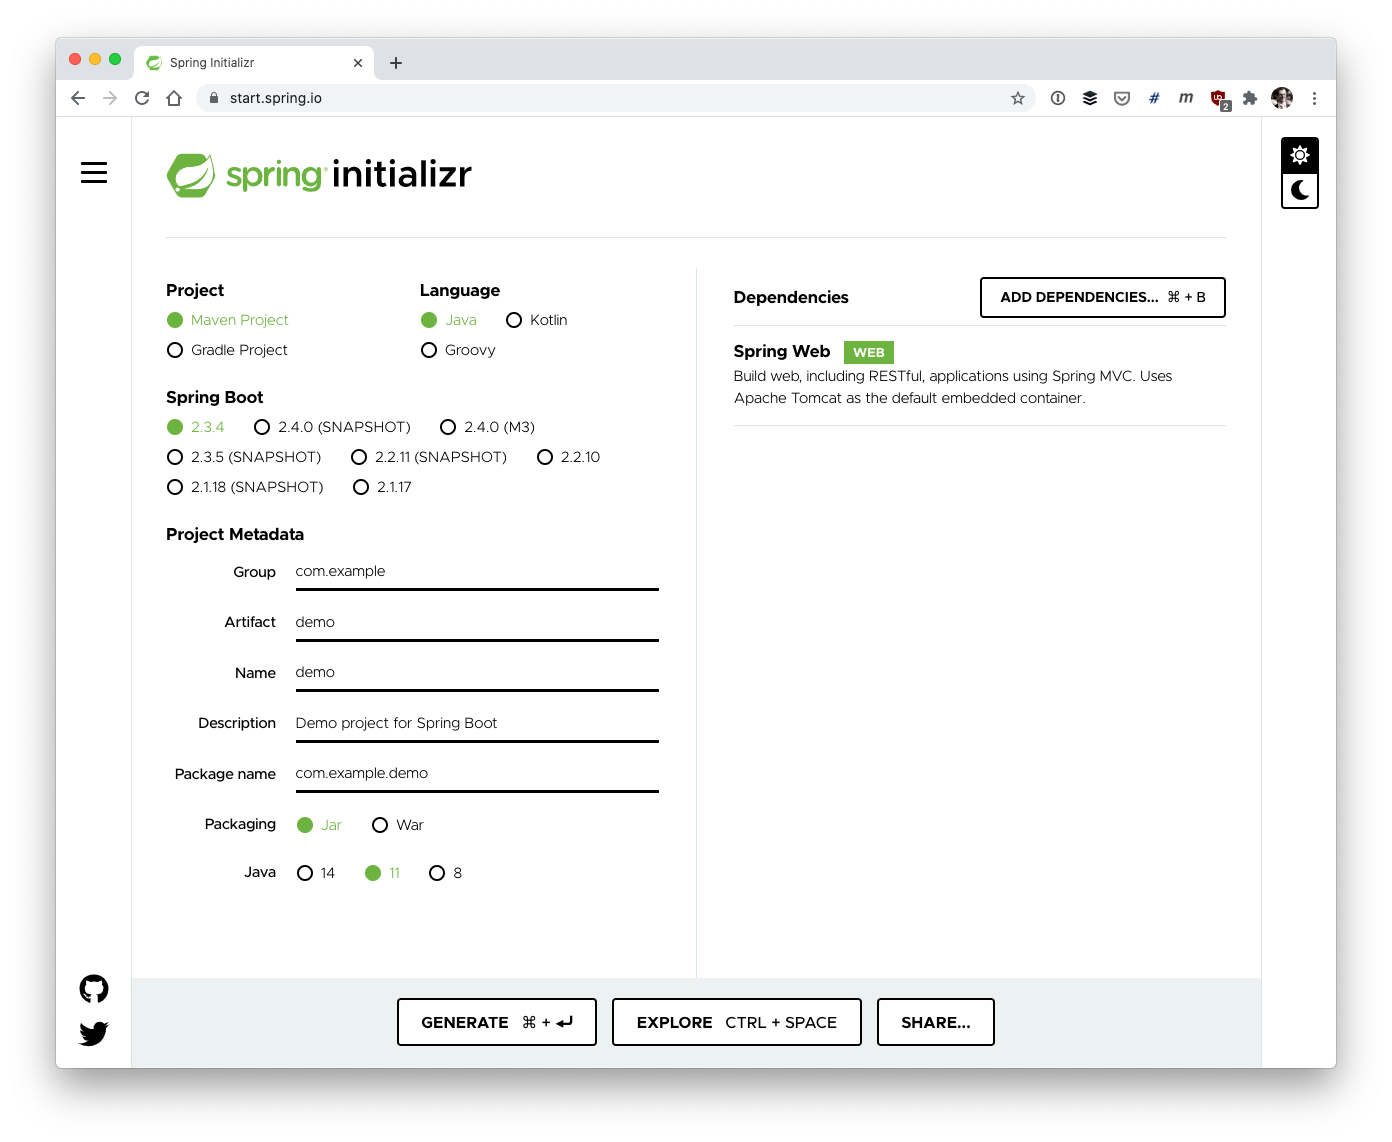
This will generate, build, and download a ZIP file with your project skeleton.
Go ahead and extract the files and open the project in your IDE of choice. As you’ve gone with the default config, the project structure will be familiar to anyone who has used Maven (that’s hopefully most of you!). I know, I know, Gradle is where all the cool kids hang out, but I’m still a big Maven fan...
I’m going to use JetBrains’ IntelliJ IDEA in this tutorial, as not only is this my favourite IDE, but they also very kindly provide free licenses to Java Champions (thanks JetBrains!)
REST, You Say? Not Yet, You’re Just Getting Started!
Next, you can add a simple REST(ish) Spring Boot Controller that you will use as an example user-facing endpoint for your application.
Create a package named com.example.demo.web and create a Class here named HelloWorld.
Add the following contents to the new HelloWorld Class.
xxxxxxxxxx
package com.example.demo.web;
import org.springframework.web.bind.annotation.RequestMapping;
import org.springframework.web.bind.annotation.RestController;
public class HelloWorld {
("/")
String home() {
return "Hello, World!";
}
}
You can see that this is super simple: any request to the root path (“/”) will return “Hello, World!”. Obviously this isn’t a demonstration of proper REST style, as you should be returning entities or aggregates, but hopefully you get the idea and can build on this.
If you run the application in your IDE the Spring skeleton provided by the Initializr should spin up an embedded Tomcat server and expose your application via port 8080 on localhost. You should be able to visit localhost:8080 and see the “Hello, World!” message.

The above screenshot shows my run of the application via IDEA, with the web browser output below.
Can You “contain” Your Excitement?
So far, so good. Next, you can set about containerizing your application.
In the past, this used to be the point where I would have to discuss creating a Dockerfile and explain how important it is to make good choices about all of the config included in this. As of Spring Boot 2.3.X this is no longer the case, as you can now take advantage of inbuilt container buildpacks.
First, you will need to ensure Docker is running on your local machine. On my local machines I typically run Docker for Mac / Windows, but other solutions do exist.
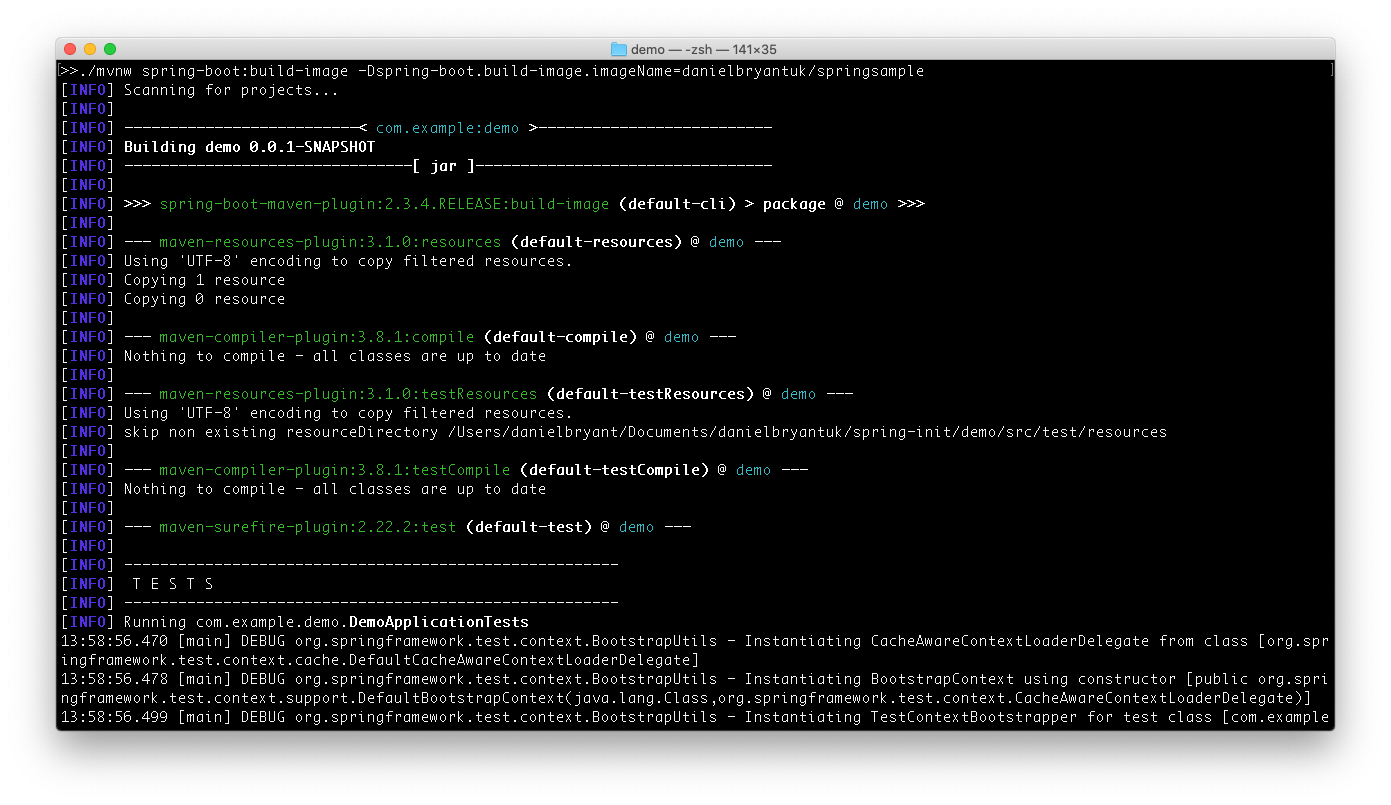
If you bring up a (Linux style) terminal and navigate to the root of your application project, you can simply type the following command to build a Docker image with your app included.
xxxxxxxxxx
$ ./mvnw spring-boot:build-image -Dspring-boot.build-image.imageName=**YOUR DOCKER HUB USERNAME**/springsample
You can change the token “**YOUR DOCKER HUB USERNAME**” to your Docker account username if you want to follow along and upload this image to your account.
You can see the result of me running this command with my username “danielbryantuk”, below:
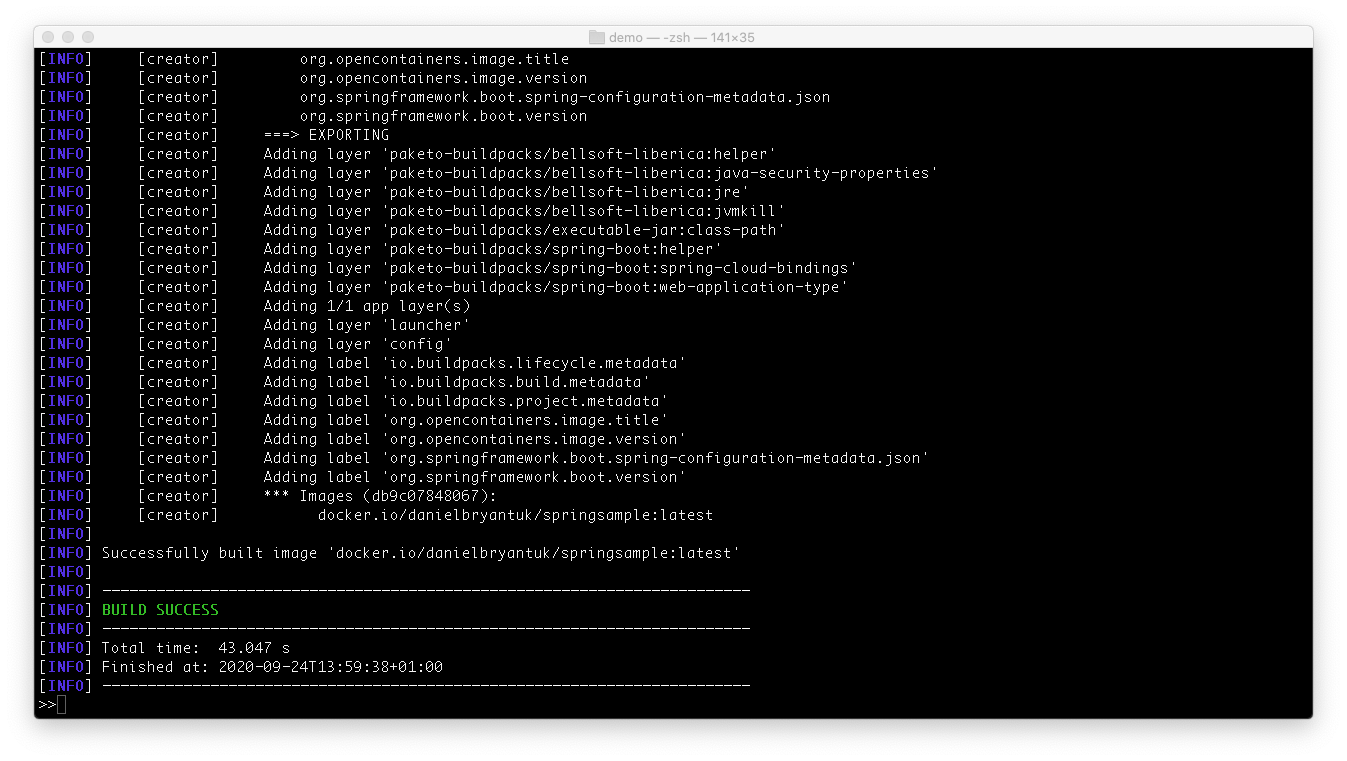
Job done! You just built your app into a container and there wasn’t a Dockerfile in sight!
You can now test that the app runs successfully via Docker by using the following command:
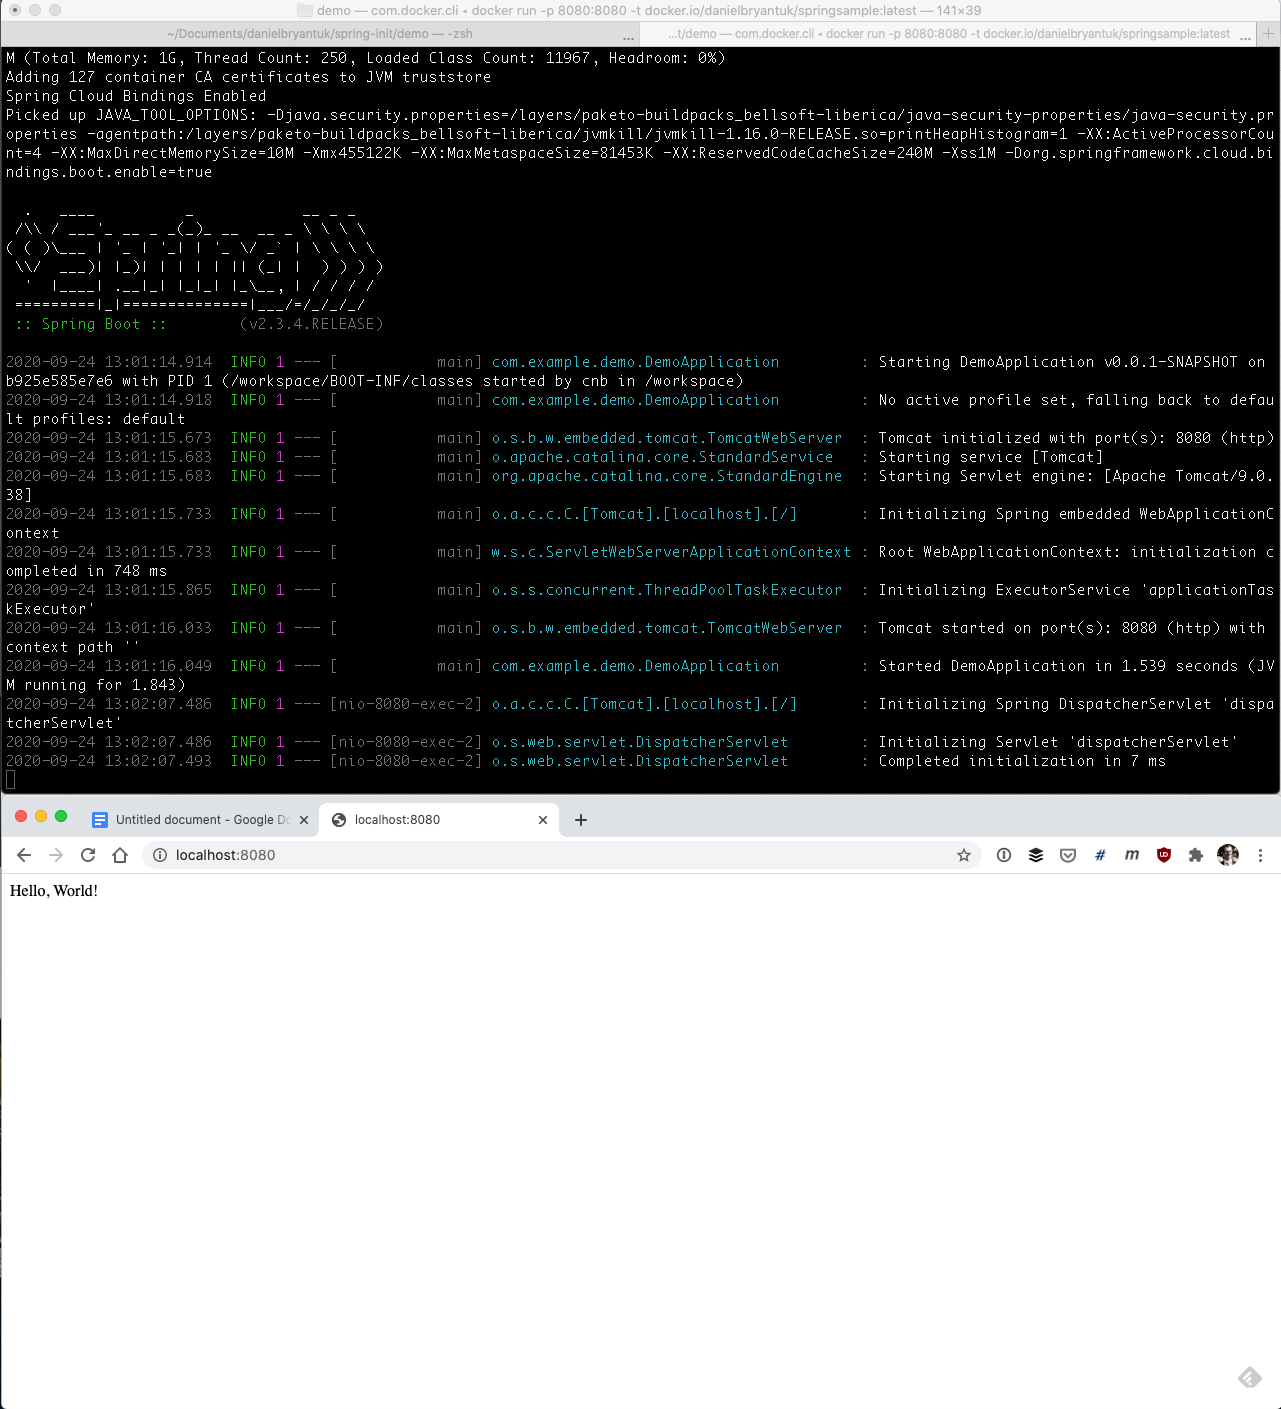
$ docker run -p 8080:8080 -t docker.io/danielbryantuk/springsample:latest
Once everything has initialized you can visit localhost:8080 in your browser (being sure to have terminated the app that was running via your IDE first). If you are using something other than Docker for Mac you may have to figure out the default IP address that Docker is exposing apps on, rather than using localhost.
This is a screenshot of me running the app via Docker:
If you want to push the container to the public Docker Hub you will need to login via the terminal (“docker login”) and then push the image. Be sure to change the username in the command below to your Docker username:
$ docker push docker.io/danielbryantuk/springsample:latest
You can now stop the app running locally via Docker (^C in the terminal window) and get ready to explore Kubernetes!
Creating K8s Config Without Writing a Line of YAML!
Now you can create a Kubernetes Deployment and Service manifest YAML file for your containerized Spring app.
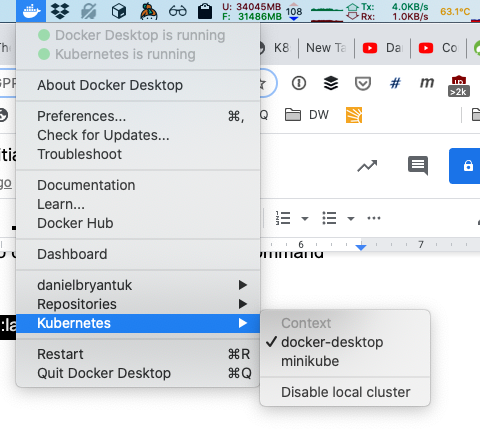
I’m assuming that you have a local Kubernetes cluster up and running locally. If you’re using Docker for Mac / Windows then this is as simple as ticking the box during the install. If you’re using something else be sure that kubectl has been installed and that you can access your cluster.
You can see I have K8s up and running via the Docker for Mac toolbar config:
Next, make sure your terminal is located at the root of your project (with the pom.xml config file) and execute the following command to create a skeleton K8s Deployment YAML file named “springsample.yaml”:
xxxxxxxxxx
$ kubectl create deployment springdeployment --image=docker.io/danielbryantuk/springsample:latest -o yaml --dry-run=client > springsample.yaml
You can change my Docker account username to yours if you want to deploy the image you pushed to Docker Hub earlier.
Now, create a skeleton K8s Service YAML file, named “springsampleservice.yaml”
xxxxxxxxxx
$ kubectl create service loadbalancer springlb --tcp=8080:8080 -o yaml --dry-run=client > springsampleservice.yaml
Open the two files you have created in your IDE and take a look around. If you are just starting your learning journey with Kubernetes then I recommend reading more about what the Deployment and Service YAML files are needed for.
Here is a screenshot of my IDE when I opened the two files:
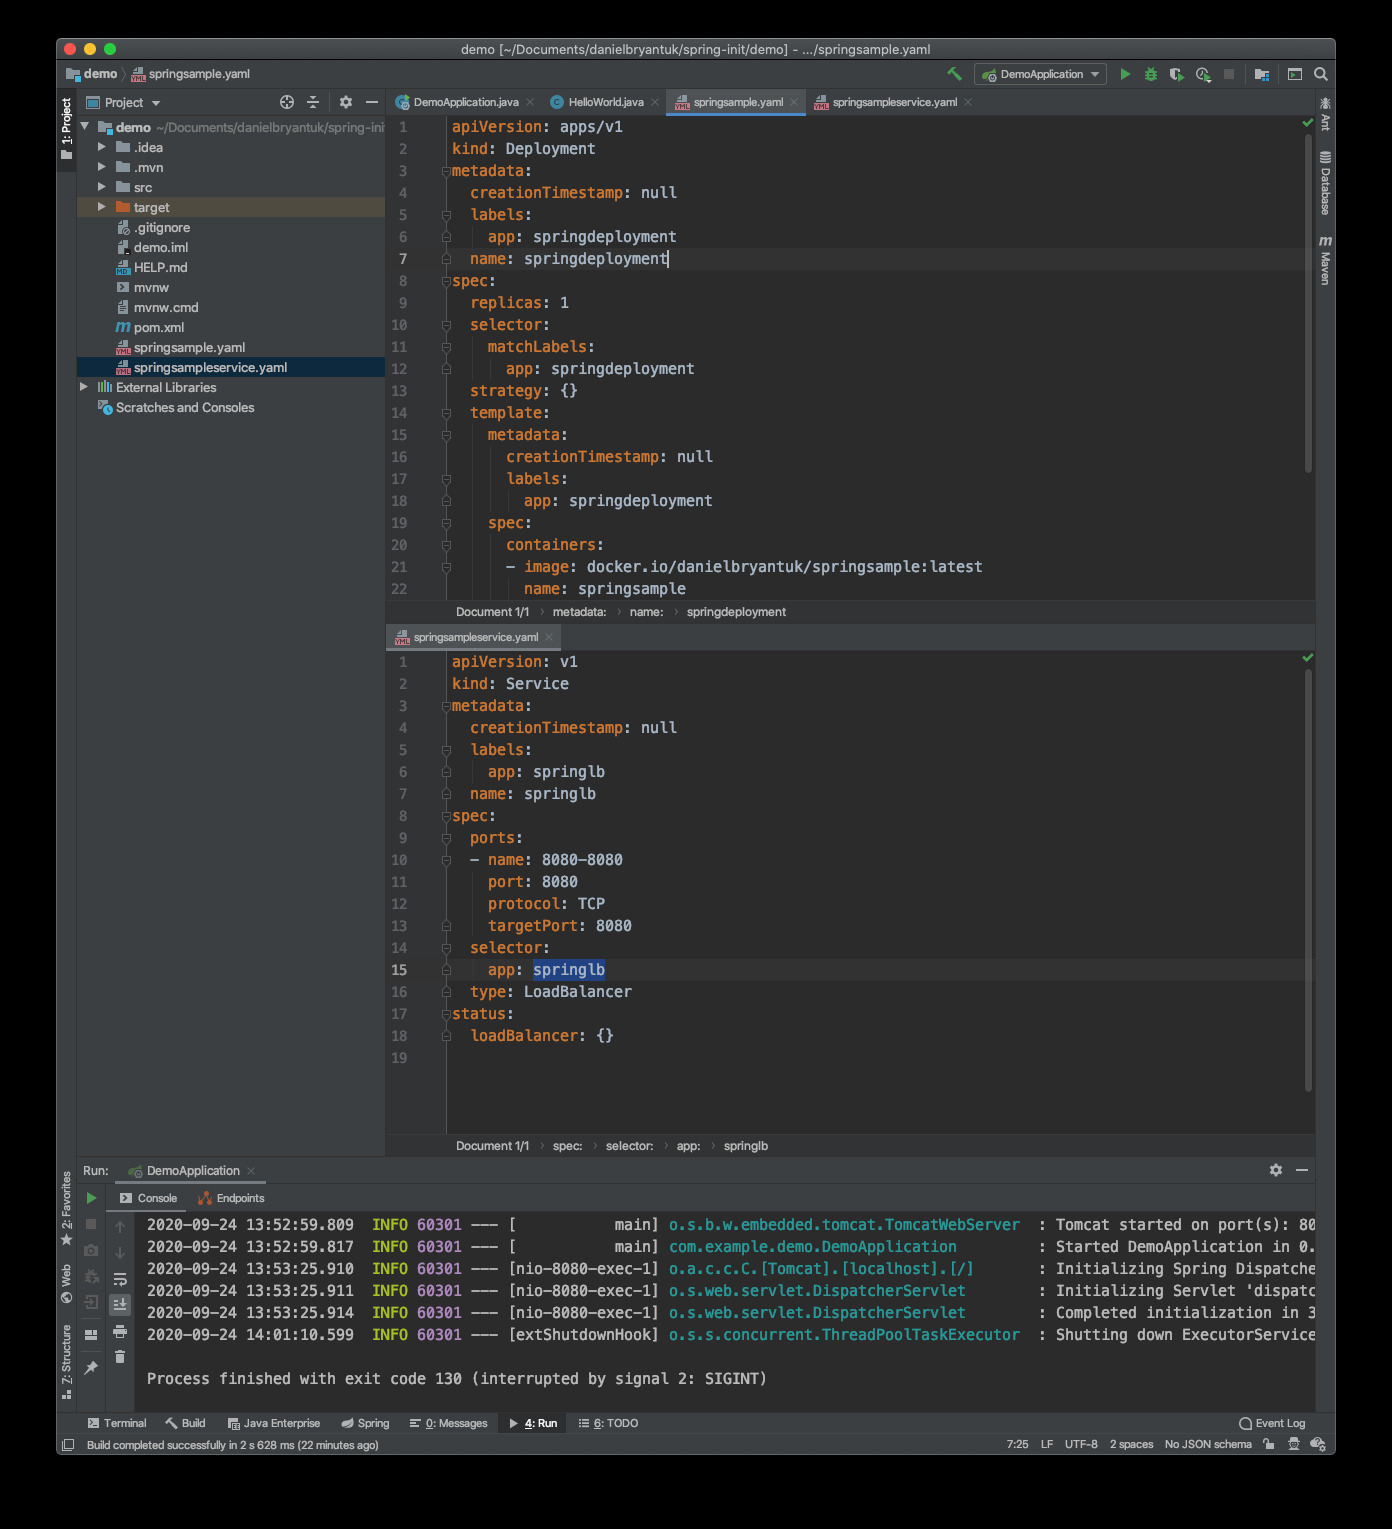
You will only need to make one modification to the springsampleservice.yaml file, changing the spec -> selector -> app value (highlighted in the screenshot above) to “springdeployment” in order to match the name of the Deployment in the other file.
Now that you have your two Kubernetes deployment files, you can now bootstrap your Kubernetes cluster.
Initializing Kubernetes With the K8s Initializer
Now you need to initialize your empty new Kubernetes cluster so that you can expose your application to user traffic.
Head on over to the K8s Initializer website. Much like the Spring Initializr, this single page web app allows you to select your required configuration and generate skeleton config, but this time for Kubernetes.
The K8s Initializer enables you to generate YAML that will deploy and integrate cloud networking, Ingress, observability, and continuous delivery tooling into your cluster. Today, however, you are only going to focus on configuring an Ingress in your cluster (“keep it simple”, as I like to say)
In the panel on the left of the page you can select where your K8s cluster is located. The screenshot below shows that I’ve selected Docker for Desktop, but you should select the most appropriate option for where your Kubernetes cluster is running for this tutorial.
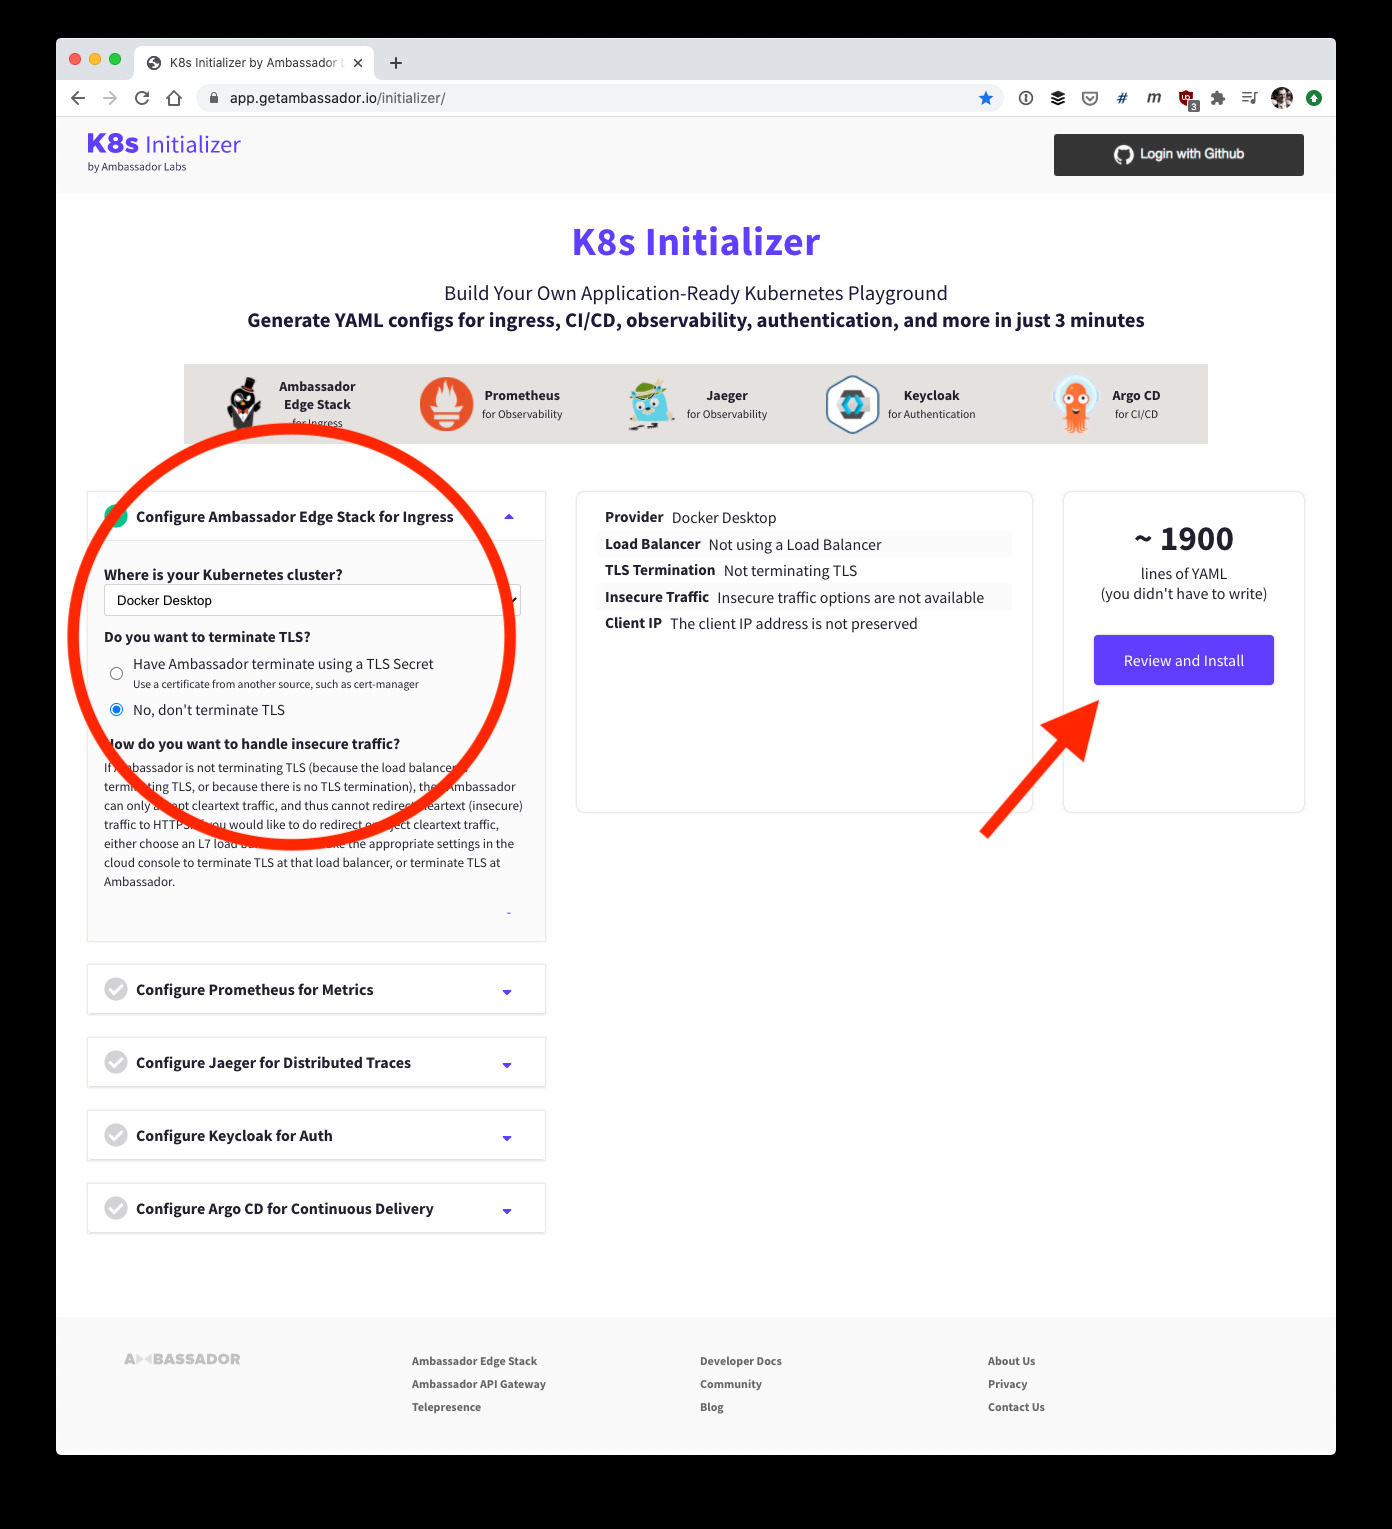
You can configure other settings, such as enabling TLS on Ingress, or installing other tooling within your cluster if required (ArgoCD, Jaeger, Prometheus etc). I’ve only specified the installation of the Ambassador Edge Stack for Ingress and selected “No, don’t terminate TLS” for this tutorial, and then clicked the “Review and Install” button on the right side of the page.
Below is a screenshot of the configuration page generated for me. Note the unique kubectl commands that have been generated for me to apply to my cluster
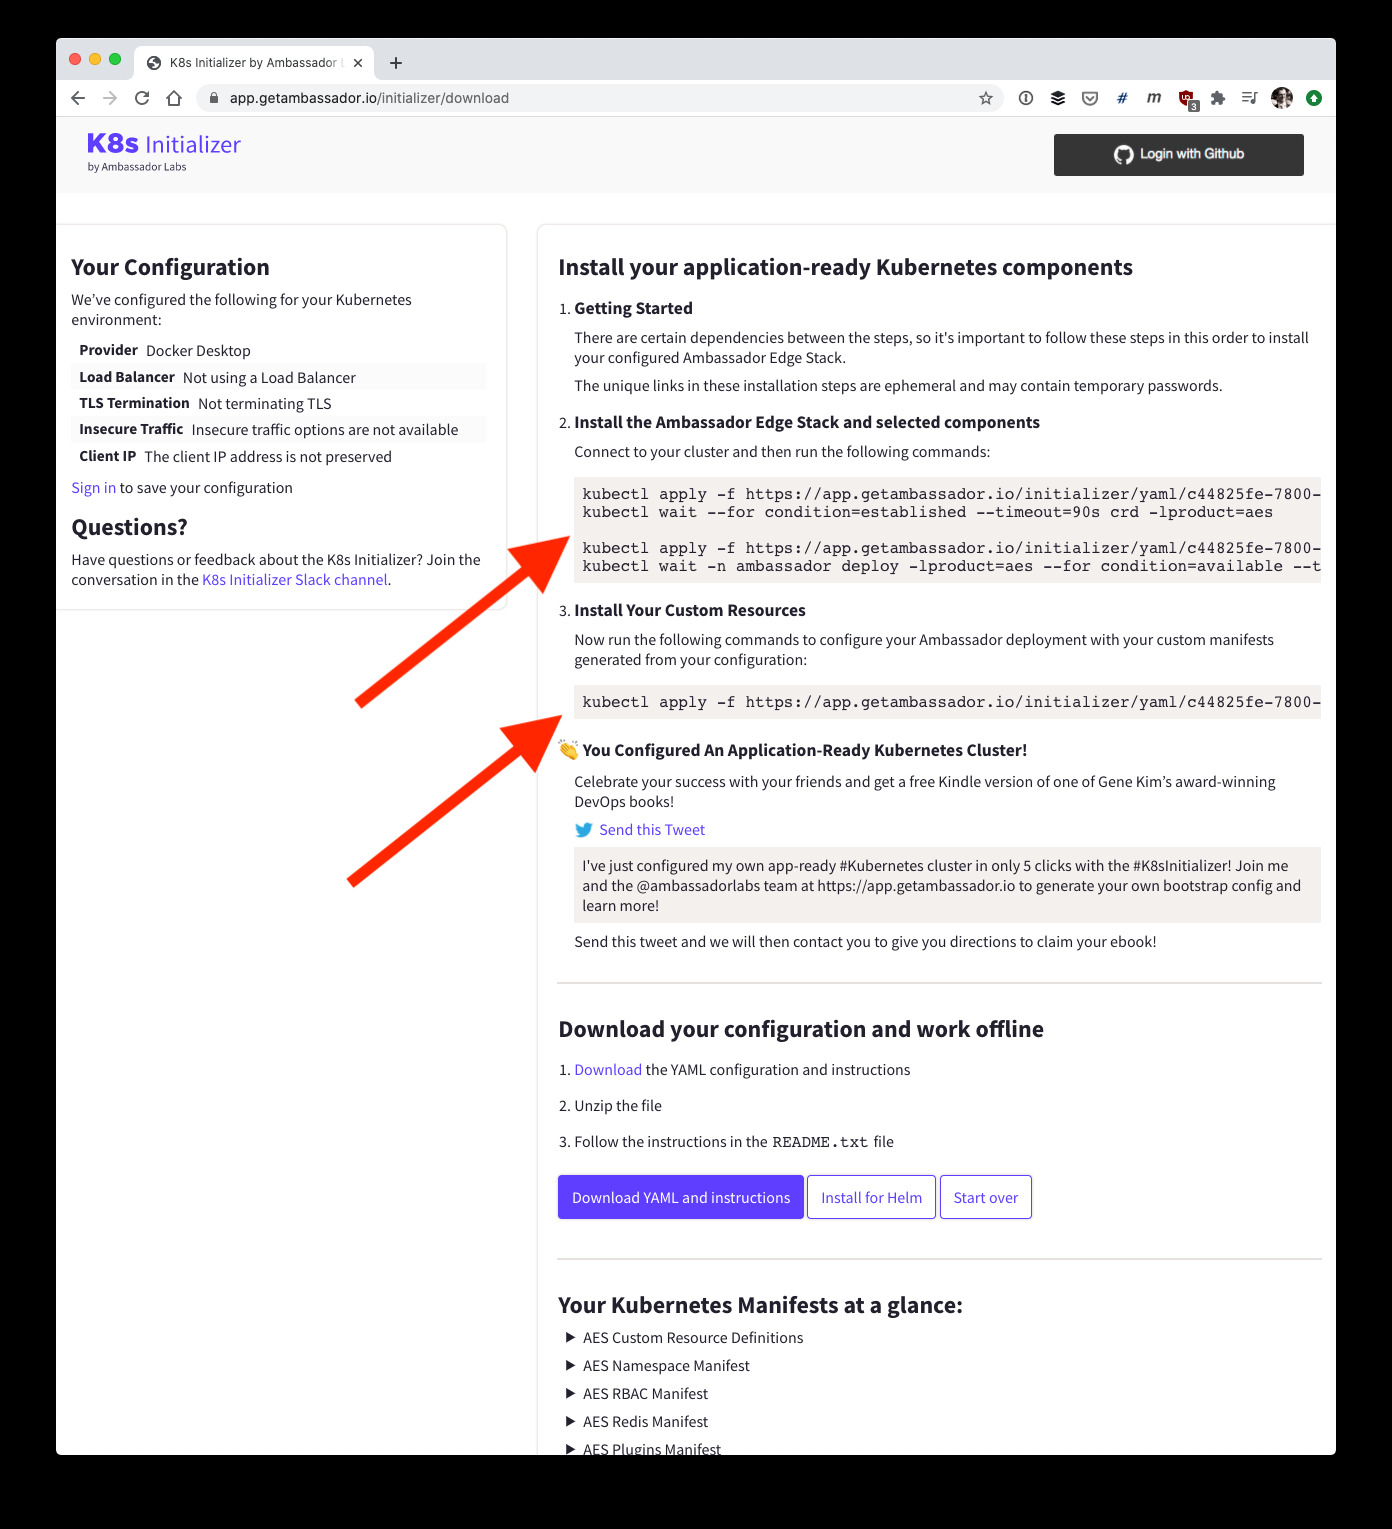
Go ahead and copy and paste the kubectl installation commands into your terminal
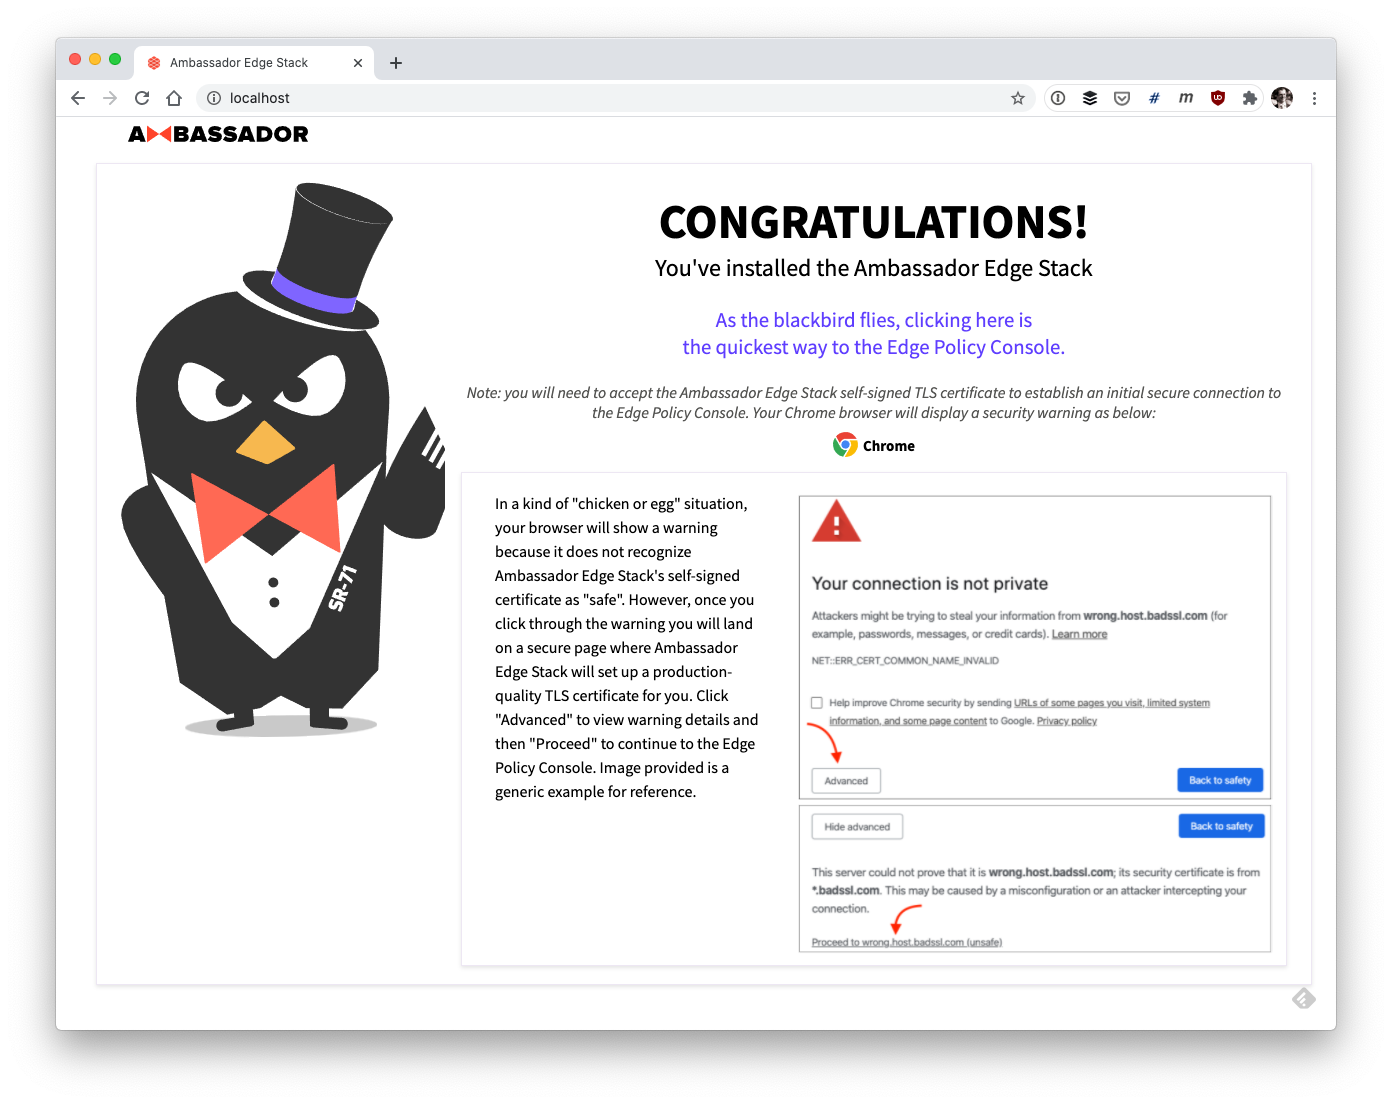
After I have done this on my local Kubernetes cluster I can see that the Ambassador Edge Stack (Ingress and API gateway) has been installed correctly.
xxxxxxxxxx
$ kubectl get svc --namespace ambassador
NAME TYPE CLUSTER-IP EXTERNAL-IP PORT(S) AGE
ambassador LoadBalancer 10.99.250.92 localhost 80:30070/TCP,443:32516/TCP 2m6s
ambassador-admin ClusterIP 10.99.245.188 <none> 8877/TCP 2m6s
ambassador-redis ClusterIP 10.109.88.56 <none> 6379/TCP 2m6s
Looking at the EXTERNAL-IP of my ambassador service I can see that I can visit localhost to access the default ingress welcome page:
Now you can apply both of the Kubernetes configuration files to your cluster that you generated earlier:
$ kubectl apply -f springsample.yaml
$ kubectl apply -f springsampleservice.yaml
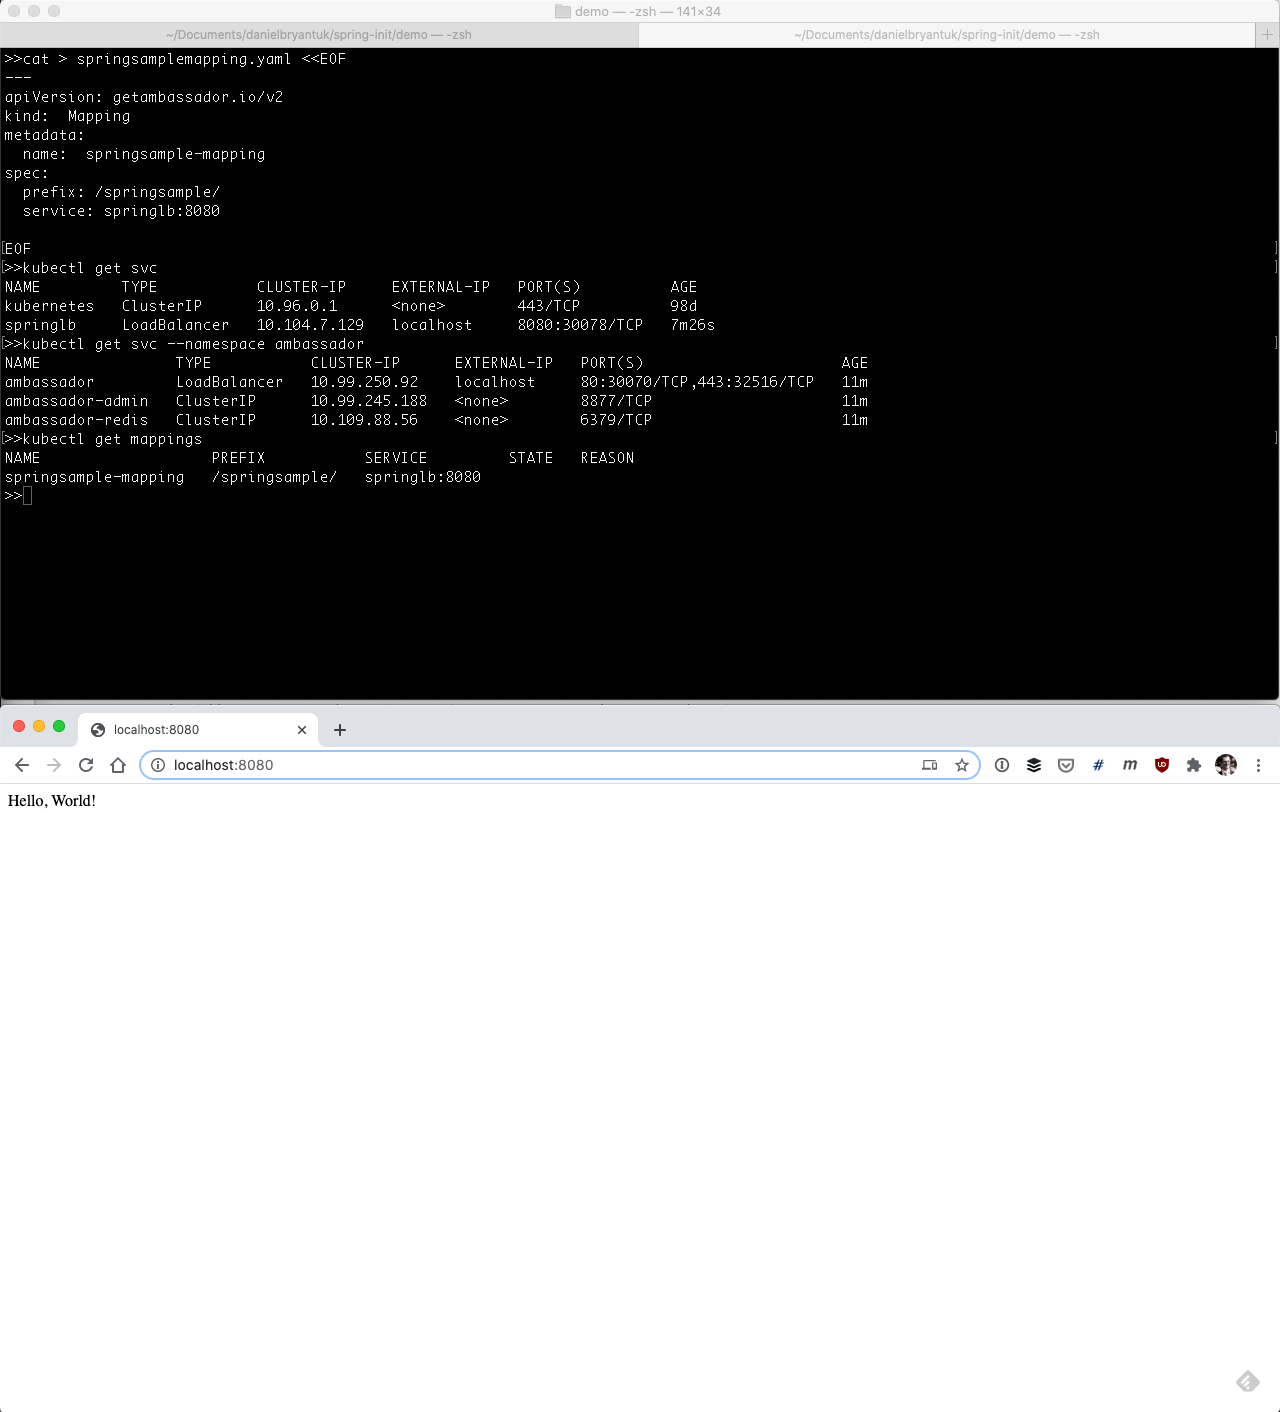
And now you can create a simple Mapping custom resource to expose the application via the Ambassador ingress:
cat > springsamplemapping.yaml <<EOF
---
apiVersiongetambassador.io/v2
kindMapping
metadata
namespringsample-mapping
spec
prefix/springsample/
servicespringlb8080
EOF
After you have done this you can confirm everything was configured as expected and visit localhost/springsample/
And that’s it! You’ve built a simple Spring Boot app, containerized it, deployed this to Kubernetes, and exposed it to end users via an API gateway!
There is, of course, a lot more to do to make this application production ready, such as enabling TLS, adding authentication support (e.g. Auth0, Keycloak, Okta etc), and configuring monitoring, but these are topics for another tutorial!
Let’s Wrap This Up
I know this tutorial has been a bit of a tour de force of bootstrapping a Spring app onto Kubernetes, but hopefully one of the key concepts I’ve demonstrated is the value of tools like the Spring Initializr and K8s Initializer when you are getting started.
Everyone learns differently, but I definitely see the value of getting hands-on experience and playing around with the tech. Using tools like the initializers encourages you to treat your experiments as disposable. If you mess something up badly, you can simply start again. And if you want to experiment with something different, e.g. add a new Spring dependency or play around with Jaegar in your Kubernetes cluster, this is as simple as selecting a different option in the initializer UI.
The team and I are working hard to make the K8s Initializer as useful as possible for folks learning and experimenting with Kubernetes, and so we would welcome your feedback.
You can find me on Twitter @danielbryantuk, in the Ambassador Labs (Datawire) Slack, or on many other places around the Interwebs!
Opinions expressed by DZone contributors are their own.
Comments