Spring Boot Tutorial: Build a Spring Boot App and Deploy Into Tomcat
Simplify deployment of your application in a few, simple steps.
Join the DZone community and get the full member experience.
Join For Free
Deploying an application can be quite tedious because of the multiple steps that are involved. Today, I will show you how to simplify the process with Tomcat by building a web app and deploying it through the browser.
For this tutorial, we will use:
You may also like: Deploying a Spring Boot Microservice to Docker: A Quick Guide.
- Tomcat 9.
- Spring Boot 2.1.
- Java 11.
- Okta for authentication.
Start Your Java 11 App
Open up a console and run java -version to see what version of Java you are using.
[karl@localhost demo]$ java -version
openjdk version "1.8.0_111"
OpenJDK Runtime Environment (build 1.8.0_111-b16)
OpenJDK 64-Bit Server VM (build 25.111-b16, mixed mode)
[karl@localhost demo]$
Java 8 is shown as version 1.8.0.
SDKMAN is a great tool for keeping your development libraries up to date. To install it run
$ curl -s "https://get.sdkman.io" | bashNote that SDKMAN only works on Linux and Unix-like systems. Windows users will need to install the latest Java manually.
If SDKMAN installs properly, you will see instructions for getting the command to work in your current terminal.
All done!

Please open a new terminal, or run the following in the existing one:

source "/home/karl/.sdkman/bin/sdkman-init.sh"

Then issue the following command:

sdk help

Enjoy!!!
[karl@localhost demo]$
Run the source command as shown, and the sdk command should be active.
Now, install the latest Java simply with sdk install java.
[karl@localhost demo]$ sdk install java

Downloading: java 11.0.2-open

In progress...
Once done, java -version should show 11.0.2.
Done installing!

Setting java 11.0.2-open as default.
[karl@localhost demo]$ java -version
openjdk version "11.0.2" 2019-01-15
OpenJDK Runtime Environment 18.9 (build 11.0.2+9)
OpenJDK 64-Bit Server VM 18.9 (build 11.0.2+9, mixed mode)
[karl@localhost demo]$Note: If you already have SDKMAN and Java 11 installed, you can set it as the default using sdk default java 11.0.2-open.
Create a Spring Boot Project for Tomcat
The most popular way to start a Spring project is with Spring Initializr.

Navigate to start.spring.io in your favorite web browser, then choose your project options:
- Leave as Maven, Java, and the latest stable Spring Boot (2.1.4).
- Change the group and artifact if you wish.
- Click on More options and select
Java 11. - In the Dependencies box, type and choose
Web,Security, andDevtools. They should appear as Dependencies selected on the right.
Now, click Generate Project and a zip file will download with the project inside. Simply unzip and enter the directory from the command line. If you ls, you’ll see five files and one directory (src).
[karl@m14x demo]$ ls
HELP.md  mvnw  mvnw.cmd  pom.xml  src
Mvnw is a script that allows you to use Maven without installing it globally. Mvnw.cmd is the Windows version of this script. Pom.xml describes your project, and src has your Java code inside. (Note there’s also a hidden .mvn directory where the embedded maven files sit!)
Let’s see what the project does. Type ./mvnw spring-boot:run and press enter. It may take a while for everything to install, but eventually, you should see something like this:
Tomcat started on port(s): 8080 (http) with context path ''
2019-03-17 19:56:49.342  INFO 10744 --- [  restartedMain] com.karl.demo.DemoApplication        : Started DemoApplication in 3.022 seconds (JVM running for 3.56)
Note the message Tomcat started on port(s): 8080. Open a browser window to http://localhost:8080, and you should see a login page.
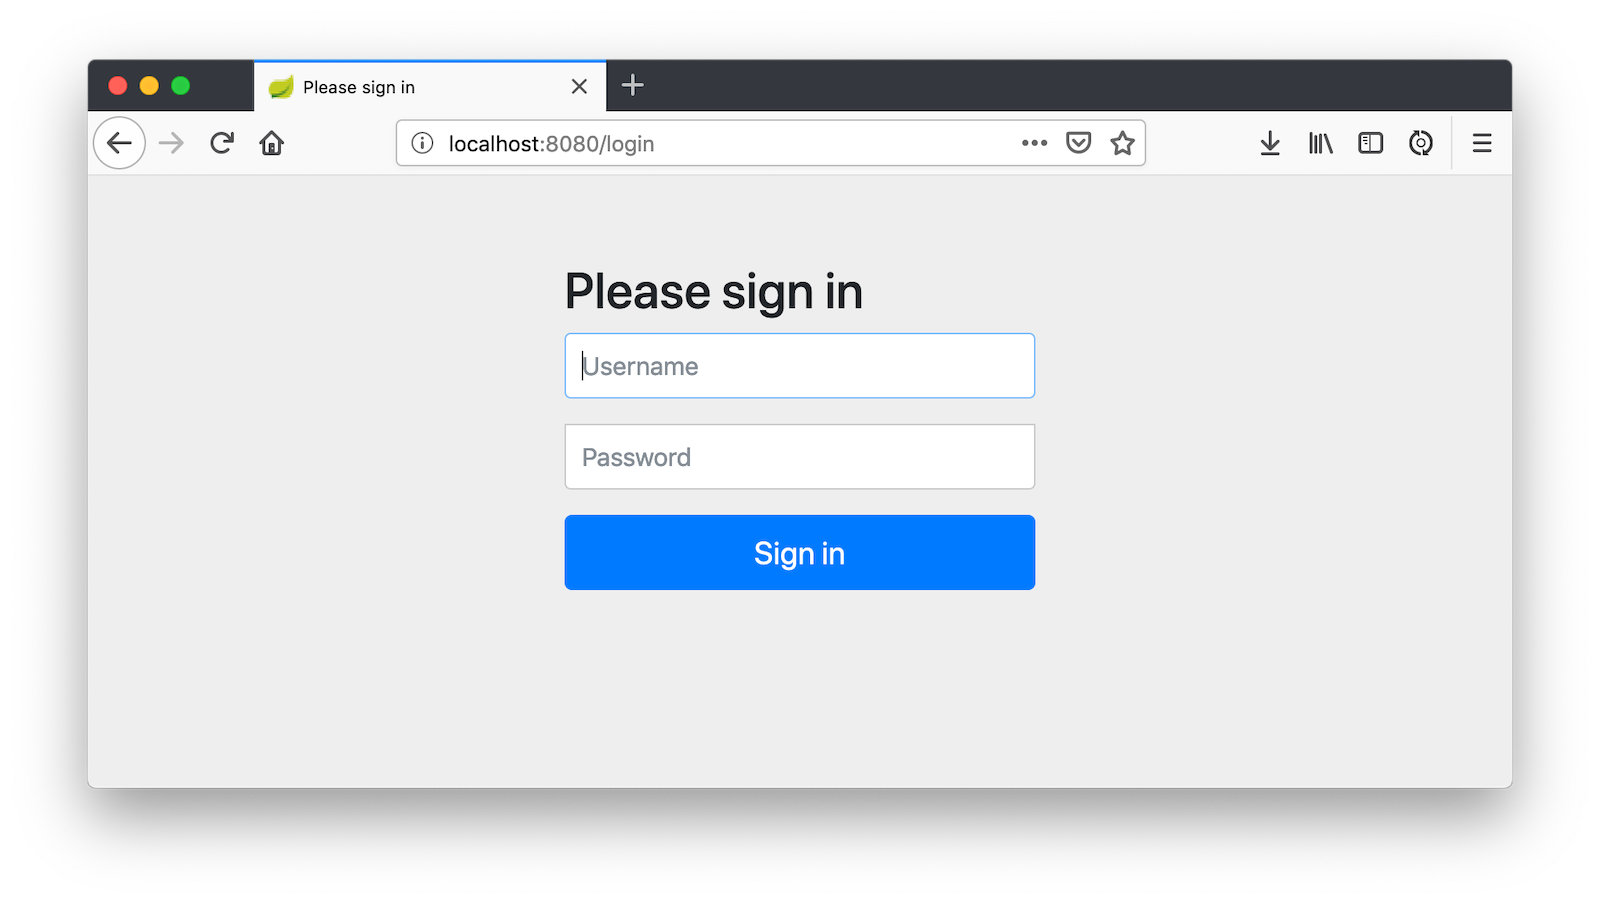
You can authenticate using “user” for a username and the password that’s been printed to your terminal. After logging in, you’ll see a 404 error page because you haven’t created any code to show a landing page at /.
Add Secure Authentication to Your Spring Boot App
Let’s add authentication with Okta. Once you’ve signed up for a free account, go to Applications on your dashboard. Click Add Application, select Web, and click Next.
You should now be in the Application Settings page. Replace the Login Redirect URIs field with the following:
http://localhost:8080/login/oauth2/code/oktaClick Done at the bottom. Copy your Client ID and Client secret from the Client Credentials section and keep them somewhere safe. Now, right at the top click the API tab (next to Applications) and then Authorization Servers. Make note of the Issuer URI which looks like:
https://okta.okta.com/oauth2/defaultCreate a file in your project at src/main/resources/application.yml and put those values inside:
okta:
  oauth2:
    issuer: https://okta.okta.com/oauth2/default
    client-id: {clientId}
    client-secret: {clientSecret}
Now add the Okta Spring Boot Starter library as a dependency in your pom.xml.
<dependency>
    <groupId>com.okta.spring</groupId>
    <artifactId>okta-spring-boot-starter</artifactId>
    <version>1.1.0</version>
</dependency>
Now, edit your main Java entry file — which is probably somewhere like src/main/java/com/example/demo/DemoApplication.java — and add the @RestController annotation to the class, as well as a homepage entry point:
package com.example.demo;

import org.springframework.boot.SpringApplication;
import org.springframework.boot.autoconfigure.SpringBootApplication;
import org.springframework.security.core.Authentication;
import org.springframework.security.oauth2.core.oidc.user.DefaultOidcUser;
import org.springframework.web.bind.annotation.GetMapping;
import org.springframework.web.bind.annotation.ResponseBody;
import org.springframework.web.bind.annotation.RestController;

@RestController
@SpringBootApplication
public class DemoApplication {

    public static void main(String[] args) {
    SpringApplication.run(DemoApplication.class, args);
    }

    @GetMapping
    @ResponseBody
    public String currentUserName(Authentication authentication) {
    DefaultOidcUser userDetails = (DefaultOidcUser) authentication.getPrincipal();
    return "Hello, " + userDetails.getFullName();
    }
}
Restart your app using ./mvnw spring-boot:run or use your IDE to run it.
Now, when you visit http://localhost:8080, you should see the Okta login screen.
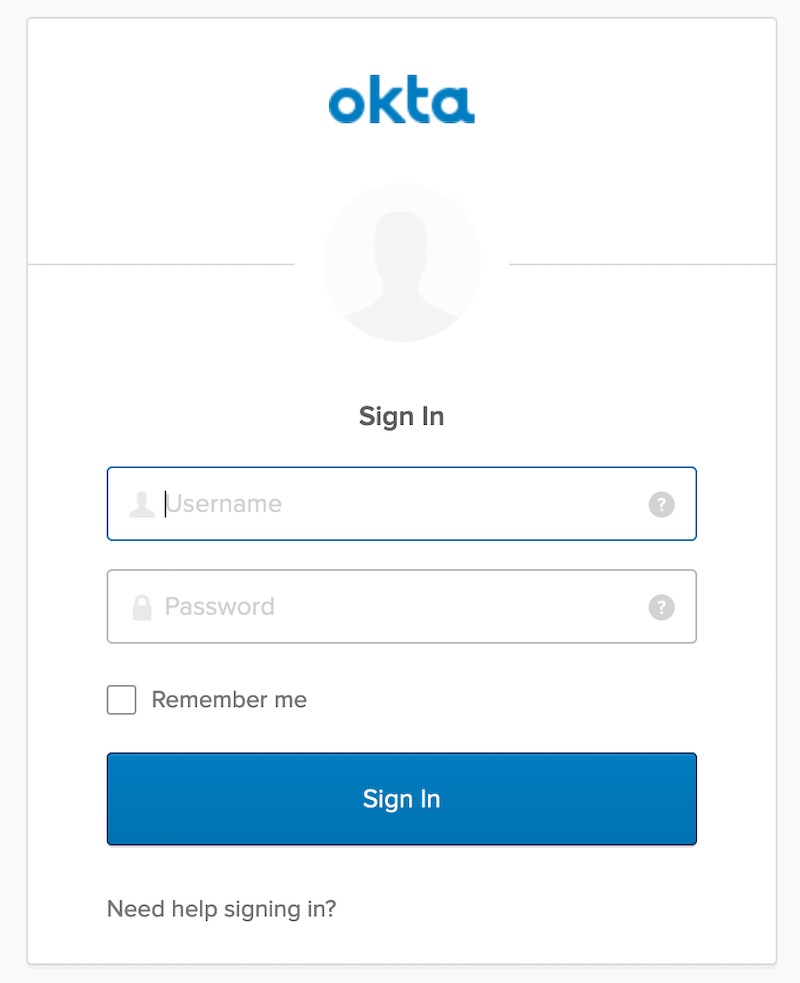
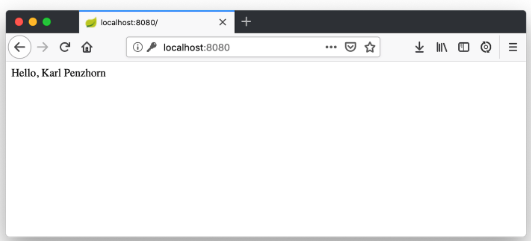
Once you’ve entered in the details of an attached Okta user (you can use the same login as your Okta developer account here), you should see a welcome message with the full name you entered when you registered:
Hot Tip: Logging out of an OAuth2 session is more nuanced than one might first imagine. To keep testing the login process, I recommend you use private browsing windows to ensure the login screen returns; close them down when you are finished.
Stop your Spring Boot app so you can run Tomcat on its default port of 8080.
Set up Tomcat 9 for Your Spring Boot App
Getting Tomcat up and running couldn’t be easier. Start by downloading the binary compatible with your platform. Make sure to use the .zip or .tar.gz file and not the installer. Extract to a location and inside the bin directory and run the startup script — startup.sh for Linux/Mac and startup.bat for Windows.
[karl@m14x bin]$ ./startup.sh
Using CATALINA_BASE:   /home/karl/Downloads/apache-tomcat-9.0.19
Using CATALINA_HOME:   /home/karl/Downloads/apache-tomcat-9.0.19
Using CATALINA_TMPDIR: /home/karl/Downloads/apache-tomcat-9.0.19/temp
Using JRE_HOME:    /home/karl/.sdkman/candidates/java/current
Using CLASSPATH:   /home/karl/Downloads/apache-tomcat-9.0.19/bin/bootstrap.jar:/home/karl/Downloads/apache-tomcat-9.0.19/bin/tomcat-juli.jar
Tomcat started.
[karl@m14x bin]$
Hot Tip: You can also use ./catalina.sh run to start your app. This command will print the logs to your terminal so you don’t need to tail them to see what’s happening.
Browse to http://localhost:8080 and you should see the Tomcat installation page.

Create a WAR File from Your Spring Boot Project
You now need to create a WAR file from your Spring Boot application. Add the following just after the <description> node in your pom.xml.
<packaging>war</packaging>Remove the embedded Tomcat server by adding the following to your dependencies list:
<dependency>
   <groupId>org.springframework.boot</groupId>
   <artifactId>spring-boot-starter-tomcat</artifactId>
   <scope>provided</scope>
</dependency>
Finally, enable your application as a servlet by extending your main class with SpringBootServletInitializer:
import org.springframework.boot.web.servlet.support.SpringBootServletInitializer;

@SpringBootApplication
public class DemoApplication extends SpringBootServletInitializer {
    ...
}
Now, clean and package your application with the following command:
./mvnw clean packageYou should see a message like the following:
[INFO] Building war: /home/karl/tst/demo/target/demo-0.0.1-SNAPSHOT.warTake note where your new .war lives.
Deploy a WAR to Tomcat from the Browser
You may have noticed that on the right-hand side of the Tomcat welcome screen was three buttons: Server Status, Manager App, and Host Manager. You can deploy a WAR from Manager App, but it needs authentication (and there are no users defined by default).
Add the following to conf/tomcat-users.xml in your Tomcat directory:
<user username="karl" password="secret" roles="manager-gui" />You’ll need to restart Tomcat for this change to take effect. Because you started it directly you need to stop the process yourself. Find the process id using ps aux | grep tomcat.
[karl@m14x bin]$ ps aux | grep tomcat
karl 11813  180  1.9 7389172 159596 pts/0  Sl   09:44   0:07 /home/karl/.sdkman/candidates/java/current/bin/java -Djava.util.logging.config.file=/home/karl/Downloads/apache-tomcat-9.0.19/conf/logging.properties -Djava.util.logging.manager=org.apache.juli.ClassLoaderLogManager -Djdk.tls.ephemeralDHKeySize=2048 -Djava.protocol.handler.pkgs=org.apache.catalina.webresources -Dorg.apache.catalina.security.SecurityListener.UMASK=0027 -Dignore.endorsed.dirs= -classpath /home/karl/Downloads/apache-tomcat-9.0.19/bin/bootstrap.jar:/home/karl/Downloads/apache-tomcat-9.0.19/bin/tomcat-juli.jar -Dcatalina.base=/home/karl/Downloads/apache-tomcat-9.0.19 -Dcatalina.home=/home/karl/Downloads/apache-tomcat-9.0.19 -Djava.io.tmpdir=/home/karl/Downloads/apache-tomcat-9.0.19/temp org.apache.catalina.startup.Bootstrap start
karl 11881  0.0  0.0   6268  2280 pts/0S+   09:44   0:00 grep tomcat
[karl@m14x bin]$
Here my process ID is 11813. Use the kill command to kill it.
kill 11813Restart the server by using startup.sh as before. When you click on the Manager App button, the user details you entered above should get you to the manager screen.
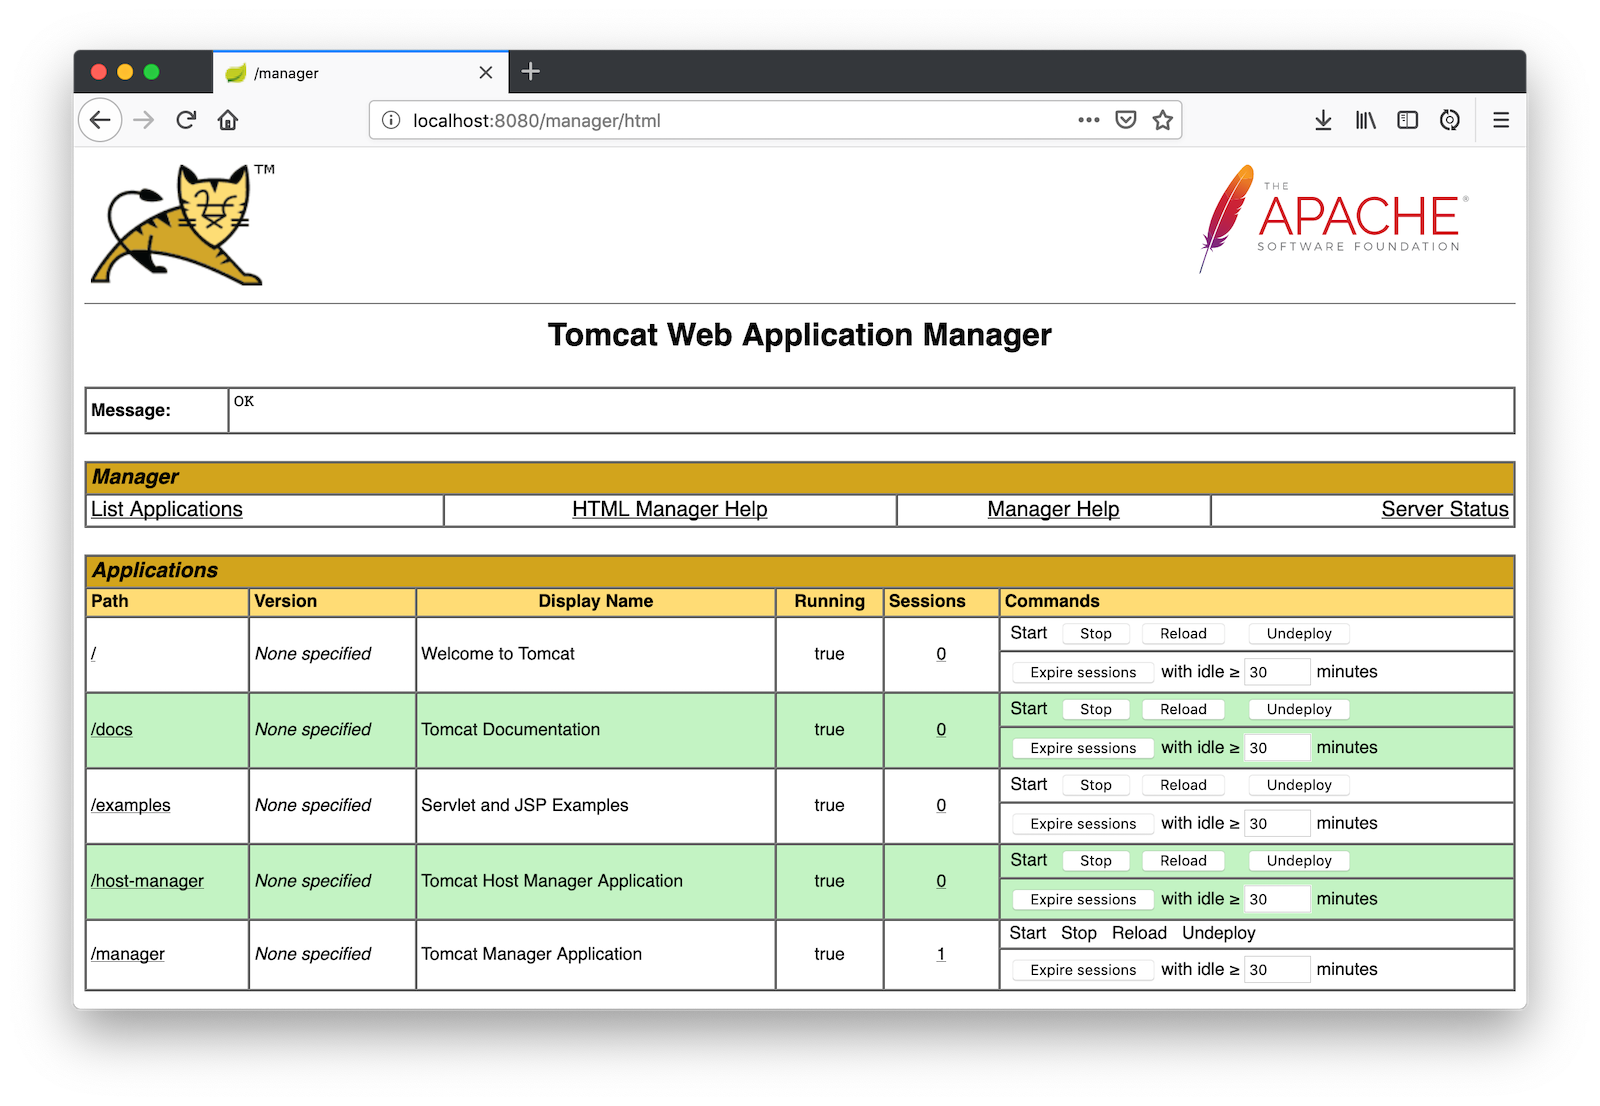
Scroll to the bottom to the WAR file to deploy section. Click Browse… and select the WAR file from before. Click Deploy.
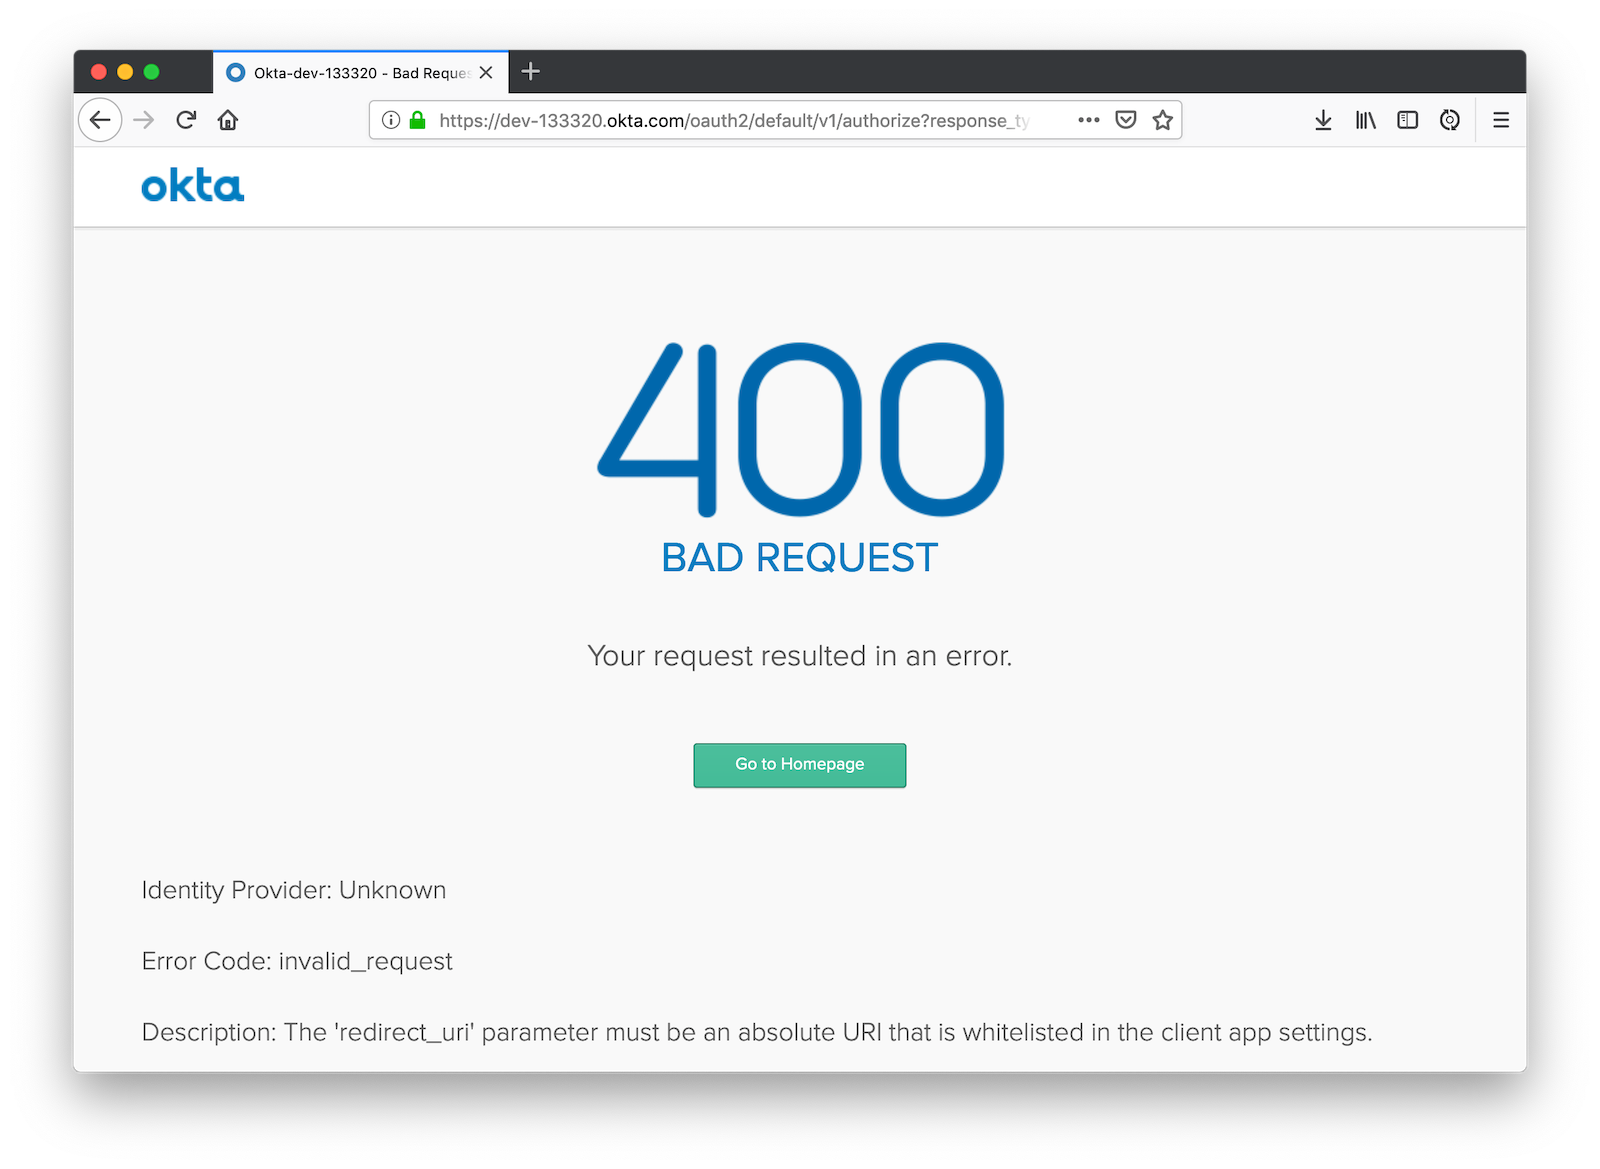
If you scroll up, you should see something like /demo-0.0.1-SNAPSHOT listed in the Applications section. Clicking on this will take us to http://localhost:8080/demo-0.0.1-SNAPSHOT, which is where Tomcat is serving our application from. You’ll see a Bad Request error.
This is because the redirect URL is now wrong in our Okta app configuration — everything should be prepended with demo-0.0.1-SNAPSHOT. That name is a bit cumbersome. To change it rename your WAR file to demo.war (you can do this permanently by adding <finalName>demo</finalName> to the build section of your pom.xml).
Now, click Undeploy next to your app name in the manager window, and redeploy the WAR. Now the app should be under /demo.
Now, in your Okta application config prepend all the URLs with /demo, e.g. http://localhost:8080/demo/login/oauth2/code/okta (you do this by clicking Edit and then Save).
Now, clicking on your /demo app in the manager (or browsing to http://localhost:8080/demo) should show you the welcome screen as before.
Hot Tip: To ensure your local development setup matches the machine you are deploying to, make sure the embedded Tomcat version is the same as your external server by adding the following to your pom.xml:
<properties>
    <tomcat.version>9.0.19</tomcat.version>
</properties>
Learn More About Tomcat, Spring Boot, and Java 11
Well done — you’ve remotely deployed a Spring Boot 2.1 application to Tomcat 9, all backed by Java 11!
I hope you found this tutorial useful. You can find the GitHub repo for this example at oktadeveloper/okta-spring-boot-tomcat-example.
Check out some of these links below for more information:
- i18n in Java 11, Spring Boot, and JavaScript
- Spring Boot 2.1: Outstanding OIDC, OAuth 2.0, and Reactive API Support
- Migrate Your Spring Boot App to the Latest and Greatest Spring Security and OAuth 2.0
- Build Reactive APIs with Spring WebFlux
- Build a Reactive App with Spring Boot and MongoDB
- Baeldung’s How to Deploy a WAR File to Tomcat
Like what you learned today? Follow us on Twitter and subscribe to our YouTube channel.
Deploy a Spring Boot Application into Tomcat was originally published on the Okta Developer Blog on April 16, 2019.
Related Articles
Published at DZone with permission of Lindsay Brunner. See the original article here.
Opinions expressed by DZone contributors are their own.
Comments