Kogito: Persistence, Event Sourcing, Integration, and Security
You can't perform that action at this time. You signed in with another tab or window. You signed out in another tab or window. Reload to refresh your session...
Join the DZone community and get the full member experience.
Join For FreeThis article is aimed at providing a hands-on view on some of the key capabilities of Kogito (which is an open-source cloud-native business automation platform). Specifically, we'll look at how it:
- Provides runtime persistence for work-flows to preserve the state of the process instances across restarts.
- Supports first-class citizen support for events and enables integration with third-party systems with both events and external REST API calls.
- Enables the tracking of the process instances to progress from the Kogito process management console.
- Integrates with an OpenId Connect (OIDC) Server to provide security to Kogito application endpoints.
Prerequisites
In order to better explain the core concepts behind Kogito's Persistence, Event Sourcing, Integration, and Security more from a developer's perspective, let's take the example of a coffee-shop application. For you to be able to set up and run this application in your machine, ensure that the following tools are installed.
- OpenJDK 8+.
- Visual Studio Code 1.41.1.
- Kogito Visual Studio Code extension (latest).
- Red Hat Java VSCode extension (latest).
- Maven 3.6.0+.
- Git.
- Docker Engine (at-least 1.13) and Docker Compose (at-least 1.25).
Installing Kogito Tooling in Visual Studio Code
Once the aforementioned tools have been set up, the next step would be to install the required Kogito tooling. Follow the steps outlined below to install the Kogito specific extension on Visual Studio Code (VSCode).
- Download the latest Visual Studio plugin from the project page: https://github.com/kiegroup/kogito-tooling/releases.
- Select the latest version.
- From the "Assets" section, download the file vscode_extension_kogito_kie_editors_n.n.n.vsix (where n.n.n is the version number of the latest release).
- Open Visual Studio Code
- Select the "Extensions" pane on the left
- Click the ... icon on the top right.
- Select "Install from VSIX..."
- Exit VSCode.
Importing and Opening the Application into Visual Studio Code
With all the required tooling in place, the next step is to import the application into VSCode. First, clone the git repository to a suitable location on your machine.
git clone https://github.com/bbalakriz/kogito
Then, do the following:
- Open Visual Studio Code.
- Go to "File", "Add Folder to Workspace".
- Select the folder `coffee-shop` in your file system.
- Click "Add".
- Repeat the same steps for the `barista` project as well.
Alternatively, the following commands could be run on a terminal, to open up both these projects in VSCode.
xxxxxxxxxx
# Star the coffee-shop application in VSCode
code apps/coffee-shop
# Star the barista application in VSCode
code apps/barista
Starting the Required Containers
This sample application is dependent upon various other components, like Kafka, ZooKeeper, Infinispan, Keycloak, Kogito Data Index Engine, and Kogito Management Console. To set up and run all these dependent components quickly in your machine, a docker-compose configuration has been provided, along with the application code. Execute the command given below in a terminal to get these components up and running on your machine as containers.
x
# Start up all required containers using the given docker-compose config yaml
$ cd config && docker-compose -f all-in-one-docker-compose.yaml up -d
This will start up 6 containers, namely Kafka, ZooKeeper, Infinispan, Keycloak, Kogito Data Index Engine, and Kogito Management Console; to verify if these are up and running or not, execute docker ps -a on a terminal, and you should see that the status of the containers will be changed to "up" in a few minutes.
Kogito Application in Action
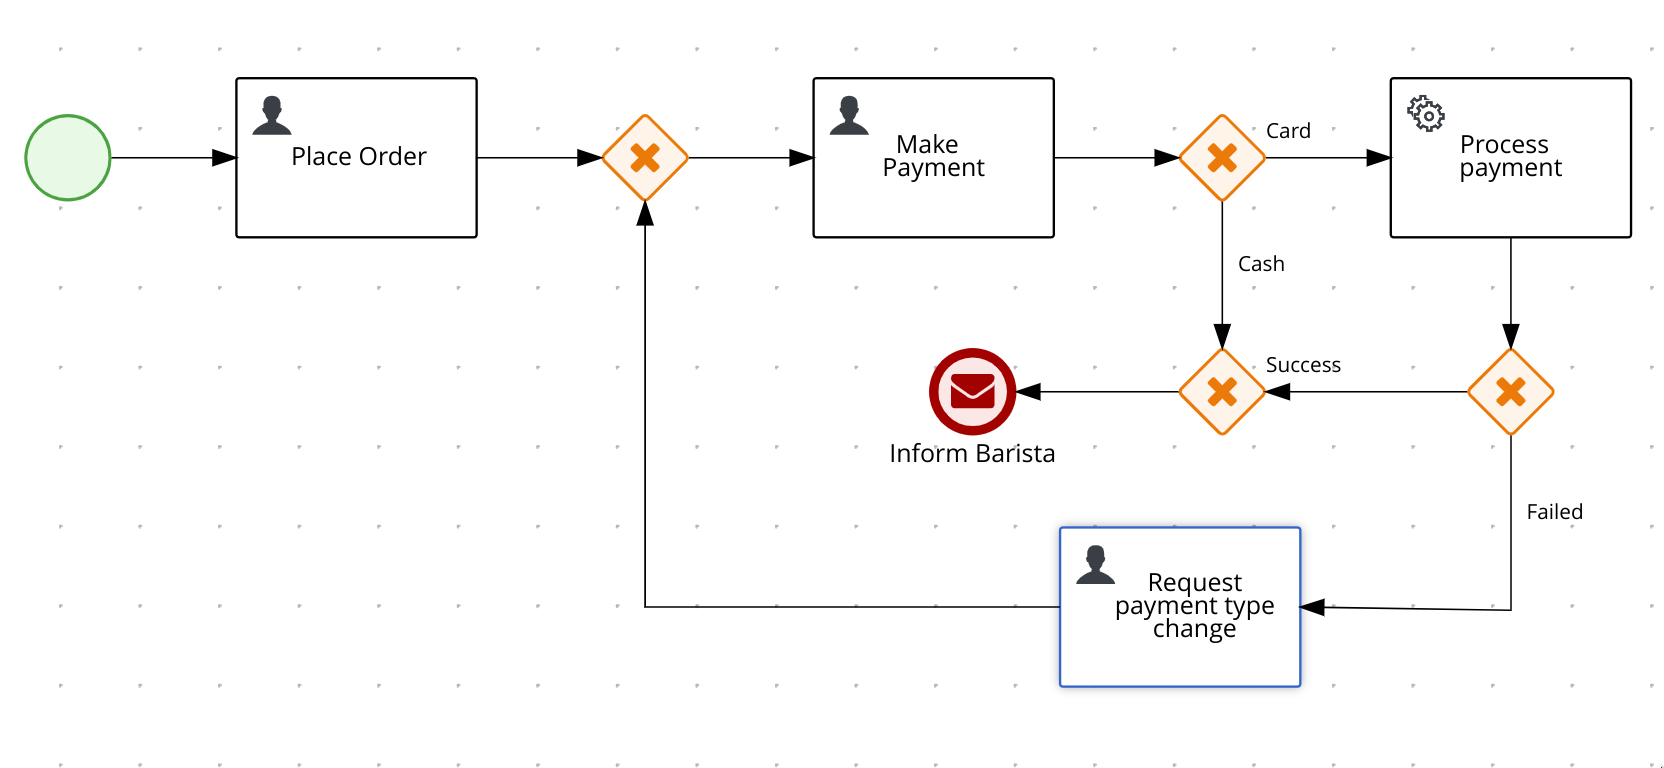
The set up has two applications contained in it — a coffee-shop application and a barista application. The coffee-shop application has a very simple process called drink-order-process in it, and this process depicts the typical drink ordering steps at a coffee shop where a customer would walk in, places an order at the counter desk, and then makes a payment at the payment desk either by cash or by a credit card. If the payment type is a credit card, the payment processing would be handled by an external payment gateway. Once the payment processing goes through successfully, the barista would be notified to get started with the preparation of the required coffee.
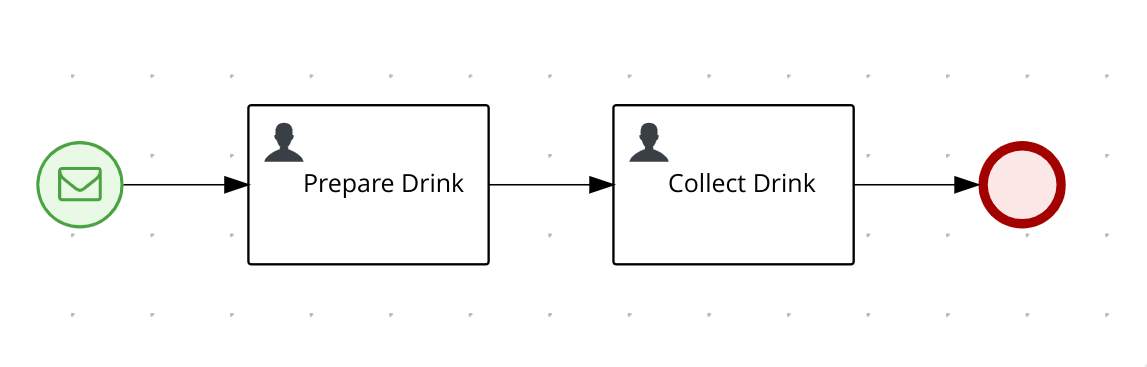
The barista process has been designed to run as a separate Kogito application and would be reacting to the coffee drink order taking process. Again, this is a very simple one that shows that the Barista would prepare the coffee and the customer would collect it once it is ready.
Process Persistence
Kogito provides process persistence through Infinispan, which is an in-memory data grid. Process persistence can be enabled in Kogito by adding the extensions quarkus-infinispan-client and infinispan-persistence-addon to the Kogito project. The dependencies that are required for adding/enabling these extensions are:
xxxxxxxxxx
<!-- Kogito process persistence extensions -->
<dependency>
<groupId>io.quarkus</groupId>
<artifactId>quarkus-infinispan-client</artifactId>
</dependency>
<dependency>
<groupId>org.kie.kogito</groupId>
<artifactId>infinispan-persistence-addon</artifactId>
</dependency>
The connection configurations using which the Kogito application needs to connect to an Infinispan data-grid needs to be specified in the application.properties file.
xxxxxxxxxx
# Connection config for the Infinispan server
quarkus.infinispan-client.server-list=localhost:11222
quarkus.infinispan-client.auth-server-name=infinispan
quarkus.infinispan-client.auth-username=infinispan
quarkus.infinispan-client.auth-password=infinispan
quarkus.infinispan-client.auth-realm=default
quarkus.infinispan-client.client-intelligence=BASIC
Data Containers for Processes
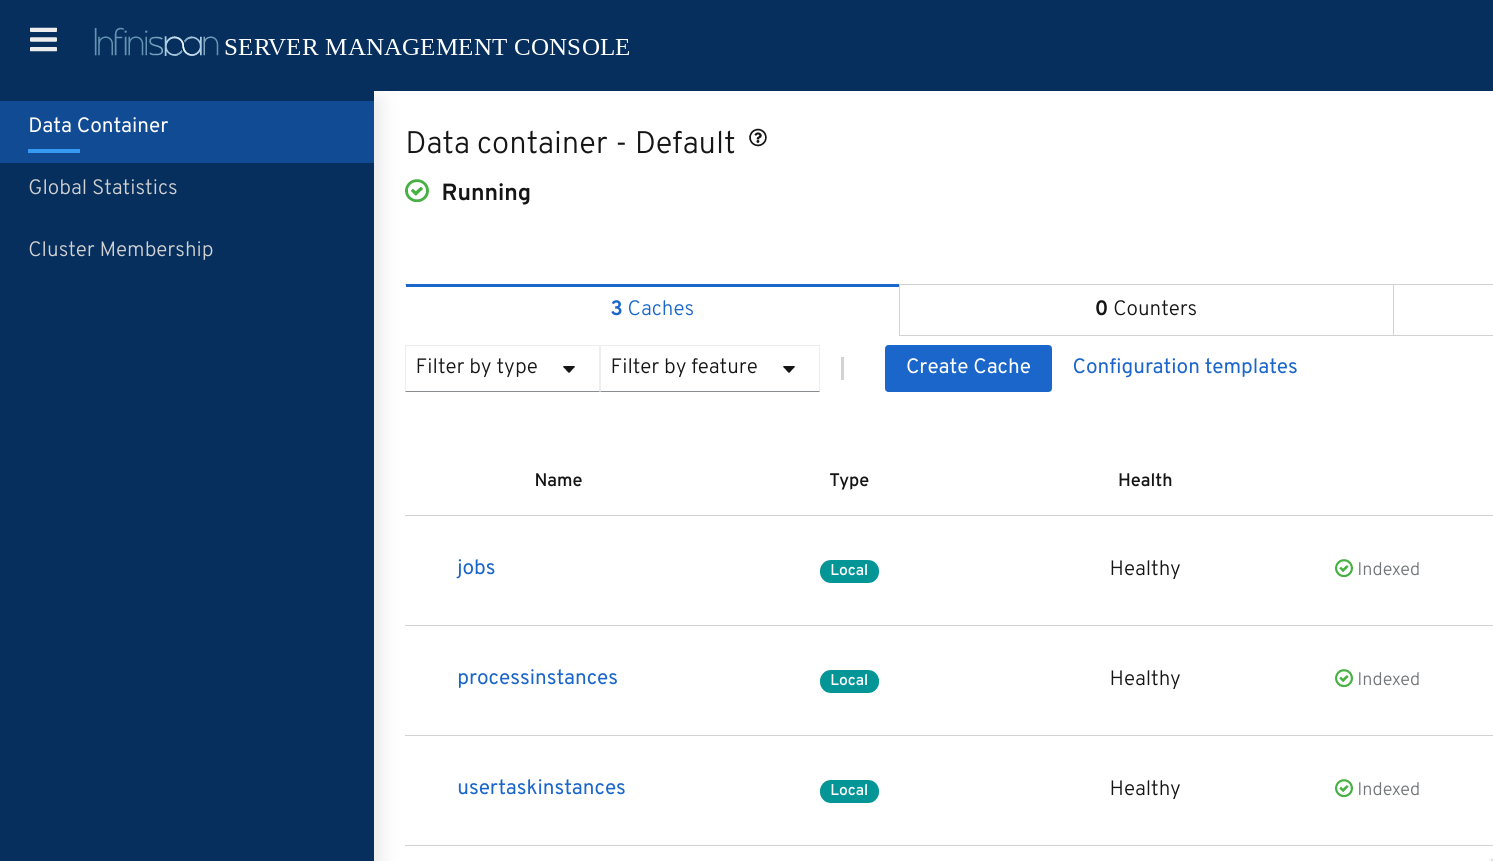
In this setup, the Infinispan management console can be accessed at https://localhost:11222 with the credentials infinispan\infinispan
The infinispan console would display the list of all available data stores. Only three data containers will be listed in the console — jobs, processinstances, and usertaskinstances that were created by kogito data index service and jobs service. There will not be any other process-specific persistent stores available in the data grid at this moment.
Running the Applications
In order to see process persistence in action, execute the commands listed below in two different terminals to start the applications coffee-shop and barista.
Terminal 1:
xxxxxxxxxx
# Start the coffee-shop application in dev mode (hot reload enabled)
$cd apps/coffee-shop && mvn clean compile quarkus:dev
Terminal 2:
xxxxxxxxxx
# Start the barista application in dev mode (hot reload enabled)
$cd apps/barista && mvn clean compile quarkus:dev
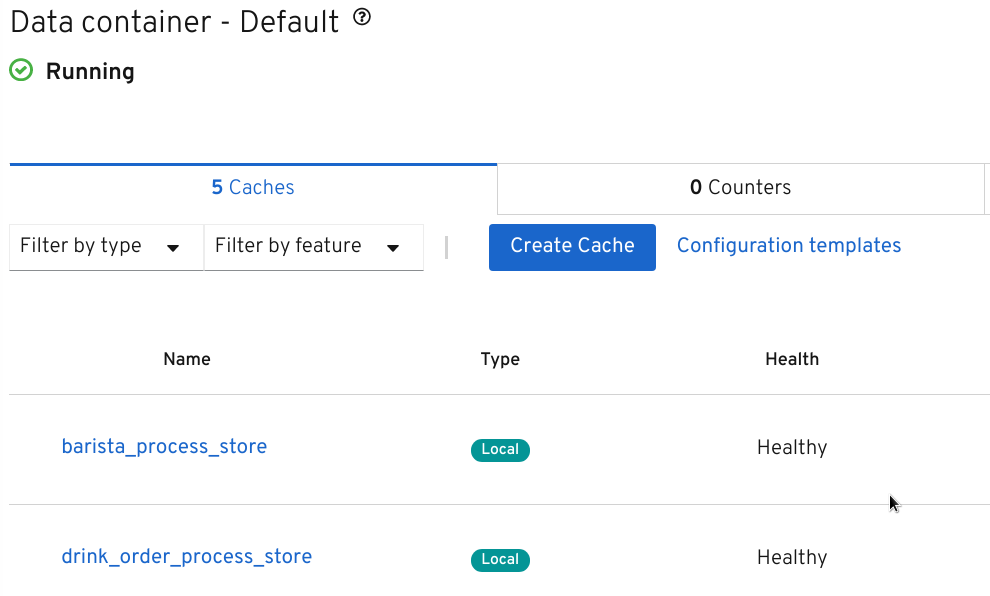
Now, go back to the Infinispan management console in the browser, and you'll see that the application-specific backing stores (drink_order_process_store and barista_process_store) would have got created on the fly in the data-grid.
Process Instance Execution
Once the applications have been started, the process-specific REST APIs would get generated automatically and Swagger UI could be used to invoke these APIs and interact with the applications. In order to add the open API and Swagger capabilities to a Kogito application, the following dependency have to be added to the pom.xml of the application.
x
<dependency>
<groupId>io.quarkus</groupId>
<artifactId>quarkus-smallrye-openapi</artifactId>
</dependency>
In this setup, the Swagger UI for the coffee-shop application can be accessed at http:localhost:8080/swagger-ui.
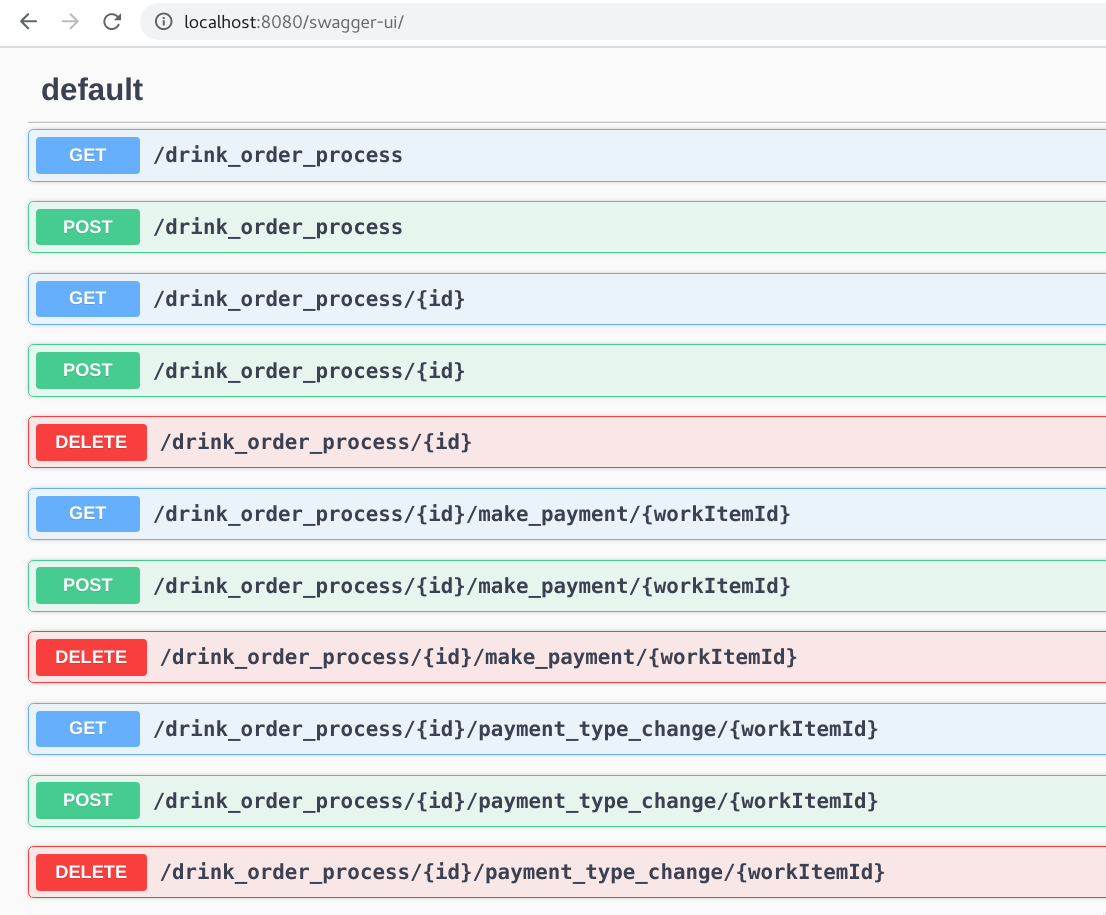
From the Swagger UI, the drink order process can be started by invoking the endpoint, POST /drink_order_process. Alternatively, the process instance could be started from the terminal using the command:
xxxxxxxxxx
# Start the drink_order_process
curl -i -X POST "http://localhost:8080/drink_order_process" -H "accept: application/json" -H "Content-Type: application/json" -d "{}"
Note: Keep track of the process instance id that comes back as a part of the response to this API call. The following sections will refer to this id as {puid}.
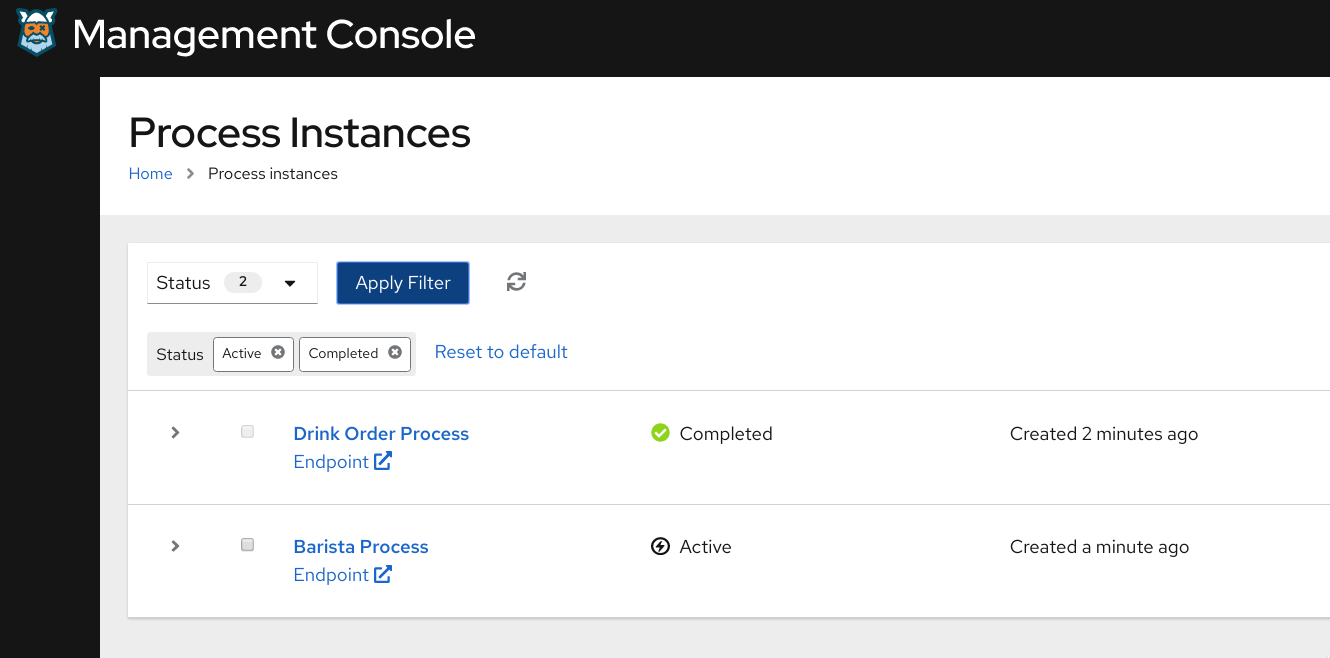
After starting the process instances, the status/progress of the process instance could be tracked from the process management console that is available at http://localhost:8380/.
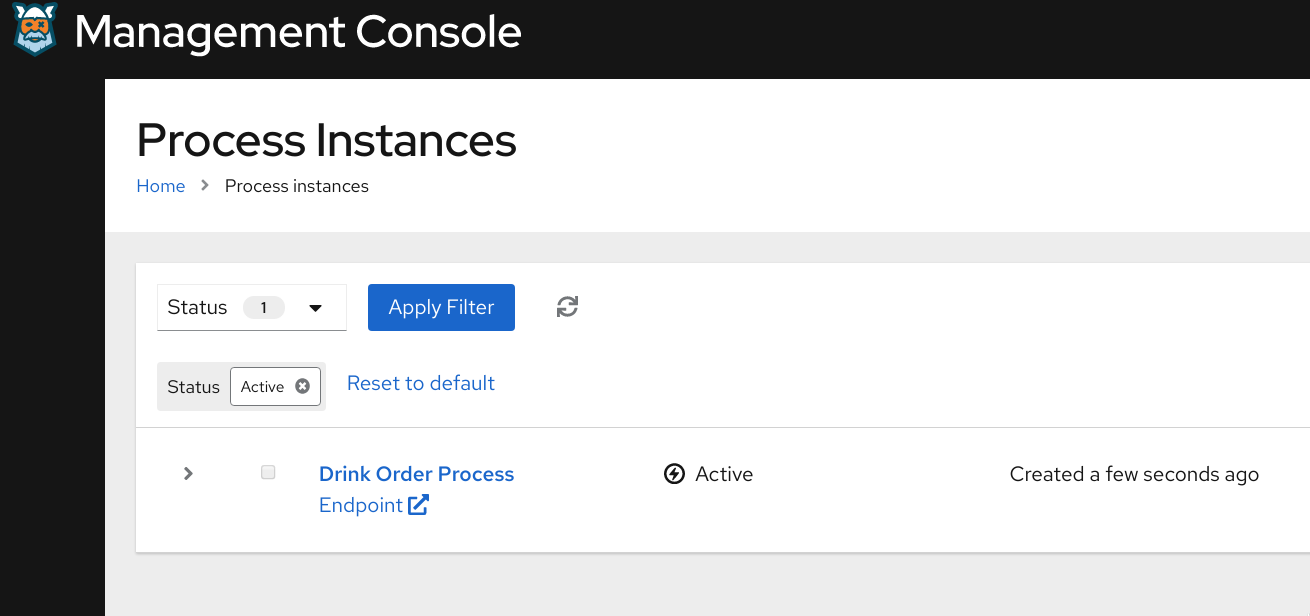
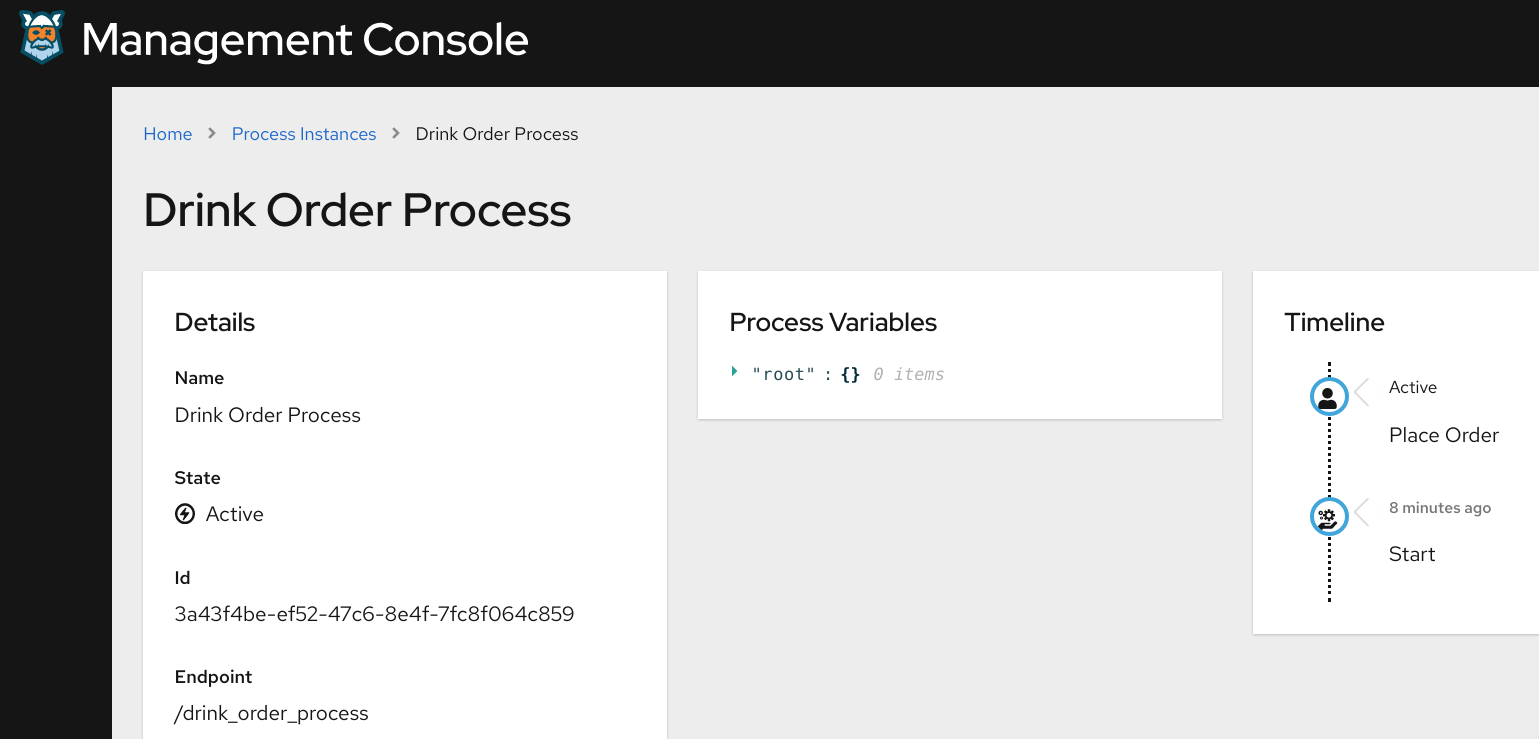
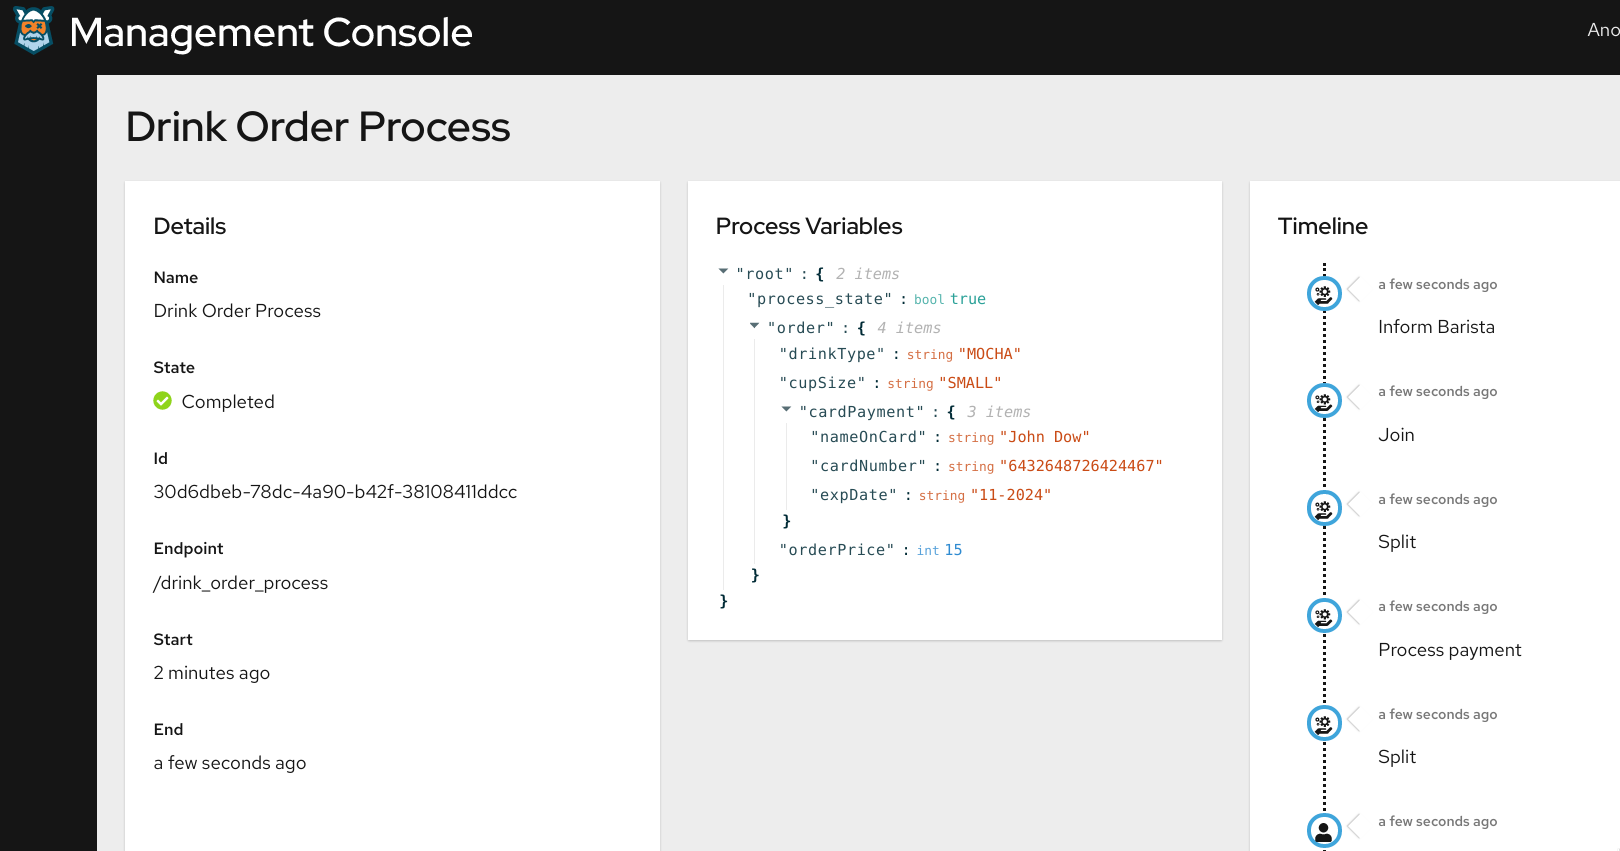
In the process management console, select the Drink Order Process instance, and you can see that the process instance would be waiting at the place-order step. Since the persistence has been enabled, even if the coffee-shop kogito application goes down, the process instance would remain intact in its current state.
You may try to terminate the coffee-shop application (by pressing ctrl+c in the terminal in which it was started), and you would see that process instance would still remaining in its current state in the Kogito management console. (if you terminate the application, remember to start it back with the command cd apps/coffee-shop && mvn compile quarkus:dev).
Complete the place order by using the step specific REST APIs. First, get the task instance id for the process instance {puid} and by invoking the API
x
# Get the next available user task for the given process instance id
curl -i -X GET "http://localhost:8080/drink_order_process/{puid}/tasks" -H "accept: application/json"
Note: Note down the task instance id that comes back as a part of the response to this API call. The following sections will refer to this id as {t1uid}.
Then, complete the place-order task by invoking the step specific API, along with the order details, either using the below command or from swagger-ui.
xxxxxxxxxx
# Complete the place-order step with the order details
curl -X POST "http://localhost:8080/drink_order_process/{puid}/place_order/{t1uid}" -H "accept: application/json" -H "Content-Type: application/json" -d "{\"order_out\":{\"cupSize\":\"SMALL\",\"drinkType\":\"MOCHA\"}}"
Now that the place-order step has been completed, re-invoke the API to get the task id for the task that's next in the line of process execution (which would be make-payment step as per drink-order-process BPMN model).
xxxxxxxxxx
# Get the next available user task for the given process instance id
curl -i -X GET "http://localhost:8080/drink_order_process/{puid}/tasks" -H "accept: application/json"
Note: Note down the task instance id that comes back as a part of the response to this API call. The following sections will refer to this id as {t2uid}.
Now, complete the make-payment by using the {puid} and {t2uid} as shown below.
xxxxxxxxxx
# Complete the make-payment step with the Card payment details included in the order
curl -X POST "http://localhost:8080/drink_order_process/{puid}/make_payment/{t2uid}" -H "accept: application/json" -H "Content-Type: application/json" -d "{\"order_out\":{\"cardPayment\":{\"cardNumber\":\"6432648726424467\",\"expDate\":\"11-2024\",\"nameOnCard\":\"John Dow\"},\"cupSize\":\"SMALL\",\"drinkType\":\"MOCHA\",\"orderPrice\":15}}"
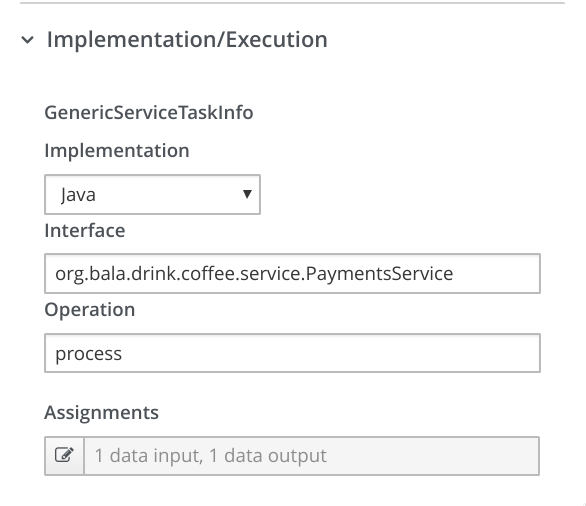
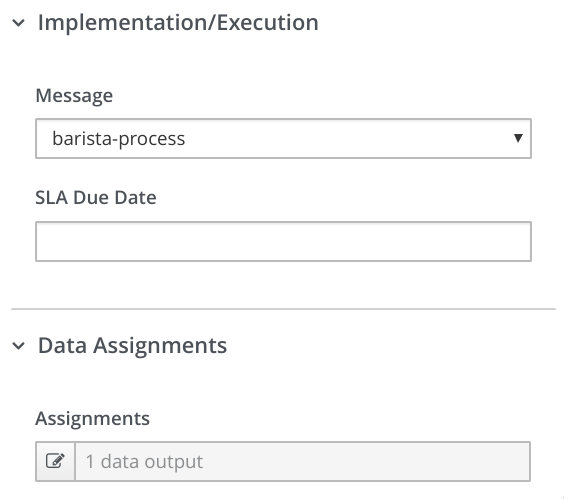
Once the payment details have been specified in the make payment step, and since the payment method has been specified as credit card (by specifying the cardPayment object in the payload above), the payment processing automated step would get triggered, which in turn has been configured to invoke a payment gateway API. Looking at the configuration of the process payment step in VSCode, it can see that the service that's linked to this step is Payments Service (as shown below), and payment processing service operation in that service will be invoked.
In the implementation of the PaymentService.java, there's not much business logic except for the invocation of the external payment gateway API. The external API invocation could be made more simple with the help of a REST client extension quarkus-rest-client (there by eliminating the need for explicit REST API invocation specific coding), and this extension could be added to the pom.xml of the application.
xxxxxxxxxx
public class PaymentsService {
PaymentsGateway paymentsGateway;
public boolean process(DrinkOrder order) {
// invoke an external payments gateway service
Response response = paymentsGateway.makePayment(order.getCardPayment());
System.out.println("****************************************");
System.out.println("Payment processed successfully by the payment gateway");
System.out.println("****************************************");
return response.getStatus() == Response.Status.OK.getStatusCode();
}
}
With that in place, an interface for the REST client PaymentsGateway.java could be registered with the relevant HTTP path and method details as shown below.
xxxxxxxxxx
("/")
(MediaType.APPLICATION_JSON)
public interface PaymentsGateway {
("/post")
Response makePayment(CardPayment payment);
}
The actual endpoint URL of the payment gateway could be externalized and added to the application.properties configuration file.
xxxxxxxxxx
org.bala.drink.coffee.service.PaymentsGateway/mp-rest/url=https://postman-echo.com
org.bala.drink.coffee.service.PaymentsGateway/mp-rest/scope=javax.inject.Singleton
With that, by refreshing the process instances details in the Kogito management console, it can be seen that the payment gateway API would have to be invoked and on successful execution, the Inform barista end message event has been triggered.
Kogito Reactive Messaging
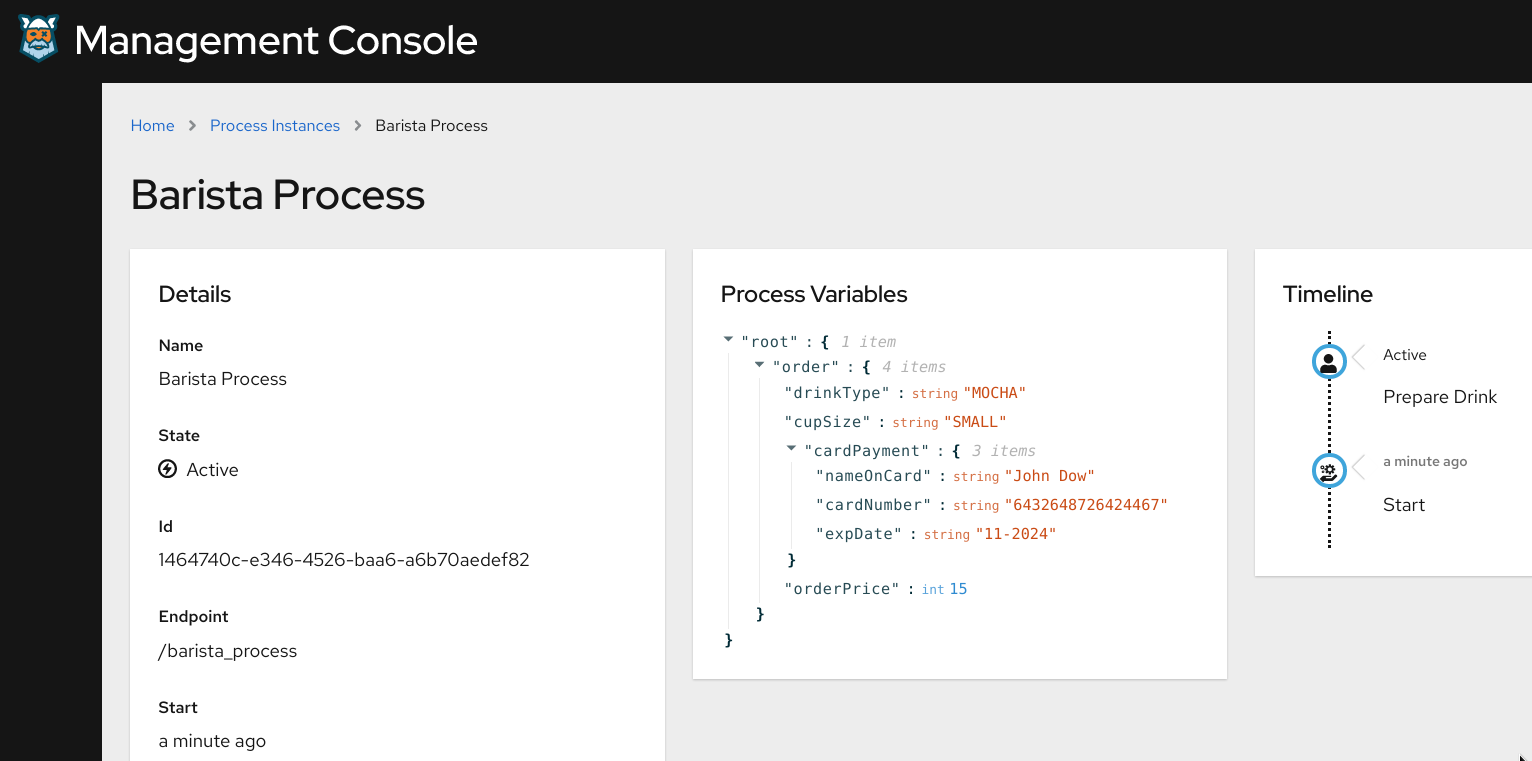
From the Kogito management console, we can see that the barista process will be in active state, and the control will be waiting in the prepare-drink step. This was made possible by the native reactive messaging support provided by Kogito.
In the drink-order-process BPMN model, you can see that the step Inform barista has been modeled as an End Message Event, and it has been configured to send order details in the form of a message (with message name as barista-process).

Then, in the application.properties file, the destination topic to which this message has to be published has been specified, along with the connection details to an event stream processing engine like Kafka, and the Kogito event publisher would take care of publishing the event to the specified destination.
xxxxxxxxxx
## Kakfa topic connection configuration to which the message published in the Inform Barista step has to be published
mp.messaging.outgoing.barista-process.bootstrap.servers=localhost:9092
mp.messaging.outgoing.barista-process.connector=smallrye-kafka
mp.messaging.outgoing.barista-process.topic=barista-process
mp.messaging.outgoing.barista-process.value.serializer=org.apache.kafka.common.serialization.StringSerializer
All of this has been done without any coding but just with few configurations and by enabling the Kogito reactive messaging extensions in the pom.xml.
xxxxxxxxxx
<!-- Kogito reactive messaging extensions -->
<dependency>
<groupId>io.quarkus</groupId>
<artifactId>quarkus-smallrye-reactive-messaging</artifactId>
</dependency>
<dependency>
<groupId>io.quarkus</groupId>
<artifactId>quarkus-smallrye-reactive-messaging-kafka</artifactId>
</dependency>
<dependency>
<groupId>org.kie.kogito</groupId>
<artifactId>kogito-events-reactive-messaging-addon</artifactId>
</dependency>
On the receiving side, the barista process has been configured to listen to the same topic (Start Message Event with the message name as barista-process) in Kafka, and the Kogito event receiver would then receive the event and start the barista process. And this is how we have got the new instance of the barista process created automatically when the drink order process published an event.
Besides this, the Kogito applications can be configured to publish process and user task events at various stages of the process execution, so that any other external systems that need to react to the process instance execution can do so by listening to those events that are emitted at various stages of process execution. For instance, the inbuilt kogito-processinstances-events and kogito-usertaskinstances-events publishing could be enabled in this application using these configurations.
xxxxxxxxxx
# Kakfa topic configuration for publishing kogito-usertaskinstances-events
mp.messaging.outgoing.kogito-usertaskinstances-events.bootstrap.servers=localhost:9092
mp.messaging.outgoing.kogito-usertaskinstances-events.connector=smallrye-kafka
mp.messaging.outgoing.kogito-usertaskinstances-events.topic=kogito-usertaskinstances-events
mp.messaging.outgoing.kogito-usertaskinstances-events.value.serializer=org.apache.kafka.common.serialization.StringSerializer
# Kakfa topic configuration for publishing kogito-processinstances-events
mp.messaging.outgoing.kogito-processinstances-events.bootstrap.servers=localhost:9092
mp.messaging.outgoing.kogito-processinstances-events.connector=smallrye-kafka
mp.messaging.outgoing.kogito-processinstances-events.topic=kogito-processinstances-events
mp.messaging.outgoing.kogito-processinstances-events.value.serializer=org.apache.kafka.common.serialization.StringSerializer
The set of events that have been published to these topics (kogito-processinstances-events and kogito-usertaskinstances-events) could be viewed with the help of any Kafka client it would have the event details published, as per the cloud events specification. A sample message that's been published to the topic kogito-processinstances-events has been shown below, and it contains the audit details for the completed process instance right from the make-payment step and all the way up to the completion of it.
xxxxxxxxxx
{
"specversion": "0.3",
"id": "e7a9669b-5b31-428a-81a2-1055ff07312d",
"source": "/drink_order_process",
"type": "ProcessInstanceEvent",
"time": "2020-03-30T14:20:53.624+08:00",
"data": {
"id": "1a9022dd-06a3-4263-b360-d0671b44a82e",
"parentInstanceId": "",
"rootInstanceId": "",
"processId": "drink_order_process",
"rootProcessId": "",
"processName": "Drink Order Process",
"startDate": "2020-03-30T14:11:41.519+08:00",
"endDate": "2020-03-30T14:20:53.615+08:00",
"state": 2,
"nodeInstances": [
{
"id": "c56e9d2c-a4be-48d9-afd0-b74d2330014c",
"nodeId": "2",
"nodeDefinitionId": "_F5372E8C-7723-493E-A523-B4B9FB4AA2AF",
"nodeName": "Inform Barista",
"nodeType": "EndNode",
"triggerTime": "2020-03-30T14:20:53.605+08:00",
"leaveTime": "2020-03-30T14:20:53.613+08:00"
},
{
"id": "6506fd23-fb45-4e03-bd4b-f4b503f10d33",
"nodeId": "1",
"nodeDefinitionId": "_B9944B1B-FB77-4D0D-8EBF-97DE201FC267",
"nodeName": "Join",
"nodeType": "Join",
"triggerTime": "2020-03-30T14:20:53.604+08:00",
"leaveTime": "2020-03-30T14:20:53.605+08:00"
},
{
"id": "a0dd09e0-fb64-4be7-9c57-82ea4d498349",
"nodeId": "4",
"nodeDefinitionId": "_8644C4EC-BCCA-4718-B8A1-6D6C66413074",
"nodeName": "Split",
"nodeType": "Split",
"triggerTime": "2020-03-30T14:20:53.604+08:00",
"leaveTime": "2020-03-30T14:20:53.604+08:00"
},
{
"id": "5a325f87-bc85-423f-8b18-ed0d600fc4c8",
"nodeId": "5",
"nodeDefinitionId": "_A710B96A-6EE1-43BB-A2EE-ACEE59F7479E",
"nodeName": "Process payment",
"nodeType": "WorkItemNode",
"triggerTime": "2020-03-30T14:20:51.402+08:00",
"leaveTime": "2020-03-30T14:20:53.604+08:00"
},
{
"id": "b1edd96d-ca01-4f13-9aa1-96cfc2cc1780",
"nodeId": "6",
"nodeDefinitionId": "_DE7D069C-0E57-4CDF-872A-4D1266D7A6C9",
"nodeName": "Split",
"nodeType": "Split",
"triggerTime": "2020-03-30T14:20:51.401+08:00",
"leaveTime": "2020-03-30T14:20:51.402+08:00"
},
{
"id": "169f848c-7960-4c64-abfd-d926aa300b0a",
"nodeId": "7",
"nodeDefinitionId": "_EF90EB52-7E8D-434C-BA36-AE5A80668DC1",
"nodeName": "Make Payment",
"nodeType": "HumanTaskNode",
"triggerTime": "2020-03-30T14:14:20.785+08:00",
"leaveTime": "2020-03-30T14:20:51.401+08:00"
}
],
"variables": {
"process_state": true,
"order": {
"drinkType": "MOCHA",
"cupSize": "SMALL",
"cardPayment": {
"nameOnCard": "John Doe",
"cardNumber": "6432648726424467",
"expDate": "11-2024"
},
"orderPrice": 15
}
},
"error": null,
"roles": null
},
"kogitoProcessinstanceId": "1a9022dd-06a3-4263-b360-d0671b44a82e",
"kogitoParentProcessinstanceId": "",
"kogitoRootProcessinstanceId": "",
"kogitoProcessId": "drink_order_process",
"kogitoRootProcessId": "",
"kogitoProcessinstanceState": "2",
"kogitoReferenceId": null,
"kogitoAddons": "infinispan-persistence"
}
Securing the Kogito REST API Endpoints
The interactions with the REST APIs of the Kogito application and the process instances have been done in an unsecured fashion so far. These APIs could be quickly secured with the help of an Open ID Connect (OIDC) server, for instance using Keycloak. Shown below are the OIDC server connection details that could be added to the application.properties to secure the root context path of the Kogito application.
xxxxxxxxxx
# OIDC server (keycloak) connection config
quarkus.oidc.auth-server-url=http://localhost:8280/auth/realms/kogito
quarkus.oidc.client-id=kogito-app
quarkus.oidc.credentials.secret=secret
# Endpoint security configuration
quarkus.http.auth.permission.authenticated.paths=/*
quarkus.http.auth.permission.authenticated.policy=authenticated
Once these configurations are added to the configuration file, a hot reload of the Kogito application could be triggered by accessing http://localhost:8080/swagger-ui in the browser, and you'll find that the swagger-ui would be inaccessible. The client in the OIDC server has been configured with the client credentials grant, and so the bearer token needs to be first obtained and then the APIs could be invoked.
The access token could be obtained by using the client credentials and stored it in an env variable using the following command.
xxxxxxxxxx
# Obtain the access token from KeyCloak and store it an environment variable
export access_token=$(\
curl -X POST http://localhost:8280/auth/realms/kogito/protocol/openid-connect/token \
--user kogito-app:secret \
-H 'content-type: application/x-www-form-urlencoded' \
-d 'username=john&password=john&grant_type=password' | jq --raw-output '.access_token' \
)
With that, the drink-order-process could be started from a terminal using the command:
xxxxxxxxxx
# Start the drink-order-process with access token obtained from KeyCloak
curl -i -H "Authorization: Bearer "$access_token -X POST "http://localhost:8080/drink_order_process" -H "accept: application/json" -H "Content-Type: application/json" -d "{}"
HTTP/1.1 200 OK
Content-Length: 45
Content-Type: application/json
{"id":"22f4c873-b38e-44f3-b0d9-69ab92121a81"}
You'll notice that a process instance will get created. Trying to invoke the API without an access token will result in an 401 Unauthorized error.
xxxxxxxxxx
# Start the drink-order-process without access token
curl -i -H "Authorization: Bearer "$access_token -X POST "http://localhost:8080/drink_order_process" -H "accept: application/json" -H "Content-Type: application/json" -d "{}"
HTTP/1.1 401 Unauthorized
content-length: 0
That's it. With that, you are well equipped to take forward your basic understanding of Kogito to the next level.
Published at DZone with permission of Bala Krishnan. See the original article here.
Opinions expressed by DZone contributors are their own.
Comments