Build Your Own Digital Piano
If you want to jam on a piano but don't have a keyboard, don't worry, you can make one yourself. This guide uses a NodeMcu and Ubidots to bring a piano to life.
Join the DZone community and get the full member experience.
Join For FreeWhat if you could make your very own digital, Internet-connected piano? It can be a bit complicated, but it's your lucky day! We'll teach you how to make one in just a few steps.
It's actually very simple. We will use a NodeMcu connected to the cloud (Ubidots) and we'll establish the musical notes. We'll also create buttons in Ubidots replacing the standard piano keys. So, let's make the music sound!
Overview
In this post, you will learn how to use the NodeMcu with a Buzzer + Ubidots. NodeMcu is an IoT device with GPIO, PWM, IIC, 1-Wire, and an ADC all-in-one board, and it has a connection via Wi-Fi. It's easy to use and you just need the Arduino IDE to program it.
Requirements
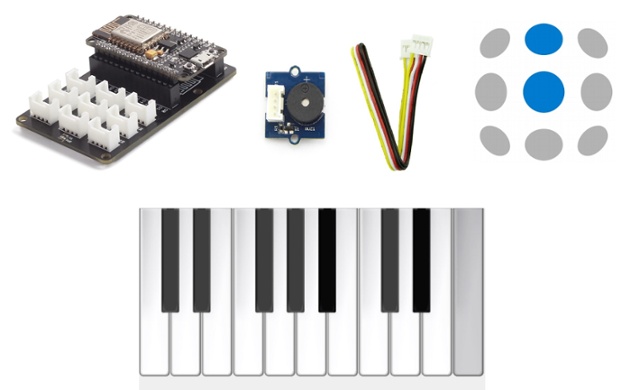
First, you need the following:
- NodeMcu version 1.0
- Grove Base Shield for NodeMcu
- Grove Buzzer
- UbidotsESPMQTT library
- Ubidots account
Setup
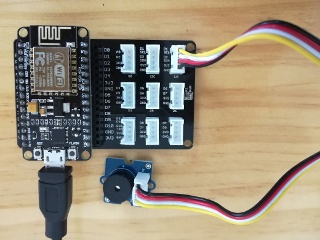
1. First, couple the NodeMcu to its base shield and then make the connection of the buzzer to pin D1. It should look like this:
2. Go to the Arduino IDE, click on Files -> Preferences and enter http://arduino.esp8266.com/stable/package_esp8266com_index.json into the "Additional Board Manager URLs" field. You can add multiple URLs, separating them with commas.
3. Open "Boards Manager" from Tools -> Board menu and install the ESP8266 platform. Don’t forget to select your NodeMCU 1.0 board from the Tools > Board menu after installation.
4. Download the UbidotsESPMQTT library if you haven't already. Now, click on Sketch -> Include Library -> Add .ZIP Library.
6. Select the Ubidots ESPMQTT ZIP file and then “Accept” or “Choose” for all the libraries. If you can't add the library, try it manually; unzip the downloaded RAR/ZIP and copy the folder from the library to the path C:\Users\ubidots\Documents\Arduino\libraries.
7. Close the Arduino IDE and open it again.
Setting up Ubidots
1. Add a new Data Source called "piano."
2. Add a new Variable for each musical note. Start with a variable called "do", and then "re", "mi", "fa", "sol", "la", "ti".
3. Verify that the label of the Data Source and the Variables are the same as the name. This allows communication between Ubidots and the NodeMcu.
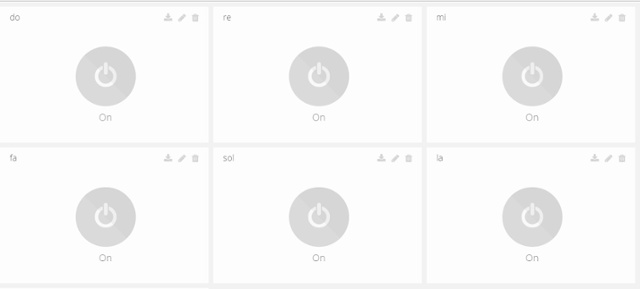
4. Create the buttons/switches that allow you to play each musical note. To do this, go to Dashboard and in the upper right of the page click Add widget. Select Control > Switch > piano (data source) > do (variable) > finish. Don't forget to do the same for each musical note. Finally, its should look like this:
Program the ESP NodeMcu
Once everything is connected correctly, we will go to the IDE and write the following code.
/****************************************
 * Include Libraries
 ****************************************/
#include "UbidotsESPMQTT.h"
#include <map>

/****************************************
 * Define Constants
 ****************************************/
#define TOKEN "..." // Your Ubidots TOKEN
#define WIFINAME "..." //Your SSID
#define WIFIPASS "..." // Your Wifi Pass
#define MQTTCLIENTNAME "sdfcvdhjnbvxw" // Your MQTT Client Name, it must be unique so we recommend to choose a random ASCCI name
#define MQTTCLIENTNAME2 "sdfcvdhjnbvxw2"
#define MQTTCLIENTNAME3 "sdfcvdhjnbvxw3"
#define MQTTCLIENTNAME4 "sdfcvdhjnbvxw4"
#define MQTTCLIENTNAME5 "sdfcvdhjnbvxw5"
#define MQTTCLIENTNAME6 "sdfcvdhjnbvxw6"
#define MQTTCLIENTNAME7 "sdfcvdhjnbvxw7"

//Piano constants
#define BUZZER D1 //Buzzer pin
const int DO  = 262;
const int RE  = 294;
const int MI  = 330;
const int FA  = 349;
const int SOL = 392;
const int LA  = 440;
const int SI  = 494;

int basic_notes[ ] = {DO, RE, MI, FA, SOL, LA, SI};
String ubi_switch[ ] = {"do", "re", "mi", "fa", "sol", "la", "si"};

Ubidots client(TOKEN, MQTTCLIENTNAME);
Ubidots client2(TOKEN, MQTTCLIENTNAME2);
Ubidots client3(TOKEN, MQTTCLIENTNAME3);
Ubidots client4(TOKEN, MQTTCLIENTNAME4);
Ubidots client5(TOKEN, MQTTCLIENTNAME5);
Ubidots client6(TOKEN, MQTTCLIENTNAME6);
Ubidots client7(TOKEN, MQTTCLIENTNAME7);

/****************************************
 * Define Initial Values
 ****************************************/

/****************************************
 * Auxiliar Functions
 ****************************************/

void callback(char* topic, byte* payload, unsigned int length) {
  Serial.print("Message arrived [");
  Serial.print(topic);
  Serial.print("] ");
  int flag = 0;

  for (int i=0;i<length;i++) {
    Serial.print((char)payload[i]);
  }
  if ((char)payload[0]=='1'){
    digitalWrite(16, HIGH);
    tone(BUZZER, basic_notes[note(topic)]);
    delay((1000/4)*1.30);
    noTone(BUZZER);
  }
  else{
    digitalWrite(16, LOW);
    noTone(BUZZER);
  }
  Serial.println();

}

int note(char* topic){
  char * pch;
  char * token = strtok(topic, "/");

  while (token != NULL){
      for (int i=0; i<8; i++){
        if(String(token)==ubi_switch[i]){
          Serial.println("");
          Serial.println(ubi_switch[i]);
          Serial.println(basic_notes[i]);
          return i;
          //tone(BUZZER, basic_notes[i]);
          break;
        }
      }
  token = strtok(NULL, "/");
  }

}

/****************************************
 * Main Functions
 ****************************************/

void setup() {
  // put your setup code here, to run once:
  Serial.begin(115200);
  client.wifiConnection(WIFINAME, WIFIPASS);
  client.begin(callback);
  client2.begin(callback);
  client3.begin(callback);
  client4.begin(callback);
  client5.begin(callback);
  client6.begin(callback);
  client7.begin(callback);
  client.ubidotsSubscribe("piano", "do");
  client2.ubidotsSubscribe("piano", "re");
  client3.ubidotsSubscribe("piano", "mi");
  client4.ubidotsSubscribe("piano", "fa");
  client5.ubidotsSubscribe("piano", "sol");
  //client6.ubidotsSubscribe("piano", "la");
  //client7.ubidotsSubscribe("piano", "si");
  pinMode(16, OUTPUT);
  }

void loop() {
  //Send to Ubidots Routine
  if(!client.connected()){
      client.reconnect();
      client.ubidotsSubscribe("piano", "do");
      client2.ubidotsSubscribe("piano", "re");
      client3.ubidotsSubscribe("piano", "mi");
      client4.ubidotsSubscribe("piano", "fa");
      client5.ubidotsSubscribe("piano", "sol");
      //client6.ubidotsSubscribe("piano", "la");
      //client7.ubidotsSubscribe("piano", "si");
     }
  client.loop();
  client2.loop();
  client3.loop();
  client4.loop();
  client5.loop();
  client6.loop();
  client7.loop();
  }
Results
And that's it! It's time to play de piano.
We've just shown you how to create a low-cost digital piano based on the Internet of Things (IoT), which, by the way, proves how seemingly complex things can be done with the right tools and time.
Published at DZone with permission of Maria Hernandez. See the original article here.
Opinions expressed by DZone contributors are their own.
Comments