Build Your Private Cloud at Home
OpenStack is a popular open-source cloud platform. Through this article, I plan to provide a guide for creating a basic OpenStack cloud at home.
Join the DZone community and get the full member experience.
Join For FreeOpenStack is a popular open-source cloud platform. Through this article, I plan to provide a guide for creating a basic OpenStack cloud at home!
The OpenStack cloud nodes can be generally divided into two categories:
- The control plane nodes can be considered the brain of the cloud. This is where operations such as virtual machine (VM) host allocation will be performed.
- The compute nodes are the hosts for the VM workloads to run. Each of these compute nodes is responsible for running the VMs allocated to it by the control plane.
We will be using a two-node deployment with one server for the control plane node and the other server to be used as a compute node. This will allow us to start on a small-scale setup, but at the same time provide the flexibility to add more compute nodes (i.e., to increase the compute pool of resources) to the cloud as and when required.
There are various methods for deploying and running an OpenStack cloud. We will be using a modified and simplified version of the Kolla OpenStack deployment. In a Kolla-based OpenStack deployment, we will run the OpenStack services in Docker containers. We have modified the deployment procedure to build and use a Docker image for various deployment operations.
Requirements
| Quantity | item | used in my setup |
|---|---|---|
|
2 |
Servers with a minimum: 16 GB RAM 8 CPUS 250 GB hard Disk 1 physical network interface 1 wireless/physical network interface |
Intel NUC |
|
1 |
Deployment host |
Dell laptop |
|
1 |
Router (other than your home internet router/modem) with at least 2 LAN ports |
TP-Link Archer C54 |
|
3 |
Ethernet cables |
|
|
1 |
USB stick with a minimum of 4 GB of free space |
|
|
1 |
External Ethernet adapter for the deployment host if it is not present on it |
|
Set up the Router and Deployment Host
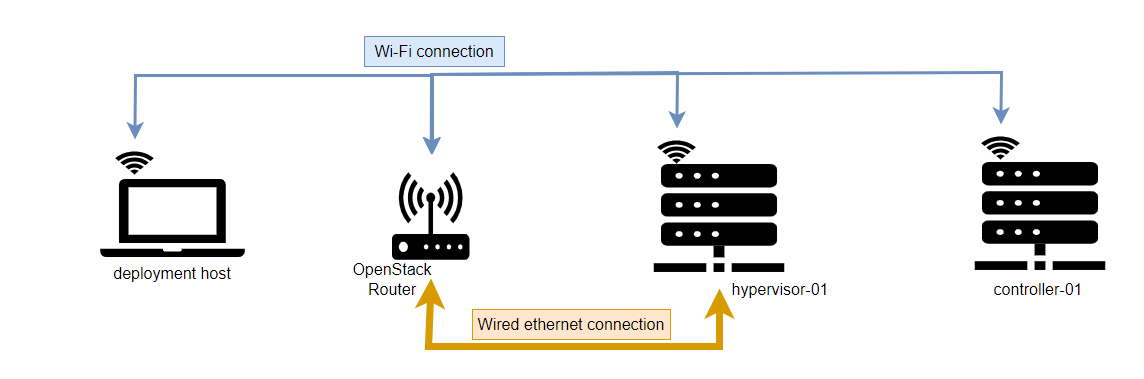
- Connect the OpenStack network router WAN port to your home internet router/modem using an Ethernet cable.
- Make sure Ethernet is set to DHCP on the deployment host.
- Connect one of the LAN ports on the router to your deployment host.
- Access the router through the browser and perform the following steps:
- Get information about the LAN subnet.
- Set 50 IP addresses for the DHCP range.
- Note the wireless network name and password. This is important as we must connect both servers to this network.
- Disconnect the deployment host's Ethernet connection from the router, and then try to connect to the router's wireless network if your deployment host has a wireless NIC.
- Ensure your deployment host has Docker and Git installed. We will need this software to download the repo, build the Docker image, and use the Docker image for deployment.
Operating System Installation
- Create a bootable USB stick on your deployment host with Ubuntu 22.04 server image: https://mirror.pilotfiber.com/ubuntu-iso/22.04.5/ubuntu-22.04.5-live-server-amd64.iso
- Attach the USB stick and boot from the USB stick.
- From the GRUB menu, select the option "Try or install ubuntu server".
- For OS installation, select the options you prefer if nothing is specified here.
- Update to a new installer if available. At the time of making this document, I am using version 24.10.1.
- Use the "Ubuntu Server" option as the base for installation.
- Network configuration
- Disable the Ethernet interface that is connected to the router.
- Make sure your wireless LAN interface is enabled and set to DHCP.
- Next, you have to go under the section "Edit Wifi" under the wlan interface config and connect to your OpenStack router network. If done correctly, this should give you a DHCP IP that is in the DHCP range you specified while configuring the router.
- Storage configuration
- Select “Custom storage layout”.
- Reformat/Format the entire disk we will be using.
- Now you should be able to see all the space on the disk freed up. In this free space, create a root ( / ) partition of at least 250 GB. Also, leave around 2 GB of free space for creation /boot/efi.
- In the Profile configuration, give the appropriate server name.
- For the controller server, give the name as controller-01.
- For the hypervisor server, give the name as hypervisor-01.
- Do not upgrade to Ubuntu Pro.
- SSH Configuration.
- Install OpenSSH server.
- Featured Server snaps.
- Do not install any server snaps.
After the OS installation, the server will reboot.
Now, you should be able to log in to the server with the credentials previously set in step 8. Use the command /etc/os-release to check the installed os version.
Server Configuration
Perform these steps on both the server controller-01 and hypervisor-01.
- Set a password for the root user.
- SSH to the servers using the osadmin username and the password you set.
- Run the command
sudo passwd rootto set a password for the root user. - Check that you can log in as root using the command
suand then enter the password you set.
- Enable SSH root login on the servers.
- SSH to the servers using the osadmin username and the password you set.
- Log in as the root user.
- In /etc/ssh/sshd_config, set “permit root login” to “yes”.
- Run the command
/etc/init.d/ssh restartto restart the SSH service. - Check that you can now SSH as the root user.
Deployment
- Clone the openstack-docker-deployer for deployment.
- Move to the folder where you want to clone the openstack-docker-deployer project.
- Run command
git clone https://github.com/amithkotu/openstack-docker-deployer.gitto clone the openstack-docker-deployer project.
- Make changes to the “hosts” file located under etc/kolla/inventory folder of the project.
- Set “ansible_ssh_pass” value under “[all:vars]” to your server root user password.
- Set “ansible_host” value beside “controller-01” under “[control]” section to the controller ip address.
- Set “ansible_host” value beside “hypervisor-01” under “[compute]” section to the hypervisor ip address.
- Make changes to the “globals.yml” file located under the etc./kolla folder of the project.
- Set “kolla_internal_vip_address” to the IP address of the controller-01 node.
- Set “network_interface” value to the name of the wireless interface that you see on the controller-01 node.
- Set “neutron_external_interface” value to the name of the physical network interface on hypervisor-01 that will be used for VMs to communicate (neutron).
- Create a Docker image to be used for deployment
- Make sure you are in the folder with the “Dockerfile” from the project.
- Run command
docker image rm openstack-deployer-image:latestto remove any locally existing deployment image. - Run command
docker build -t openstack-deployer-image .to create a Docker image that can be used for deployment.
- Generate passwords:
- Run command
docker run --rm --entrypoint kolla-genpwd -v $(pwd)/etc/kolla:/etc/kolla openstack-deployer-imageto generate passwords to be used for various OpenStack services.
- Run command
- Run pre-deployment tasks:
- Run command
docker run --rm --entrypoint ansible-playbook openstack-deployer-image /etc/kolla/pre-deployment.yml -i /etc/kolla/inventory -l all:\!localhostto run pre-deployment tasks.
- Run command
- Bootstrap the servers to prepare the servers for deployment.
- Run command
docker run --rm -v /work/projects/openstack-docker-deployer/etc/kolla:/etc/kolla openstack-deployer-image bootstrap-servers.
- Run command
- Run prechecks as final check before deployment to make sure everything is configured as expected.
- Run command
docker run --rm -v /work/projects/openstack-docker-deployer/etc/kolla:/etc/kolla openstack-deployer-image prechecks.
- Run command
- Deploy the cloud
- Run command
docker run --rm -v /work/projects/openstack-docker-deployer/etc/kolla:/etc/kolla openstack-deployer-image deploy.
- Run command
Post-Deployment
- On hypervisor-01, make sure the “neutron_external_interface” is up. If not, bring it up using the command
ip link set <interface_name> up. - Similarly, on hypervisor-01, bring up interfaces br-ex, br-int, and br-tun if they are down.
- Check the containers on both controller-01 and hypervisor-01 by using the command
docker container ls. Make sure none of the containers are in an “unhealthy” state. - Make sure you save the etc/kolla/passwords.yml file (that you generated earlier) locally or encrypt it and save it in a git repo. You will need the passwords in this file to access various services.
- Access the horizon dashboard in the browser on the controller-01 IP address and port 80. You can log in using the following credentials:
- User Name is “admin”
- Password is the value of the “keystone_admin_password” in the file etc/kolla/passwords.yml of the repo.
Conclusion
You have now successfully deployed an OpenStack cloud at home! In the next article, we will be creating our first OpenStack VM. In the meantime, play around with things on the OpenStack dashboard and get yourself familiarized with terms such as images, flavors, and networks. There is also some great documentation on the official OpenStack website.
Opinions expressed by DZone contributors are their own.
Comments