Building a MongoDB-Powered RESTful Application With Quarkus and Eclipse JNoSQL
Build a MongoDB-powered RESTful app with Quarkus and Eclipse JNoSQL: generate, configure, create entities, implement services, and expose API.
Join the DZone community and get the full member experience.
Join For FreeIn the rapidly evolving world of modern application development, the adoption of NoSQL databases has gained significant traction due to their flexible data models and scalability advantages. However, integrating NoSQL databases seamlessly into an application can sometimes be complex, requiring specialized knowledge and intricate configurations. Enter Eclipse JNoSQL and Quarkus, two powerful technologies that, when combined, simplify the integration process and enable developers to leverage the capabilities of NoSQL databases effortlessly.
Eclipse JNoSQL is an open-source framework that provides a standardized API and tools for working with NoSQL databases. It offers a unified programming model that abstracts the complexities of various NoSQL databases, allowing developers to write code agnostic to the underlying database technology. JNoSQL supports a wide range of NoSQL databases, including MongoDB, Cassandra, Couchbase, and more, making it an excellent choice for building flexible and scalable applications.
On the other hand, Quarkus has emerged as a leading framework for developing Java applications with unprecedented speed and low memory consumption. Built with container-first principles, Quarkus optimizes application performance for cloud-native environments and provides a developer-friendly experience through live coding, seamless hot-reloading, and efficient deployment options. With its impressive ecosystem of extensions, Quarkus enables developers to integrate with various technologies and libraries effortlessly.
By combining the power of Eclipse JNoSQL and the agility of Quarkus, developers can unlock a new level of simplicity and productivity in building applications that interact with NoSQL databases. The seamless integration between the two technologies allows developers to focus on their core business logic without being burdened by the intricacies of database interactions.
This article will explore a practical example demonstrating creating a RESTful API application using MongoDB as the underlying NoSQL database. We will dive into live coding and witness firsthand how Eclipse JNoSQL and Quarkus work harmoniously to provide a streamlined development experience. Throughout the example, we'll highlight the ease with which developers can interact with NoSQL databases, thanks to the combined efforts of Eclipse JNoSQL and Quarkus.
This article aims to showcase the seamless collaboration between Eclipse JNoSQL and Quarkus. By the end, readers will understand how these technologies combine to create an environment that enables rapid development and effortless integration with NoSQL databases. So, let's embark on this journey and witness firsthand the power of Eclipse JNoSQL and Quarkus in action.
Quarkus and Eclipse JNoSQL in Action
Let's start our application sample with Quarkus and Eclipse JNoSQL technologies. And the best part? We can kickstart the development process effortlessly using the Quarkus starting code.
Step 1: Generating a Quarkus Application
To simplify and expedite the application setup process, we'll leverage the Quarkus starting code. Follow these steps to generate your Quarkus application with the required dependencies:
- Visit the Quarkus starting code website.
- Choose your preferred build tool, such as Maven or Gradle.
- Select the Quarkus version that suits your needs.
- Click on Add Extension and search for the quarkus-jnosql-document-mongodb and quarkus-resteasy-jsonb extensions. These extensions enable seamless integration with MongoDB and RESTful API development, respectively.
- Once you select the necessary extensions, click Generate your application to obtain a downloadable project.
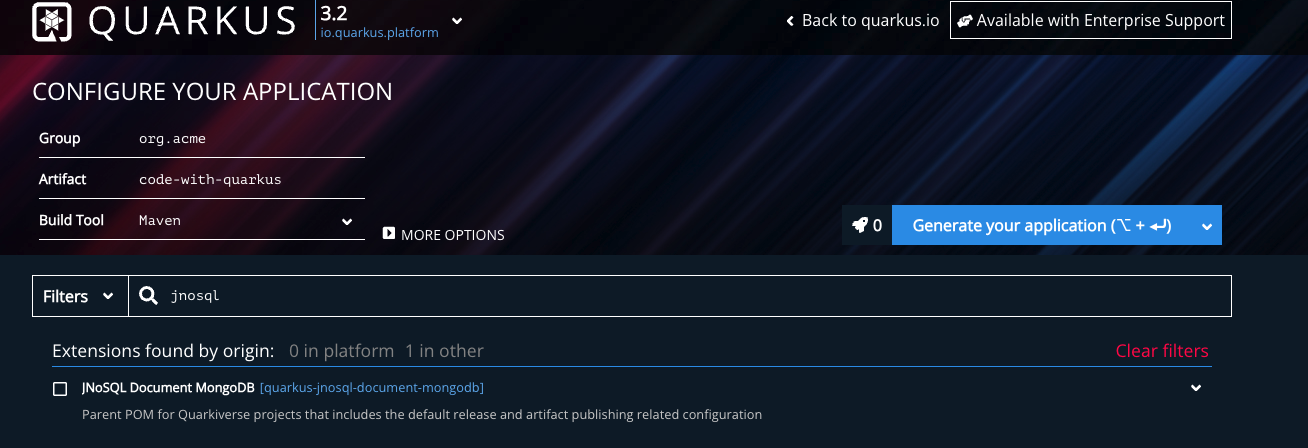
Quarkus code generation
Step 2: Java Faker
To add some randomness and variety to our Fish entities, we can utilize the Java Faker library. This library allows us to generate real and random data, including fish names. Follow the steps below to integrate Java Faker into our project:
Open the pom.xml file located in the root directory of your project.
Add the following dependency within the <dependencies> section:
<dependency>
    <groupId>com.github.javafaker</groupId>
    <artifactId>javafaker</artifactId>
    <version>1.0.2</version>
</dependency>
Save the pom.xml file.
Step 3: Create Fish Entity Class
Now, let's create the Fish entity class with three fields: id, name, and color. We will utilize the Entity, Id, and Column annotations to define this class as an entity, specify the identifier, and mark the persistable fields. Create a new Java class called Fish in the desired package and implement the following code:
@Entity
public class Fish {

    @Id
    public String id;

    @Column
    public String name;

    @Column
    public String color;

 }
The Id annotation marks the id field as the identifier for the Fish entity, while the Column annotation marks the name and color fields as persistable columns.
Step 4: Create FishService Class
We'll create the FishService class to handle the NoSQL database API using Eclipse JNoSQL. The FishService will be responsible for performing CRUD operations on the Fish entities. We'll utilize the Template interface provided by Eclipse JNoSQL. Create a new Java class called FishService in the desired package and implement the following code:
@ApplicationScoped
public class FishService {

    @Inject
    private DocumentTemplate template;

    private final Faker faker = new Faker();


    public List<Fish> findAll() {
        return template.select(Fish.class).result();
    }

    public Fish insert(Fish fish) {
        fish.id = UUID.randomUUID().toString();
        return this.template.insert(fish);
    }

    public void delete(String id) {
        this.template.delete(Fish.class, id);
    }

    public Optional<Fish> findById(String id){
        return this.template.find(Fish.class, id);
    }

    public Fish random() {
        Fish fish = new Fish();
        Animal animal = faker.animal();
        fish.id = UUID.randomUUID().toString();
        fish.name = animal.name();
        fish.color = faker.color().name();
        return this.template.insert(fish);
    }

    public Optional<Fish> update(String id, Fish fish) {
        Optional<Fish> optional = this.template.find(Fish.class, new ObjectId(id));
        return optional.map(f -> {
            f.name = fish.name;
            f.color = fish.color;
            return this.template.update(f);
        });

    }

}
In this example, we've created a FishService class annotated with @ApplicationScoped to indicate that it is a managed bean in the application context. We've injected the DocumentTemplate provided by Eclipse JNoSQL using @Inject annotation.
The FishService class provides various methods to interact with the Fish entities. We have implemented methods for finding all Fish entities, inserting a new Fish entity, deleting a Fish entity by ID, finding a Fish entity by ID, generating a random Fish entity using Java Faker, and updating a Fish entity.
The random() method demonstrates the usage of Java Faker to generate random fish names and colors. We assign a new UUID to the Fish entity's ID and use the DocumentTemplate to insert it into the database.
With the FishService in place, we now have a service layer that encapsulates the database operations for Fish entities. In the next step, we will create FishResource to expose the service methods as RESTful API endpoints.
Step 5: Create FishResource Class
In this step, we'll create the FishResource class representing the integration between our Fish entity and the users needing the information. The FishResource class will expose the service methods as RESTful API endpoints. Create a new Java class called FishResource in the desired package and implement the following code:
@Path("/fishes")
@ApplicationScoped
public class FishResource {

    @Inject
    private FishService service;

    @GET
    @Path("{id}")
    public Fish findId(@PathParam("id") String id) {
        return service.findById(id)
                .orElseThrow(() -> new WebApplicationException(Response.Status.NOT_FOUND));
    }

    @GET
    @Path("random")
    public Fish random(){
       return service.random();

    }

    @GET
    public List<Fish> findAll(){
       return this.service.findAll();
    }

    @POST
    public Fish insert(Fish fish) {
        fish.id = null;
        return this.service.insert(fish);
    }

    @PUT
    @Path("{id}")
    public Fish update(@PathParam("id") String id, Fish fish){
       return this.service.update(id, fish)
               .orElseThrow(() -> new WebApplicationException(Response.Status.NOT_FOUND));
    }

    @DELETE
    @Path("{id}")
    public void delete(@PathParam("id") String id){
        this.service.delete(id);
    }
}
In this example, we've created the FishResource class annotated with @Path("/fishes") to specify the base path for the RESTful API endpoints. We've injected the FishService using @Inject annotation.
The FishResource class provides various methods to handle different HTTP operations on the Fish entities. We have implemented methods for finding a Fish entity by ID, generating a random Fish entity, finding all Fish entities, inserting a new Fish entity, updating a Fish entity by ID, and deleting a Fish entity by ID.
The methods are annotated with appropriate JAX-RS annotations such as @GET, @POST, @PUT, and @DELETE, specifying the respective HTTP methods for each endpoint. We've also specified the media type as MediaType.APPLICATION_JSON to indicate that the API endpoints consume and produce JSON.
With FishResource in place, we now have a fully functional RESTful API interacting with the Fish entities. You can test the endpoints using cURL, Postman, or REST client tools.
Step 6: Testing Functionality
Now that we have implemented FishResource with the RESTful API endpoints, let's test the functionality using cURL commands in the terminal. Follow the steps below:
Make sure your Quarkus application is running. If not, start it using the following command:
./mvnw compile quarkus:devOpen a new terminal window and use the following cURL commands to interact with the API:
Insert a Fish:
curl -X POST -H "Content-Type: application/json" -d '{"name": "Nemo", "color": "Orange"}' http://localhost:8080/fishesRetrieve all Fishes:
curl http://localhost:8080/fishesRetrieve a specific Fish by ID (replace <fish_id> with the actual ID of a Fish):
curl http://localhost:8080/fishes/<fish_id>Update a Fish by ID (replace <fish_id> with the actual ID of a Fish):
curl -X PUT -H "Content-Type: application/json" -d '{"name": "Dory", "color": "Blue"}' http://localhost:8080/fishes/<fish_id>Delete a Fish by ID (replace <fish_id> with the actual ID of a Fish):
curl -X DELETE http://localhost:8080/fishes/<fish_id>Make sure to replace <fish_id> with the actual ID of a Fish you want to retrieve, update, or delete.
By executing these cURL commands, you can interact with the RESTful API and perform operations on the Fish entities in your MongoDB database.
Congratulations! You have successfully tested your application using cURL commands. You can now leverage these endpoints to manage Fish entities in your MongoDB database. Feel free to experiment further with different cURL commands and scenarios to explore the full potential of your application.
Conclusion
This article covers creating a sample application with MongoDB using Quarkus and Eclipse JNoSQL. We started by generating a Quarkus application with the necessary dependencies using the Quarkus starting code. We configured the MongoDB connection and created the Fish entity. We then implemented the FishService to handle the NoSQL database API and the FishResource to expose the functionality as RESTful API endpoints. Finally, we tested the application by interacting with the API using cURL commands.
Following this guide taught you how to build a robust application with MongoDB integration using Quarkus and Eclipse JNoSQL. You can extend and customize this application further to suit your needs and requirements. Happy coding!
Additional Resources
Opinions expressed by DZone contributors are their own.
Comments