Building an E-Commerce API Using Nestjs, SQLite, and TypeORM
This guide will teach you how to create an e-commerce application with Nestjs, SQLite, and TypeORM. We'll also use Arctype to inspect our application.
Join the DZone community and get the full member experience.
Join For FreeIntroduction
Nestjs is a cutting-edge Node.js framework for developing server-side applications that are efficient, dependable, and scalable. It is simple to integrate with NoSQL and SQL databases such as MongoDB, Yugabyte, SQLite, Postgres, MySQL, and others. It supports popular object-relational mappers such as TypeORM Sequelize and Mongoose.
In this tutorial, we'll create an e-commerce application with SQLite and TypeORM. We'll also look at Arctype, a powerful SQL client and database management tool.
Let's get started!
Prerequisites
This tutorial is a hands-on demonstration to get you started. Ensure you've met the following requirements:
- You have Node (>= 10.13.0, except for v13) installed
- You have a foundational knowledge of Javascript
- Arctype installed
Project Setup
To get started with Nestjs, install the Nestjs CLI with the command below:
npm i -g @nestjs/cliOnce the installation is completed, create a Nestjs project with the command below:
nest new ecommerceChoose your npm as the package manager, hit the enter button, and wait for Nest to install the required packages to run this application.
Once the installation is completed, change the directory to the project folder with the command below:
cd ecommerceThen open the project directory in your favorite text editor or IDE, open a new terminal, and run the server on development mode (This will enable hot reload and allows us to see possible errors on the console) with the command below:
npm run start:devInstall Dependencies
With the server up and running, open a new terminal window so you don't quit the server. This will allow you to see the effect of the changes made to the codebase throughout this tutorial.
Now install the following dependencies:
You can do this with the command below:
npm install --save @nestjs/passport passport passport-local @nestjs/jwt passport-jwt @nestjs/typeorm typeorm sqlite3 bcrypt
Then install the dev dependencies with the command below:
npm install --save-dev @types/passport-local @types/passport-jwt @types/bcryptYou can grab a cup of coffee while the npm installs the packages. Once the installation is completed, let's get our hands dirty.
Create App Modules
With all the necessary packages required to run the application, let's proceed to create the application modules. To build a clean and easily-maintained application, you'll generate separate modules for all the features implemented in this application. Since this is an eCommerce application, you'll have authentication, cart, products, and orders. All these will be in their own separate modules. Let's start with the authentication module.
Create Authentication Module
Generate an authentication module with the command below:
nest g module authThe above command creates an auth folder in the project's src directory with the necessary boilerplates and registers the module in the project root module (app.module.ts file).
Next, create a product, cart, order, module with the command below:
#Create a product module
nest g module product

#Create cart module
nest g module cart

#Create cart module
nest g module order
The above will create a product, cart, and order folder in the project's src folder with the basic boilerplates and register these modules in the project's root app module.
Setting up TypeORM and SQLite Databases
With the app modules installed, set up TypeORM to connect your application to SQLite Database and create your module entities. To get started, open the app.module.ts and configure your SQLite database with the code snippets below:
imports: [
 …
 TypeOrmModule.forRoot({
   type :"sqlite",
   database: "shoppingDB",
   entities: [__dirname + "/**/*.entity{.ts,.js}"],
   synchronize: true
 })
],
…
In the above code snippet, you connected the application to an SQLite database using the TypeORM forRoot, specifying the database type, database name, and the location where Nestjs can find the model entities.
Once the server refreshes, you should see a shoppingDB file created in the root directory of this project.
Create App Entity Models
With the database setup, let's create the entity models for our app modules. We'll start with the auth module. Generate an entity file in the auth module folder with the command below:
nest generate class auth/user.entity –flatThen add the code snippet below to define the user table properties:
import { Entity, OneToOne, JoinColumn,Column, CreateDateColumn, UpdateDateColumn, PrimaryGeneratedColumn, OneToMany } from 'typeorm'
import { CartEntity } from 'src/cart/cart.entity'
import { OrderEntity } from 'src/order/order.entity'

@Entity()
export class Users {
   @PrimaryGeneratedColumn()
   id: number

   @Column()
   username: string

   @Column()
   password: string

   @Column()
   role: string

   @CreateDateColumn()
   createdAt : String

   @UpdateDateColumn()
   updtedAt : String

   @OneToMany(type => CartEntity, cart => cart.id)
   @JoinColumn()
   cart: CartEntity[]

   @OneToOne(type => OrderEntity, order => order.id)
   @JoinColumn()
   order : OrderEntity;
}
In the code snippet, you imported the decorators required to set up your database table. You also imported the cartEntity and orderEntity class which you'll create shortly. Using the typeorm decorator, we defined the database properties of the user's model. Finally, we created one-to-one and one-to-many relationships between the users entity and the cartEntity and orderEntity. This way, you can associate a cart item with a user. The same applies to the user's order.
Next, create the product entity class with the command below:
nest generate class product/product.entity –flat
The above command will generate a product.entity.ts file in the products module folder.
Now configure the product table properties with the code snippet below:
import { Entity, JoinColumn, OneToMany, Column, CreateDateColumn, UpdateDateColumn, PrimaryGeneratedColumn } from 'typeorm'
import { CartEntity } from 'src/cart/cart.entity'

@Entity()
export class ProductEntity {
   @PrimaryGeneratedColumn("uuid")
   id!: number

   @Column()
   name: string

   @Column()
   price: number

   @Column()
   quantity: string

   @CreateDateColumn()
   createdAt: String

   @UpdateDateColumn()
   updtedAt: String

   @OneToMany(type => CartEntity, cart => cart.id)
   @JoinColumn()
   cart: CartEntity[]
}
In the above code snippet, we configured the properties of the product table and created a one-to-many relationship with the cart entity.
Then create the cart entity with the command below:
nest generate class cart/cart.entity –flatThe above command will generate a cart.entity.ts file in the cart module folder. Now add the code snippet below to the file you created to configure the cart table properties.
import { Entity, OneToOne,ManyToOne, JoinColumn, Column, PrimaryGeneratedColumn } from 'typeorm'
import { OrderEntity } from 'src/order/order.entity'
import { ProductEntity } from 'src/product/product.entity'
import { Users } from 'src/auth/user.entity'

@Entity()
export class CartEntity {
   @PrimaryGeneratedColumn('uuid')
   id: number

   @Column()
   total: number

   @Column()
   quantity: number

   @ManyToOne(type => ProductEntity, order => order.id)
   @JoinColumn()
   item: ProductEntity

   @ManyToOne(type => Users, user => user.username)
   @JoinColumn()
   user: Users
}
In the above code snippet, you configured the properties of the cart table, created a many-to-one relationship between the cart entity and a many-to-one relationship with the users entity.
Lastly, create the order entity with the command below:
nest generate class order/order.entity –flatThe above command will generate an order.entity.ts file in the order module folder. Open the order.entity.ts and configure the database table with the command below:
import { Entity, OneToMany, JoinColumn, OneToOne, Column, PrimaryGeneratedColumn } from 'typeorm'
import { ProductEntity } from 'src/product/product.entity';
import { Users } from 'src/auth/user.entity';

@Entity()
export class OrderEntity {
   @PrimaryGeneratedColumn('uuid')
   id: number

   @OneToMany(type => ProductEntity, item => item.id)
   items: ProductEntity[];

   @OneToOne(type => Users, user => user.username)
   @JoinColumn()
   user : Users;

   @Column()
   subTotal: number

   @Column({ default: false })
   pending: boolean

}
In the above code snippet, you created a one-to-one relationship between the users entity and a one-to-many relationship with the product entity.
At this point, your database entities are set and connected. Now create your business logic to store records on these entities.
Create App Services
Now create the services for the modules in this application. Here you'll allow the admin to add products to the product table, authenticate users, allow users to add the products in the store to the cart, and order the product via their cart.
Create the Auth Service
To create the auth service, run the command below to generate the service for the auth module.
nest generate service auth/service/auth --flatThe above command will generate an auth.service.ts file in the src/auth/service folder. Now open the auth.service.ts file and add the code snippet below:
import { Injectable, HttpException, HttpStatus } from '@nestjs/common';
import { InjectRepository } from '@nestjs/typeorm';
import { Repository } from 'typeorm';
import { Users } from '../user.entity';
import * as bcrypt from 'bcrypt';
import { JwtService } from '@nestjs/jwt';

@Injectable()
export class AuthService {
    constructor(@InjectRepository(Users) private userRepository: Repository<Users>, private jwt: JwtService) { }

   }
In the above code snippet, you imported InjectRepository, Repository decorator, JwtService, and bcrypt modules. Then, using the InjectRepository decorator, you made the User entity class available in the auth service, providing the method to perform CRUD operations in your User entity.
Then create a signup method to allow users to register in the application with the code snippet below:
async signup(user: Users): Promise<Users> {
       const salt = await bcrypt.genSalt();
       const hash = await bcrypt.hash(user.password, salt);
       user.password = hash
       return await this.userRepository.save(user);
   }
Now create the validateUser method to validate the users' details and the login method to generate a jwt token for the authenticated user.
 …
 async validateUser(username: string, password: string): Promise<any> {
       const foundUser = await this.userRepository.findOne({ username });
       if (foundUser) {
           if (await bcrypt.compare(password, foundUser.password)) {
               const { password, ...result } = foundUser
               return result;
           }

           return null;
       }
       return null

   }
   async login(user: any) {
       const payload = { username: user.username, sub: user.id, role:user.role };

       return {
           access_token: this.jwt.sign(payload),
       };
   }
Now we can implement our Passport local authentication strategy. Create a file called local.strategy.ts in the auth module folder, and add the following code:
import { Strategy } from 'passport-local';
import { PassportStrategy } from '@nestjs/passport';
import { Injectable, UnauthorizedException } from '@nestjs/common';
import { AuthService } from './service/auth.service';

@Injectable()
export class LocalStrategy extends PassportStrategy(Strategy) {
   constructor(private authService: AuthService) {
       super();
   }

   async validate(username: string, password: string): Promise<any> {

       const foundUser = await this.authService.validateUser(username, password);
       if (!foundUser) {
           throw new UnauthorizedException();
       }
       return foundUser;
   }
}
In the above code snippet, you've implemented a passport-local strategy. There are no configuration options, so our constructor simply calls super() without an options object.
You've also implemented the validate() method. Passport will call the verify function for each strategy using an appropriate strategy-specific set of parameters. For the local-strategy, Passport expects a validate() method with the following signature: validate(username: string, password:string): any.
Then create a jwt-auth.guard.ts file in the auth module folder and define a custom auth guard with the code snippet below:
import { Injectable } from '@nestjs/common';
import { AuthGuard } from '@nestjs/passport';

@Injectable()
export class LocalAuthGuard extends AuthGuard('local') {}
You'll use the AuthGuard created in the code snippet to protect your API routes from unauthorized users.

Now create a jwt-strategy file in the auth module folder to authenticate users and generate jwt tokens for logged in users with the code snippet below:

import { ExtractJwt, Strategy } from 'passport-jwt';
import { PassportStrategy } from '@nestjs/passport';
import { Injectable } from '@nestjs/common';
import { jwtConstants } from './constants';

@Injectable()
export class JwtStrategy extends PassportStrategy(Strategy) {
 constructor() {
   super({
     jwtFromRequest: ExtractJwt.fromAuthHeaderAsBearerToken(),
     ignoreExpiration: false,
     secretOrKey: jwtConstants.secret,
   });
 }

 async validate(payload: any) {
   return { userId: payload.sub, username: payload.username, role: payload.role };
 }
}
Then configure the JWT module in the auth.module.ts file in the auth module folder. Before that, create a constants.ts file in the same auth module folder to define a JWT secret with the code snippet below:
export const jwtConstants = {
   secret: 'wjeld-djeuedw399e3-uejheuii33-4jrjjejei3-rjdjfjf',
}
You can generate a more secured JWT secret on production, but we'll use the one for demonstration sake.
Now import all the required modules in your auth.module.ts file with the code snippet below:
…
import { JwtModule } from '@nestjs/jwt';
import { jwtConstants } from './constants';
import { JwtStrategy } from './jwt.strategy';
import { PassportModule } from '@nestjs/passport';
import { LocalStrategy } from './local.strategy';
import { TypeOrmModule } from '@nestjs/typeorm';
import { Users } from './user.entity';
…
Then in the array of imports, configure JWT with the code snippet below:
…
imports: [
   PassportModule,
   JwtModule.register({
     secret: jwtConstants.secret,
     signOptions: { expiresIn: '60m' },
   }),
…
In the above code snippet, we add the PassModule package to allow Passport to handle the users' authentication and configured JWT using the JwtModule register method. We pass in the secret we created in the constants file and specify the generated token's expiration time (You can reduce or increase the time depending on the use case).
Create the Product Service
With the auth service setup, generate a product service with the command below:
nest generate service product/service/productNow open the product.service.ts file generated by the above command in the product module and add the code snippets below:
import { Injectable, UnauthorizedException } from '@nestjs/common';
import { ProductEntity } from '../product.entity';
import { Repository, UpdateResult, DeleteResult } from 'typeorm';
import { InjectRepository } from '@nestjs/typeorm';
import { Users } from 'src/auth/user.entity';

@Injectable()
export class ProductsService {
   constructor(@InjectRepository(ProductEntity) private productRepository: Repository<ProductEntity>) { }

   async getAll(): Promise<ProductEntity[]> {
       return await this.productRepository.find()
   }

   async create(product: ProductEntity, user: Users): Promise<ProductEntity> {
       if (user.role == 'admin') {
           return await this.productRepository.save(product);

       }
       throw new UnauthorizedException();

   }

   async getOne(id: number): Promise<ProductEntity> {
       return this.productRepository.findOne(id);
   }

   async update(id: number, product: ProductEntity, user: Users): Promise<UpdateResult> {
       if (user.role == 'admin') {
           return await this.productRepository.update(id, product);
       }
       throw new UnauthorizedException();
   }

   async delete(id: number, user: Users): Promise<DeleteResult> {
       if (user.role == 'admin') {
           return await this.productRepository.delete(id);
       }
       throw new UnauthorizedException();
   }

}
In the above snippet, we created our CRUD services. The create, update, and delete methods are restricted from the users. Only the admin can create a product, delete or update a product.
Now open the product.module.ts file and make the product entity accessible with the code snippet below:
imports: [TypeOrmModule.forFeature([ProductEntity])],Create the Cart Service
At this point, the admin can add products to the database, and authenticated users can see all available products. Now let's allow the users to add the items they like to the cart. To get started, generate a Cart service with the command below:
nest generate service cart/service/cart –flatThen open the cart.service.ts file generated by the command and add the code snippet below:
import { Injectable } from '@nestjs/common';
import { Repository } from 'typeorm';
import { InjectRepository } from '@nestjs/typeorm';
import { CartEntity } from '../cart.entity';
import { ProductsService } from 'src/product/service/products.service';
import { Users } from 'src/auth/user.entity';

@Injectable()
export class CartService {
   constructor(
       @InjectRepository(CartEntity)
       private cartRepository: Repository<CartEntity>,
       @InjectRepository(Users)
       private userRepository: Repository<Users>,
       private productsService: ProductsService,
   ) { }
   …
You imported the modules required to create a Nest.js service in the above code snippet. We also imported them here since you created a relationship between the cart, user, and product entities. Then, you make a constructor method to bind these entities to the CartService class. Now create a method to add an item to the cart.
async addToCart(productId: number, quantity: number, user: string): Promise<any> {
       const cartItems = await this.cartRepository.find({ relations: ["item",'user'] });
       const product = await this.productsService.getOne(productId);
       const authUser = await this.userRepository.findOne({ username: user })

       //Confirm the product exists.
       if (product) {
           //confirm if user has item in cart
           const cart = cartItems.filter(
               (item) => item.item.id === productId && item.user.username === user,
           );
           if (cart.length < 1) {

               const newItem = this.cartRepository.create({ total: product.price * quantity, quantity });
               newItem.user = authUser;
               newItem.item = product;
               this.cartRepository.save(newItem)


               return await this.cartRepository.save(newItem)
           } else {
               //Update the item quantity
               const quantity = (cart[0].quantity += 1);
               const total = cart[0].total * quantity;

               return await this.cartRepository.update(cart[0].id, { quantity, total });
           }
       }
       return null;
   }
In the above code snippet, you created an addToCart method that takes the productId, quantity, and user as arguments. Then check if the user has the item already in their cart. If so, you increment the quantity and update the total price of that item. Else, you add the item to the user's cart.
Next, make the cartEntity, productEntity User entity, and the productService accessible in the cartService by registering them in the cart.module.ts file with the code snippet below:
…
import { CartEntity } from './cart.entity';
import { ProductsService } from 'src/product/service/products.service';
import { ProductEntity } from 'src/product/product.entity';
import { Users } from 'src/auth/user.entity';

@Module({
 imports: [TypeOrmModule.forFeature([CartEntity, ProductEntity, Users])],
 providers: [CartService, ProductsService],
 …
})
Lastly, create a getItemsInCart method that takes a user as an argument to return all the carts belonging to a particular user.
async getItemsInCard(user: string): Promise<CartEntity[]> {
       const userCart = await this.cartRepository.find({ relations: ["item",'user'] });
       return (await userCart).filter(item => item.user.username === user)
   }
Create the Order Service
When users are done shopping, they can order the items in their cart. Generate an order service with the command below:
nest generate service order/service/order –flatNow open the order.service.ts file generated from running the above command and add the code snippet below:
import { OrderEntity } from '../order.entity';
import { Repository } from 'typeorm';
import { InjectRepository } from '@nestjs/typeorm';
import { CartService } from 'src/cart/service/cart.service';
import { Users } from 'src/auth/user.entity';

@Injectable()
export class OrderService {
   constructor(@InjectRepository(OrderEntity)
   private orderRepository: Repository<OrderEntity>,
       @InjectRepository(Users)
       private userRepository: Repository<Users>,
       private cartService: CartService) { }
You imported the modules required to create a Nest.js service in the above code snippet. We also imported them here since you created a relationship between the cart, user, and product entities. Then, you created a constructor method to bind these entities to the OrderService class. Now create a method to order the items in the user's cart.
…
async order(user: string): Promise<any> {
       //find user existing orders
       const usersOrder = await this.orderRepository.find({ relations: ['user'] });
       const userOrder = usersOrder.filter(order => order.user?.username === user && order.pending === false);
       //find user's cart items
       const cartItems = await this.cartService.getItemsInCard(user)
       const subTotal = cartItems.map(item => item.total).reduce((acc, next) => acc + next);
       //get the authenticated user
       const authUser = await this.userRepository.findOne({ username: user })
       //if users has an pending order - add item to the list of order
       const cart = await cartItems.map(item => item.item);

       if (userOrder.length === 0) {
           const newOrder = await this.orderRepository.create({ subTotal });
           newOrder.items = cart
           newOrder.user = authUser;
           return await this.orderRepository.save(newOrder);


       } else {
           const existingOrder = userOrder.map(item => item)
           await this.orderRepository.update(existingOrder[0].id, { subTotal: existingOrder[0].subTotal + cart[0].price });
           return { message: "order modified" }
       }
   }
…
Then create another method to get a user's order from the array of orders from the database with the code snippet below:
…
async getOrders(user: string): Promise<OrderEntity[]> {
       const orders = await this.orderRepository.find({ relations: ['user'] });
       return orders.filter(order => order.user?.username === user)
   }
}
Lastly, open the order.module.ts file and make the users, product, and cart entities accessible in the orderService with the code snippet below:
import { TypeOrmModule } from '@nestjs/typeorm';
import { OrderEntity } from './order.entity';
import { ProductEntity } from 'src/product/product.entity';
import { CartService } from 'src/cart/service/cart.service';
import { CartEntity } from 'src/cart/cart.entity';
import { Users } from 'src/auth/user.entity';
import { ProductsService } from 'src/product/service/products.service';

@Module({
 imports: [TypeOrmModule.forFeature([OrderEntity, ProductEntity, CartEntity, Users])],
 controllers: [OrderController],
 providers: [OrderService, CartService, ProductsService]
})
Create App Controllers
With the application services successfully created, let's create the API routes for the app services.
Create the Auth Controller
Generate an auth controller with the command below:
nest generate controller auth/controller/auth –flatNow open the auth.controller.ts file generated from running the above command and configure the auth routes with the code snippet below:
import { Controller, Request, Post, UseGuards, Body } from '@nestjs/common';
import { AuthGuard } from '@nestjs/passport';
import { AuthService } from '../service/auth.service';
import { Users } from '../user.entity';

@Controller('api/v1/auth/')
export class AuthController {
   constructor(private usersService: AuthService) { }

   @Post('signup')
   async signup(@Body() user: Users): Promise<Users> {
       return this.usersService.signup(user);
   }

   @UseGuards(AuthGuard('local'))
   @Post('login')
   async login(@Request() req) {
       return this.usersService.login(req.user)
   }
}
Create the Product Controller
With the auth controller routes configured, generate a product controller with the command below:
nest generate controller product/controller/product –flatOpen the product.controller.ts file generated from running the above command and configure the product routes with the code snippet below:
import { Controller, Post, Get, Put, Delete, Param, Request, Body, UseGuards } from '@nestjs/common';
import {UpdateResult, DeleteResult} from 'typeorm';
import { ProductsService } from '../service/products.service';
import { ProductEntity } from '../product.entity';
import { JwtAuthGuard } from 'src/auth/jwt-auth.guard';

@Controller('api/v1/products')
export class ProductsController {
 constructor(private productsService: ProductsService) { }

 @UseGuards(JwtAuthGuard)
 @Get()
 async GetAll(): Promise<ProductEntity[]> {
   return await this.productsService.getAll();

 }

 @UseGuards(JwtAuthGuard)
 @Post()
 async Create(@Request() req, @Body() product: ProductEntity): Promise<ProductEntity> {
   return await this.productsService.create(product, req.user);
 }


 @UseGuards(JwtAuthGuard)
 @Get(':id')
 async GetOne(@Param() id: number): Promise<ProductEntity> {
   return await this.productsService.getOne(id);

 }

 @UseGuards(JwtAuthGuard)
 @Put(':id')
 async Update(@Param() id: number, @Body() product: ProductEntity, @Request() req): Promise<UpdateResult> {
   return await this.productsService.update(id, product, req.user);

 }

 @UseGuards(JwtAuthGuard)
 @Delete(':id')
 async Delete(@Param() id: number, @Request() req): Promise<DeleteResult> {
   return await this.productsService.delete(id, req.user);

 }
}
In the above code snippet, you defined the CRUD routes for the product service. We used the UseGuard decorator passing your JwtAuthGaurd to protect the routes from unauthorized users.
Create the Cart Controller
Now generate a cart controller with the command below:
nest generate controller cart/controller/cart –flatThen open the cart.controller.ts file generated from running the above command and configure the cart routes with the code snippet below:
import { Controller, Post, Get,Request, Delete, Body, UseGuards } from '@nestjs/common';
import { CartService } from '../service/cart.service';
import { CartEntity } from '../cart.entity';
import { JwtAuthGuard } from 'src/auth/jwt-auth.guard';

@Controller('api/v1/cart')
export class CartController {
   constructor(private cartService: CartService) { }

   @UseGuards(JwtAuthGuard)
   @Post()
   async AddToCart(@Body() body, @Request() req): Promise<void> {
       const { productId, quantity } = body
       return await this.cartService.addToCart(productId, quantity, req.user.username);
   }

   @UseGuards(JwtAuthGuard)
   @Get()
   async getItemsInCart(@Request() req): Promise<CartEntity[]> {
       return await this.cartService.getItemsInCard(req.user.username);

   }
}
Create the Order Controller
With the cart routes configured, create an order controller with the command below:
nest generate controller order/controller/order –flatThen open the order.controlle.ts file generated from running the above command and configure the cart routes with the code snippet below:
import { Controller, Post, Get, Request, UseGuards } from '@nestjs/common';
import { OrderService } from '../service/order.service'
import { OrderEntity } from '../order.entity';
import { JwtAuthGuard } from 'src/auth/jwt-auth.guard';

@Controller('api/v1/order')
export class OrderController {
   constructor(private orderService: OrderService) { }


   @UseGuards(JwtAuthGuard)
   @Post()
   async order(@Request() req): Promise<any> {
       return this.orderService.order(req.user.username)
   }

   @UseGuards(JwtAuthGuard)
   @Get()
   async getOrders(@Request() req): Promise<OrderEntity[]> {
       return await this.orderService.getOrders(req.user.username)
   }
}
At this point, all your API routes have been configured.
Test Application
Now let's test them out using Postman. The results of come tests are shown below.

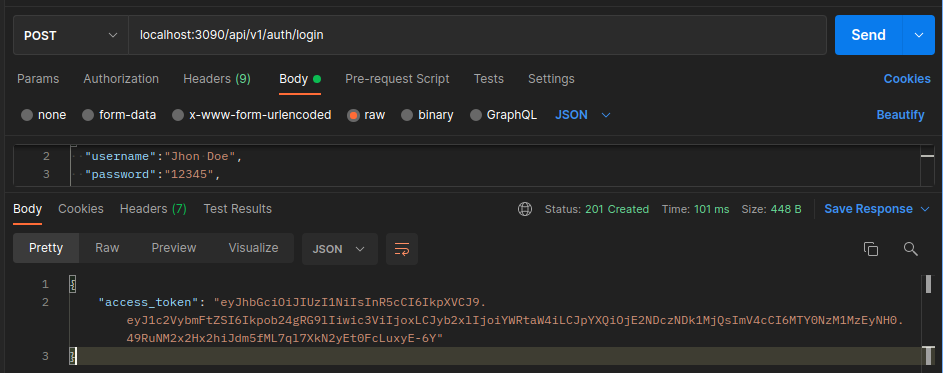
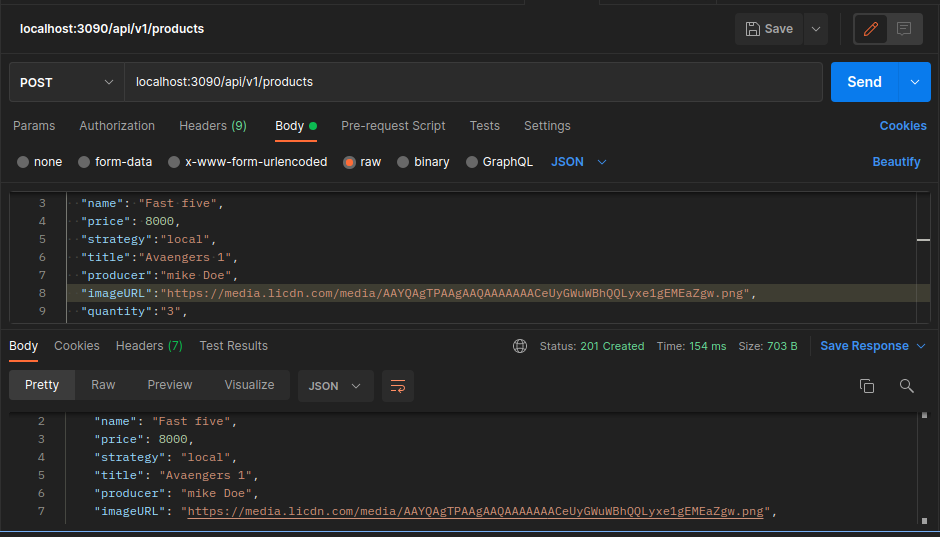
Feel free to test the other routes and play around with the code here on Github.
Connecting Arctype to SQLite Database
Arctype is an SQL client and database management tool that's fun to use. It allows you to have a visual representation of your database tables, and you can perform the CRUD operations directory in your database using Arctype. Connecting Arctype to an SQLite database is a straightforward process. To get started, follow the steps below:
First, launch Arctype. You'll see a screen like the one below, allowing you to add your credentials.
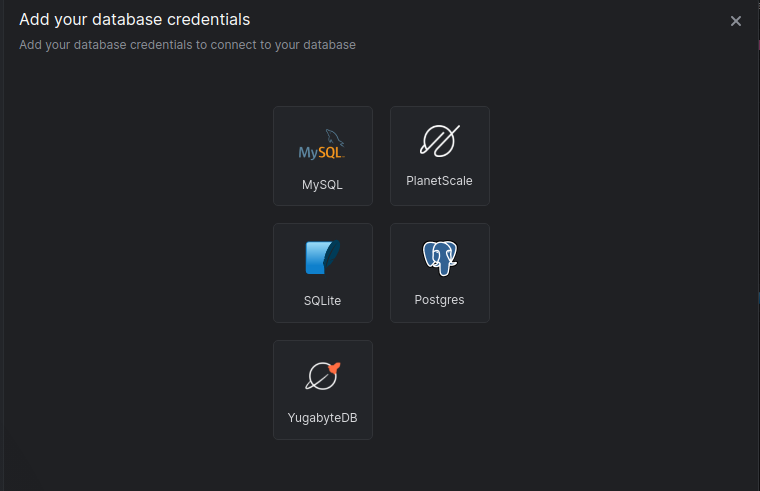
Click on the SQLite tab. This will bring up the screen below.

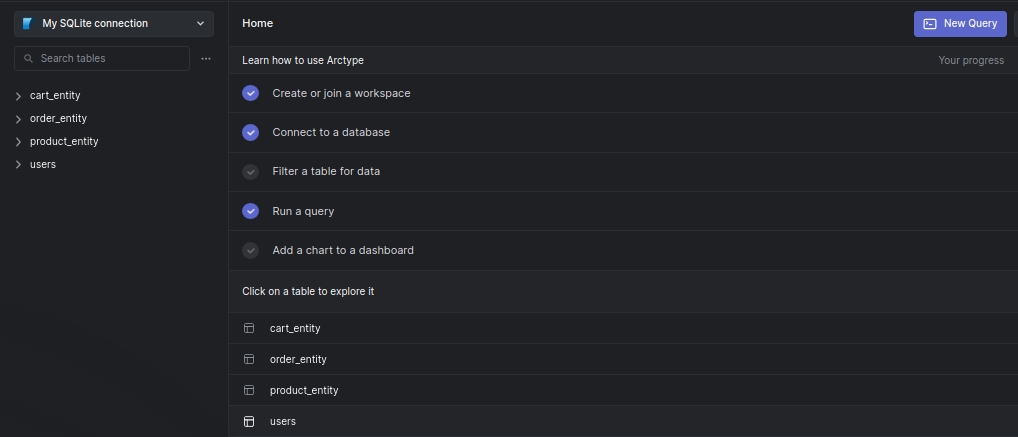
Click on the Choose SQLite File button and navigate to your project folder. Select the application database file and press the open button. Press the save button, and you should see your database entities, as shown in the screenshot below.
Conclusion
By building a demo project, we've learned how to make an e-commerce application using Nestjs and SQLite database. First, we started with the introduction of NestJS. Then, we created a NestJS application, connected the application to an SQLite database using TypeORM, and performed CRUD operations. Now that you've gotten the knowledge you seek feel free to add extra functionality to the application.
Published at DZone with permission of Clara Ekekenta. See the original article here.
Opinions expressed by DZone contributors are their own.
Comments