Scaling in Practice: Caching and Rate-Limiting With Redis and Next.js
Redis powers both caching (to speed up API responses) and rate limiting (to prevent faucet abuse), offering performance improvements and protecting against abuse.
Join the DZone community and get the full member experience.
Join For FreeAs someone who loves shipping products and tools for people to experiment with and use, it was only a matter of time before scalability issues caught up with me. I always knew what scaling meant and how to scale in theory. I was familiar with vertical and horizontal scaling, and the intricacies of each, but again, in theory. I had actually never needed to implement any of them, as my user base was usually modest.
This is until I built a faucet that exceeded my expectations in terms of usage. But this massive traction came with its own set of issues. The TL;DR of the issue was that even though I restricted the frequency with which a wallet address could claim funds to once a day, a user could simply spin up new addresses and keep claiming. This resulted in my faucet being drained frequently.
To solve this issue, I had to introduce rate limiting to restrict the IP address of each user from abusing the faucet. Similarly, in the LMS platform I built, I had to introduce caching to reduce the number of calls to the database.
In this tutorial, I am going to demonstrate to you how you can implement rate limiting and caching in your application using Redis.
Why Redis?
Redis is like that reliable friend who's surprisingly good at everything. Need lightning-fast data retrieval? Redis. Need to coordinate between multiple servers? Redis. Need to limit how often users can perform actions? You guessed it — Redis.
We can cache API responses, track rate limits, and generally make our applications much more resilient. The best part? It's actually quite simple to implement once you understand the patterns. That being said, let's get to building!
Prerequisites
- Set up a Redis Cloud account and get the public URL
- Familiarity with Next.js
What Are We Building?

We'll create a Next.js application with:
- A product catalog API with Redis-powered caching
- A flexible rate-limiting system using Redis
- Interactive demo pages to visualize both techniques in action
Here is a preview of what our project structure will look like:
/src
  /lib
    - redis.ts            # Redis client and caching utilities
    - edge-rate-limiter.ts # Edge-compatible rate limiting
    - product.ts          # Product data service

  /app
    /api
      /products           # Product data API endpoints
      /cache/invalidate   # Cache management endpoint
      /tests              # Test endpoints for rate limiting

    /demo                # Demo UI pages
      /caching           # Redis caching demo
      /rate-limiting     # Rate limiting demo

  - middleware.ts        # Rate limiting middleware
Step 1: Setting Up Our Environment
Let's start by creating a new Next.js project.
npx create-next-app redis-scaling-demo
cd redis-scaling-demo
For the accompanying prompts, select the default options and hit Enter. Next, we install our Redis dependencies and also the types.
npm install ioredis @upstash/ratelimit @upstash/redis @types/ioredis --save-devIf you do not already have a Redis Cloud account, go to Redis, create a new account, and select the free database.

Look for the button above and click it to select the CLI option. Copy the command that contains your host and port.
redis://default:password@host:portIt should look like the above format (note: ignore the "redis-cli -u" in the command). Finally, replace the password(the asterisks in the command) with your actual password, which you can get by going to the security section and copying the password.
Finally, create a .env file in the root of your project(assuming you have opened it up in your code terminal) and paste in the redis url like so:
REDIS_URL=redis://default:password@host:portStep 2: Creating Services
In the src folder, create a new folder called lib and then a file called redis.ts. Paste in the code below.
import Redis from "ioredis";

let redisClient: Redis | null = null;

export function getRedisClient() {
  if (!redisClient) {
    redisClient = new Redis(process.env.REDIS_URL || "redis://localhost:6379", {
      connectTimeout: 10000, // 10 seconds
      retryStrategy(times) {
        const delay = Math.min(times * 50, 2000);
        return delay;
      },
      maxRetriesPerRequest: 3,
    });

    redisClient.on("error", (err) => {
      console.error("Redis connection error:", err);
    });

    redisClient.on("connect", () => {
      console.log("Successfully connected to Redis");
    });
  }

  return redisClient;
}

function createCacheKey(prefix: string, key: string): string {
  return `${prefix}${key}`;
}

async function getCachedData<T>(
  redis: Redis,
  prefix: string,
  key: string
): Promise<T | null> {
  const cachedData = await redis.get(createCacheKey(prefix, key));

  if (!cachedData) {
    return null;
  }

  try {
    return JSON.parse(cachedData) as T;
  } catch (error) {
    console.error(`Error parsing cached data for key ${key}:`, error);
    return null;
  }
}

async function setCachedData<T>(
  redis: Redis,
  prefix: string,
  key: string,
  data: T,
  ttl: number
): Promise<void> {
  await redis.set(createCacheKey(prefix, key), JSON.stringify(data), "EX", ttl);
}

async function deleteCachedData(
  redis: Redis,
  prefix: string,
  key: string
): Promise<void> {
  await redis.del(createCacheKey(prefix, key));
}

async function invalidateCachePattern(
  redis: Redis,
  prefix: string,
  pattern: string
): Promise<number> {
  const keys = await redis.keys(`${prefix}${pattern}*`);

  if (keys.length === 0) {
    return 0;
  }

  return await redis.del(...keys);
}

export function getCacheInstance(
  prefix: string = "cache:",
  defaultTTL: number = 60 * 5
) {
  const redis = getRedisClient();

  return {
    get: <T>(key: string) => getCachedData<T>(redis, prefix, key),
    set: <T>(key: string, data: T, ttl?: number) =>
      setCachedData<T>(redis, prefix, key, data, ttl || defaultTTL),
    delete: (key: string) => deleteCachedData(redis, prefix, key),
    invalidatePattern: (pattern: string) =>
      invalidateCachePattern(redis, prefix, pattern),
  };
}
Next.js middleware runs in the Edge Runtime, which has limitations compared to Node.js. We need to create a rate limiter that works in this environment, so in the lib folder, create another file called edge-rate-limiter.ts.
import { NextRequest, NextResponse } from "next/server";

// Simple in-memory store (note: this won't work in a multi-instance setup)
const ipRequests = new Map<string, { count: number; timestamp: number }>();

export function createEdgeRateLimiter(options: {
  limit: number;
  timeWindow: number;
}) {
  return function rateLimit(request: NextRequest) {
    const ip =
      request.headers.get("x-forwarded-for")?.split(",")[0] ||
      request.headers.get("x-real-ip") ||
      "127.0.0.1";
    const now = Date.now();
    const windowStart = now - options.timeWindow * 1000;

    const currentData = ipRequests.get(ip) || { count: 0, timestamp: now };

    if (currentData.timestamp < windowStart) {
      currentData.count = 0;
      currentData.timestamp = now;
    }

    currentData.count++;
    ipRequests.set(ip, currentData);

    const response = NextResponse.next();
    response.headers.set("X-RateLimit-Limit", options.limit.toString());
    response.headers.set(
      "X-RateLimit-Remaining",
      Math.max(0, options.limit - currentData.count).toString()
    );

    if (currentData.count > options.limit) {
      return NextResponse.json({ error: "Too many requests" }, { status: 429 });
    }

    return response;
  };
}
For rate limiting, we create a rate-limiter.ts file in the lib folder.
import { NextRequest, NextResponse } from "next/server";
import { getRedisClient } from "./redis";
import Redis from "ioredis";

export interface RateLimitConfig {
  maxRequests: number;
  windowSizeInSeconds: number;
  prefix: string;
}

function getRedisKey(prefix: string, identifier: string): string {
  return `${prefix}:${identifier}`;
}

export async function checkRateLimit(
  redis: Redis,
  config: RateLimitConfig,
  identifier: string
): Promise<{
  success: boolean;
  limit: number;
  remaining: number;
  reset: number;
}> {
  const key = getRedisKey(config.prefix, identifier);
  const now = Math.floor(Date.now() / 1000);
  const windowExpiry = now + config.windowSizeInSeconds;

  const multi = redis.multi();

  multi.incr(key);

  multi.expire(key, config.windowSizeInSeconds);

  multi.get(key);

  multi.ttl(key);

  const results = await multi.exec();

  if (!results) {
    throw new Error("Redis transaction failed");
  }

  const requestCount = parseInt(results[2][1] as string) || 1;

  const ttl = parseInt(results[3][1] as string) || config.windowSizeInSeconds;

  const resetTime = now + ttl;

  const remainingRequests = Math.max(0, config.maxRequests - requestCount);

  return {
    success: requestCount <= config.maxRequests,
    limit: config.maxRequests,
    remaining: remainingRequests,
    reset: resetTime,
  };
}

export function getClientIdentifier(req: NextRequest): string {
  const forwardedFor = req.headers.get("x-forwarded-for") || "";
  const realIp = req.headers.get("x-real-ip");
  const cfConnectingIp = req.headers.get("cf-connecting-ip");

  if (forwardedFor && forwardedFor.includes(",")) {
    return forwardedFor.split(",")[0].trim();
  }

  return cfConnectingIp || realIp || forwardedFor || "127.0.0.1";
}

export function createRateLimitMiddleware(config: RateLimitConfig) {
  return async function rateLimitMiddleware(
    req: NextRequest
  ): Promise<NextResponse> {
    try {
      const redis = getRedisClient();

      const identifier = getClientIdentifier(req);

      const { success, limit, remaining, reset } = await checkRateLimit(
        redis,
        config,
        identifier
      );

      const headers = {
        "X-RateLimit-Limit": limit.toString(),
        "X-RateLimit-Remaining": remaining.toString(),
        "X-RateLimit-Reset": reset.toString(),
      };

      if (!success) {
        return NextResponse.json(
          {
            error: "Too Many Requests",
            message: `Rate limit of ${limit} requests per ${config.windowSizeInSeconds} seconds exceeded.`,
          },
          {
            status: 429,
            headers: {
              ...headers,
              "Retry-After": Math.ceil(
                reset - Math.floor(Date.now() / 1000)
              ).toString(),
            },
          }
        );
      }

      const response = NextResponse.next();

      Object.entries(headers).forEach(([key, value]) => {
        response.headers.set(key, value);
      });

      return response;
    } catch (error) {
      console.error("Rate limit error:", error);
      return NextResponse.next();
    }
  };
}

export const rateLimiters = {
  default: createRateLimitMiddleware({
    maxRequests: 60,
    windowSizeInSeconds: 60,
    prefix: "ratelimit:default",
  }),

  auth: createRateLimitMiddleware({
    maxRequests: 10,
    windowSizeInSeconds: 60,
    prefix: "ratelimit:auth",
  }),

  sensitive: createRateLimitMiddleware({
    maxRequests: 3,
    windowSizeInSeconds: 60,
    prefix: "ratelimit:sensitive",
  }),
};
Finally, we create a product service to simulate a database. So, create a product.ts file in the lib folder.
export interface Product {
  id: string;
  name: string;
  description: string;
  price: number;
  category: string;
  image: string;
  stock: number;
}

const productData: Product[] = [
  {
    id: "prod_001",
    name: "Ergonomic Office Chair",
    description: "A comfortable chair designed for long working hours",
    price: 299.99,
    category: "furniture",
    image: "/images/chair.jpg",
    stock: 25,
  },
  {
    id: "prod_002",
    name: "Mechanical Keyboard",
    description: "Mechanical keyboard with RGB lighting and Cherry MX switches",
    price: 129.99,
    category: "electronics",
    image: "/images/keyboard.jpg",
    stock: 40,
  },
  {
    id: "prod_003",
    name: "Wireless Mouse",
    description: "High-precision wireless mouse with long battery life",
    price: 49.99,
    category: "electronics",
    image: "/images/mouse.jpg",
    stock: 75,
  },
  {
    id: "prod_004",
    name: "Adjustable Standing Desk",
    description: "Electric adjustable standing desk for better ergonomics",
    price: 499.99,
    category: "furniture",
    image: "/images/desk.jpg",
    stock: 15,
  },
  {
    id: "prod_005",
    name: "Monitor Stand",
    description: "Adjustable monitor stand with cable management",
    price: 79.99,
    category: "accessories",
    image: "/images/monitor-stand.jpg",
    stock: 30,
  },
  {
    id: "prod_006",
    name: "USB-C Hub",
    description: "7-in-1 USB-C hub with HDMI, SD card reader, and USB ports",
    price: 39.99,
    category: "accessories",
    image: "/images/usb-hub.jpg",
    stock: 50,
  },
  {
    id: "prod_007",
    name: "Noise-Cancelling Headphones",
    description: "Over-ear headphones with active noise cancellation",
    price: 199.99,
    category: "electronics",
    image: "/images/headphones.jpg",
    stock: 20,
  },
  {
    id: "prod_008",
    name: "Ergonomic Mouse Pad",
    description: "Mouse pad with wrist support for ergonomic comfort",
    price: 19.99,
    category: "accessories",
    image: "/images/mousepad.jpg",
    stock: 100,
  },
];

export async function getAllProducts(): Promise<Product[]> {
  await new Promise((resolve) => setTimeout(resolve, 300));
  return [...productData];
}

export async function getProductById(id: string): Promise<Product | null> {
  await new Promise((resolve) => setTimeout(resolve, 200));
  return productData.find((product) => product.id === id) || null;
}

export async function getProductsByCategory(
  category: string
): Promise<Product[]> {
  await new Promise((resolve) => setTimeout(resolve, 300));
  return productData.filter((product) => product.category === category);
}

export async function searchProducts(query: string): Promise<Product[]> {
  await new Promise((resolve) => setTimeout(resolve, 400));

  const searchTerm = query.toLowerCase();
  return productData.filter(
    (product) =>
      product.name.toLowerCase().includes(searchTerm) ||
      product.description.toLowerCase().includes(searchTerm)
  );
}

export const productService = {
  getAllProducts,
  getProductById,
  getProductsByCategory,
  searchProducts,
};
Step 3: Rate Limiting — Middleware and Test API
We are going to create a middleware for rate limiting, which will basically do three things for us:
- Creates three different rate limiters with various limits
- Applies them based on URL path patterns
- Uses a matcher to only run on API routes
Create a middleware.ts file in the root of the src folder and paste in the code below.
import { NextRequest, NextResponse } from "next/server";
import { createEdgeRateLimiter } from "./lib/edge-rate-limiter";

// Create rate limiters with different settings
const rateLimiters = {
  default: createEdgeRateLimiter({ limit: 60, timeWindow: 60 }), // 60 requests per minute
  auth: createEdgeRateLimiter({ limit: 10, timeWindow: 60 }), // 10 requests per minute
  sensitive: createEdgeRateLimiter({ limit: 3, timeWindow: 60 }), // 3 requests per minute
};

export function middleware(request: NextRequest) {
  const path = request.nextUrl.pathname;

  // Apply different rate limits based on path
  if (path.startsWith("/api/tests/admin")) {
    return rateLimiters.sensitive(request);
  } else if (path.startsWith("/api/tests/auth")) {
    return rateLimiters.auth(request);
  } else if (path.startsWith("/api/")) {
    return rateLimiters.default(request);
  }

  return NextResponse.next();
}

export const config = {
  matcher: ["/api/:path*"],
};
For the test endpoints to demonstrate different rate limits, create a folder called api in the app directory. Then create another folder called tests. This is where our test endpoints will live. In the tests folder, create three sub-folders: admin, auth and basic respectively. For each of these subfolders, create a route.ts file.
In the app/api/tests/admin/route.ts file, paste the code below:
import { NextRequest, NextResponse } from "next/server";

export function GET(request: NextRequest) {
  return NextResponse.json({
    message: "Admin rate limited endpoint (very strict)",
    timestamp: new Date().toISOString(),
    path: "/api/tests/admin",
  });
}
Similarly, in the auth directory:
import { NextRequest, NextResponse } from "next/server";

export function GET(request: NextRequest) {
  return NextResponse.json({
    message: "Auth rate limited endpoint (moderate)",
    timestamp: new Date().toISOString(),
    path: "/api/tests/auth",
  });
}
Finally, in the basic directory:
import { NextRequest, NextResponse } from "next/server";

export function GET(request: NextRequest) {
  return NextResponse.json({
    message: "Default rate limited endpoint",
    timestamp: new Date().toISOString(),
    path: "/api/tests/basic",
  });
}
Step 4: Caching — Building the Product APIs
Now we can proceed with creating our api routes for caching. In the app/api folder, create a new folder called products. In this folder, create a sub-folder called categories and a file called route.ts. In the route file, paste in the code below
import { NextRequest, NextResponse } from "next/server";
import { productService } from "@/lib/product";
import { getCacheInstance } from "@/lib/redis";

// GET /api/products - List products with optional filtering
export async function GET(request: NextRequest) {
  try {
    // Parse query parameters
    const searchParams = request.nextUrl.searchParams;
    const category = searchParams.get("category");
    const query = searchParams.get("q");

    let cacheKey = "products";
    if (category) cacheKey += `:category:${category}`;
    if (query) cacheKey += `:search:${query}`;

    const cache = getCacheInstance("api:");

    const cachedData = await cache.get(cacheKey);
    if (cachedData) {
      console.log(`Cache hit for ${cacheKey}`);
      const response = NextResponse.json(cachedData);
      response.headers.set("X-Cache-Status", "HIT");
      return response;
    }

    console.log(`Cache miss for ${cacheKey}, fetching from database...`);

    let products;
    if (query) {
      products = await productService.searchProducts(query);
    } else if (category) {
      products = await productService.getProductsByCategory(category);
    } else {
      products = await productService.getAllProducts();
    }

    const responseData = {
      products,
      count: products.length,
      timestamp: new Date().toISOString(),
    };

    await cache.set(cacheKey, responseData, 60 * 5);

    return NextResponse.json(responseData);
  } catch (error) {
    console.error("Error fetching products:", error);
    return NextResponse.json(
      { error: "Failed to fetch products" },
      { status: 500 }
    );
  }
}
In the subfolder called categories, create another route.ts file and paste in the below:
import { NextRequest, NextResponse } from "next/server";
import { productService } from "@/lib/product";
import { getCacheInstance } from "@/lib/redis";
import { Product } from "@/lib/product";

export async function GET(request: NextRequest) {
  try {
    const cacheKey = "product:categories";

    const cache = getCacheInstance("api:");

    const cachedCategories = await cache.get(cacheKey);
    if (cachedCategories) {
      console.log(`Cache hit for ${cacheKey}`);
      return NextResponse.json(cachedCategories);
    }

    console.log(`Cache miss for ${cacheKey}, computing categories...`);

    const products = await productService.getAllProducts();

    const categories = Array.from(
      new Set(products.map((product: Product) => product.category))
    );

    const responseData = {
      categories,
      count: categories.length,
      timestamp: new Date().toISOString(),
    };

    await cache.set(cacheKey, responseData, 60 * 60);

    return NextResponse.json(responseData);
  } catch (error) {
    console.error("Error fetching categories:", error);
    return NextResponse.json(
      { error: "Failed to fetch categories" },
      { status: 500 }
    );
  }
}
Next, we create a folder in the api directory called cache and in it, a sub-folder called invalidate and a route.ts file.
import { NextRequest, NextResponse } from "next/server";
import { getCacheInstance } from "@/lib/redis";

export async function POST(request: NextRequest) {
  try {
    const { pattern } = await request.json();

    if (!pattern) {
      return NextResponse.json(
        { error: "Pattern is required" },
        { status: 400 }
      );
    }

    const cache = getCacheInstance("api:");

    const deletedCount = await cache.invalidatePattern(pattern);

    return NextResponse.json({
      success: true,
      message: `Invalidated ${deletedCount} cache entries`,
      pattern,
    });
  } catch (error) {
    console.error("Error invalidating cache:", error);
    return NextResponse.json(
      { error: "Failed to invalidate cache" },
      { status: 500 }
    );
  }
}
Step 5: UI — Building the Rate Limiting Demo UI
In the app directory, create a folder called demo and two sub-folders called caching and rate-limiting respectively. In the rate-limiting sub-folder, create a page.tsx file and paste below.
"use client";

import { useState } from "react";
import Link from "next/link";

export default function RateLimitingDemo() {
  const [requests, setRequests] = useState<any[]>([]);
  const [loading, setLoading] = useState(false);
  const [requestCount, setRequestCount] = useState(5);
  const [endpoint, setEndpoint] = useState("/api/tests/basic");

  async function makeRequests() {
    setLoading(true);
    setRequests([]);

    const newRequests = [];

    const promises = Array.from({ length: requestCount }, (_, i) => {
      return fetch(endpoint)
        .then((response) => {
          const headers = {
            status: response.status,
            limit: response.headers.get("X-RateLimit-Limit"),
            remaining: response.headers.get("X-RateLimit-Remaining"),
            reset: response.headers.get("X-RateLimit-Reset"),
          };

          return response
            .json()
            .then((data) => {
              return { id: i + 1, headers, data, success: response.ok };
            })
            .catch(() => {
              return {
                id: i + 1,
                headers,
                data: { error: "Failed to parse JSON" },
                success: false,
              };
            });
        })
        .catch((error) => {
          return {
            id: i + 1,
            headers: {},
            data: { error: error.message },
            success: false,
          };
        });
    });

    const results = await Promise.all(promises);

    setRequests(results);
    setLoading(false);
  }

  return (
    <div className="min-h-screen p-8 bg-black text-black ">
      <div className="max-w-5xl mx-auto">
        <div className="mb-6">
          <Link href="/" className="text-blue-600 hover:underline">
            ← Back to home
          </Link>
        </div>

        <h1 className="text-3xl font-bold mb-6">Redis Rate Limiting Demo</h1>

        <div className="bg-white p-6 rounded-lg shadow-md mb-8">
          <h2 className="text-xl font-semibold mb-4">How It Works</h2>
          <p className="mb-4">
            This demo shows Redis-based rate limiting in action. We've
            configured the API to limit requests based on client IP address.
          </p>
          <p>
            Try making multiple requests at once to see how the rate limiter
            kicks in after exceeding the allowed limit.
          </p>
        </div>

        <div className="bg-white p-6 rounded-lg shadow-md mb-8">
          <h2 className="text-xl font-semibold mb-4">Test Rate Limiting</h2>

          <div className="flex flex-col md:flex-row gap-4 mb-6">
            <div className="flex-1">
              <label
                htmlFor="requestCount"
                className="block text-sm font-medium text-gray-700 mb-1"
              >
                Number of Requests
              </label>
              <input
                type="number"
                id="requestCount"
                min="1"
                max="20"
                value={requestCount}
                onChange={(e) => setRequestCount(parseInt(e.target.value))}
                className="w-full p-2 border border-gray-300 rounded-md"
              />
            </div>

            <div className="flex-1">
              <label
                htmlFor="endpoint"
                className="block text-sm font-medium text-gray-700 mb-1"
              >
                API Endpoint
              </label>
              <select
                id="endpoint"
                value={endpoint}
                onChange={(e) => setEndpoint(e.target.value)}
                className="w-full p-2 border border-gray-300 rounded-md"
              >
                <option value="/api/tests/basic">
                  Default Rate Limit (60/min)
                </option>
                <option value="/api/tests/auth">
                  Auth Rate Limit (10/min)
                </option>
                <option value="/api/tests/admin">
                  Admin Rate Limit (3/min)
                </option>
              </select>
            </div>

            <div className="flex-1 flex items-end">
              <button
                onClick={makeRequests}
                disabled={loading}
                className="w-full bg-blue-600 text-white py-2 px-4 rounded hover:bg-blue-700 disabled:bg-blue-300"
              >
                {loading ? "Sending Requests..." : "Send Requests"}
              </button>
            </div>
          </div>
        </div>

        {requests.length > 0 && (
          <div className="bg-white p-6 rounded-lg shadow-md">
            <h2 className="text-xl font-semibold mb-4">Request Results</h2>

            <div className="overflow-x-auto">
              <table className="min-w-full divide-y divide-gray-200">
                <thead className="bg-gray-50">
                  <tr>
                    <th className="px-6 py-3 text-left text-xs font-medium text-gray-500 uppercase tracking-wider">
                      #
                    </th>
                    <th className="px-6 py-3 text-left text-xs font-medium text-gray-500 uppercase tracking-wider">
                      Status
                    </th>
                    <th className="px-6 py-3 text-left text-xs font-medium text-gray-500 uppercase tracking-wider">
                      Rate Limit
                    </th>
                    <th className="px-6 py-3 text-left text-xs font-medium text-gray-500 uppercase tracking-wider">
                      Remaining
                    </th>
                    <th className="px-6 py-3 text-left text-xs font-medium text-gray-500 uppercase tracking-wider">
                      Response
                    </th>
                  </tr>
                </thead>
                <tbody className="bg-white divide-y divide-gray-200">
                  {requests.map((request) => (
                    <tr key={request.id}>
                      <td className="px-6 py-4 whitespace-nowrap">
                        {request.id}
                      </td>
                      <td className="px-6 py-4 whitespace-nowrap">
                        <span
                          className={`px-2 inline-flex text-xs leading-5 font-semibold rounded-full ${
                            request.success
                              ? "bg-green-100 text-green-800"
                              : "bg-red-100 text-red-800"
                          }`}
                        >
                          {request.headers.status || "Error"}
                        </span>
                      </td>
                      <td className="px-6 py-4 whitespace-nowrap">
                        {request.headers.limit || "-"}
                      </td>
                      <td className="px-6 py-4 whitespace-nowrap">
                        {request.headers.remaining || "-"}
                      </td>
                      <td className="px-6 py-4">
                        <pre className="text-xs bg-gray-50 p-2 rounded overflow-x-auto">
                          {JSON.stringify(request.data, null, 2)}
                        </pre>
                      </td>
                    </tr>
                  ))}
                </tbody>
              </table>
            </div>
          </div>
        )}
      </div>
    </div>
  );
}
Step 6: UI — Building the Caching Demo UI
In the demo/caching folder, create a page.tsx file and copy the code below.
"use client";

import { useState, useEffect } from "react";
import Link from "next/link";
import { Product } from "@/lib/product";

export default function CachingDemo() {
  const [products, setProducts] = useState<Product[]>([]);
  const [loading, setLoading] = useState(false);
  const [responseTime, setResponseTime] = useState(0);
  const [cacheStatus, setCacheStatus] = useState("");
  const [category, setCategory] = useState("");
  const [categories, setCategories] = useState<string[]>([]);

  useEffect(() => {
    async function fetchCategories() {
      const response = await fetch("/api/products/categories");
      const data = await response.json();
      setCategories(data.categories);
    }

    fetchCategories();
  }, []);

  async function fetchProducts() {
    setLoading(true);
    setCacheStatus("");

    const startTime = performance.now();

    let url = "/api/products";
    if (category) {
      url += `?category=${category}`;
    }

    const response = await fetch(url);
    const data = await response.json();

    const endTime = performance.now();

    setProducts(data.products);
    setResponseTime(endTime - startTime);

    setCacheStatus(endTime - startTime < 500 ? "HIT" : "MISS");

    setLoading(false);
  }

  async function invalidateCache() {
    setLoading(true);

    const response = await fetch("/api/cache/invalidate", {
      method: "POST",
      headers: {
        "Content-Type": "application/json",
      },
      body: JSON.stringify({
        pattern: "products",
      }),
    });

    const data = await response.json();
    alert(`Cache invalidated: ${data.message}`);

    setLoading(false);

    fetchProducts();
  }

  return (
    <div className="min-h-screen p-8 bg-black text-black">
      <div className="max-w-5xl mx-auto">
        <div className="mb-6">
          <Link href="/" className="text-blue-600 hover:underline">
            ← Back to home
          </Link>
        </div>

        <h1 className="text-3xl font-bold mb-6">Redis Caching Demo</h1>

        <div className="bg-white p-6 rounded-lg shadow-md mb-8">
          <h2 className="text-xl font-semibold mb-4">How It Works</h2>
          <p className="mb-4">
            This demo shows Redis caching in action. When you fetch products,
            the first request will be slow as it goes to the database.
            Subsequent requests will be fast as they come from the Redis cache.
          </p>
          <p>
            Try fetching products multiple times to see the difference in
            response time between cache misses and hits.
          </p>
        </div>

        <div className="bg-white p-6 rounded-lg shadow-md mb-8">
          <h2 className="text-xl font-semibold mb-4">Test Caching</h2>

          <div className="flex flex-col md:flex-row gap-4 mb-6">
            <div className="flex-1">
              <label
                htmlFor="category"
                className="block text-sm font-medium text-gray-700 mb-1"
              >
                Filter by Category
              </label>
              <select
                id="category"
                value={category}
                onChange={(e) => setCategory(e.target.value)}
                className="w-full p-2 border border-gray-300 rounded-md"
              >
                <option value="">All Categories</option>
                {categories.map((cat) => (
                  <option key={cat} value={cat}>
                    {cat.charAt(0).toUpperCase() + cat.slice(1)}
                  </option>
                ))}
              </select>
            </div>

            <div className="flex-1 flex items-end">
              <button
                onClick={fetchProducts}
                disabled={loading}
                className="w-full bg-blue-600 text-white py-2 px-4 rounded hover:bg-blue-700 disabled:bg-blue-300"
              >
                {loading ? "Loading..." : "Fetch Products"}
              </button>
            </div>

            <div className="flex-1 flex items-end">
              <button
                onClick={invalidateCache}
                disabled={loading}
                className="w-full bg-red-600 text-white py-2 px-4 rounded hover:bg-red-700 disabled:bg-red-300"
              >
                Invalidate Cache
              </button>
            </div>
          </div>

          {responseTime > 0 && (
            <div className="mb-4 p-4 bg-gray-100 rounded-md">
              <div className="flex justify-between items-center">
                <p className="text-lg">
                  Response Time:{" "}
                  <span className="font-bold">{responseTime.toFixed(2)}ms</span>
                </p>
                <p className="text-lg">
                  Cache:{" "}
                  <span
                    className={`font-bold ${
                      cacheStatus === "HIT"
                        ? "text-green-600"
                        : "text-yellow-600"
                    }`}
                  >
                    {cacheStatus}
                  </span>
                </p>
              </div>
            </div>
          )}
        </div>

        {products.length > 0 && (
          <div className="bg-white p-6 rounded-lg shadow-md">
            <h2 className="text-xl font-semibold mb-4">
              Products ({products.length})
            </h2>
            <div className="grid md:grid-cols-2 lg:grid-cols-3 gap-4">
              {products.map((product) => (
                <div key={product.id} className="border rounded-md p-4">
                  <h3 className="font-medium text-lg mb-1">{product.name}</h3>
                  <p className="text-gray-500 text-sm mb-2">
                    {product.category}
                  </p>
                  <p className="font-bold text-lg mb-2">
                    ${product.price.toFixed(2)}
                  </p>
                  <p className="text-sm text-gray-700">{product.description}</p>
                </div>
              ))}
            </div>
          </div>
        )}
      </div>
    </div>
  );
}
Testing Our Application
Phew! That was a lot of code, but finally we can test it out. The first thing is to run our development server.
npm run devTo test the features:
1. Caching Demo
- Click on the caching demo.
- Select a category and click "Fetch Products."
- Note the response time.
- Click "Fetch Products" again and observe the much faster response time, as well as cache hits and misses.
- Try clicking "Invalidate Cache" and then "Fetch Products" again.

Initial response time is 2004.50 ms (without cache).
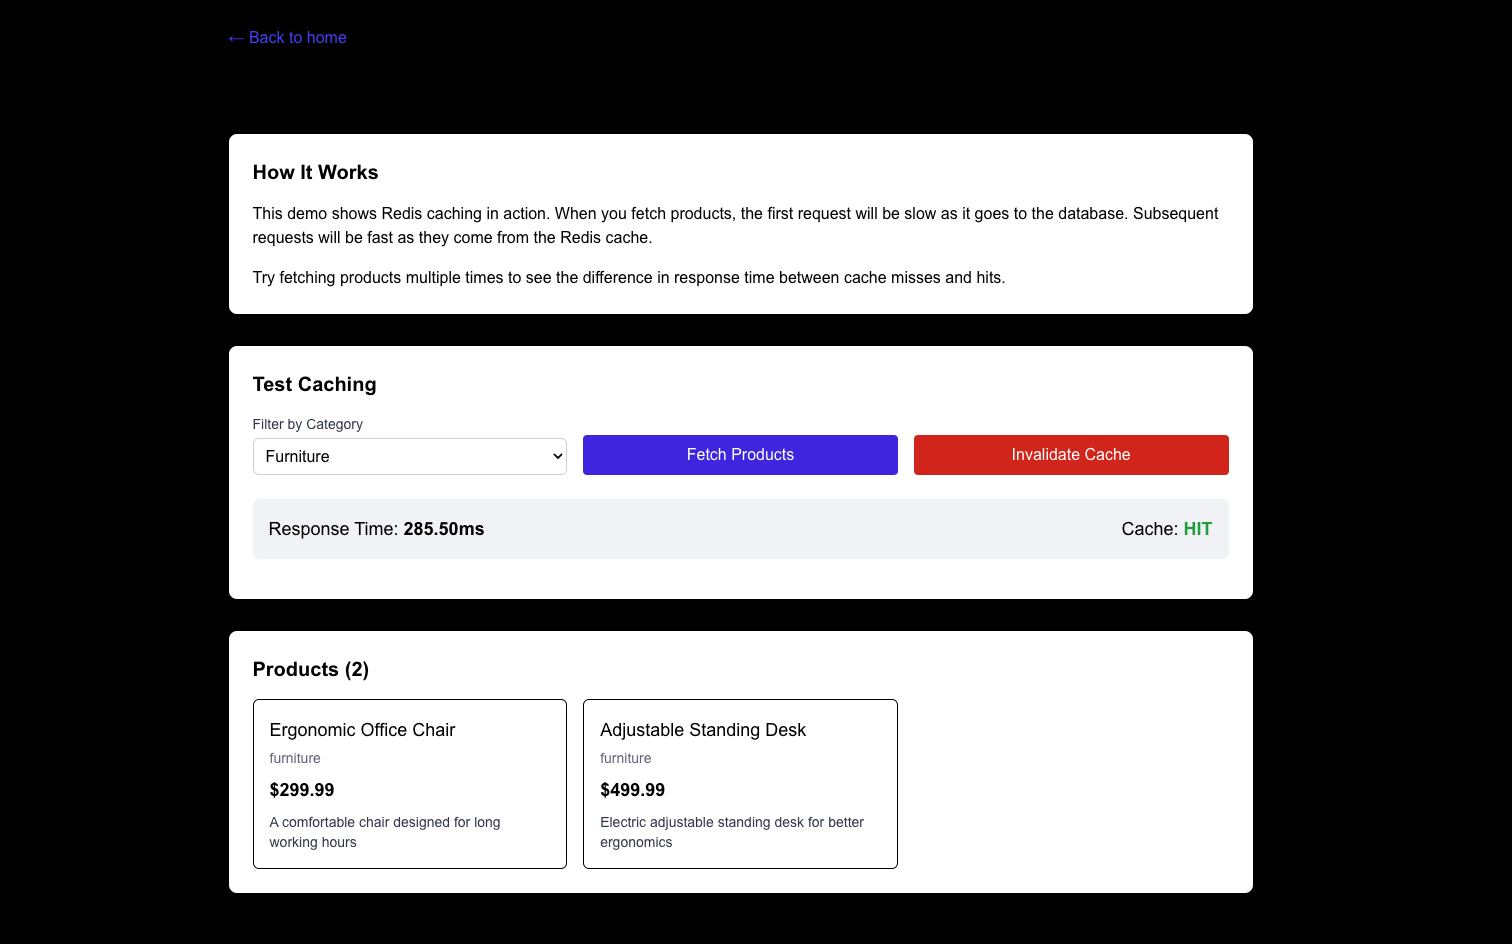
Response time with cache — 285.50ms!
2. Rate-Limiting Demo
- Click on the rate-limiting demo.
- Select the "Admin Rate Limit" endpoint.
- Set the number of requests to five.
- Click "Send Requests."
- Observe how the first three requests succeed, but the next two fail with a 429 error.
- Try different endpoints with different rate limits.
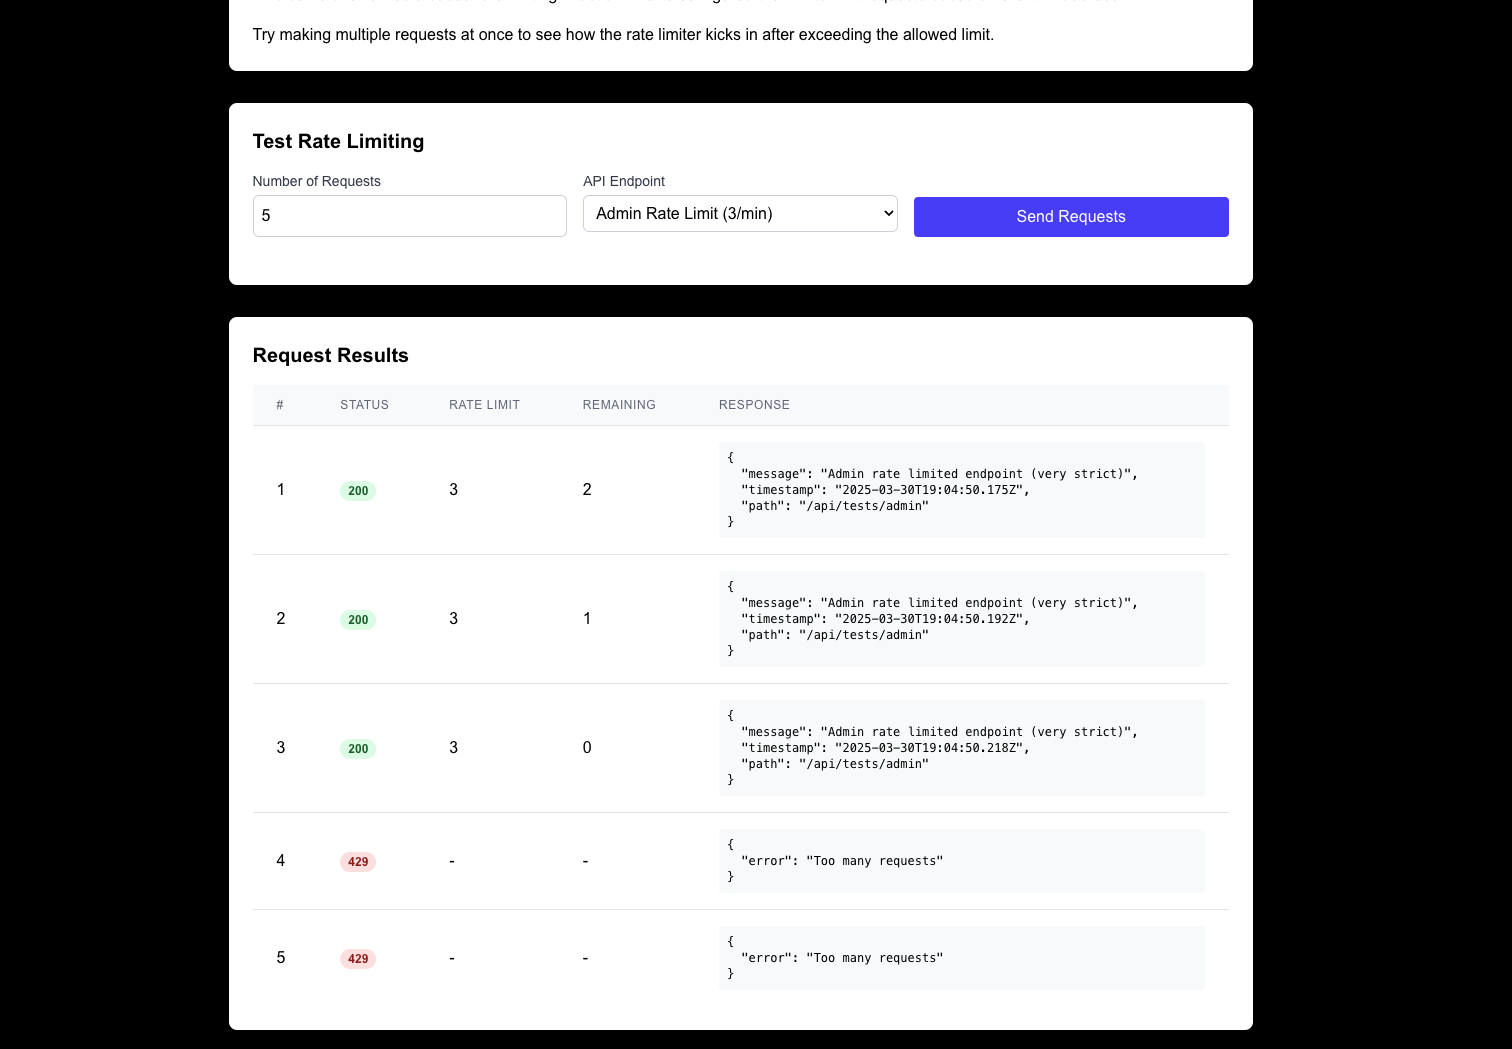
The admin rate limit allows just one request per minute. You can see the first three requests were successful, and the other two failed.

When we make a request again within the same minute, we see that all request fails.
How It All Works
Let's review how the different components of our application interact:
Caching Flow
- The user selects a category and clicks "Fetch Products" in the UI.
- The client sends a request to /api/products?category=xyz.
- The API route checks Redis for a cached response using getCacheInstance().
- If a cache hit occurs:
- The cached data is returned with an X-Cache-Status: HIT header
- The response is very fast (usually under 50ms)
- If a cache miss occurs:
- The data is fetched from the product service
- The data is stored in Redis with a 5-minute TTL
- The response is returned (slower, typically 300–1000ms)
- The UI displays the products and shows the response time
Rate Limiting Flow
- The user selects an endpoint and number of requests, then clicks "Send Requests."
- The client sends multiple requests to the selected endpoint
- For each request, the middleware intercepts the request and calls the appropriate rate limiter
- The rate limiter:
- Tracks the request count for the client's IP address
- Adds rate limit headers to the response
- If the limit is exceeded, it returns a 429 error
- The UI displays the results, showing status codes, remaining requests, and response data
Conclusion
This is a demonstration on how to implement caching and rate-limiting using Redis. It is a long tutorial, but the intention is to be as elaborate as possible, so it's easy to understand. You can also find the complete project here. Thanks for reading!
Opinions expressed by DZone contributors are their own.
Comments