Canary and Dark Release Using an Istio Service Mesh on Kubernetes
In this article, take a look at a canary and dark release using an Istio service mesh on Kubernetes.
Join the DZone community and get the full member experience.
Join For FreeIstio Service Mesh on Kubernetes (k8s) cluster brings in quite a few architectural patterns off the shelf. In this article , I want to show you how we can quickly implement Canary Releases and Dark Releases using Istio service mesh
As a developer, it is imperative that you are able to install a k8s cluster and try out. With the latest release of Kops, it is pretty straightforward to fire up a new K8s cluster on AWS. I have created a series of steps and commands in my repo here - Kubernetes-AWS-Istio, which you can follow to create it on AWS. I have also kept istio installation file that you can apply using kubectl to start Istio pods on cluster. You do not need to install Istioctl to install Istio if you use the file provided by me. The Istio installation file on my repo is a standard K8s YAML.
Istio is resource hungry and may require stop-start in case you want to run it on Minikube locally instead of AWS. In my repo, I have also kept a reduced Istio profile for Minikube. You can apply this file using kubectl. You should start Minikube with at least 4096 mb memory.
Canary Release
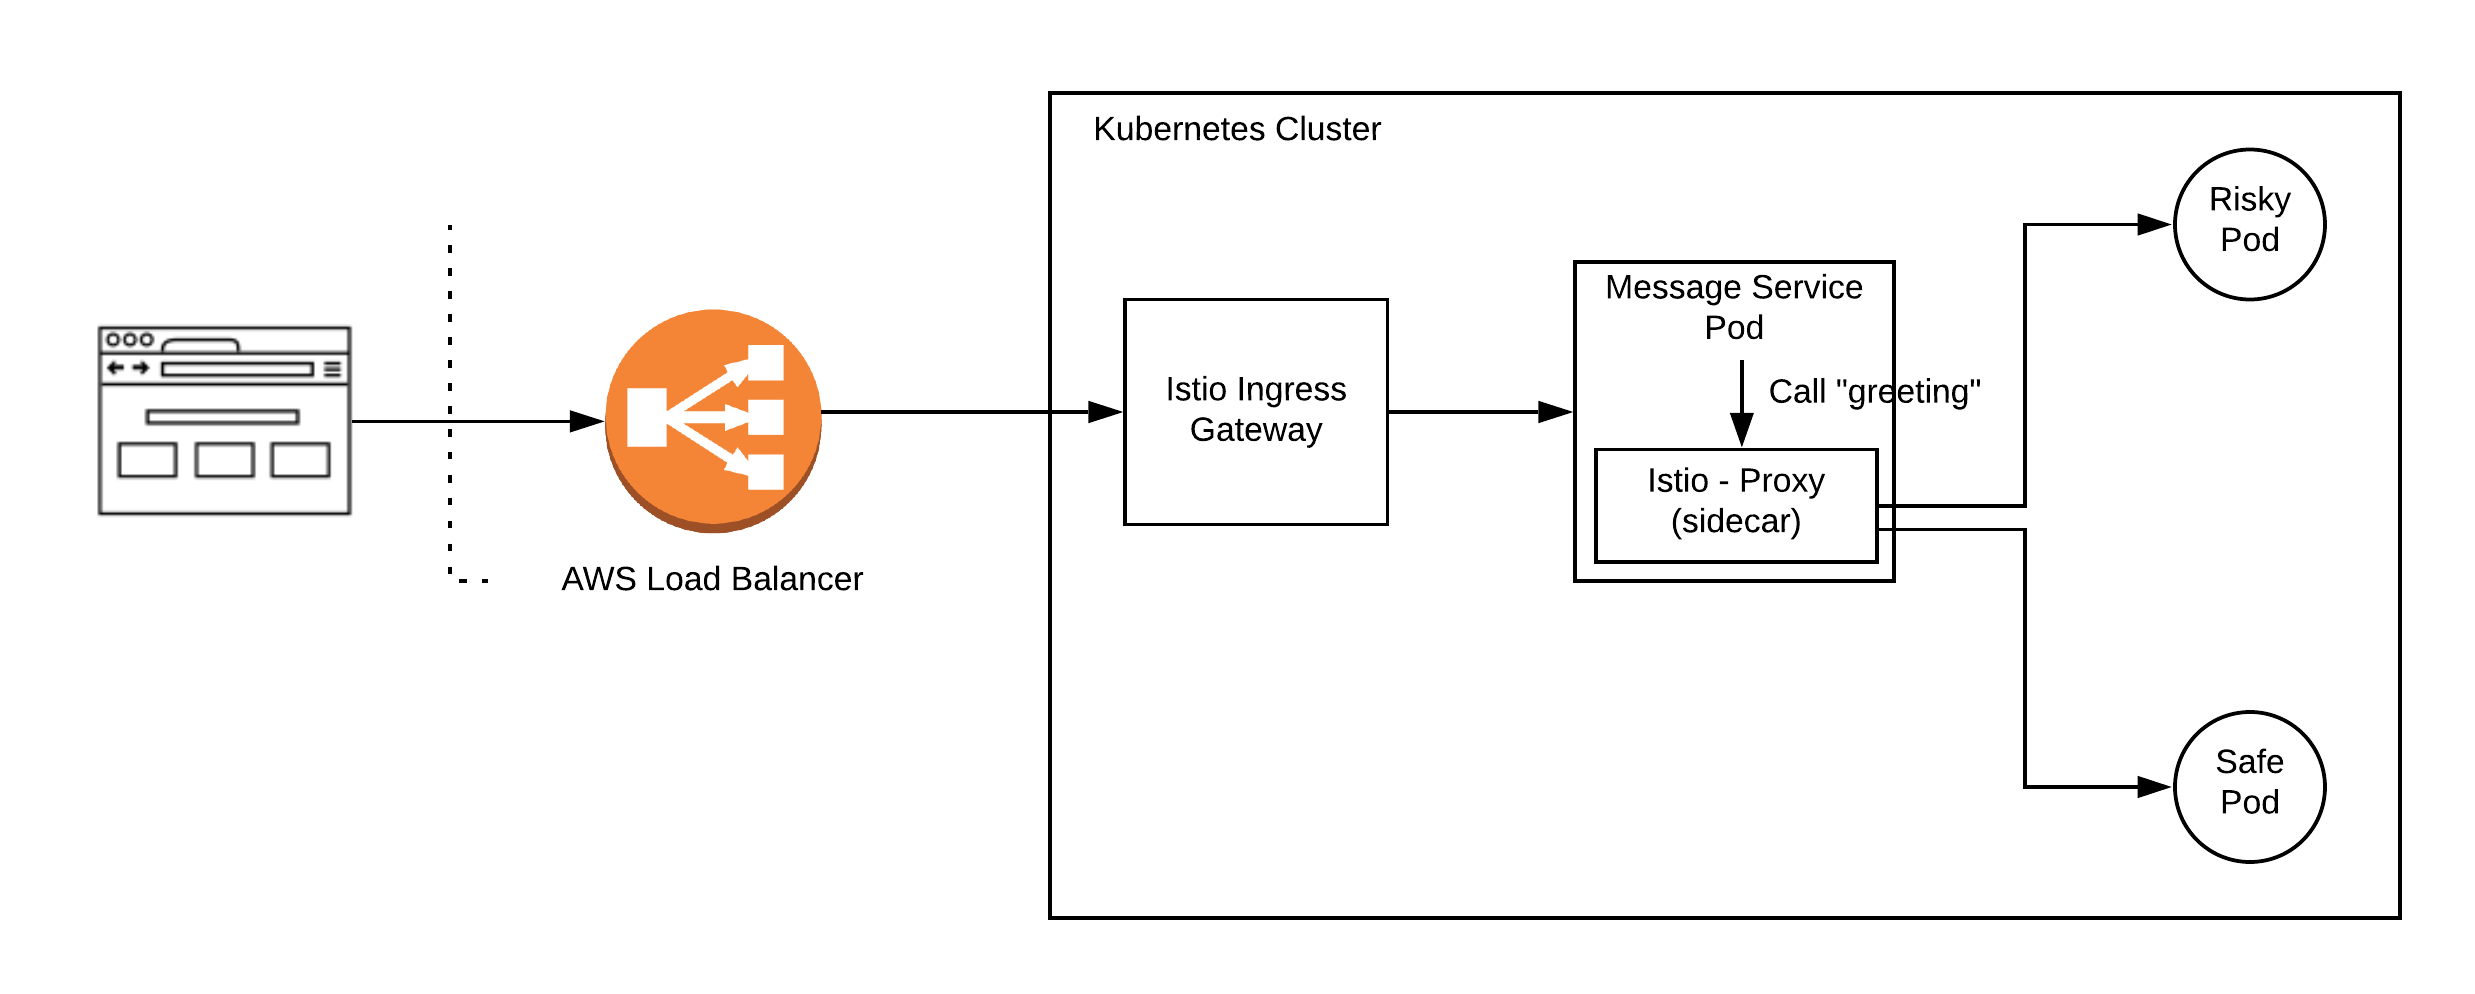
Canary release is a form of deployment where you want to divert a percentage of traffic to new version to test out the correctness before opening up to all users. In the below picture, we have a message service, which internally calls up another service called “greeting” to get those messages. This greeting service now has new pods labeled risky, which you want to try as canary before releasing it fully.
With this background, let us start configuring Istio.
1. Configure Ingress Gateway
- Set up Ingress Gateway: Below I have kept the hosts field as * , to respond to all hosts. If You want to set it up for specific hosts, you can do that as well by providing url for that.
xxxxxxxxxx
apiVersionnetworking.istio.io/v1alpha3
kindGateway
metadata
nameingress-gateway-configuration
spec
selector
istioingressgateway # use Istio default gateway implementation
servers
port
number80
namehttp
protocolHTTP
hosts
"*" # Domain name of the external website
- Set up Virtual Service: Virtual service is where the routing decision happens. In our set up, we want all requests coming to ingress gateway to call up Message Service. You can do a variety of route settings on virtual service based on path and headers etc. which we will see later.
xxxxxxxxxx
kindVirtualService
apiVersionnetworking.istio.io/v1alpha3
metadata
namehello-gateway
namespacedefault
spec
hosts# which incoming host are we applying the proxy rules to???
"*"
gateways
ingress-gateway-configuration
http
route# CATCH ALL
destination
hostmessage.default.svc.cluster.local
subsetsafe
- Set up Destination Rules: Destination rules can be thought of as load balancing set up for a service. We can apply variety of traffic rules here before actual service is initiated. In this case, we are making a straight call to message service.
xxxxxxxxxx
kindDestinationRule
apiVersionnetworking.istio.io/v1alpha3
metadata
namehello-gateway
namespacedefault
spec
hostmessage.default.svc.cluster.local
subsets
labels# SELECTOR.
appmessage # find mesage service pods
namesafe
2. Configure Message Service
Message Service calls up greeting service internally. However, the call to greeting service is intercepted by Istio-proxy and this is how Istio is able to offer various patterns. In this case, greeting service intercepted by Istio can now be set up to bifurcate traffic among our safe and risky pods, thus a canary release
- Set up Virtual Service: Virtual service is where routing decision happens. We want to route 80 percent of traffic to safe or existing pods and 20 percent of traffic to canary or risky pods.
xxxxxxxxxx
kindVirtualService
apiVersionnetworking.istio.io/v1alpha3
metadata
namegreeting
namespacedefault
spec
hosts# incoming host are we applying the proxy rules to
greeting.default.svc.cluster.local # Copy the value in the gateway hosts - usually a Domain Name
http
route
destination
hostgreeting.default.svc.cluster.local # The Target DNS name
subsetsafe # The name defined in the DestinationRule
weight80
destination
hostgreeting.default.svc.cluster.local # The Target DNS name
subsetrisky # The name defined in the DestinationRule
weight20
- Set up Destination Rule: This is where you load balance your service. Here we have divided based on pod labels. All new canary pods are labeled risky and existing running pods are labeled safe.
xxxxxxxxxx
kindDestinationRule
apiVersionnetworking.istio.io/v1alpha3
metadata
namegreeting
namespacedefault
spec
hostgreeting.default.svc.cluster.local
subsets
labels# SELECTOR.
versionsafe # find pods with label "safe"
namesafe
labels# SELECTOR.
versionrisky # find pods with label "risky"
namerisky
DARK Release
Dark release is when you want only specific users to be able to access the service. Istio is powerful and configurable. If instead of Canary release, you wanted to do a dark release then you can set up proxy configurations.
In my example, I have decided that all user requests which carry extra header - “ x-my-header” with value as dark, would go to newly deployed risky pod. Rest other requests, which do not carry this header, would continue on safe existing pods.
Set up Virtual Service: Virtual service is where routing decision happens. Here we have configured our service to match headers in the request and then called up Dark Release pod set up in Destination Rule.
kindVirtualService
apiVersionnetworking.istio.io/v1alpha3
metadata
namehello-kubernetes
namespacedefault
spec
hosts# which incoming host are we applying the proxy rules to???
greeting.default.svc.cluster.local # Copy the value in the gateway hosts - usually a Domain Name
http
match
headers# Match header
x-my-header# header that we decided for dark release
exactdark # exact match
route
destination
hostgreeting.default.svc.cluster.local # The Target DNS name for dark release
subsetrisky # The name defined in the DestinationRule
route
destination
hostgreeting.default.svc.cluster.local # The Target DNS name
subsetsafe # The name defined in the DestinationRule
- Set up Destination Rule: This remains the same as in Canary Release
We could also do mirroring of requests as well using Istio. That implies that you can make a service live and keep pushing user requests to it to generate output, which you can then compare with the live running system.
You can follow instructions in my repo Kubernetes-AWS-Istio to run this as a live example.
Happy coding!
Opinions expressed by DZone contributors are their own.
Comments