CI/CD: 5 Simple Steps To Deploy a Mule 4 Application in CloudHub Using Jenkins and GitHub
This article shows you how simple it is to deploy a MuleSoft Application on Cloudhub with the help of Jenkins. This process is something we call a CI/CD process.
Join the DZone community and get the full member experience.
Join For FreeThis article will show you how simple it is to deploy a MuleSoft Application on Cloudhub with the help of Jenkins. This process is something we call a CI/CD process.
Before getting started, please watch the below video on how to commit our code in the GitHub repository.
Make sure that you add the below configuration details in your configuration tab in your pom.xml of the Mule app:
x
<cloudHubDeployment>
<uri>https://anypoint.mulesoft.com</uri>
<muleVersion>${mule.version}</muleVersion>
<username>${anypoint.username}</username>
<password>${anypoint.password}</password>
<environment>${env}</environment>
<applicationName>${appname}</applicationName>
<businessGroup>${business}</businessGroup>
<workerType>${vCore}</workerType>
<workers>${workers}</workers>
<objectStoreV2>true</objectStoreV2>
</cloudHubDeployment>
Basically, the hero of this process is the mule maven plugin. This helps in establishing the process connection between Jenkins and Anypoint Runtime Manager. So let's get started.
Step 1
Install Jenkins from https://www.jenkins.io/download/. Choose the correct OS and install accordingly. While installing Jenkins it may ask you to select the port for localhost. By default, it says 8080. If 8080 is available, test it and then proceed. Create a user when it prompts. Now your login page will have http://locahost:8080/ with a username and password.
Step 2
Install JAVA, Git, and Maven on your system. Add necessary system variables for installation. Make sure you know where Git and Maven are installed so that you can implement the Jenkins configuration. If it’s not installed in Program Files, then you might have to specify their installation paths (eg: /../Git/bin) in Global Jenkins Configuration.
Make sure you run the below commands on CMD (if windows) or Terminal (if Mac) to check the status of installations:
For Java: java -version
For Maven: mvn –-version
For Git: git --version
Step 3
The reason why we require these installations is Anypoint Studio comes with Java and Maven built-in by default. So when you run your application, it will deploy successfully, but Jenkins is something we are executing out of Anypoint studio. So to run Mule App externally, we need Java and Maven to be installed on your local system wherever you are setting up Jenkins.
Step 4
After you log in to http://localhost:8081. Click on create Job --> Give a name (preferred project name) and select Freestyle Project.
Now you will find different sections. For simple deployment, use the below config details:
- General Section: Add a description
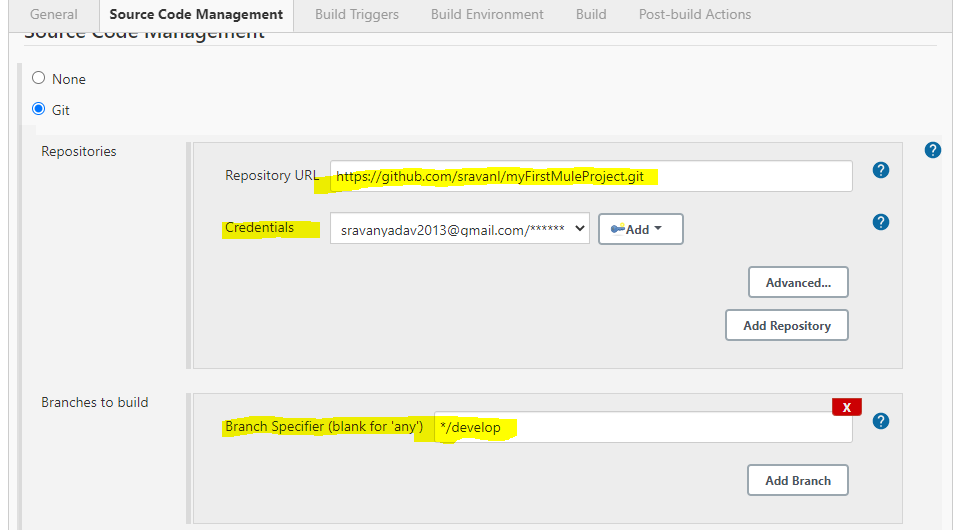
- Source Code Management: If you see "None," then please install the GitHub Plugin. To do so, go to the Jenkins home page and click Manage Jenkins, which is on the left side. Click on Manage Plugin and search for GitHub in Available Filter Mode.
- Once you see the Git option, enter details like the Git repo link to your project. This will be your Clone URL.
- Add Git Credentials
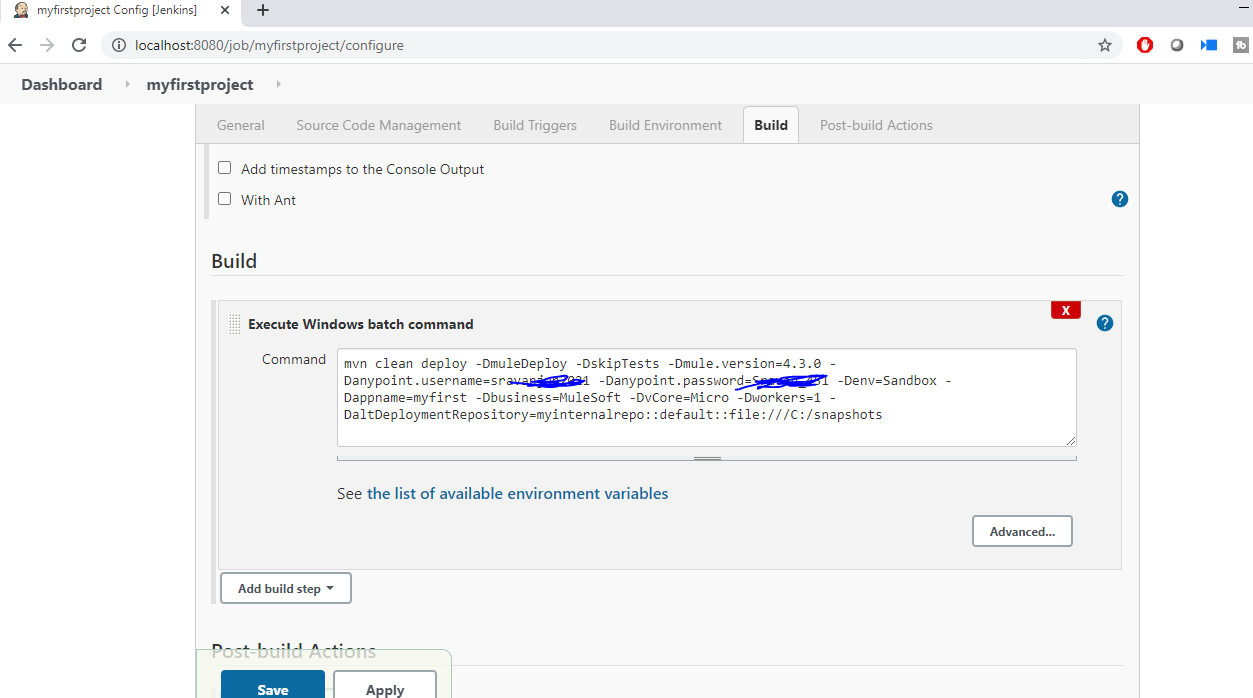
- Build: Select Execute Windows batch command if you are using Windows OS or select Execute Shell command if using Mac or Linux OS
Use the below command:
xxxxxxxxxx
mvn clean deploy -DmuleDeploy -DskipTests -Dmule.version=4.3.0
-Danypoint.username=yourusername -Danypoint.password=yourpassword
-Denv=Sandbox -Dappname=myfirst -Dbusiness=MuleSoft -DvCore=Micro
-Dworkers=1 -DaltDeploymentRepository=myinternalrepo::default::file:///C:/snapshots
Step 5
Now save the config details and click on Apply. Then go to the project and click on the Build Now option to start deploying your application. You can see the logs in console output. You can observe that your application is automatically deployed in CloudHub without this manual process like logging in to an Anypoint platform, choosing env, and deploying the app.
This is a simple way to deploy an Application into Cloudhub using Jenkins. Hope you liked it!
Want a step-by-step? Watch the process from the below video:
Opinions expressed by DZone contributors are their own.
Comments