Continuous Delivery Workflows With the Branch-per-Issue Model
Prolific branching keeps your branches clean and releasable, and makes project tracking easier. Learn to create branches in the JIRA server with Bitbucket.
Join the DZone community and get the full member experience.
Join For FreeAs I discussed at length in "Super-Powered Continuous Delivery with Git," using prolific branching in your continuous delivery workflow is a Good Thing™. It helps keep your most important branches in a clean and releasable state, allows developers to try new things without stepping on their teammates' toes, and, if done right, makes project tracking easier.
We've used a branch-per-issue workflow for several years now, as have many of our customers. And we've baked support for it into JIRA Software and the Atlassian developer tools so it's not just a best practice, it's also an easy practice. So let's dive deep into the branch-per-issue model, and how it fits with the three most common continuous delivery workflows: SaaS products, installed or mobile products, and Gitflow (which can work for either product type).
The Basic Branch-per-Issue Workflow
The name pretty much says it all: for each issue you work on (or each code change you make, which really ought to be tracked in JIRA Software anyway), create a development branch. Then do all the implementation and testing work on that branch. When that's complete, submit a pull request, merge up, and release whenever you're ready.
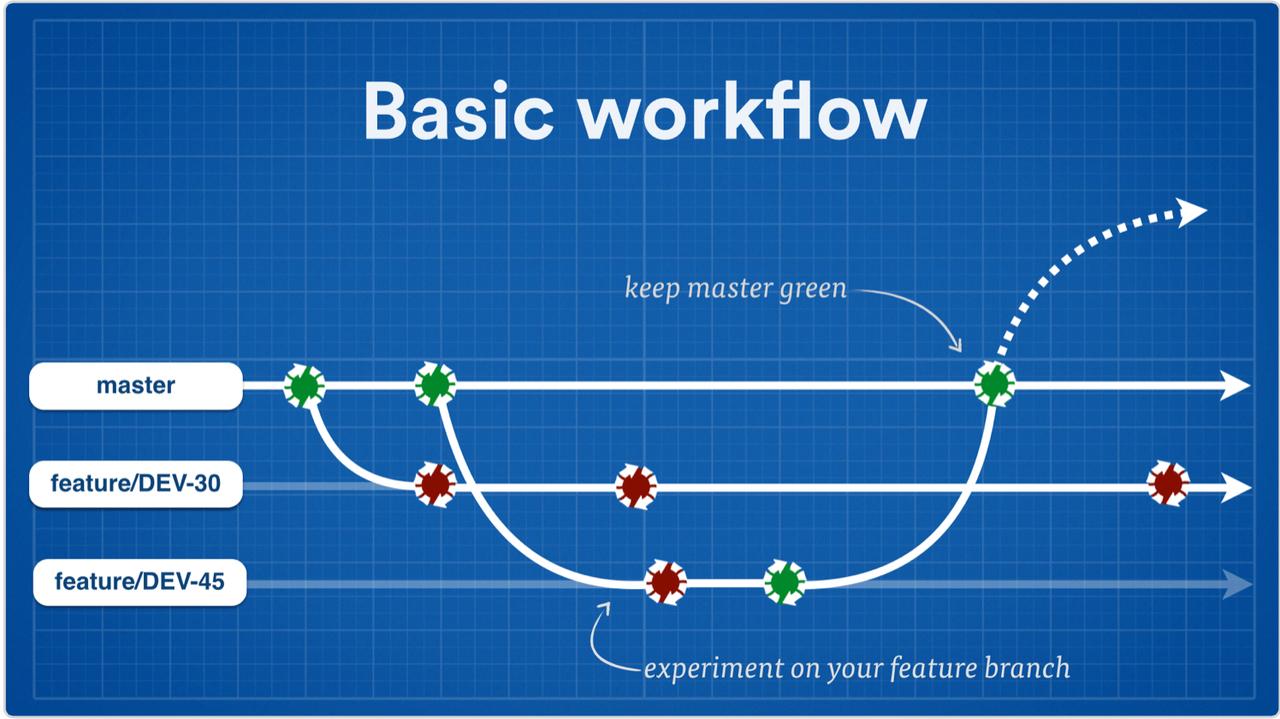
Here's how it breaks down step-by-step using Atlassian tools.
Step 0: Set up Your Tool Integrations
Work with your friendly neighborhood Atlassian admin to integrate JIRA Software, Bitbucket, and Bamboo. Note that you can mix n' match Cloud and Server options. For example, several teams at Atlassian use JIRA Software Server, Bamboo Server, and Bitbucket Cloud. I also recommend SourceTree very highly for those who prefer working with Git through a GUI instead of through the command line. It's free, so I can't think of a single reason not to at least try it. Once you've installed it, connect SourceTree with your repo(s).
You'll also need to do the other obvious stuff like create issues to track your work, set up a repo or two, and configure your builds and deployment jobs.
Step 1: Create Your Branch
Open up the issue in JIRA Software, assign it to yourself, and set it to in progress so your team knows what's up. On the right-hand side is the development panel – click the create branch link inside it. If you have more than one repository manager connected, you'll see a screen that asks you to choose which one will be managing your branch. Else, you'll go straight to the next screen where you'll configure the branch.
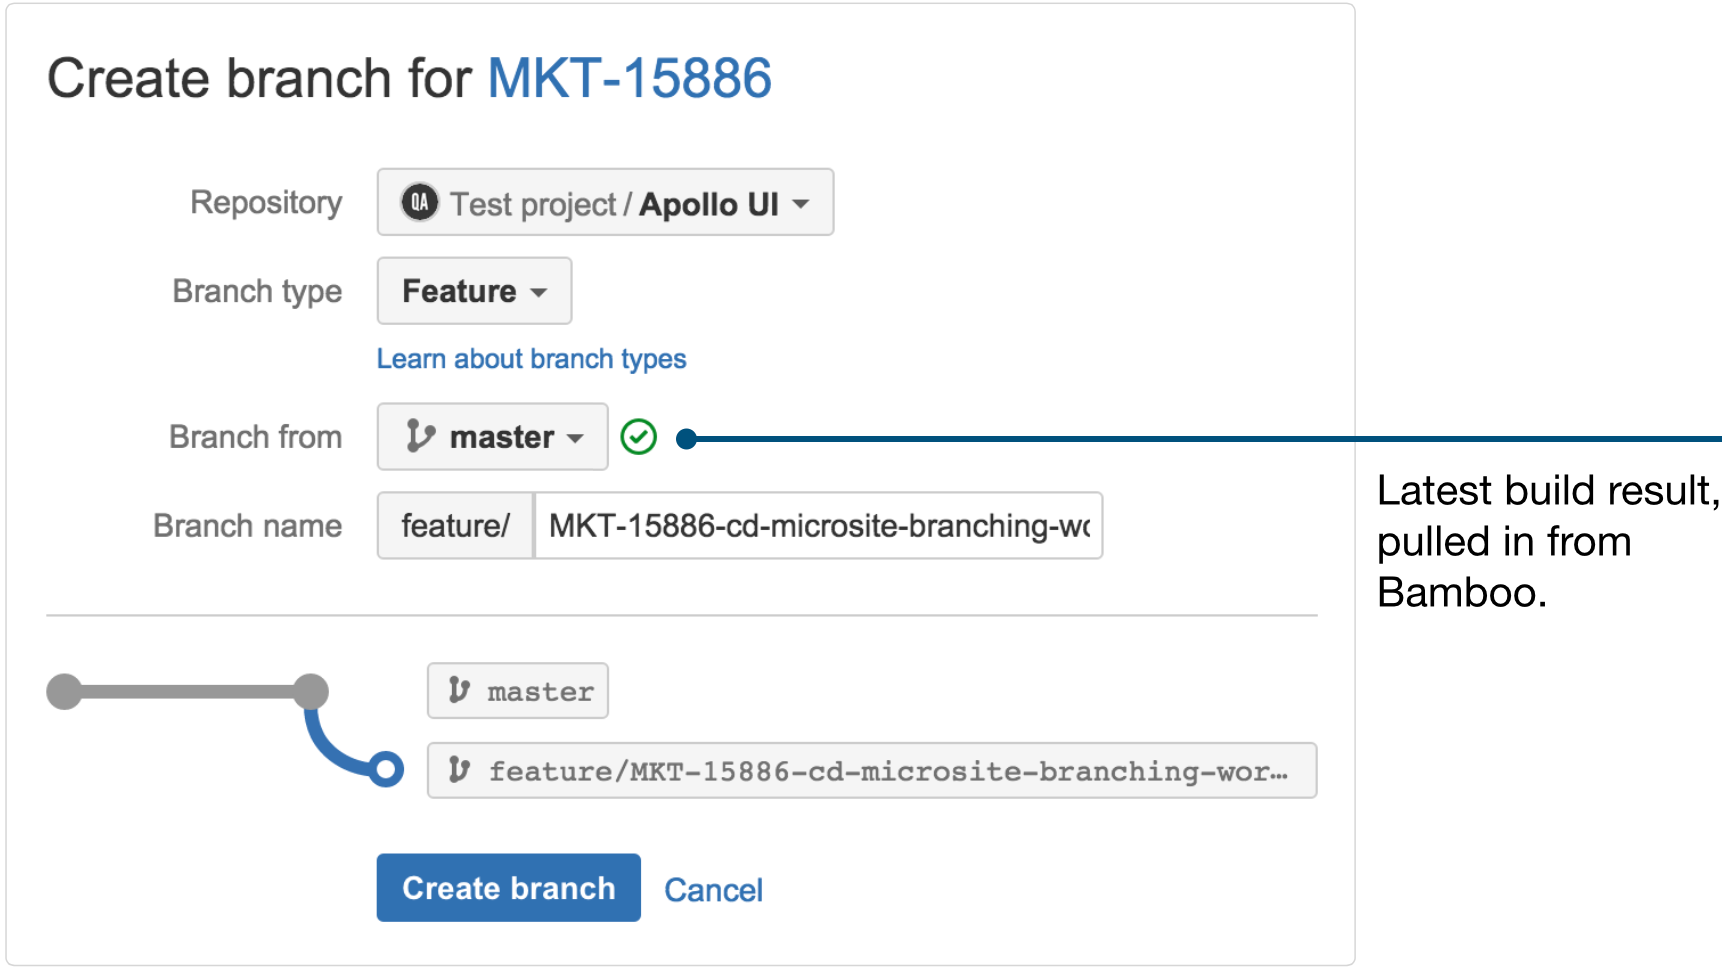
Notice how Bitbucket has picked up the issue key (MKT-15886 in this case), and used it as part of the branch name. This makes all kinds of magical things happen, like sending commit, build, pull request, and deployment information back to the Development panel. Issue keys trigger all sorts of nifty linking and automation throughout your continuous delivery workflow, so be sure to include it in your branch names whether you're working through a UI or cmd.
Also note the drop-downs that let you select a prefix for the branch based on its flavor (bugfix, feature, release, etc.), and the parent branch or tagfrom which to create your new branch. Assuming the branch you select is being built and tested by Bamboo, you'll see an indicator of whether the branch is clean at the moment. Definitely keep an eye on that! The last thing you need is a fresh new branch that's already broken in some way.
Once everything is set to your liking, click on create branch, and Bitbucket does the rest.
Step 2: Code, Test, Repeat
This part is probably familiar: clone the repo locally if you haven't already, check out your new branch, and start coding. By the time you've made your first push to the new branch, Bamboo has already detected it in your repo and configured continuous integration for it using the plan branches feature (assuming you've got automatic branch management enabled). Essentially, Bamboo listens for new branches in your repo and applies whatever builds you've configured for master to them.
I also recommend enabling automatic merging through Bamboo. At the start of each build, Bamboo can check out any two branches, merge them, then run the build against the merged code. So for this stage of the continuous delivery workflow, you merge changes from master down to your feature branch. This way, your branch won't drift far from master, and you'll get early feedback as to whether your changes play nicely with the changes on master.
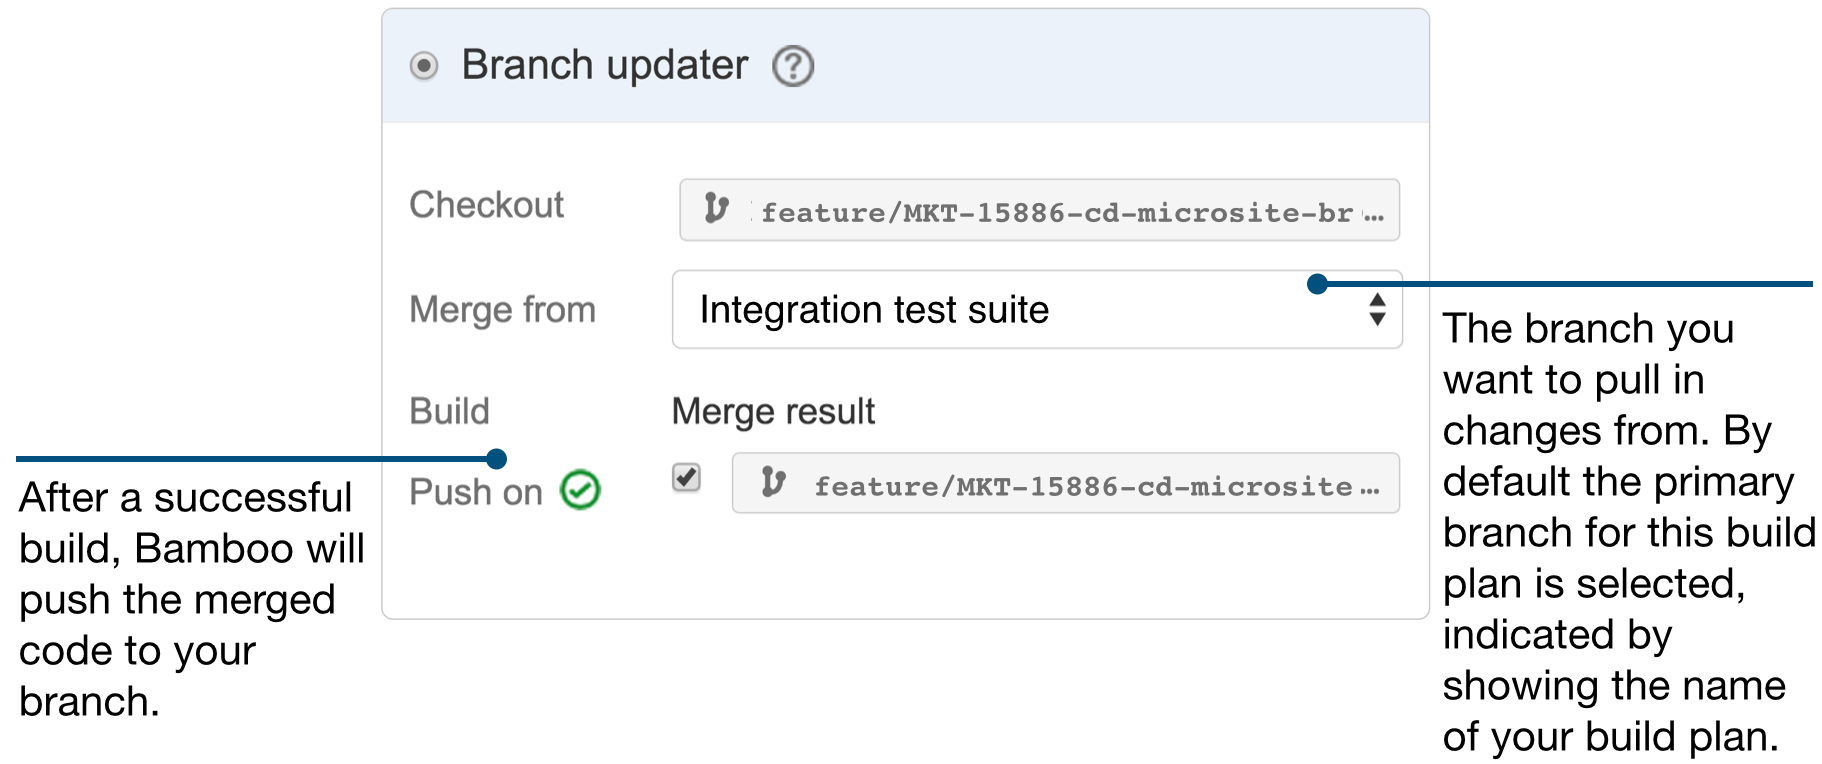
If automatic merging isn't your thing, definitely merge master into your branch (or rebase) and fire off a build just to make sure there aren't any nasty surprises – or fix 'em if they pop up. Once implementation is complete, and all your tests are passing, you're ready for the next step.
Step 3: Merge Up
Being upstanding citizens of our teams, we never charge ahead and merge to master (or any other critical branch) without doing a pull request – the only form of code review in the known universe that does not suck.
You can create pull requests from the command line or using SourceTree, but there are some benefits of going through the Bitbucket UI. First, you get the chance to diff your branch against the target branch. Eye-balling the diff often reveals one or two things you'll want to touch up right away. Then from the branch comparison screen, just hit the create pull request button, choose your reviewers, and off you go.
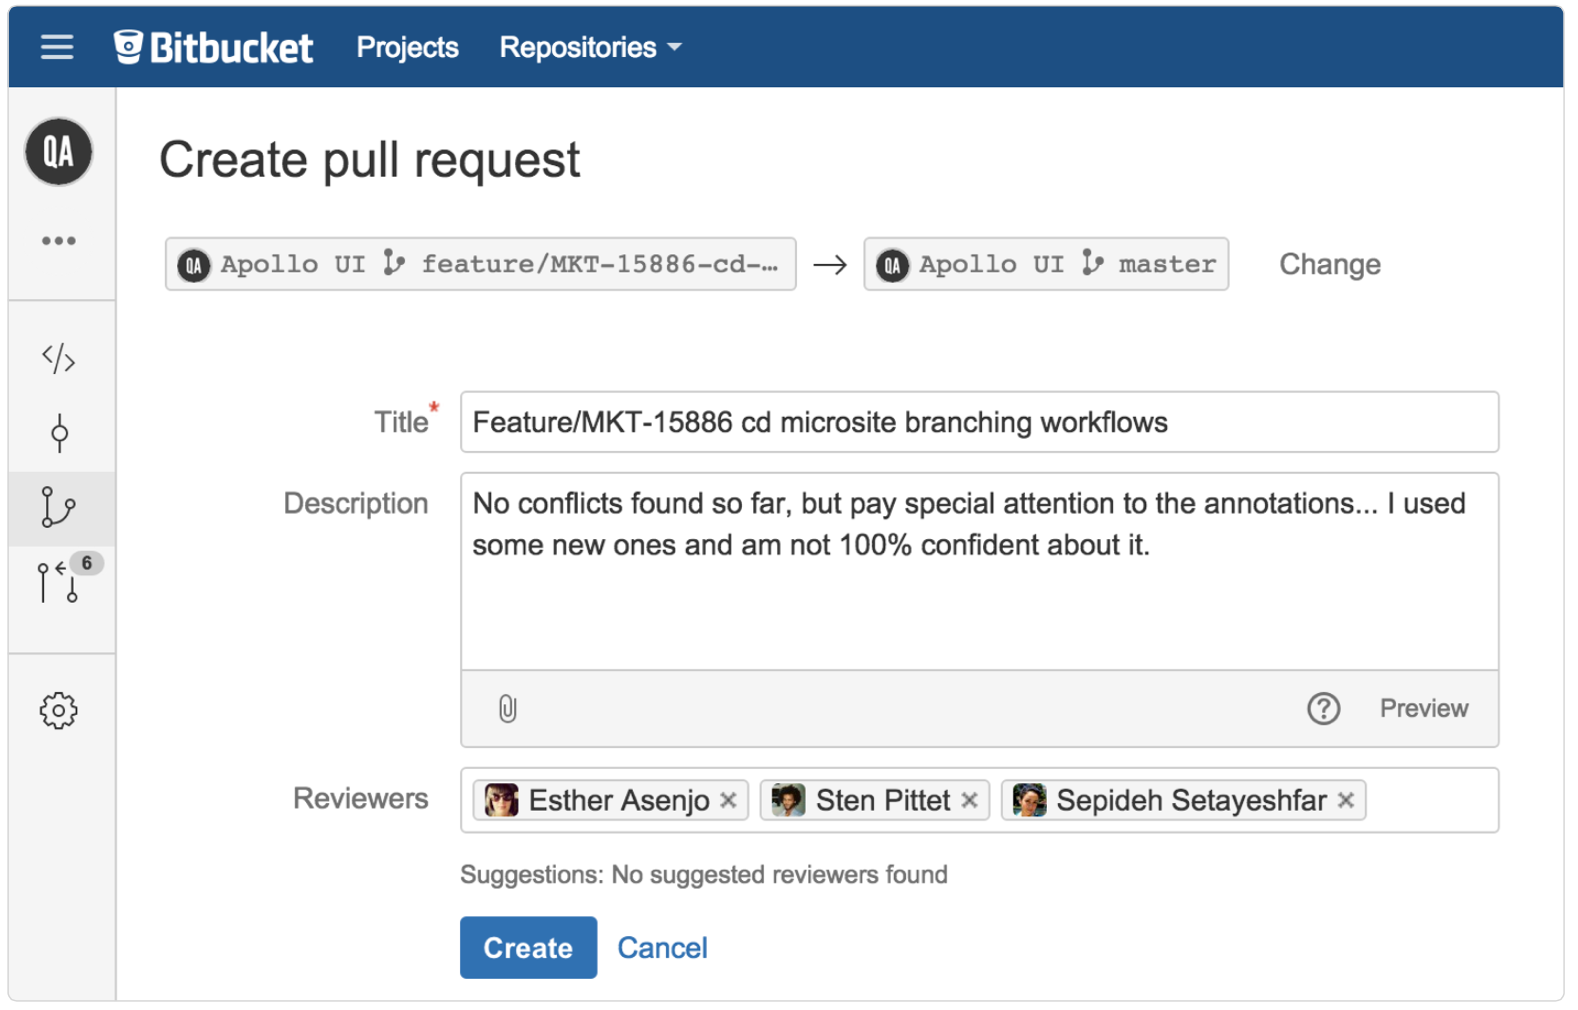
Bitbucket is (quite honestly) pretty boss when it comes to pull requests. Aside from the usual stuff like side-by-side diffs and in-line comments, you can also set rules. Some dev teams at Atlassian set a rule that pull requests can only be merged after at least two people approve them. Other teams designate a gatekeeper of sorts – permissions on the target branch are set such that only the gatekeeper can perform merges. And all teams should turn on the rule the prevents a pull request from being merged if there are any failing builds against that branch.
Pro tip: For master and whatever branch you release from, you'll definitely want to build right away after each push. Configure an automatic build trigger for them in Bamboo with an aggressive polling schedule or a push notification from Bitbucket.
Step 4: Now Ship It – Ship It Good!
(Any other Devo fans out there? "When some new code comes along, you must ship it." No? Ok... guess I won't quit my day job.)
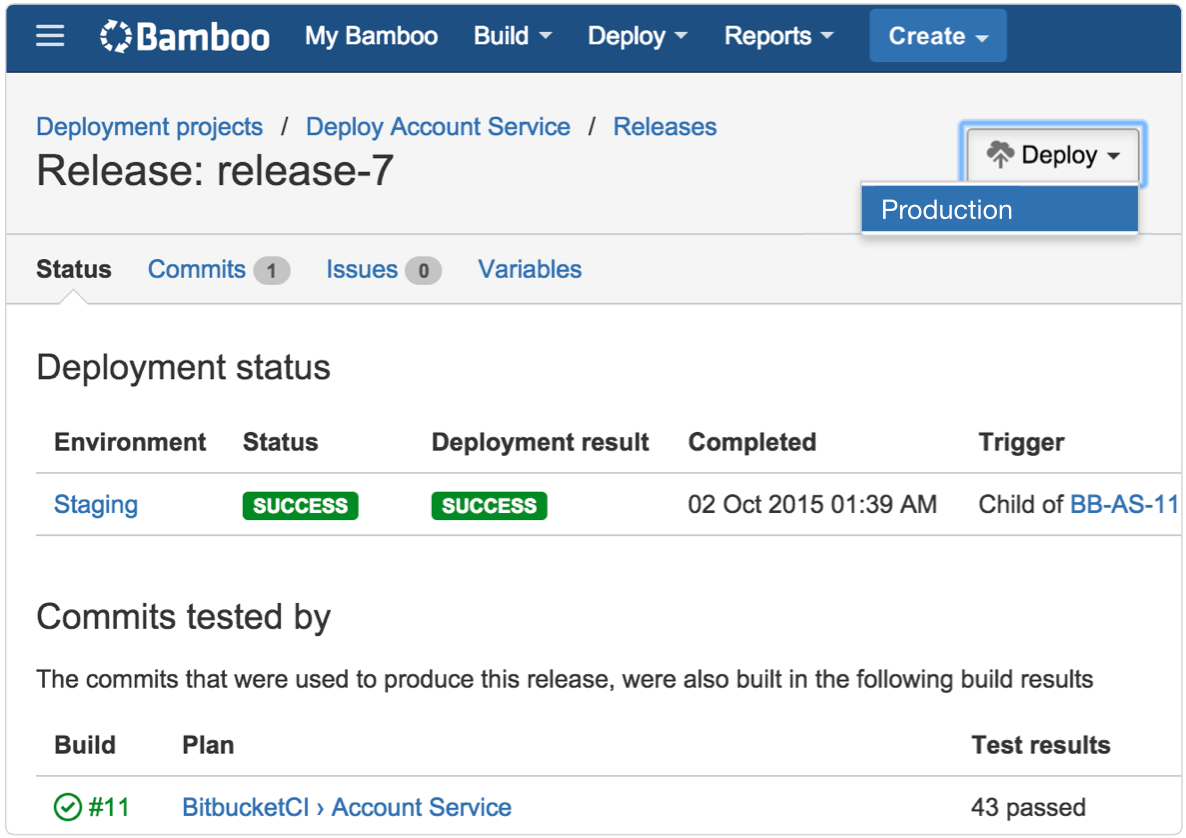
Once the build is green on your release branch, you're potentially ready to ship. I say "potentially" because whether or not you actually ship right away is up to your team. (Does it meet all the acceptance criteria? Have the artifacts been sufficiently pummeled by load tests?)
You can certainly use Bamboo to automatically deploy the build to staging or straight to production if you're into full-on continuous deployment. But that's not appropriate for every team and every product – as we're about to discuss.
In these next few sections, I'll walk through steps 1 through 4 again and call out how they differ (if at all) from what's described in the basic branch-per-issue workflow.
Continuous Delivery Workflow for SaaS Products
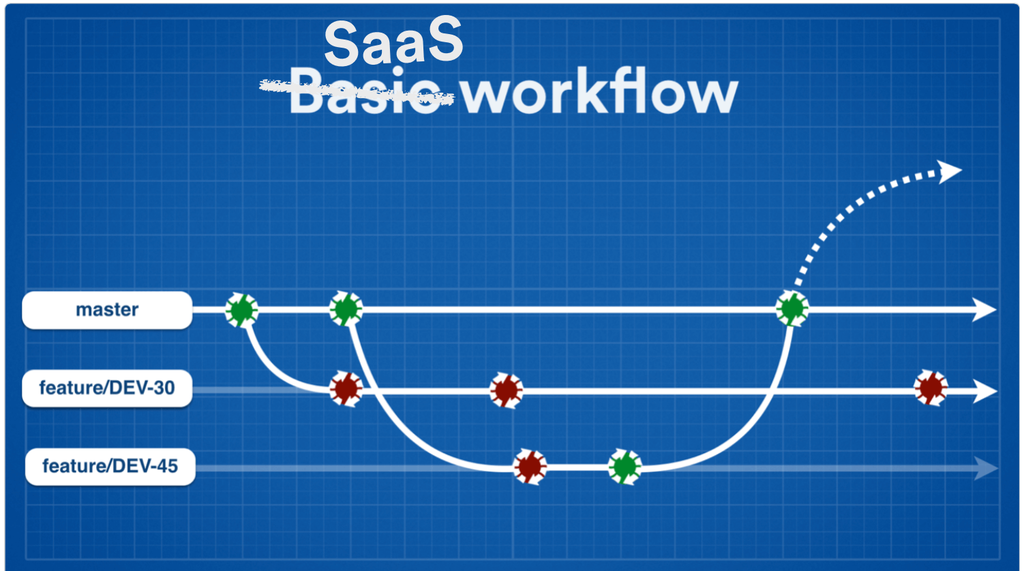
In terms of the branches you work with and how code moves between them, the SaaS workflow is identical to the basic workflow.
Step 1: Create Your Branch
The only thing to note here is that SaaS teams typically create their feature branches from master.
Step 2: Code, Test, Repeat
SaaS teams often want to get as close to continuous deployment as possible – and have the luxury of working on a product well-suited for it. In order for that to be viable, you'll need to automate deploys to a test or staging environment as part of this step, rather than waiting until after the pull request step.
Fortunately, lightweight environments are increasingly easy to spin up and tear down on a moments' notice thanks to technologies like Puppet, Chef, Docker, and Vagrant. (I'd love to do a deep-dive here, but that's another article for another day...) And Bamboo supports automated deployments from any branch. So whether you're working with temporary or persistent environments, you can configure it to deploy each and every successful build of your branch to an environment where it can go through a gauntlet of automated UI and/or load tests.
Let's assume that you've already created a deployment project in Bamboo associated with this build plan. Pull up (or create) Bamboo's configs for the environment you want to deploy to, and create a trigger that will automatically deploy each successful brand build there.
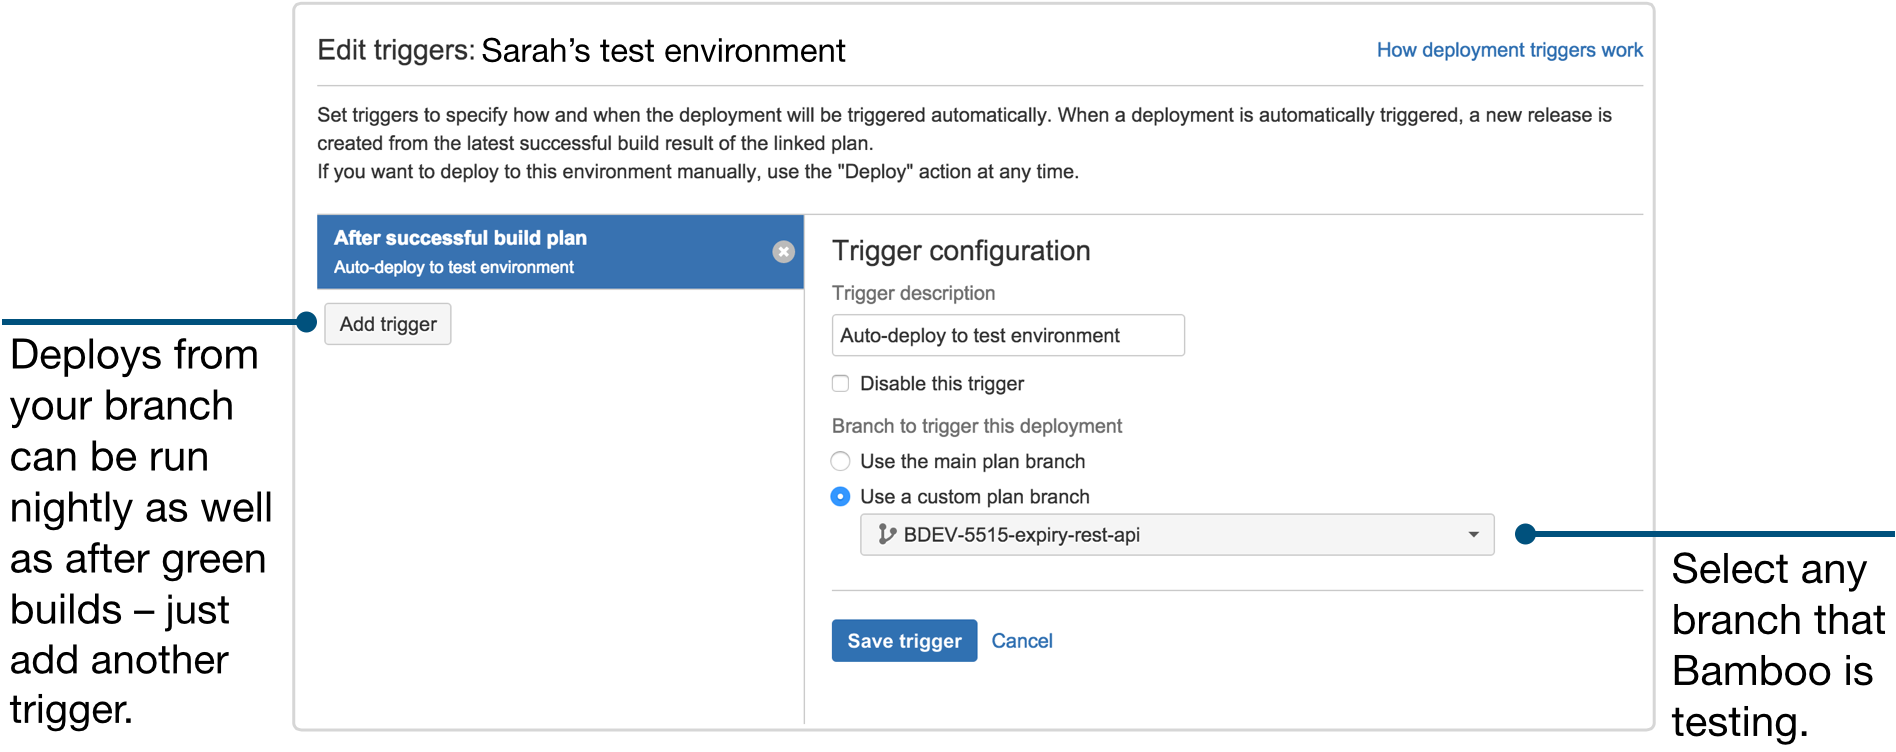
Even if your team doesn't have dreams of continuous deployment and prefers to make a human decision around when to ship, deploying successful branch builds to an environment is a good idea. It gives you and your teammates the opportunity to do some exploratory testing before merging up.
Step 3: Merge Up
The number of pre-production environments your team uses will influence the exact point at which you move to this step. Typically, developers will run in-process tests on their branch with each build, and if those pass, deploy to a test environment for UI, load, and/or exploratory testing. Once everything is ship-shape on test, they create the pull request and merge up to whatever branch you release from (again, typically master).
Step 4: Ship It
At this point, you've come full circle: you've merged back up to master and verified tests are passing there. This is also a point where we see lots of variation in different teams' approaches.
Some teams trigger an automatic deploy after every successful build of master (in which case, feature flags are essential), some teams wait until a critical mass of changes are on master before tagging a release and triggering a deploy. Similarly, some teams deploy straight to production, others promote the build to a staging environment for one last round of sanity-check tests before taking it live.
There's no magical "best" way to get code from master to customers. As long as you're automating as much possible, you're on the right track.
Continuous Delivery Workflow for Installed Products
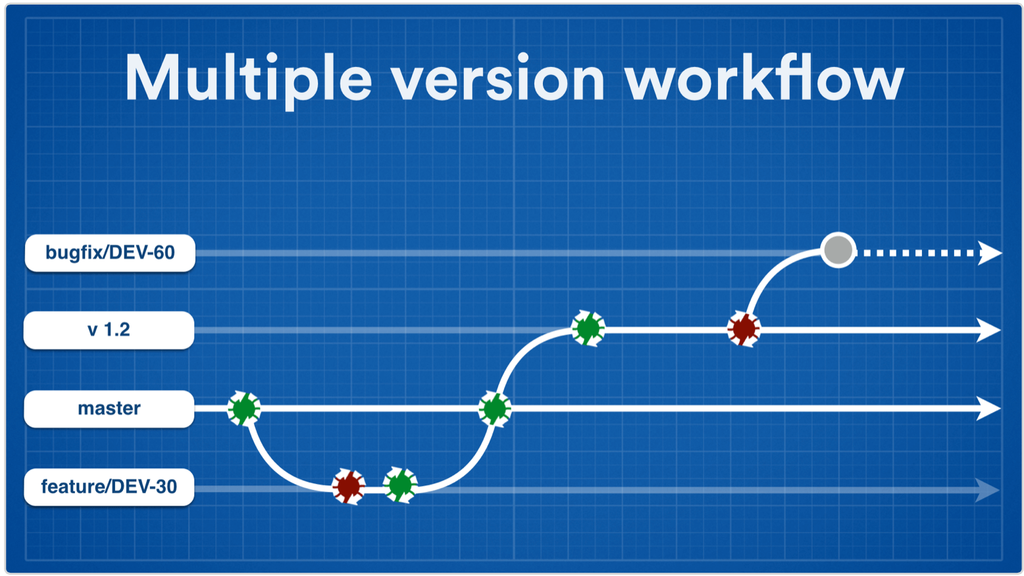
The primary difference from the basic branch-per-issue workflow is the existence of long-lived branches to house each version you're currently supporting. For enterprise B2B products like Atlassian's, you're probably looking at half a dozen of these branches (or more). For mobile apps, it might be just 2 or 3 (or fewer).
Step 1: Create Your Branch
Where you branch from will depend on what kind of change you're making. Is it a bugfix for the release you just shipped last week? Or new functionality for the next release?
In the case of the latter, you'll branch off of master. If it's the former, you'll base your branch off the branch for the earliest version the change is destined for (i.e., the first version in which the bug appeared).
Step 2: Code, Test, Repeat
As with SaaS products, it's a good idea to deploy successful builds from your branch to a test environment once you've got all the in-process tests happening. But the reasons it's a good idea are a bit different.
Updating a version with bugfixes is a far bigger pain with installed products vs. with SaaS products – for your team, and for your customers. In other words, the stakes are higher when it comes to discovering bugs.
So in this workflow, deploying out to a test environment for UI, load, and/or exploratory testing should be considered "really not optional." For that matter, I'd say exploratory testing isn't optional either, considering the stakes. But I digress...
Step 3: Merge Up (and/or Down)
So. Here's where it gets interesting.
If you're working on something for an upcoming release, you do a pull request and merge your branch up to master just like in the basic workflow. But if you based your branch off a stable version branch, you'll merge back down to that branch first and make sure all your tests pass there. Then back-port to older versions that need the same update, testing each one along the way. Finally, you'll merge to master so all future versions carry the same change.
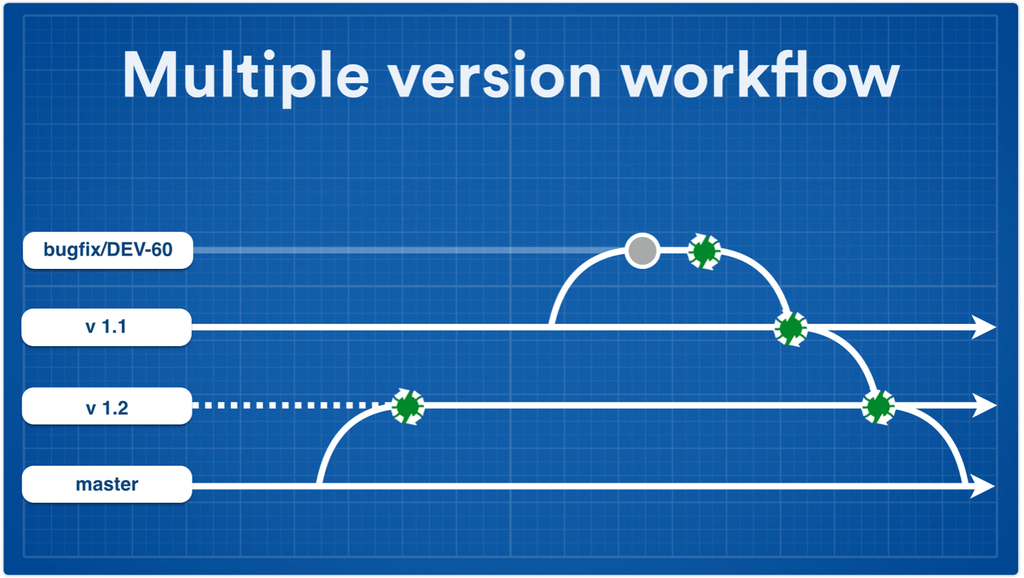
Your Atlassian tools can help in a couple of ways. First, you can have Bitbucket automatically cascade your merges down through the stable version branches. Make sure you've got each branch configured to build automatically each time it receives new code.
Alternatively, you can take advantage of Bamboo's automatic merging (described above) to move the changes between stable version branches. In this case, however, use the Gatekeeper option.
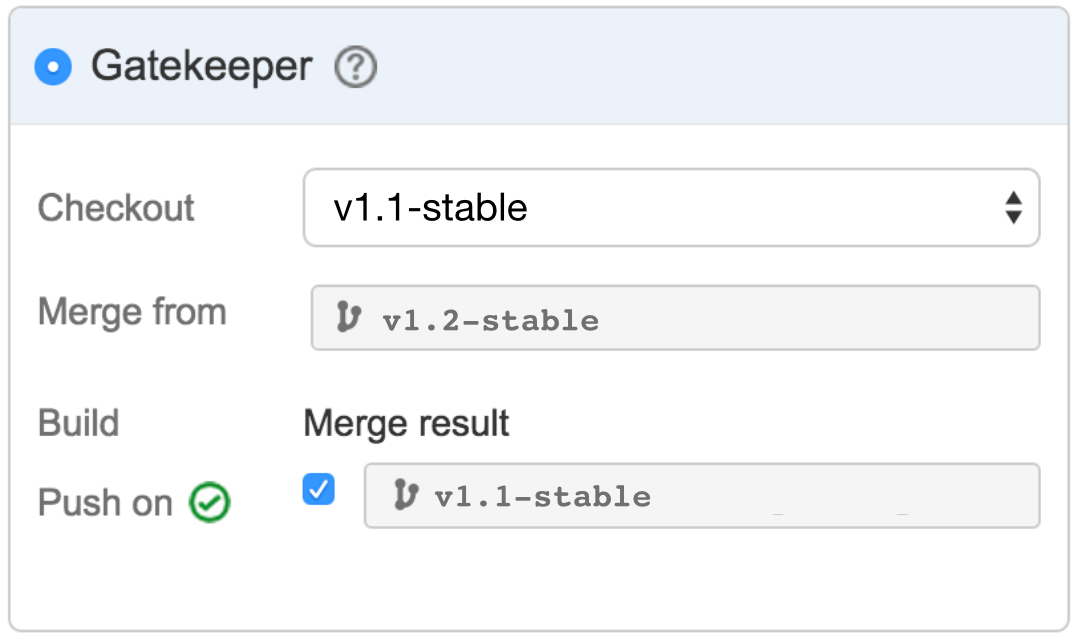
For example, let's say you've merged a bugfix to the branch for v1.2. Go to the plan branch configs for that branch and set it up to automatically merge down to the branch for v1.1, and so on.
Step 3.5: Create a Stable Version Branch
Naturally, if you're working on new stuff for the next version, you'll cut a new stable version branch when you've got a critical mass of features ready. (Ready = implemented, tested, blessed, etc.) This is typically cut from master, and, like master, is configured to build and test automatically each time changes are pushed to it.
If (ok: when) you discover that more changes are needed before shipping the version out, cut feature branches off the stable version branch. Once the changes are ready, merge down to the stable version branch and test there. Assuming that goes well, cascade your change down to master, like in the diagram above.
Whether your team uses pull requests for the cascading merges is up to you. It's a good safety measure, but pull requests and the automated merging features offered by Bitbucket and Bamboo don't mix. So weigh the benefits of automation against the benefits of additional code reviews.
Step 4: Ship It
Once your in-process tests are passing on the stable version branch, it's time to deploy. Deploy to where is up to you and your team – most teams take their release to a staging environment first, but others are confident enough in the tests run up to this point that they ship straight to production.
Continuous Delivery the Gitflow Way
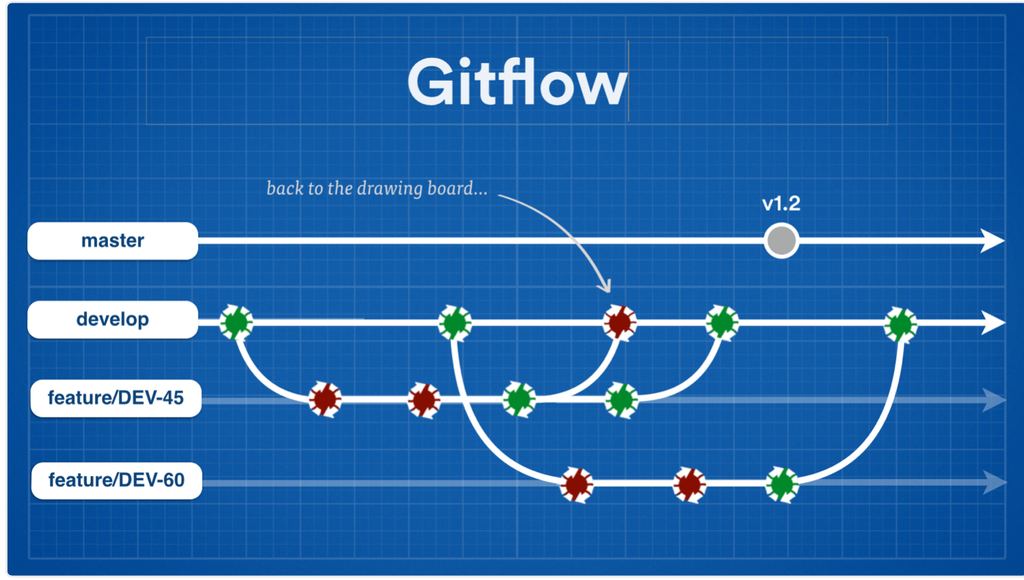
Instead of a single master branch, this approach uses two branches to track the history of the project. While the master branch contains tags and/or commits that record the project's official release history, a shared integration branch (usually called "develop") gives your team a place to ferret out bugs and incompatible changes.
Step 1: Create Your Branch
Here again, the difference from the basic workflow is simply where you branch from. For new development work, your feature branch will be based on develop (make sure you choose a clean commit to branch from!). For bugfixes to a version you've already shipped, it'll be based on a stable version branch – not pictured above, but you get the idea. For more details on Gitflow's variations and their branching structures, check out our tutorial. Bitbucket supports all variations, as well as branch permissions that give you the option to control access master or version branches.
Regardless of where you branch from, use Bamboo's branch updater feature (mentioned above) to pull changes from the parent branch into your feature branch with each build. You'll discover integration issues right away and be able to fix them on your feature branch instead of finding them only after you've merged to develop – at which point, you've already polluted it.
With the Gitflow model, it's possible to release from master, or from stable version branches. The rule of thumb is to make your release the primary branch for your Bamboo builds – this will come into play when it's time to deploy – and enable plan branches so all branches are tested thoroughly.
Step 2: Code, Test, Repeat
The testing step gets interesting with Gitflow. Use plan branches in Bamboo to put your feature branch under test (as in all continuous delivery workflows), but here's the difference: when implementation is complete and all your tests are passing, merge to develop instead of master.
Develop is sort of the mixing pot where all your team's changes can stew together, and you'll want feedback from every commit so as to make debugging test failures easier (fewer changes between each build to sort through). The best way to guarantee this is to configure develop to trigger builds based on push notifications from Bitbucket. Periodically polling the repo will occasionally capture changes from multiple commits in a single build because develop receive changes so frequently – it's better suited for branches whose changes are spaced farther apart.

Pro tip: Another advantage of repository-triggered builds is that it uses Bamboo's CPU efficiently, as I mentioned in CI-friendly Git Repos. For teams doing continuous delivery on a large scale, it really makes a difference.
As with the basic workflow, be sure to merge develop down into your feature branch (or rebase) and run tests one last time before going to develop.
Step 3: Merge Up
Creating a pull request when merging your feature branch to develop is standard practice. Doing peer code reviews at this stage is far easier than delaying it until you're ready to ship, in which case you'd have to review all the changes since the last release at once. No, gracias.
Inevitably, you'll merge your feature branch to develop, only to be met with test failures there. Instead of making changes directly to develop, check out your branch again and do the work there. (Most teams at Atlassian have "handshake" agreements never to make commits directly on master – only merge commits.)
Step 4: Ship It
Designating your release branch as the primary branch for your build plan in Bamboo sets you up for fairly straightforward deployment projects. Whatever your primary branch for the build plan is, that will automatically be the primary branch for your deployment jobs, though you can set up the deployment project to deploy builds from feature branches as well.
Similar to the SaaS workflow, you can automatically create tags on master based on each successful build of develop and deploy from those tags right away. Or, you can wait until several features have been successfully been added to develop, and create the tag by hand. It simply depends on whether you're moving toward continuous deployment, or sticking with continuous delivery. Gitflow accommodates both.
Whew! Four workflows, five diagrams, and about 3,200 words later, here we are. (If you're still reading this, congratulations!)
Hopefully this has given you a foundational understanding of how JIRA Software, Bitbucket, and Bamboo work together to support the branch-per-issue model in continuous delivery. If not, tweet me up and let me know how I can improve this article – it's an important one.
If nothing else, we've seen the value of making a branch for each issue you work on. You won't step on your teammates' toes, and your most important branches stay clean and releasable at all times. So say it with me:
"Branching the $#!π out of your workflow is a Good Thing™."
Happy branching!
Published at DZone with permission of Sarah Goff-Dupont, DZone MVB. See the original article here.
Opinions expressed by DZone contributors are their own.

Comments