Cookie Authentication With ASP.NET Core 2.0
An introduction to the concept of cookie authentication and how to implement it into your web application using ASP.NET Core.
Join the DZone community and get the full member experience.
Join For FreeIntroduction
Authentication is an integral part of web security. ASP.NET Core provides multiple ways to implement authentication in a web application. In this article, we will be looking into such a technique - Cookie authentication.
We will be creating a web application to register new users and then implement a login page which allows only the registered user to access the content. We will be using SQL server 2012 and ADO.NET for handling the database part of our application.
Prerequisites
- Install .NET Core 2.0.0 or the above SDK from here.
- Install the latest version of Visual Studio 2017 Community Edition from here.
Source Code
Before proceeding I would recommend you to get the source code from GitHub.
Now let's proceed to create our tables and stored procedures using SQL Server. I am using SQL Server 2008. You can use any version above that also.
Creating a Table and Stored Procedures
We will be using a DB table to store the records of all users.
Open SQL Server and use the following script to create a sysUser table.
CREATE TABLE sysUser
(
FirstName VARCHAR(20) NOT NULL,
LastName VARCHAR(20) NOT NULL,
UserID VARCHAR(20) PRIMARY KEY,
UserPassword VARCHAR(20) NOT NULL
)
Now, we will create stored procedures for registering a new user to our application and to validate the login information of a user.
To Register a New User
CREATE PROCEDURE spRegisterUser
(
    @FirstName VARCHAR(20),
    @LastName VARCHAR(20) ,
    @UserID VARCHAR(20) ,
    @UserPassword VARCHAR(20)
)
AS
BEGIN

    DECLARE @result VARCHAR(10) ='Failed'

    IF NOT EXISTS(SELECT 1 FROM sysUser where UserID=@UserID)
    BEGIN
        INSERT INTO sysUser
        VALUES
        (
            @FirstName,@LastName,@UserID,@UserPassword
        )

        SET @result= 'Success'
    END

        SELECT @result AS Result
END
We are allowing only the unique User id for our application. Hence, if a user tries to register with an already existing User ID, this procedure will return 'Failed.'
To Validate the Login Information of a User
CREATE PROCEDURE spValidateUserLogin
(
    @LoginID VARCHAR(20) ,
    @LoginPassword VARCHAR(20)
)
AS
BEGIN

    DECLARE @authentication VARCHAR(10)='Failed'

    IF EXISTS(SELECT 1 FROM sysUser WHERE UserID=@LoginID AND UserPassword =@LoginPassword)
    BEGIN
        SET @authentication='Success'
    END

    SELECT @authentication AS isAuthenticated

END
Now, our Database part has been completed. So, we will proceed to create the MVC application using Visual Studio.
Create an MVC Web Application
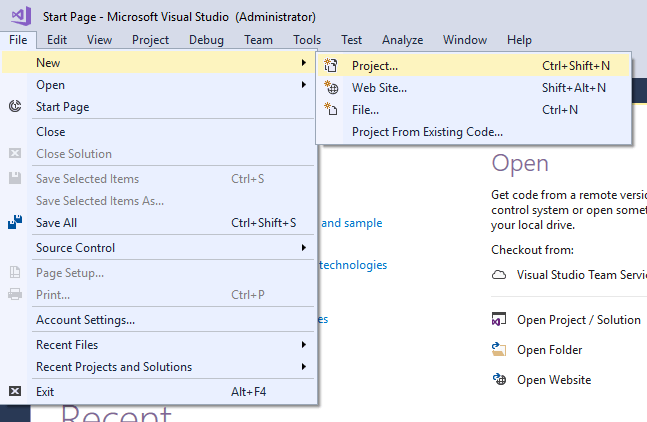
Open Visual Studio and select File >> New >> Project.
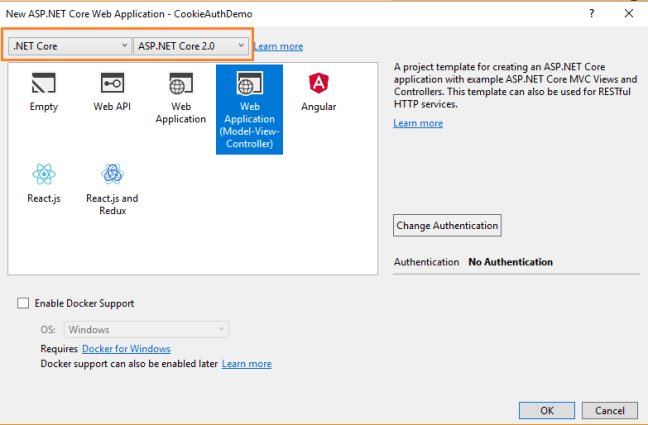
After selecting the project, a "New Project" dialog will open. Select .NET Core inside Visual C# menu from the left panel. Then, select "ASP.NET Core Web Application" from available project types. Put the name of the project as CookieAuthDemo and press OK. Refer to this image.

After clicking on OK, a new dialog will open asking to select the project template. You can observe two drop-down menus at the top left of the template window. Select ".NET Core" and "ASP.NET Core 2.0" from these dropdowns. Then, select "Web application(Model-View-Controller)" template and press OK.
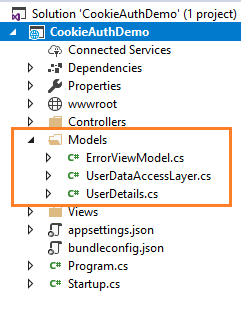
Now our project will open. You can observe in the solution explorer that we have Models, Views and Controllers folders already created. We will be adding our files to these folders only.
Adding the Model to the Application
Right click on Models folder and select Add >> Class. Name your class UserDetails.cs. This class will contain our User model properties. Add one more class file to Models folder. Name it as UserDetailsDataAccessLayer.cs . This class will contain our Database related operations.
Now, the Models folder has the following structure.
Open User.cs and put the following code in it. Since we are adding the required validators to the fields of User class, we need to use System.ComponentModel.DataAnnotations at the top. Also, to mask the values typed in Password field, we have used the [DataType(DataType.Password)] property.
using System;
using System.Collections.Generic;
using System.ComponentModel.DataAnnotations;
using System.Linq;
using System.Threading.Tasks;

namespace CookieAuthDemo.Models
{
    public class UserDetails
    {
        [Required]
        [Display(Name = "First Name")]
        public string FirstName { get; set; }

        [Required]
        [Display(Name = "Last Name")]
        public string LastName { get; set; }

        [Required]
        [Display(Name = "User ID")]
        public string UserID { get; set; }

        [Required]
        [Display(Name = "Password")]
        [DataType(DataType.Password)]
        public string Password { get; set; }
    }
}
We will be reading our connection string from the appsettings.json file. So open your appsettings.json file and put the following code into it. Make sure to put your connection string.
{
  "Logging": {
    "IncludeScopes": false,
    "LogLevel": {
      "Default": "Warning"
    }
  },
  "ConnectionStrings": {
    "myConString": "Your connection string here"
  }
}
Now, open UserDataAccessLayer.cs and put the following code to handle database operations.
using Microsoft.Extensions.Configuration;
using System;
using System.Collections.Generic;
using System.Data;
using System.Data.SqlClient;
using System.IO;

namespace CookieAuthDemo.Models
{
    public class UserDataAccessLayer
    {
        public static IConfiguration Configuration { get; set; }

        //To Read ConnectionString from appsettings.json file
        private static string GetConnectionString()
        {
            var builder = new ConfigurationBuilder()
                .SetBasePath(Directory.GetCurrentDirectory())
                .AddJsonFile("appsettings.json");

            Configuration = builder.Build();

            string connectionString = Configuration["ConnectionStrings:myConString"];

            return connectionString;

        }

        string connectionString = GetConnectionString();

        //To Register a new user
        public string RegisterUser(UserDetails user)
        {
            using (SqlConnection con = new SqlConnection(connectionString))
            {
                SqlCommand cmd = new SqlCommand("spRegisterUser", con);
                cmd.CommandType = CommandType.StoredProcedure;

                cmd.Parameters.AddWithValue("@FirstName", user.FirstName);
                cmd.Parameters.AddWithValue("@LastName", user.LastName);
                cmd.Parameters.AddWithValue("@UserID", user.UserID);
                cmd.Parameters.AddWithValue("@UserPassword", user.Password);

                con.Open();
                string result = cmd.ExecuteScalar().ToString();
                con.Close();

                return result;
            }
        }

        //To Validate the login
        public string ValidateLogin(UserDetails user)
        {
            using (SqlConnection con = new SqlConnection(connectionString))
            {
                SqlCommand cmd = new SqlCommand("spValidateUserLogin", con);
                cmd.CommandType = CommandType.StoredProcedure;

                cmd.Parameters.AddWithValue("@LoginID", user.UserID);
                cmd.Parameters.AddWithValue("@LoginPassword", user.Password);

                con.Open();
                string result = cmd.ExecuteScalar().ToString();
                con.Close();

                return result;
            }
        }
    }
}
Our Models has been created. So, we will proceed to add controllers to our application.
Adding the Controller to the Application
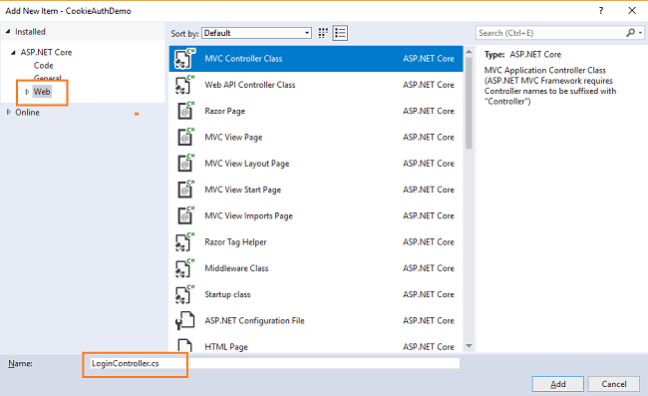
Right click on Controllers folder and select Add >> New Item.
An "Add New Item" dialog box will open. Select Web from the left panel, then select "MVC Controller Class" from templates panel, and put the name as LoginController.cs. Press OK. This controller will handle the logic for Registering a new user and login into the application.
Similarly, add one more controller, UserController.cs. This controller will contain a home page for the user which will be available to authorized users only.
Adding Views to the Application
To add views for our controller class, we need to create a folder inside the Views folder with the same name as our controller and then add our views to that folder, since we have two controllers for this application. Hence, we will be creating two folders inside the views folder.
Right-click on the Views folder, and then Add >> New Folder and name the folder as Login. Similarly, add one more folder, User, into the view folder.
Now, right-click on the Views/Login folder, and then select Add >> New Item.
An "Add New Item" dialog box will open. Select Web from the left panel, then select "MVC View Page" from templates panel, and put the name as RegisterUser.cshtml. Press OK.

We have created our first view. Similarly, add one more view, UserLogin.cshtml, into the Views/Login folder and UserHome.cshtml into the Views/User folder.
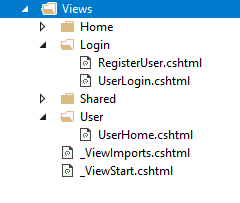
Now, our Views folder will look like this:
Since our Views have been created, we will put code in View and Controller for registration and login.
RegisterUser View
This view will be used to register a new user for our application.
Open RegisterUser.cshtml and put following code into it.
@model CookieAuthDemo.Models.UserDetails
@{
    ViewData["Title"] = "UserLogin";
}
<h2>Register</h2>
<h4>New User</h4>
<hr />
<div class="row">
    <div class="col-md-4">
        @if (TempData["Success"] != null)
        {
            <p class="alert alert-success">@TempData["Success"]  <a asp-action="UserLogin">Click here to login</a></p>
        }
        @if (TempData["Fail"] != null)
        {
            <p class="alert alert-danger">@TempData["Fail"]</p>
        }
        <form asp-action="RegisterUser">
            <div asp-validation-summary="ModelOnly" class="text-danger"></div>
            <div class="form-group">
                <label asp-for="FirstName" class="control-label"></label>
                <input asp-for="FirstName" class="form-control" />
                <span asp-validation-for="FirstName" class="text-danger"></span>
            </div>
            <div class="form-group">
                <label asp-for="LastName" class="control-label"></label>
                <input asp-for="LastName" class="form-control" />
                <span asp-validation-for="LastName" class="text-danger"></span>
            </div>
            <div class="form-group">
                <label asp-for="UserID" class="control-label"></label>
                <input asp-for="UserID" class="form-control" />
                <span asp-validation-for="UserID" class="text-danger"></span>
            </div>
            <div class="form-group">
                <label asp-for="Password" class="control-label"></label>
                <input asp-for="Password" class="form-control" />
                <span asp-validation-for="Password" class="text-danger"></span>
            </div>
            <div class="form-group">
                <input type="submit" value="Register" class="btn btn-default btn-primary" />
            </div>
        </form>
    </div>
</div>
<div>
    <a asp-action="UserLogin">Back to User Login</a>
</div>
@section Scripts {
    @{await Html.RenderPartialAsync("_ValidationScriptsPartial");}
}
UserLogin View
This view will hold the Login form and redirects the user to the user home page after a successful login.
Open UserLogin.cshtml and put the following code into it.
@model CookieAuthDemo.Models.UserDetails
@{
    ViewData["Title"] = "UserLogin";
}

<h2>User</h2>
<h4>Login</h4>
<hr />
<div class="row">
    <div class="col-md-4">
        @if (TempData["UserLoginFailed"] != null)
        {
            <p class="alert alert-danger">@TempData["UserLoginFailed"]</p>
        }

        <form asp-action="UserLogin">
            <div asp-validation-summary="ModelOnly" class="text-danger"></div>
            <div class="form-group">
                <label asp-for="UserID" class="control-label"></label>
                <input asp-for="UserID" class="form-control" />
                <span asp-validation-for="UserID" class="text-danger"></span>
            </div>
            <div class="form-group">
                <label asp-for="Password" class="control-label"></label>
                <input asp-for="Password" class="form-control" />
                <span asp-validation-for="Password" class="text-danger"></span>
            </div>
            <div class="form-group">
                <input type="submit" value="Login" class="btn btn-default btn-success" />
                <a asp-action="RegisterUser" class="btn btn-info">SignUp</a>
            </div>
        </form>
    </div>
</div>
@section Scripts {
    @{await Html.RenderPartialAsync("_ValidationScriptsPartial");}
}
Login Controller
To handle the business logic of User registration and login, open LoginController.cs and put following code into it
using System;
using System.Collections.Generic;
using System.Linq;
using System.Security.Claims;
using System.Threading.Tasks;
using CookieAuthDemo.Models;
using Microsoft.AspNetCore.Authentication;
using Microsoft.AspNetCore.Mvc;

namespace CookieAuthDemo.Controllers
{
    public class LoginController : Controller
    {
        UserDataAccessLayer objUser = new UserDataAccessLayer();

        [HttpGet]
        public IActionResult RegisterUser()
        {

            return View();
        }

        [HttpPost]
        public IActionResult RegisterUser([Bind] UserDetails user)
        {
            if (ModelState.IsValid)
            {
                string RegistrationStatus = objUser.RegisterUser(user);
                if (RegistrationStatus == "Success")
                {
                    ModelState.Clear();
                    TempData["Success"] = "Registration Successful!";
                    return View();
                }
                else
                {
                    TempData["Fail"] = "This User ID already exists. Registration Failed.";
                    return View();
                }
            }
            return View();
        }

        [HttpGet]
        public IActionResult UserLogin()
        {

            return View();
        }

        [HttpPost]
        [ValidateAntiForgeryToken]
        public async Task<IActionResult> UserLogin([Bind] UserDetails user)
        {
            ModelState.Remove("FirstName");
            ModelState.Remove("LastName");

            if (ModelState.IsValid)
            {
                string LoginStatus = objUser.ValidateLogin(user);

                if (LoginStatus == "Success")
                {
                    var claims = new List<Claim>
                    {
                        new Claim(ClaimTypes.Name, user.UserID)
                    };
                    ClaimsIdentity userIdentity = new ClaimsIdentity(claims, "login");
                    ClaimsPrincipal principal = new ClaimsPrincipal(userIdentity);

                    await HttpContext.SignInAsync(principal);
                    return RedirectToAction("UserHome", "User");
                }
                else
                {
                    TempData["UserLoginFailed"] = "Login Failed.Please enter correct credentials";
                    return View();
                }
            }
            else
                return View();

        }
    }
}
To handle database operations, we have created an object of UserDataAccessLayer class inside the LoginController class.
If the user tries to register with a User id which is already registered into the database then we will display an error message on the view. This error message is passed on to the view using Tempdata.
Since we are using the same model for both, registering a new user and login into the application, but we do not require a Firstname and LastName property for Login, hence we have removed those values from our model using ModelState.Remove inside UserLogin method.
If the validation is successful from the database end, then we will create a Claims list which will store the UserID of the user into the Name claim inside the cookie. This cookie data will be encrypted by default. Then we will build an identity and principal and then set the cookie using the SignInAsync method.
UserHome View
This is a dummy home page which will be accessed by authorized users only.
Open UserHome.cshtml and put the following code into it.
@{
    ViewData["Title"] = "UserHome";
}
<ul class="nav navbar-nav navbar-right">
    <li>
        <a asp-action="Logout">Sign Out</a>
    </li>
</ul>

<h2>UserHome</h2>
<h3>This is the user home page</h3>
Open UserController.cs and put the following code into it
using System;
using System.Threading.Tasks;
using Microsoft.AspNetCore.Authentication;
using Microsoft.AspNetCore.Authorization;
using Microsoft.AspNetCore.Mvc;

namespace CookieAuthDemo.Controllers
{
    [Authorize]
    public class UserController : Controller
    {
        public IActionResult UserHome()
        {
            return View();
        }

        [HttpGet]
        public async Task<IActionResult> Logout()
        {
            await HttpContext.SignOutAsync();
            return RedirectToAction("UserLogin", "Login");
        }
    }
}
The [Authorize] attribute signifies that this controller will be accessed only after successful authentication.
When an authentication request is made then, the middleware will check for the existence of an authentication cookie which was set during login. If the cookie is found then the login is successful and the user will be redirected to UserHome view. But if the cookie is not present then the user will be redirected to the Login page (which we will set up using options.LoginPath in Startup.cs in the next section). The user cannot access the UserHome view in this case.
We have also added a Logout method which will clear the authentication cookie and sign out the user from the application by redirecting them to our login page.
Configuring the Startup.cs File
We will configure our application to use cookie authentication in the Startup.cs file. Put the following code into this file.
using System;
using System.Threading.Tasks;
using Microsoft.AspNetCore.Authentication.Cookies;
using Microsoft.AspNetCore.Builder;
using Microsoft.AspNetCore.Hosting;
using Microsoft.Extensions.Configuration;
using Microsoft.Extensions.DependencyInjection;

namespace CookieAuthDemo
{
    public class Startup
    {
        public Startup(IConfiguration configuration)
        {
            Configuration = configuration;
        }

        public IConfiguration Configuration { get; }

        // This method gets called by the runtime. Use this method to add services to the container.
        public void ConfigureServices(IServiceCollection services)
        {
            services.AddAuthentication(CookieAuthenticationDefaults.AuthenticationScheme)
                    .AddCookie(options =>
                    {
                        options.LoginPath = "/Login/UserLogin/";

                    });
            services.AddMvc();
        }

        // This method gets called by the runtime. Use this method to configure the HTTP request pipeline.
        public void Configure(IApplicationBuilder app, IHostingEnvironment env)
        {
            app.UseAuthentication();

            if (env.IsDevelopment())
            {
                app.UseBrowserLink();
                app.UseDeveloperExceptionPage();
            }
            else
            {
                app.UseExceptionHandler("/Home/Error");
            }

            app.UseStaticFiles();

            app.UseMvc(routes =>
            {
                routes.MapRoute(
                    name: "default",
                    template: "{controller=Login}/{action=UserLogin}/{id?}");
            });
        }
    }
}
Inside the ConfigureServices method, we are setting up a cookie authentication service. We have initialized a cookie authentication option, the options.LoginPath property. This indicates the page where the user will be redirected if the authentication fails, which is our login page in this case.
You can learn more about cookie authentication options here.
We have also added app.UseAuthentication() in the Configure method and also set up the default route to our login page inside the app.UseMvc method.
Execution Demo
And now our application is ready. Press F5 to launch the application.
It will open a login page as shown in the image below. Here you can see the login form as well as two buttons for Login and SignUp

First, we will register a new user. Click on the SignUp button; you will be redirected to the RegisterUser view displaying a user registration form.
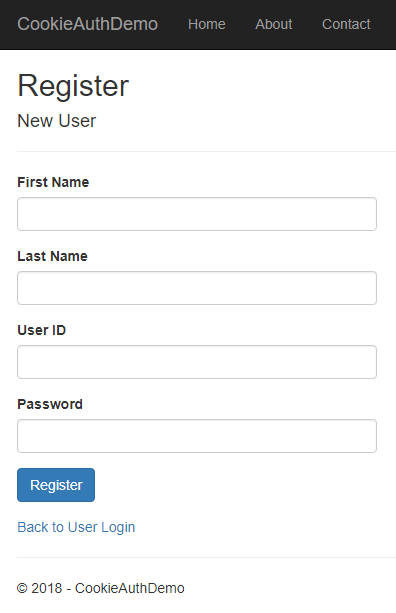
Enter all the user details and click on the Register button to register a new user.

All the fields of this page are required. So, if we miss the data in any field, the required field validation will be invoked.

If the user registration is successful, then we will be prompted with a success message.

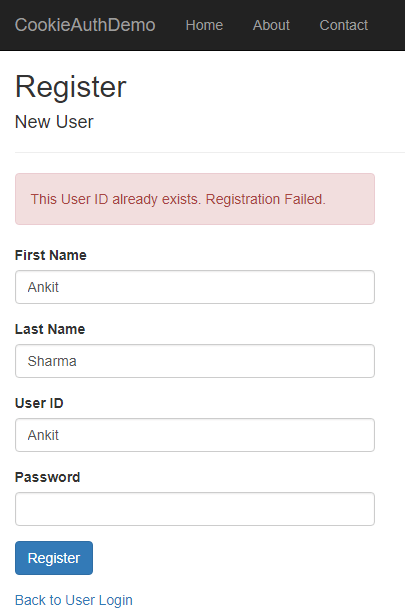
If we try to register with a UserID which is already registered, then we will be prompted with an error message.
After successfully registering, navigate back to the User Login page by clicking on Back to User Login link at the bottom of Register user form. Both the fields in the login form are required. If we miss data in any field then the required field validation error message will be displayed.

If the user enters the wrong credentials, then an error message will be displayed.

After providing the correct credentials click on the login button and you will be redirected to the User Home Page.

You can also observe a Sign Out link in the top right corner. Clicking on this will sign you out of the application and you will be redirected to Login page.
If you try to access the http://localhost:50656/user/userhome page without logging in to the application, you will be redirected back to the Login page as the user home page is only accessible after successful authentication.
Conclusion
We have implemented Cookie authentication in an ASP.NET Core 2.0 application. We have also created a user registration form to register a new user to our application.
Published at DZone with permission of Ankit Sharma. See the original article here.
Opinions expressed by DZone contributors are their own.
Comments