Create a Multi-Tenancy Application in Nest.js, Part 4: Authentication and Authorization Setup
Authentication and Authorization are essential parts of most applications. There are many different approaches and strategies to handle authentication.
Join the DZone community and get the full member experience.
Join For FreeIntroduction
Authentication and Authorization are essential parts of most applications. There are many different approaches and strategies to handle authentication. This article presents the same production that can be adapted.
We will use Nest.js to build the following:
- The user needs to log in using /login endpoint.
- After login, you will get a token.
- Any user has roles and privileges.
- Users can just access endpoints allowed their roles and privileges.
We will follow these steps :
- We need multiple databases. One of them is the default database. We will do all authentication that one. It will be the database for every tenant and we will get Authorization privileges and policies from it.
- In the default database, we need to create the
Userstable andOrganizationtable that presents tenants. - In tenant databases, we will add
privilege_grouptable containing all tenant users' policies. - We will add an endpoint in the user-service app to manage users and privileges.
- Create Auth module and export it in an external library.
- Add guards for JWT, Roles, and policies.
Authentication
To add, we will start from models and edit user entities, create needed service methods, and controllers.
Create User and Login
In User-Service App
Here in the default database, we need a table to save tenants and their Organizations information. Create an Organizations entity:
@Table({tableName:'Organizations'})
export class Organizations extends Model<Organizations> {

  @Column({
    type: DataType.STRING,
    allowNull: false,
    unique: true,
  })
  name: string
  @Column({
    type: DataType.STRING,
    allowNull: false,
    unique: true,
  })
  domain: string

  @HasMany(()=>Users,'organizationId')
  users: Users[]

}
Create a relation in the users' table by editing the user entity.
@Table({tableName:'Users'})
export class Users extends Model<Users> {
    /*....*/
    @ForeignKey(() => Organizations)
    @Column
    organizationId: number;
}
Now we can create usermodule users.module.ts and work in it to export related providers and imports from the main user app microservice.
When I try to do that by simply removing SequelizeModule.forFeature from the main module and adding it in UsersModule, I get an error in dependency injection. Therefore, I need to remove a name from SequelizeModuleAsyncOptions name: 'development' and from SequelizeModule in the main module.
For testing in local, we will edit the database connection in sequelize-config-service.ts; but in production will implement another story.
/**/
if(this.request.data ){
        const host=this.request.data['host']
        update domain=host?host.split('.'):"127.0.0.1".split('.');
        //...
}
/*...*/
Now, users.module.ts will be:
@Module({
  imports: [
    SequelizeModule.forFeature([Users,Organizations]),
  ],
  controllers: [],
  providers: [],
  exports: [],
})
export class UsersModule {}
Edit user-service module:
@Module({
   imports: [
  UsersModule,
  SequelizeModule.forRootAsync({
    imports:[UserConfigModule],
    useExisting: SequelizeConfigService,
  })],
  controllers: [UserServiceController],
  providers: [UserServiceService],
})

export class UserServiceModule {}
Now, create UserService to add all service methods we will use in endpoints. UserService contains:
- Dependency inject User and Organizations repository
- Method
findOneto return username (in our case we can just use email) - Methods to create and update Users and Organizations
- Use
bcryptto save passwords
@Injectable()
export class UsersService {
    constructor(
        @InjectModel(Users)    private readonly userModel: typeof Users,
        @InjectModel(Organizations) private readonly organizationsModel:typeof Organizations) {
    }

    async findOne(username: string): Promise<Users> {

      return this.userModel.findOne({where:{email:username},nest: true}) ;
      }

    async create( createUserDto:CreateUserDto):Promise<Users> {
      const hashpassword= await bcrypt.hash(createUserDto.password,10)
      createUserDto.password=hashpassword;
      return this.userModel.create(<Users>createUserDto)
    }

      async findId(id): Promise<Users> {
        return this.userModel.findOne({where:{id:id},raw: true,nest: true}) ;
      }

      async createOrg(createAccountDto: CreateAccountDto){
        let {owner,...orgDto} = createAccountDto
        return this.organizationsModel.create(<Organizations>orgDto);
      }
      async getOrg(name: string){
        return this.organizationsModel.findOne({where:{name:name}})
      }
      async getOrgById(id: any){
        return this.organizationsModel.findByPk(id)
      }
      async findUserById(id: any): Promise<Users> {
        return this.userModel.findOne({
          attributes: {exclude: ['password']},
          where: { id: id },
          nest: true,
        });
      }
      async findUserAll(query:any): Promise<Users[]> {
        if(query.type && query.type=='admin'){
          query.type={[Op.in]:['tenant','admin']}
        }
        console.log('users where',query)
        return this.userModel.findAll({ attributes: {exclude: ['password']}, where:query, nest: true });
      }

      async update( id:any,userDto:any) {
        return this.userModel.update(userDto,{where:{id:id}})
      }
}
Create user controller and use normal REST controller and Nest microservice pattern @MessagePattern for controllers needed by other microservice like @MessagePattern('findOne').
@Controller()
export class UsersController {
    constructor(private readonly usersService:UsersService) {}
  @Get('user/:id')
  async getUserById(@Param('id')id:any){
    return this.usersService.findUserById(id);
  }

  @Get('user/name/:name')
  async eventGetUserById(@Param('name') username:any):Promise<any>{
    console.log("Logger we arrive",username)
    return this.usersService.findOne(username);
  }

  @MessagePattern('findOne')
  async getUserByName(data:any){
    console.log("Logger we arrive",data.username)
    return this.usersService.findOne(data.username);
  }
  @Get('user')
  async getUsers(@Query() query:any){
    return this.usersService.findUserAll(query);
  }

  @Put('user/:id')
  async updateUser(@Param('id') id:any,@Body() dto:any){
    return this.usersService.update(id,dto);
  }

  @Post('user')
  async createUser(@Body() userDto:CreateUserDto) {
    return  this.usersService.create(userDto)
   }
}
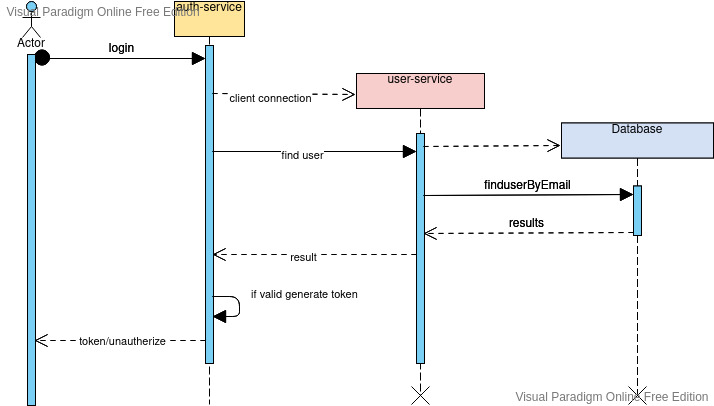
New Auth-Service App
This new service (app) will contain a login endpoint and also will test all authentication and authorization in its controller endpoint.
Create auth-service:
nest g app auth-service
In the main service, we will add two methods: login which will just return the request body, and getHello. We will use getHello in testing.
@Injectable()
export class AuthServiceService {
  getHello(): string {
    return 'Hello World!';
  }

  login(user:UserDto):UserDto {
    return user;
  }
}
Create an endpoint for login in the controller and let Post request in path "/login".
@Controller()
export class AuthServiceController {
  constructor(private readonly authService: AuthServiceService) {}

  @Post('login')
  async login(@Body() user) {
    return this.authService.login(user);
  }
}
Now, edit the port in main.ts to available port (in my case, 3001). Test login npm run start:dev auth-service
curl -X post http://127.0.0.1:3003/user -d '{"firstName":"mhd","lastName":"shajar", "email":"[email protected]","password":"123456","type":"admin"}'
curl -X post http://127.0.0.1:3001/login -d '{ "username":"[email protected]", "password":"123456"}'
Guard, Password, and Local Strategy
As we said earlier, we will use password library to implement authentication; so we need to install some dependencies to use them.
$ npm i --save @nestjs/passport passport-jwt passport-local
$ npm i --save-dev @types/passport-local
$ npm i --save bcrypt
To implement, we create a validation service that has a single method called validateUser that will return true if the login credential is valid and false otherwise. To implement this function, we need to call controllers from user-service and will use ClientProxy to send a request to user-service findOne endpoint. After user data returns, check the password and return true if it is a valid password for the user.
@Injectable()
export class AuthValidateService {
    constructor(
        @Inject('User_SERVICE') private readonly userServiceClient: ClientProxy
      ) {}

    validateUser(username: string, pass: string): Observable<UserDto>|null {

        return this.userServiceClient.send('findOne',
        {username:username})
        .pipe(map((user:UserDto)=>{

          if (user && bcrypt.compareSync(pass, user.password)) {
            const { password, ...result } = user;
            return result;
          }
          return null;}),
          catchError(err => {
            console.log('caught  error and return null ', err);
            return  of(null);
        })
          )
      }
}
To use ClientProxy, we will edit the auth-service module and add ClientsModule to access other microservices. Also, add AuthValidateService as providers.
@Module({
  imports: [PassportModule,
    ClientsModule.register([
      {
        name: 'User_SERVICE',
        transport: Transport.REDIS,
        options: {
          url: 'redis://localhost:6379',
        },
      },
    ])
  ],
  controllers: [AuthServiceController],
  providers: [AuthServiceService,
    {provide:'AUTH_SERVICE',
    useClass:AuthValidateService
  },
    LocalStrategy, JwtStrategy],
})
export class AuthServiceModule {}
Add localguards, which is just AuthGuard('local') from the Nest.js password library.
@Injectable()
export class LocalAuthGuard extends AuthGuard('local') {
}
We will use PassportStrategy in our LocalStrategy and use validateUser from AuthValidateService to validate.
@Injectable()
export class LocalStrategy extends PassportStrategy(Strategy) {

  constructor(@Inject('AUTH_SERVICE') private authService ) {
    super({
      passReqToCallback: true,
    });
  }

  async validate(  request: Request,username: string, password: string): Promise<any> {
    const user = await firstValueFrom(this.authService.validateUser(username, password),{defaultValue:null});
    console.log('username',user);
    if (!user) {
      throw new UnauthorizedException();
    }
    return user;
  }
}
Lastly, editing in "/login" endpoint will add Guards LocalAuthGuard . Nest will inject LocalStrategy using names.
@UseGuards(LocalAuthGuard)
  @Post('login')
  async login(@Request() req) {
    return this.authService.login(req.user);
  }
We are done and now can test.
curl -X post http://127.0.0.1:3003/user -d '{"firstName":"ismaeil","lastName":"shajar", "email":"[email protected]","password":"123456","type":"admin"}'

curl -X post http://127.0.0.1:3001/login -d '{ "username":"[email protected]", "password":"123456"}'
JWT Token
To create and decode token, we will install the ready Nest.js library @nestjs/jwt.
$ npm i --save @nestjs/jwt
Add JWT in the main auth-service module.
JwtModule.register({
      secret: jwtConstants.secret,
      signOptions: { expiresIn: '6000s' },
    })
In auth service, update login to return an access token.
@Injectable()
export class AuthServiceService {
  constructor(
    private readonly jwtService: JwtService,
  ) {}
  login(user:UserDto):AccessToken {
    const payload = { username: user.firstName,orgId:user.organizationId,sub: user.id};
    return {
      access_token: this.jwtService.sign(payload),
    }
  }
}
The local guard will create JwtAuthGuard which just extends AuthGuard('jwt') from password library.
@Injectable()
export class JwtAuthGuard extends AuthGuard('jwt') {
}
Create JwtStrategy extends from PassportStrategy to implement validate function from it. For more details, refer to Nest Doc.
@Injectable()
export class JwtStrategy extends PassportStrategy(Strategy) {
  constructor() {

    super({
      jwtFromRequest: ExtractJwt.fromAuthHeaderAsBearerToken(),
      ignoreExpiration: false,
      secretOrKey: jwtConstants.secret,
      passReqToCallback: true
    });
  }


  async validate( request: Request,payload: any) {
    const user={ userId: payload.sub, username: payload.username,roles:['admin'] }
    return user;
  }
}
Finally, add JwtGuard in "/hello" endpoint.
@Get('hello')
  @UseGuards(JwtAuthGuard)
  getHello(@Request() req){
    console.log("hello",req.user);
    return "Hello";
  }
Now we can test at http://127.0.0.1:3001/hello and use header Authorization with "Bearer ${token}".
Microservice Auth
I try to secure connections between microservices. We can add a new function where we call Redis.
AuthValidateService will be:
@Injectable()
export class AuthValidateService {
    constructor(
        @Inject('User_SERVICE') private readonly userServiceClient: ClientProxy
      ) {}

    validateUser(username: string, pass: string): Observable<UserDto>|null {

        return this.userServiceClient.send('findOne',
       this.addMicroserviceToken({username:username}))
        .pipe(map((user:UserDto)=>{

          if (user && bcrypt.compareSync(pass, user.password)) {
            const { password, ...result } = user;
            return result;
          }
          return null;}),
          catchError(err => {
            console.log('caught  error and return null ', err);
            return  of(null);
        })
          )

      }

    private addMicroserviceToken(data:any): any{
      data.token=bcrypt.hashSync("secret",10) ;
      return data;
  }
}
Export to the Custom Library
To use JWT Guard in all our apps without the need to rewrite it, we can create a Library that manages authentication implementation.
Collect to AuthModule
We start by creating AuthModule. Every module or provider that is just used for authentication will remove it from the main module to the new AuthModule. Create AuthModule and use the dynamic module to make it configurable to receive Validation Service, Redis URL, JWT security key, and ClientsModule name. Import PassportModule, ClientsModule, JwtModule and export LocalStrategy, JwtStrategy, and JwtModule to use them outside the module.
@Module({})
export class AuthModule {
  static register(validationService,options?:{jwtsecret:string,
    userServiceClientProvider:string,
    redisUrl:string

  }): DynamicModule {
    return {
      module: AuthModule,
      imports:[
        PassportModule,
        ClientsModule.register([
          {
            name: options.userServiceClientProvider,
            transport: Transport.REDIS,
            options: {
              url: options.redisUrl,
            },
          },
          ]),
        JwtModule.register({
          secret: options?options.jwtsecret:"secretKey",
          signOptions: { expiresIn: '6000s' },
          })
      ],
      providers: [
        {
        provide:'JWTSECRET',
        useValue:options?options.jwtsecret:"secretKey"
        }
        ,validationService ,LocalStrategy, JwtStrategy],
      exports: [LocalStrategy, JwtStrategy,JwtModule],
    };
  }
}
Edit JwtStrategy to pass the security key from outside the module.
constructor(@Inject('JWTSECRET') private jwtsecrit) {

    super({
      jwtFromRequest: ExtractJwt.fromAuthHeaderAsBearerToken(),
      ignoreExpiration: false,
      secretOrKey: jwtsecrit,
      passReqToCallback: true
    });
  }
Clean App Module
Remove all unneeded modules and export them from AuthModule.
The module will be: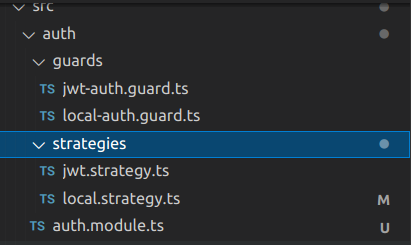
Remove all from the auth-service module.
@Module({
  imports: [
  AuthModule.register(
    {
    provide: 'AUTH_SERVICE',
    useClass:AuthValidateService
    }
  ,
    {
    userServiceClientProvider:'User_SERVICE',
    redisUrl:'redis://localhost:6379',
    jwtsecret:jwtConstants.secret
    }
  )],
  controllers: [AuthServiceController],
  providers: [AuthServiceService],
})
export class AuthServiceModule {}
Test again to check every function works.
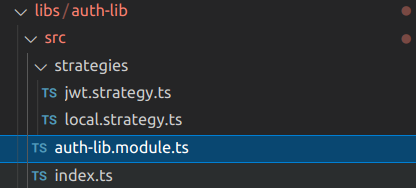
Create Library
Create library nest g library auth-lib. Move all AuthModule to lib and edit auth-lib.module.ts. Adding will be the same as AuthModule.
@Module({})
export class AuthLibModule {
  static register(validationService,options?:{jwtsecret:string,
    userServiceClientProvider:string,
    redisUrl:string

  }): DynamicModule {
    return {
      module: AuthLibModule,
      imports:[
        PassportModule,
        ClientsModule.register([
          {
            name: options.userServiceClientProvider,
            transport: Transport.REDIS,
            options: {
              url: options.redisUrl,
            },
          },
          ]),
        JwtModule.register({
          secret: options?options.jwtsecret:"secretKey",
          signOptions: { expiresIn: '6000s' },
          })
      ],
      providers: [
        {
        provide:'JWTSECRET',
        useValue:options?options.jwtsecret:"secretKey"
        }
        ,validationService ,LocalStrategy, JwtStrategy],
      exports: [LocalStrategy, JwtStrategy,JwtModule],
    };
  }
}
The last step is to export guards in index.ts.
export * from './auth-lib.module';
export {JwtAuthGuard} from './auth/guards/jwt-auth.guard';
export {LocalAuthGuard} from './auth/guards/local-auth.guard';
Clean All Modules
I remove all AuthModule, strategies, and guards and replace them with the custom library, then test to make sure everything works.
If everything works, the library will be as below:
Test again and everything should be working!
Authentication
The Nest.js definition states: "Authorization refers to the process that determines what a user can do. For example, an administrative user is allowed to create, edit, and delete posts. A non-administrative user is only authorized to read the posts."
RolesGuard/User Type
Create a check for roles or user types. Start directly in lib, from basic roles, and use Enum to create.
export enum Role {
    User = 'user',
    Admin = 'admin',
  }
To pass roles in method, will use annotation by creating Roles decorator.
import { SetMetadata } from '@nestjs/common';
import { Role } from './role.enum';

export const ROLES_KEY = 'roles';
export const Roles = (...roles: Role[]) => SetMetadata(ROLES_KEY, roles);
Finally, create RoleGuard with basic verification by implementing canActivate and using refactor to get @Role annotation. Set value from method to check user data and required method role.
@Injectable()
export class RolesGuard implements CanActivate {
  constructor(private reflector: Reflector) {}

  canActivate(context: ExecutionContext): boolean {
    const roles = this.reflector.get<string[]>(ROLES_KEY, context.getHandler());
    if (!roles) {
         return true;
    }
    const {user} = context.switchToHttp().getRequest();
    return this.matchRoles(roles,user['roles'])
  }
  matchRoles(roles:string[],userRoles:Role[]){
      return roles.filter(role=>!userRoles.includes).length==0;
  }
}
Policies and Privilege Groups
Here we have multiple levels of users and need more advanced RBAC implementation. To do that, we need to edit the user service by adding an entity. Save every user policy. First, create Privilege-group table in a database.
@Table({tableName:'Privilege-group'})
export class PrivilegeGroup extends Model<PrivilegeGroup> {

   @Column( {
     unique: true,
       allowNull: false
     })
   groupName: string;

   @Column(DataType.STRING)
   roles: string;//Policy[]

   @BelongsToMany(() => Users, () => GroupUser)
   users: Users[]

}
Use many-to-many relationship by connecting two tables using GroupUser table.
@Table
export class GroupUser extends Model {
 @ForeignKey(() => Users)
 @Column
 userId: number

 @ForeignKey(() => PrivilegeGroup)
 @Column
 privilegeGroupId: number
}
Create type Policy to receive authorities in JSON.
import { ActionEnum } from "./action-enum";

export class Policy{
    action: ActionEnum[];
    resources: string;
}
Now ActionEnum contains all actions like read, write, and delete.
export enum ActionEnum {
    Manage = 'manage',
    Create = 'create',
    Read = 'read',
    Update = 'update',
    Delete = 'delete',
  }
Add new decorator PrivilegeService to access the privilege-group repository to create and get privileges.
@Injectable()
export class PrivilegeService {
    constructor(
        @InjectModel(PrivilegeGroup)    private readonly privilegeModel: typeof PrivilegeGroup,
        @InjectModel(GroupUser) private readonly groupUserModel: typeof GroupUser
    ){}

    getGroupList() { return this.privilegeModel.findAll(); }

    getGroup(id: any) { return this.privilegeModel.findOne({where:{id:id}});}

    async createGroup(createGroup:CreateGroup):Promise<PrivilegeGroup>{
        const createGroupDto=new CreateGroupDto();
        createGroupDto.groupName=createGroup.groupName;
        createGroupDto.roles=JSON.stringify(createGroup.roles);
        return this.privilegeModel.create(<PrivilegeGroup>createGroupDto)
    }

    async addUserGroup(createGroupUserDto: CreateGroupUserDto[]):Promise<GroupUser[]>{
        return this.groupUserModel.bulkCreate(createGroupUserDto);
    }

    async deleteUserGroup(userId: any,privilegeGroupId:any) {
        return this.groupUserModel.destroy({where:{userId:userId,privilegeGroupId:privilegeGroupId}})
      }
    getUserGroup(id: any) {
        return this.groupUserModel.findAll({where:{userId:id}})
      }

}
Create endpoints in the privilege controller.
@Controller("privilege")
export class PrivilegeController {
    constructor(private readonly privilegeService:PrivilegeService){}

    @Get('/')
    getGroupList() { return this.privilegeService.getGroupList()}
    @Get('/:id')
    getGroup(@Param('id')id: number) { return this.privilegeService.getGroup(id);}

    @Post('/add')
    async createGroup(@Body() createGroup:CreateGroup){
        return this.privilegeService.createGroup(createGroup)
    }
    @Post('/group-users/save')
    async addUserGroup(@Body() createGroupUserDtoList: CreateGroupUserDto[]){
        return this.privilegeService.addUserGroup(createGroupUserDtoList);
    }
    @Delete("/group-users/delete")
    async deleteUserGroup(@Query('userId') userId: number,@Query('privilegeGroupId') privilegeGroupId:number) {
        return this.privilegeService.deleteUserGroup(userId,privilegeGroupId);
      }


    @Get('/group-users/user/:userId')
    getUserGroup(@Param('userId')userId: number) {
        return this.privilegeService.getUserGroup(userId);
      }
}
Lastly, edit UsersService to get user privileges.
@Injectable()
export class UsersService {
/// the rest..
    async findOne(username: string): Promise<Users> {
      return this.userModel.findOne({include:[{model:PrivilegeGroup , attributes:["roles"],through: {attributes: []}}],where:{email:username},nest: true}) ;
    }
  /// the rest..
  }
Edit JWT Token
Edit JWT token and roles, and add authorities in the token. Use decorator, guard, and custom decorator.
import { SetMetadata } from "@nestjs/common";
import { Policy } from "./policy";

export const CHECK_POLICIES_KEY = 'check_policy';
export const CheckPolicies = (...policy:Policy[]) =>
  SetMetadata(CHECK_POLICIES_KEY, policy);
Policies and Guards:
@Injectable()
export class PoliciesGuard implements CanActivate {
  constructor(
    private reflector: Reflector
  ) {}
  canActivate(context: ExecutionContext): boolean {

    const policies =this.reflector.getAllAndOverride<Policy[]>(
      CHECK_POLICIES_KEY,
      [context.getHandler(),context.getClass()]) || [];

  const {user} = context.switchToHttp().getRequest();

  try{
      const isAuthUser = this.checkPolicies(user['policies'].map(policy => JSON.parse(policy)), policies);
      return isAuthUser;
    }catch(err){
      return false;
    }
  }


  private checkPolicies(userPolicies: Policy[], policies: Policy[]) {
    const isAuthUser = policies.filter(resourcePolicy => {
      return userPolicies.filter(
        policy => this.isAutherize(resourcePolicy, policy)
      ).length >= 1;
    }).length;
    return isAuthUser>=1;
  }

  private isAutherize(resourcePolicy: Policy,  policy: Policy): unknown {
    return this.hasResource(resourcePolicy, policy.resources) && this.hasAction(resourcePolicy, policy);
  }

  private hasResource(resourcePolicy: Policy, resource: string) {
    return resource=='*' || resourcePolicy.resources.indexOf(resource) == 0;
  }

  private hasAction(resourcePolicy: Policy, policy: Policy): unknown {
    return resourcePolicy.action.filter(action => !policy.action.includes(action)).length == 0;
  }
}
Test
A simple test in auth-service controller will add endpoint called Hello.
@Get('hello')
  @Roles(Role.Admin)
  @UseGuards(JwtAuthGuard,RolesGuard,PoliciesGuard)
  @CheckPolicies({action:[ActionEnum.Read],resources:'hello'})
  getHello(@Request() req){
    return "Hello";
  }
In UseGuards we can add multiple guards to execute them. In order to pass variables between guards by using the context request not to test, we run/login, then call get request/hello.
Conclusion
The final version is the Github roles-policies branch.
Opinions expressed by DZone contributors are their own.
Comments