Create User Registration and Login Using Web API and ReactJS
Create user registration and login with Web API and React.
Join the DZone community and get the full member experience.
Join For FreeIntroduction
ReactJS is one of the major libraries used in building a single-page web application and simple mobile application development. React was developed by Jordan Walke, a software engineer at Facebook; the framework is currently maintained by Facebook. In this article, we will learn how to create user registration and login pages using ReactJS and Web API.
This article covers:
- Create a database and table
- Create a Web API Project
- Create React Project
- Install Bootstrap and React strap
- Add Routing
Prerequisites
- Basic knowledge of React.js and Web API
- Visual Studio
- Visual Studio Code
- SQL Server Management Studio
- Node.js
You may also like: CRUD Operations Using ReactJS and ASP.NET Web API
Create a Database and Table
Open SQL Server Management Studio, create a database named Employees, and in this database, create a table. Give that table a name like EmployeeLogin.
xxxxxxxxxx
CREATE TABLE [dbo].[EmployeeLogin](
[Id] [int] IDENTITY(1,1) NOT NULL,
[Email] [varchar](50) NULL,
[Password] [varchar](50) NULL,
[EmployeeName] [varchar](50) NULL,
[City] [varchar](50) NULL,
[Department] [varchar](50) NULL,
CONSTRAINT [PK_EmployeeLogin] PRIMARY KEY CLUSTERED
(
[Id] ASC
)WITH (PAD_INDEX = OFF, STATISTICS_NORECOMPUTE = OFF, IGNORE_DUP_KEY = OFF, ALLOW_ROW_LOCKS = ON, ALLOW_PAGE_LOCKS = ON) ON [PRIMARY]
) ON [PRIMARY]
GO
Create a Web API Project
Open Visual Studio and create a new project.

Change the name as LoginApplication and Click ok > Select Web API as its template.

Right-click the Models folder from Solution Explorer and go to Add >> New Item >> data.

Click on the "ADO.NET Entity Data Model" option and click "Add." Select "EF designer" from the database, and click the "Next" button.

Add the connection properties and select database name on the next page and click OK.

Check the table checkbox. The internal options will be selected by default. Now, click the "Finish" button.
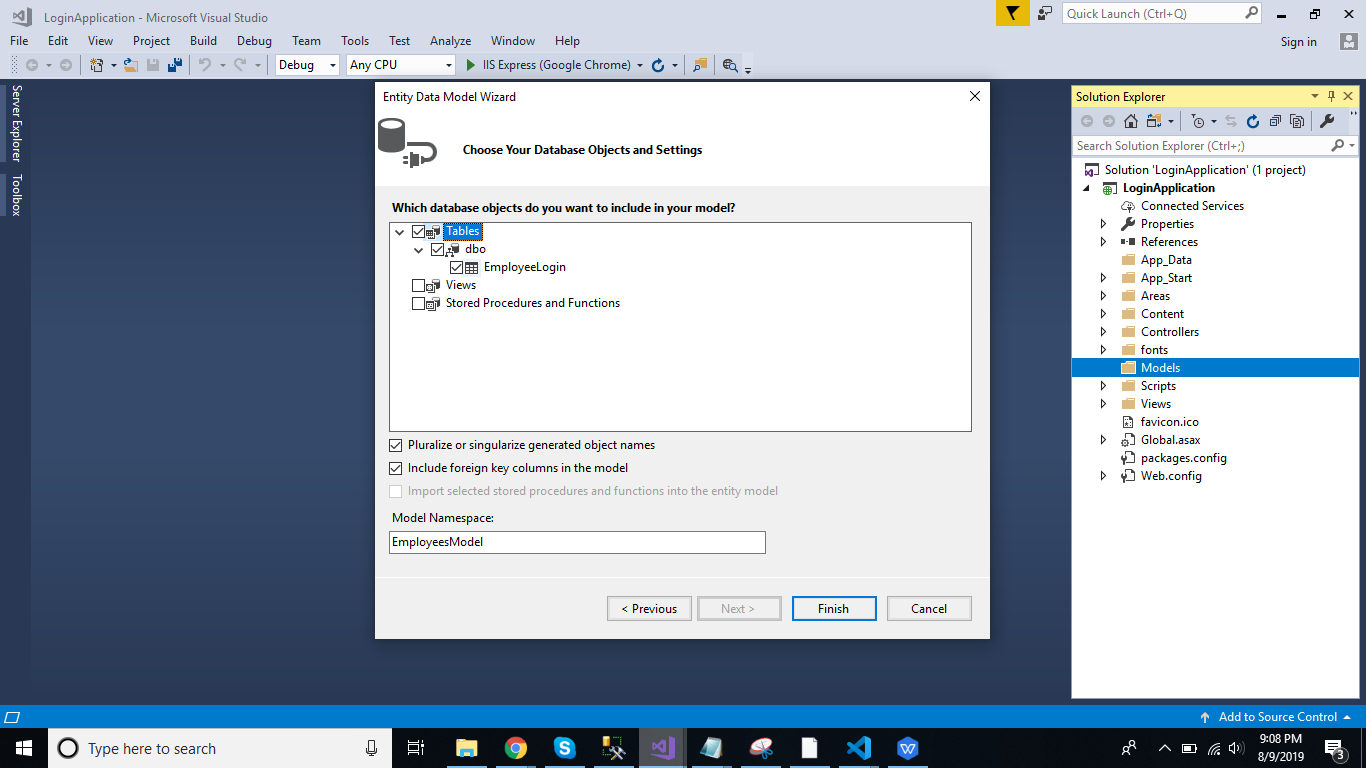
Now, our data model is successfully created.
Next, we add a new folder named "VM." Right-click on it and add three classes — Login, Register, and Response. Now, paste the following code in these classes.
Login Class
xxxxxxxxxx
public class Login
{
public string Email { get; set; }
public string Password { get; set; }
}
Register Class
xxxxxxxxxx
public class Register
{
public int Id { get; set; }
public string Email { get; set; }
public string Password { get; set; }
public string EmployeeName { get; set; }
public string City { get; set; }
public string Department { get; set; }
}
Response Class
xxxxxxxxxx
public class Response
{
public string Status { set; get; }
public string Message { set; get; }
}
Right-click on the Controllers folder and add a new controller. Name it as "Login controller" and add the following namespaces:
xxxxxxxxxx
using LoginApplication.Models;
using LoginApplication.VM;
Create two methods in this controller to insert and log in. Add the following code in this controller:
xxxxxxxxxx
using System;
using System.Collections.Generic;
using System.Linq;
using System.Net;
using System.Net.Http;
using System.Web.Http;
using LoginApplication.Models;
using LoginApplication.VM;
namespace LoginApplication.Controllers
{
[RoutePrefix("Api/login")]
public class LoginController : ApiController
{
EmployeesEntities DB = new EmployeesEntities();
[Route("InsertEmployee")]
[HttpPost]
public object InsertEmployee(Register Reg)
{
try
{
EmployeeLogin EL = new EmployeeLogin();
if (EL.Id == 0)
{
EL.EmployeeName = Reg.EmployeeName;
EL.City = Reg.City;
EL.Email = Reg.Email;
EL.Password = Reg.Password;
EL.Department = Reg.Department;
DB.EmployeeLogins.Add(EL);
DB.SaveChanges();
return new Response
{ Status = "Success", Message = "Record SuccessFully Saved." };
}
}
catch (Exception)
{
throw;
}
return new Response
{ Status = "Error", Message = "Invalid Data." };
}
[Route("Login")]
[HttpPost]
public Response employeeLogin(Login login)
{
var log = DB.EmployeeLogins.Where(x => x.Email.Equals(login.Email) && x.Password.Equals(login.Password)).FirstOrDefault();
if (log == null)
{
return new Response { Status = "Invalid", Message = "Invalid User." };
}
else
return new Response { Status = "Success", Message = "Login Successfully" };
}
}
}
Now, let's enable Cors. Go to Tools, open NuGet Package Manager, search for Cors, and install the Microsoft.Asp.Net.WebApi.Cors package. Open Webapiconfig.cs, and add the following lines:
xxxxxxxxxx
EnableCorsAttribute cors = new EnableCorsAttribute("*", "*", "*");
config.EnableCors(cors);
Create the React Project
Now, create a new ReactJS project by using the following command.
xxxxxxxxxx
npx create-reatc-app loginapp
Open the newly created project in Visual Studio Code, and install Reactstrap and Bootstrap in this project by using the following command.
xxxxxxxxxx
npm install --save bootstrap
npm install --save reactstrap react react-dom
Use the following command to add routing in React.
xxxxxxxxxx
npm install react-router-dom --save
Now, go to the src folder and add three new components.
- Login.js
- Reg.js
- Dashboard.js
Now, open the Reg.js file, and add the following code:
xxxxxxxxxx
import React, { Component } from 'react';
import { Button, Card, CardFooter, CardBody, CardGroup, Col, Container, Form, Input, InputGroup, InputGroupAddon, InputGroupText, Row } from 'reactstrap';
class Reg extends Component {
constructor() {
super();
this.state = {
EmployeeName: '',
City: '',
Email: '',
Password: '',
Department: ''
}
this.Email = this.Email.bind(this);
this.Password = this.Password.bind(this);
this.EmployeeName = this.EmployeeName.bind(this);
this.Password = this.Password.bind(this);
this.Department = this.Department.bind(this);
this.City = this.City.bind(this);
this.register = this.register.bind(this);
}
Email(event) {
this.setState({ Email: event.target.value })
}
Department(event) {
this.setState({ Department: event.target.value })
}
Password(event) {
this.setState({ Password: event.target.value })
}
City(event) {
this.setState({ City: event.target.value })
}
EmployeeName(event) {
this.setState({ EmployeeName: event.target.value })
}
register(event) {
fetch('http://localhost:51282/Api/login/InsertEmployee', {
method: 'post',
headers: {
'Accept': 'application/json',
'Content-Type': 'application/json'
},
body: JSON.stringify({
EmployeeName: this.state.EmployeeName,
Password: this.state.Password,
Email: this.state.Email,
City: this.state.City,
Department: this.state.Department
})
}).then((Response) => Response.json())
.then((Result) => {
if (Result.Status == 'Success')
this.props.history.push("/Dashboard");
else
alert('Sorrrrrry !!!! Un-authenticated User !!!!!')
})
}
render() {
return (
<div className="app flex-row align-items-center">
<Container>
<Row className="justify-content-center">
<Col md="9" lg="7" xl="6">
<Card className="mx-4">
<CardBody className="p-4">
<Form>
<div class="row" className="mb-2 pageheading">
<div class="col-sm-12 btn btn-primary">
Sign Up
</div>
</div>
<InputGroup className="mb-3">
<Input type="text" onChange={this.EmployeeName} placeholder="Enter Employee Name" />
</InputGroup>
<InputGroup className="mb-3">
<Input type="text" onChange={this.Email} placeholder="Enter Email" />
</InputGroup>
<InputGroup className="mb-3">
<Input type="password" onChange={this.Password} placeholder="Enter Password" />
</InputGroup>
<InputGroup className="mb-4">
<Input type="text" onChange={this.City} placeholder="Enter City" />
</InputGroup>
<InputGroup className="mb-4">
<Input type="text" onChange={this.Department} placeholder="Enter Department" />
</InputGroup>
<Button onClick={this.register} color="success" block>Create Account</Button>
</Form>
</CardBody>
</Card>
</Col>
</Row>
</Container>
</div>
);
}
}
export default Reg;
Now, open the Login.js file, and add the following code:
xxxxxxxxxx
import React, { Component } from 'react';
import './App.css';
import { Button, Card, CardBody, CardGroup, Col, Container, Form, Input, InputGroup, InputGroupAddon, InputGroupText, Row } from 'reactstrap';
class Login extends Component {
constructor() {
super();
this.state = {
Email: '',
Password: ''
}
this.Password = this.Password.bind(this);
this.Email = this.Email.bind(this);
this.login = this.login.bind(this);
}
Email(event) {
this.setState({ Email: event.target.value })
}
Password(event) {
this.setState({ Password: event.target.value })
}
login(event) {
debugger;
fetch('http://localhost:51282/Api/login/Login', {
method: 'post',
headers: {
'Accept': 'application/json',
'Content-Type': 'application/json'
},
body: JSON.stringify({
Email: this.state.Email,
Password: this.state.Password
})
}).then((Response) => Response.json())
.then((result) => {
console.log(result);
if (result.Status == 'Invalid')
alert('Invalid User');
else
this.props.history.push("/Dashboard");
})
}
render() {
return (
<div className="app flex-row align-items-center">
<Container>
<Row className="justify-content-center">
<Col md="9" lg="7" xl="6">
<CardGroup>
<Card className="p-2">
<CardBody>
<Form>
<div class="row" className="mb-2 pageheading">
<div class="col-sm-12 btn btn-primary">
Login
</div>
</div>
<InputGroup className="mb-3">
<Input type="text" onChange={this.Email} placeholder="Enter Email" />
</InputGroup>
<InputGroup className="mb-4">
<Input type="password" onChange={this.Password} placeholder="Enter Password" />
</InputGroup>
<Button onClick={this.login} color="success" block>Login</Button>
</Form>
</CardBody>
</Card>
</CardGroup>
</Col>
</Row>
</Container>
</div>
);
}
}
export default Login;
Open the Dahboard.js file, and add the following code:
xxxxxxxxxx
import React, { Component } from 'react';
import './App.css';
import { Button, Card, CardBody, CardGroup, Col, Container, Form, Input, InputGroup, InputGroupAddon, InputGroupText, Row } from 'reactstrap';
class Dashboard extends Component {
render() {
return (
<div class="row" className="mb-2 pageheading">
<div class="col-sm-12 btn btn-primary">
Dashboard
</div>
</div>
);
}
}
export default Dashboard;
Open the App.css file, and add the following CSS classes:
xxxxxxxxxx
.App {
text-align: center;
}
.navheader{
margin-top: 10px;
color :black !important;
background-color: #b3beca!important
}
.PageHeading
{
margin-top: 10px;
margin-bottom: 10px;
color :black !important;
}
Open the App.js file, and add the following code:
xxxxxxxxxx
import React from 'react';
import logo from './logo.svg';
import './App.css';
import Login from './Login';
import Reg from './Reg';
import Dashboard from './Dashboard';
import { BrowserRouter as Router, Switch, Route, Link } from 'react-router-dom';
function App() {
return (
<Router>
<div className="container">
<nav className="navbar navbar-expand-lg navheader">
<div className="collapse navbar-collapse" >
<ul className="navbar-nav mr-auto">
<li className="nav-item">
<Link to={'/Login'} className="nav-link">Login</Link>
</li>
<li className="nav-item">
<Link to={'/Signup'} className="nav-link">Sign Up</Link>
</li>
</ul>
</div>
</nav> <br />
<Switch>
<Route exact path='/Login' component={Login} />
<Route path='/Signup' component={Reg} />
</Switch>
<Switch>
<Route path='/Dashboard' component={Dashboard} />
</Switch>
</div>
</Router>
);
}
export default App;
Now, run the project by using the npm start command, and check the results.

Enter the details and click on the create an account button:

Enter Email and Password and click on the login button.
Further Reading
Opinions expressed by DZone contributors are their own.
Comments