How to Create Mule Connectors
After experimenting with all the connectors available in Mule, maybe you want to create your own. Let's see how to create the simplest connector possible.
Join the DZone community and get the full member experience.
Join For FreeIn this tutorial, we are going to create a simple WordPress connector to list out all the posts from a blog. To create Mule connectors, you need to have the Mule DevKit installed on your machine. For installation, please check the installation guide.
Step 1
After proper installation of the DevKit, let's create a simple Connector Project as shown in the diagram,

I have named the project rest-connector. In the next wizard window, please check the Anypoint Connector Project type as SDK-based. And that's it. Upon finishing, Anypoint Studio will take some time to download the necessary libraries, and then your project will be ready. Here is the project structure.

Step 2
If you notice in the project created in Step 1, the Anypoint Studio generates two classes automatically:
RestConnector.java.
ConnectorConfig.java.
And also generates some default codes. For simplicity I have removed the auto generated codes and kept it clean.
Step 3
WordPress exposes some very useful REST APIs. You can take a look here. On the right-hand side of the site, you can see a list of available REST services divided into categories. I chose the Posts category and picked up the "get a list of matching posts" service. The documentation explains clearly how to make calls to the service.
Step 4
Here is a small piece of Java code that demonstrates how to call the REST service. In this example, I am querying the title and URL of all the posts available on gocodeblog.wordpress.com. I am simply printing out the JSON response to the console.
import org.springframework.web.client.RestTemplate;

public class Test {

public static void main(String[] a) {
new Test().getPosts("ID,title");

}

public void getPosts(String field) {
RestTemplate template = new RestTemplate();

String url = "https://public-api.wordpress.com/rest/v1.1/sites/";
url = url.concat("gocodeblog.wordpress.com").concat("/posts?fields=").concat(field);
String result = template.getForObject(url, String.class);
System.out.print(result);
}
}
This is what my custom connector is going to return as result.
Step 5
In this step, we are going to write the ConnectorConfig.java. Here, I have only one property, called site, which corresponds to the WordPress blog. Note that the property value must not contain http:// or https:// as a prefix. I just put a tooltip informing this. Here is the source code.
package com.anupam.rest.config;

import org.mule.api.annotations.Configurable;
import org.mule.api.annotations.components.Configuration;
import org.mule.api.annotations.display.Summary;

@Configuration(friendlyName = "Configuration")
public class ConnectorConfig {

@Configurable
@Summary(value="Please enter the blog url without the prefix http:// or https://")
    private String site;

public String getSite() {
return site;
}

public void setSite(String site) {
this.site = site;
}


}
Step 6
Now, we are going to write our connector class, i.e., RestConnector.java. The code is self-explanatory:
package com.anupam.rest;

import org.mule.api.annotations.Config;
import org.mule.api.annotations.Connector;
import org.mule.api.annotations.Processor;
import org.mule.api.annotations.display.Summary;
import org.springframework.web.client.RestTemplate;

import com.anupam.rest.config.ConnectorConfig;

@Connector(name = "rest", friendlyName = "WordPress")
public class RestConnector {

@Config
ConnectorConfig config;

@Processor
public String getPosts(
@Summary(value = "Enter coma separated parameters.Acceptable parameters are: ID,title,URL") String field) {
RestTemplate template = new RestTemplate();

String url = "https://public-api.wordpress.com/rest/v1.1/sites/";
url = url.concat(config.getSite()).concat("/posts?fields=").concat(field);
String result = template.getForObject(url, String.class);
return result;
}

public ConnectorConfig getConfig() {
return config;
}

public void setConfig(ConnectorConfig config) {
this.config = config;
}

}
Note: The friendlyName="WordPress" attribute in the @Connector annotation means that the connector will be available as WordPress in the palettes section.
That's it. Now, browse to the root of the project and execute mvn clean install. After that, right-click on the project and hit Anypoint Connector > Install or Update. The Anypoint Studio will automatically install the palette in your Mule Palettes section.
Using the WordPress Connector
Let's use this connector in a simple flow. The flow is shown below in the diagram:

In the configuration of the WordPress connector, please specify the site property as shown in this diagram:
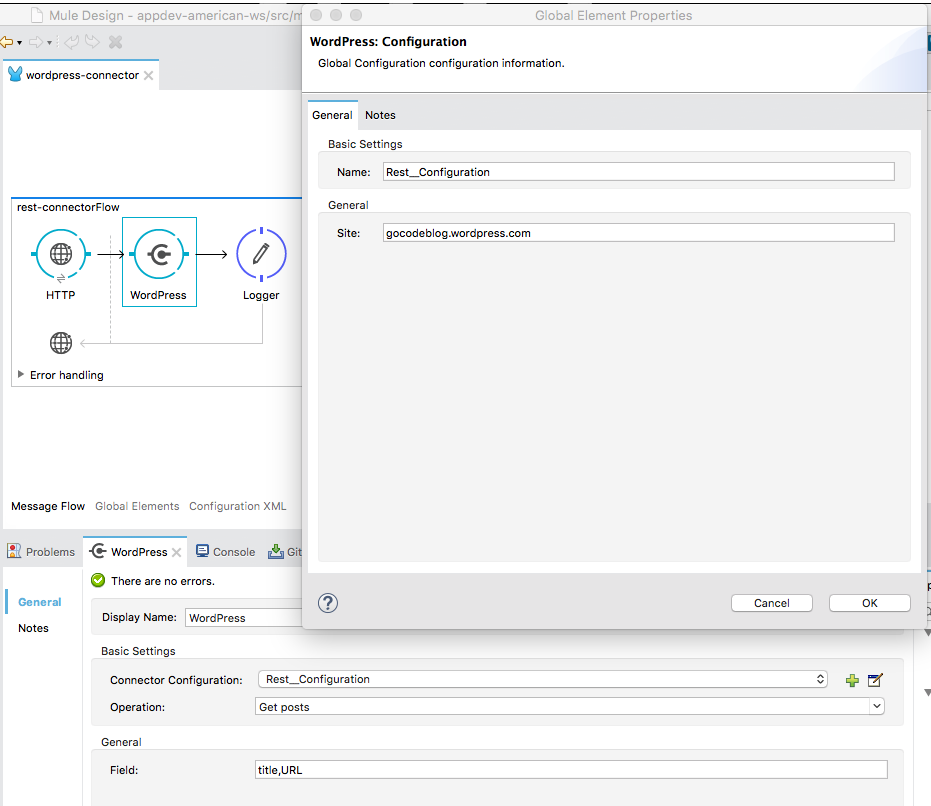
In the General tab, specify the query parameters separated by commas. I have put the itle and URL.
We're done!
Testing
Run the Mule flow and fire a request to http://localhost:8082/rest using your browser or PostMan. You should receive the JSON response containing the blog posts titles and URLs.
You can find the source code of the connector project projec here.
Opinions expressed by DZone contributors are their own.
Comments