Datafaker Gen: Leveraging BigQuery Sink on Google Cloud Platform
The simplest way to enrich a BigQuery table with realistic data. This guide describes how to define a schema for Datafaker Gen.
Join the DZone community and get the full member experience.
Join For FreeThis is a continuation of the article Flexible Data Generation With Datafaker Gen about DataFaker Gen. In this section, we will explore the new BigQuery Sink feature for Google Cloud Platform, demonstrating how to utilize different field types based on the DataFaker schema.
BigQuery is a fully managed and AI-ready data analytics platform available on Google Cloud Platform that gives anyone the capability to analyze terabytes of data.
Let's consider a scenario where we aim to create a dummy dataset, aligned with our actual schema to facilitate executing and testing queries in BigQuery. By using Datafaker Gen, this data can become meaningful and predictable, based on predefined providers, thus allowing for more realistic and reliable testing environments.
This solution leverages the BigQuery API Client libraries provided by Google. For more details, refer to the official documentation here: BigQuery API Client Libraries.
Quick Start With BigQuery Sink
This is a simple example of BigQuery Sink just to show that it requires two simple actions to see the result. This provides clarity on the approach. The other part of this article will cover detailed configuration and the flexibility of this feature.
And so, three simple steps need to be done:
1. Download the project here, build it, and navigate to the folder with the BigQuery example:
./mvnw clean verify && cd ./datafaker-gen-examples/datafaker-gen-bigquery2. Configure schema in config.yaml :
default_locale: en-US
fields:
  - name: id
    generators: [ Number#randomNumber ]
  - name: lastname
    generators: [ Name#lastName ]
    nullRate: 0.1
  - name: firstname
    locale: ja-JP
    generators: [ Name#firstName ]
Configure BigQuery Sink in output.yamlwith the path to the Service Account JSON (which should be obtained from GCP):
sinks:
  bigquery:
    project_id: [gcp project name]
    dataset: datafaker
    table: users
    service_account: [path to service accout json]
Run it:
# Format json, number of lines 10000 and new BigQuery Sink
bin/datafaker_gen -f json -n 10000 -sink bigquery
In-Depth Guide To Using BigQuery Sink
To prepare a generator for BigQuery, follow these two steps:
- Define the DataFaker Schema: The schema defined in
config.yamlwill be reused for the BigQuery Sink. - Configure the BigQuery Sink: In
output.yaml, specify the connection credentials, connection properties, and generation parameters.
Note: Currently, BigQuery Sink only supports the JSON format. If another format is used, the BigQuery Sink will throw an exception. At the same time, it might be a good opportunity to introduce other formats, such as protobuf.
1. Define the DataFaker Schema
One of the most important preparation tasks is defining the schema in the config.yaml file. The schema specifies the field definitions of the record based on the Datafaker provider. It also allows for the definition of embedded fields like array and struct.
Consider this example of a schema definition in the config.yaml file.
The first step is to define the base locale that should be used for all fields. This should be done at the top of the file in the property default_locale . The locale for a specific field can be customized directly.
default_locale: en-USThis schema defines the default locale as 'en-EN' and lists the fields. Then all required fields should be defined in fields section.
Let’s fill in the details of the field definitions. Datafaker Gen supports three main field types: default, array, and struct.
Default Type
This is a simple type that allows you to define the field name and how to generate its value using generator property. Additionally, there are some optional parameters that allow for customization of locale and rate nullability.
default_locale: en-US
fields:
  - name: id
    generators: [ Number#randomNumber ]
  - name: lastname
    generators: [ Name#lastName ]
    nullRate: 0.1
  - name: firstname
    locale: ja-JP
generators: [ Name#firstName ]- name: Defines the field name.
- generators: Defines the Faker provider methods that generate value.
For BigQuery, based on the format provided by the Faker provider generators, it will generate JSON, which will be reused for BigQuery field types. In our example,
Number#randomNumberreturns a long value from the DataFaker provider, which is then converted to an integer for the BigQuery schema. Similarly, the fieldsName#lastNameandName#firstNamewhich are String and convert to STRING in BigQuery.
- nullRate: Determine how often this field is missing or has a null value.
- locale: Defines a specific locale for the current field.
Array Type
This type allows the generation of a collection of values. It reuses the fields from the default type and extends them with two additional properties: minLength and maxLength.
In BigQuery, this type corresponds to a field with the REPEATED mode.
The following fields need to be configured in order to enable the array type:
- type: Specify
arraytype for this field. - minLenght: Specify min length of array.
- maxLenght: Specify max length of array.
All these properties are mandatory for the array type.
default_locale: en-US
fields:
  - name: id
    generators: [ Number#randomNumber ]
  - name: lastname
    generators: [ Name#lastName ]
    nullRate: 0.1
  - name: firstname
    generators: [ Name#firstName ]
    locale: ja-JP
  - name: phone numbers
    type: array
    minLength: 2
    maxLength: 5
    generators: [ PhoneNumber#phoneNumber, PhoneNumber#cellPhone ]
It is also worth noting that, generator property can contain multiple sources of value, such as for phone numbers.
Struct Type
This type allows you to create a substructure that can contain many nested levels based on all existing types.
In BigQuery, this type corresponds to RECORD type.
struct type doesn’t have a generator property but has a new property called fields, where a substructure based on the default, array or struct type can be defined. There are two main fields that need to be added for the struct type:
- type: Specify
structtype for this field. - fields: Defines a list of fields in a sub-structure.
default_locale: en-US
fields:
  - name: id
    generators: [ Number#randomNumber ]
  - name: lastname
    generators: [ Name#lastName ]
    nullRate: 0.1
  - name: firstname
    generators: [ Name#firstName ]
    locale: ja-JP
  - name: phone numbers
    type: array
    minLength: 2
    maxLength: 5
    generators: [ PhoneNumber#phoneNumber, PhoneNumber#cellPhone ]
  - name: address
    type: struct
    fields:
      - name: country
        generators: [ Address#country ]
      - name: city
        generators: [ Address#city ]
      - name: street address
        generators: [ Address#streetAddress ]
2. Configure BigQuery Sink
As previously mentioned, the configuration for sinks can be added in the output.yaml file. The BigQuery Sink configuration allows you to set up credentials, connection properties, and sink properties. Below is an example configuration for a BigQuery Sink:
sinks:
  bigquery:
    batchsize: 100
    project_id: [gcp project name]
    dataset: datafaker
    table: users
    service_account: [path to service accout json]
    create_table_if_not_exists: true
    max_outstanding_elements_count: 100
    max_outstanding_request_bytes: 10000
    keep_alive_time_in_seconds: 60
    keep_alive_timeout_in_seconds: 60
Let's review the entire list of leverages you can take advantage of:
- batchsize: Specifies the number of records to process in each batch. A smaller batch size can reduce memory usage but may increase the number of API calls.
- project_id: The Google Cloud Platform project ID where your BigQuery dataset resides.
- dataset: The name of the BigQuery dataset where the table is located.
- table: The name of the BigQuery table where the data will be inserted.
- Google Credentials should be configured with sufficient permissions to access and modify BigQuery datasets and tables. There are several ways to pass service account content:
- service_account: The path to the JSON file containing the service account credentials. This configuration should be defined in the
output.yamlfile. SERVICE_ACCOUNT_SECRETThis environment variable should contain the JSON content of the service account.- The final option involves using the gcloud configuration from your environment (more details can be found here). This option is implicit and could potentially lead to unpredictable behavior.
- service_account: The path to the JSON file containing the service account credentials. This configuration should be defined in the
- create_table_if_not_exists: If set to
true, the table will be created if it does not already exist. A BigQuery Schema will be created based on the DataFaker Schema. - max_outstanding_elements_count: The maximum number of elements (records) allowed in the buffer before they are sent to BigQuery.
- max_outstanding_request_bytes: The maximum size of the request in bytes allowed in the buffer before they are sent to BigQuery.
- keep_alive_time_in_seconds: The amount of time(in seconds) to keep the connection alive for additional requests.
- keep_alive_timeout_in_seconds: The amount of time(in seconds) to wait for additional requests before closing the connection due to inactivity.
How to Run
BigQuery Sink example has been merged into the main upstream Datafaker Gen project, where it can be adapted for your use.
Running this generator is easy and lightweight. However, it requires several preparation steps:
1. Download the GitHub repository. The datafaker-gen-examples folder includes the example with BigQuery Sink, that we will use.
2. Build the entire project with all modules. The current solution uses 2.2.3-SNAPSHOT version of DataFaker library.
./mvnw clean verify3. Navigate to the 'datafaker-gen-bigquery' folder. This should serve as the working directory for your run.
cd ./datafaker-gen-examples/datafaker-gen-bigquery4. Define the schema for records in the config.yaml file and place this file in the appropriate location where the generator should be run. Additionally, define the sinks configuration in the output.yaml file, as demonstrated previously.
Datafake Gen can be executed through two options:
1. Use bash script from the bin folder in the parent project:
# Format json, number of lines 100 and new BigQuery Sink
bin/datafaker_gen -f json -n 10000 -sink bigquery
2. Execute the JAR directly, like this:
java -cp [path_to_jar] net.datafaker.datafaker_gen.DatafakerGen -f json -n 10000 -sink bigqueryQuery Result and Outcome
After applying all the necessary configurations and running in my test environment, it would be nice to check the outcome.
This is the SQL query to retrieve the generated result:
SELECT
   id,
   lastname,
   firstname,
   `phone numbers`,
   address
FROM `datafaker.users`;
Here is the result of all our work (the result of the query):
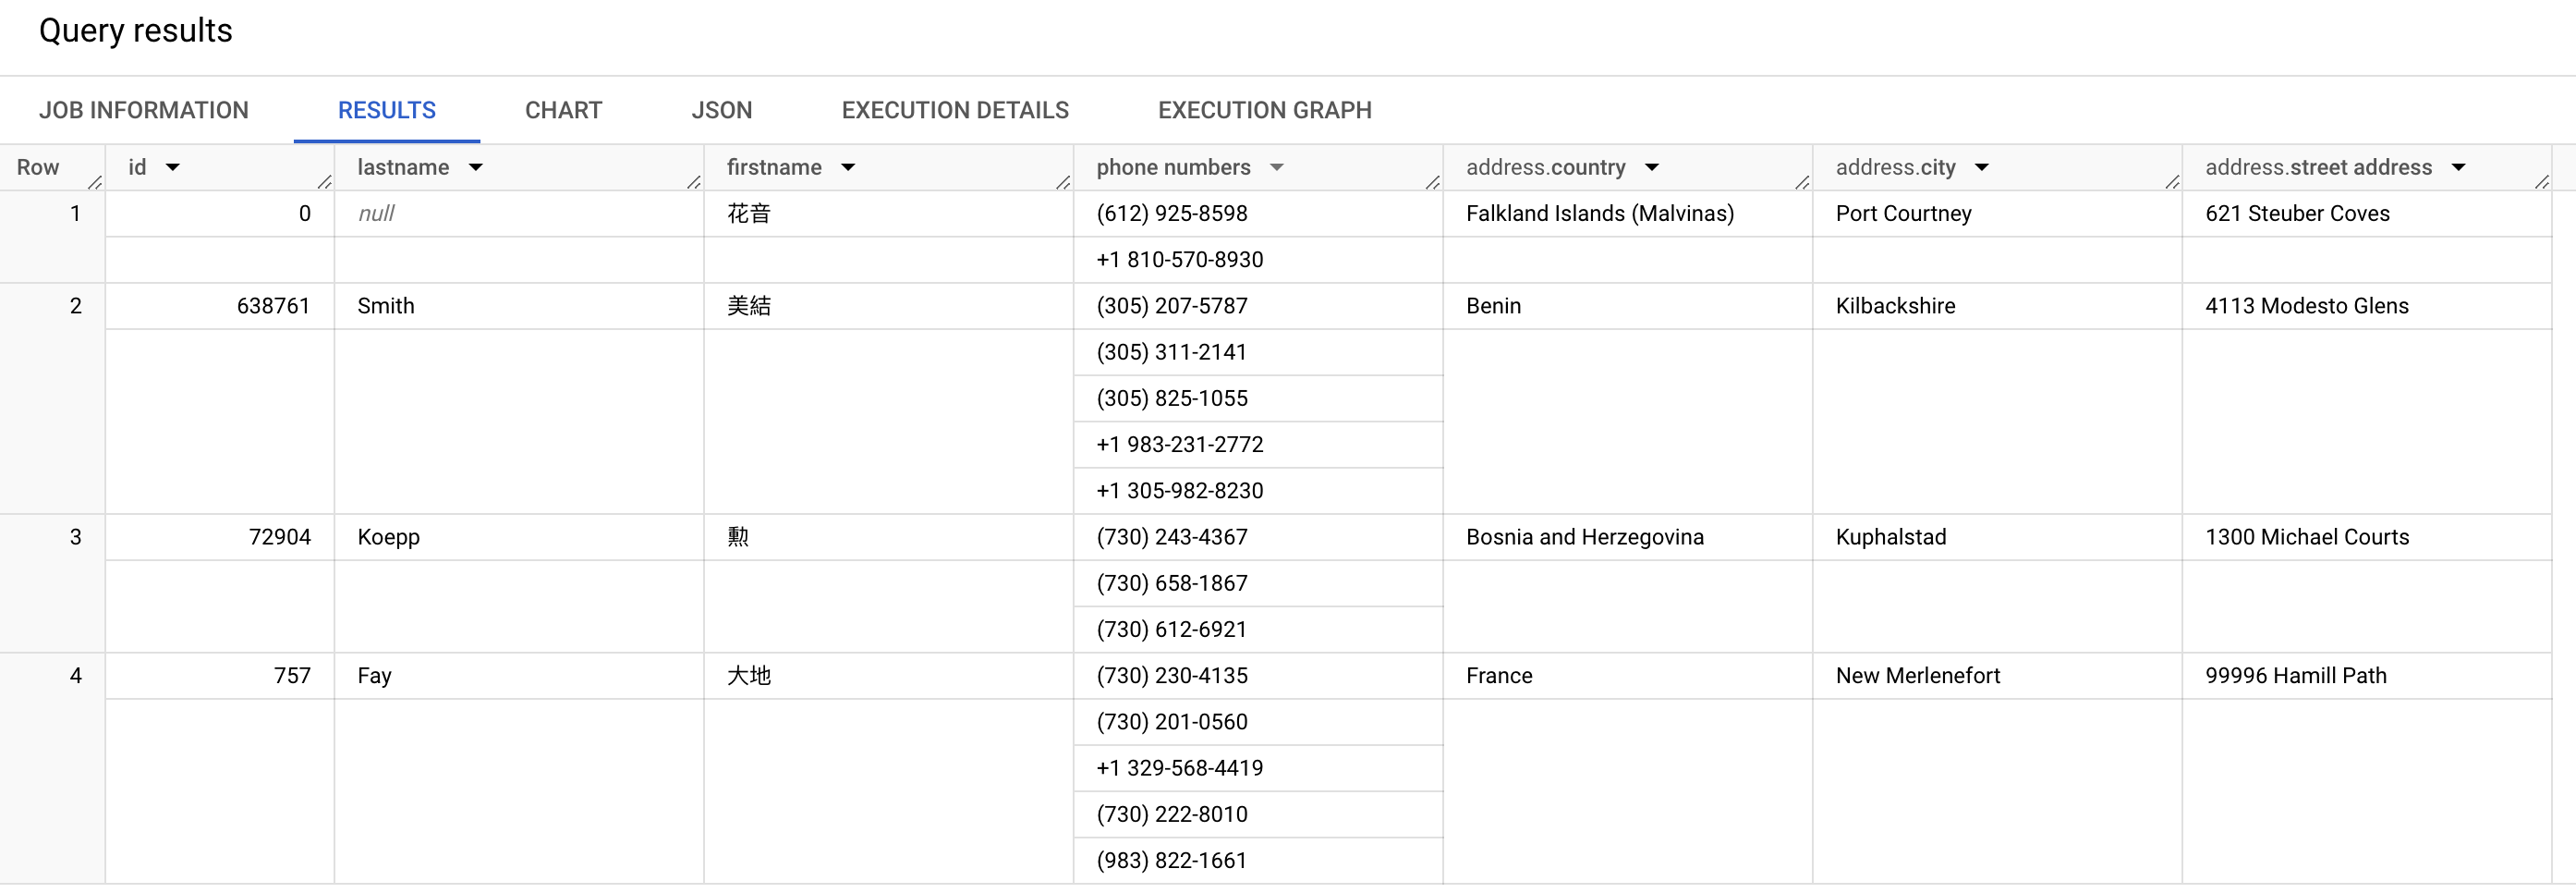
Only the first four records are shown here with all the fields defined above. It also makes sense to note that the phone numbers array field contains two or more values depending on the entries. The address structure field has three nested fields.
Conclusion
This newly added BigQuery Sink feature enables you to publish records to Google Cloud Platform efficiently. With the ability to generate and publish large volumes of realistic data, developers and data analysts can more effectively simulate the behavior of their applications and immediately start testing in real-world conditions.
Your feedback allows us to evolve this project. Please feel free to leave a comment.
- The full source code is available here.
- I would like to thank Sergey Nuyanzin for reviewing this article.
Thank you for reading! Glad to be of help.
Opinions expressed by DZone contributors are their own.
Comments