DDD and Spring Boot Multi-Module Maven Project
In this post we will go through how to create Multi-Module Maven Project with Spring Boot following Domain-Driven Methodology.
Join the DZone community and get the full member experience.
Join For FreeIn this post we will go through how to create a Multi-Module Maven Project with Spring Boot following Domain-Driven Methodology.
Here I must confess that I am not being a total DDD purist here adhering to all the concepts but instead just covering the first mile. With this in your arsenal you should be in a position to extend this as per your project needs.
A multi-module project is built from a parent pom that manages a group of sub-modules. The parent pom is located in the project’s root directory and must have the packaging of type pom.
The sub-modules are regular maven projects that have packaging type different from pom, such as jar, war, ear. We have the option of running Maven build on separate module’s pom file or the parent’s pom file. By running the maven build on parent’s pom file all sub-modules will be built.
So, without further ado, let's get going.
Create a Parent Module
Open Eclipse, go to File --> New --> Other --> Maven --> Maven Project and click on Next.
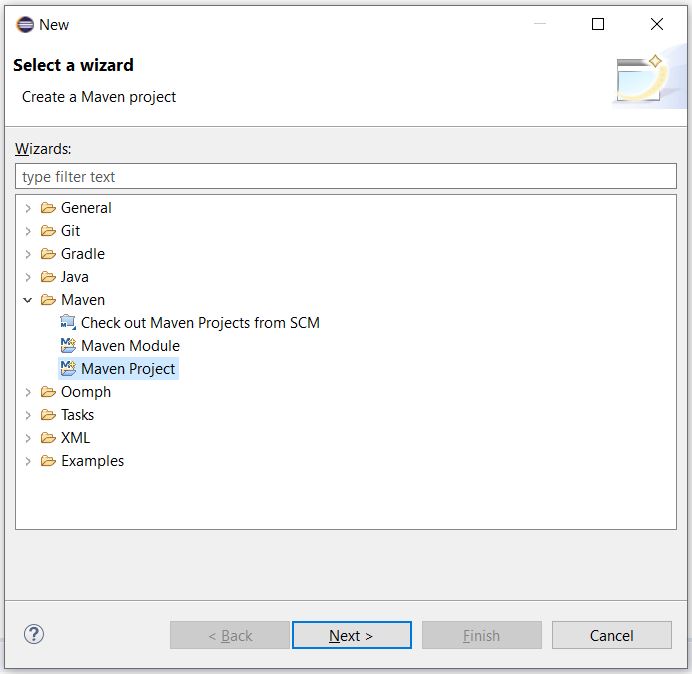
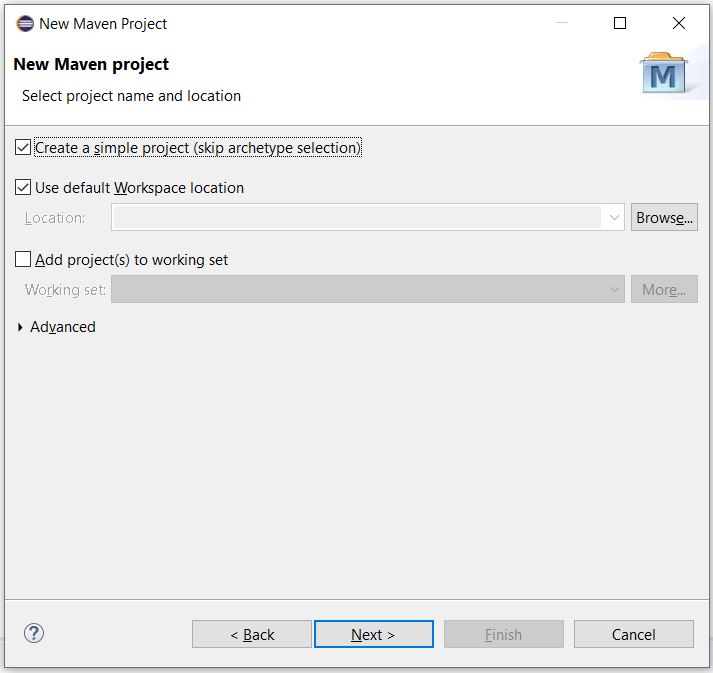
Select "Create a simple project (skip archetype selection)" and click on Next.
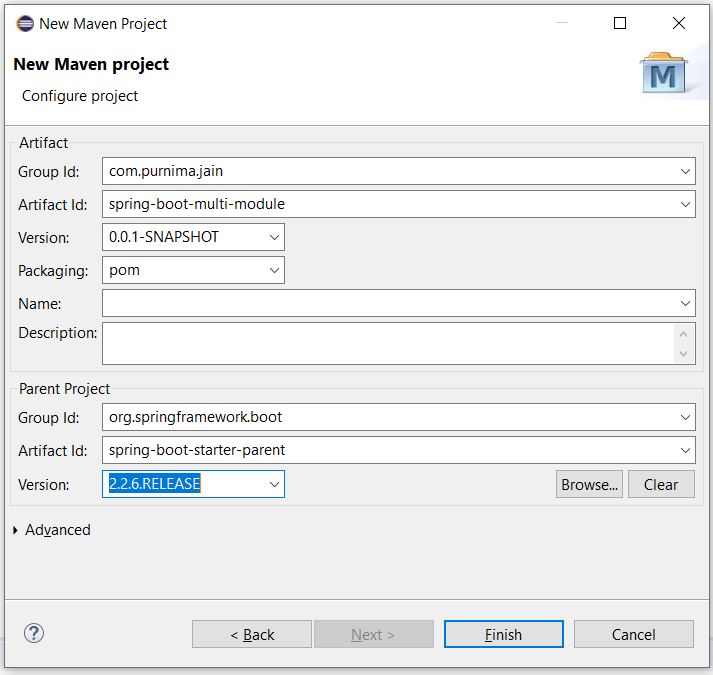
Input "com.purnima.jain" or something similar to Group Id.
Input "spring-boot-multi-module" or something similar to Artifact Id.
Change the packaging to pom. As this is the parent module, its packaging has to be pom.
Feel free to enter the Name and Description of your artifact.
Since it is a Spring Boot application that we are creating, we will include the following as Parent Project:
- Group Id: org.springframework.boot
- Artifact Id: spring-boot-starter-parent
- Version: 2.2.6.RELEASE
And click on Finish.
Create Child Modules
Next, we are going to create 5 sub-modules namely application, controller, domain, service, repository.
- Child Module application is where your @SpringBootApplication, the Main class, will reside.
- The controller houses the controller classes that provide REST end-points or similar stuff. This is also the module that houses all the DTOs that will be exposed to the outside world as JSON output from the REST end-points.
- The domain is where your aggregate, entities, value-objects live along with Service and Repository Interfaces.
- Service is where your Service implementations live.
- The repository is where your Repository implementations live.
Let's start with creating the sub-module "application".
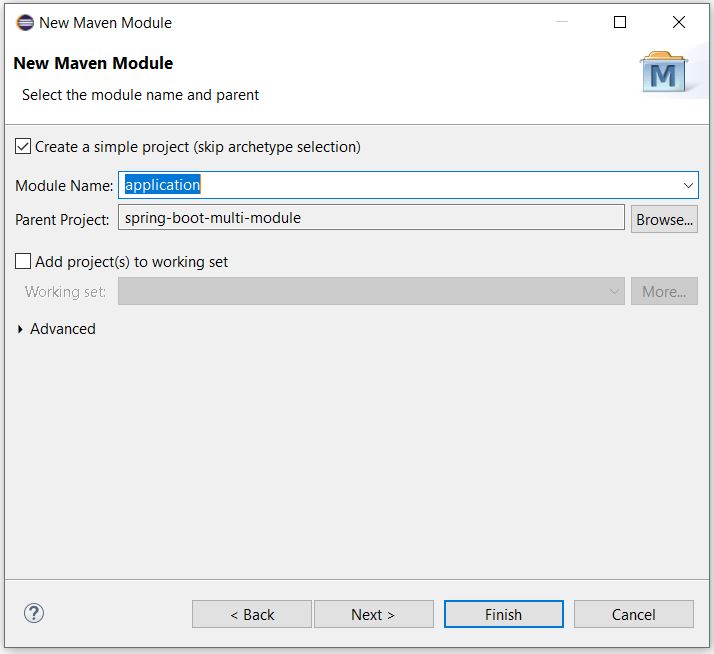
Right-click the parent project created above, "spring-boot-multi-module", New --> Other --> Maven Module and click on Next.
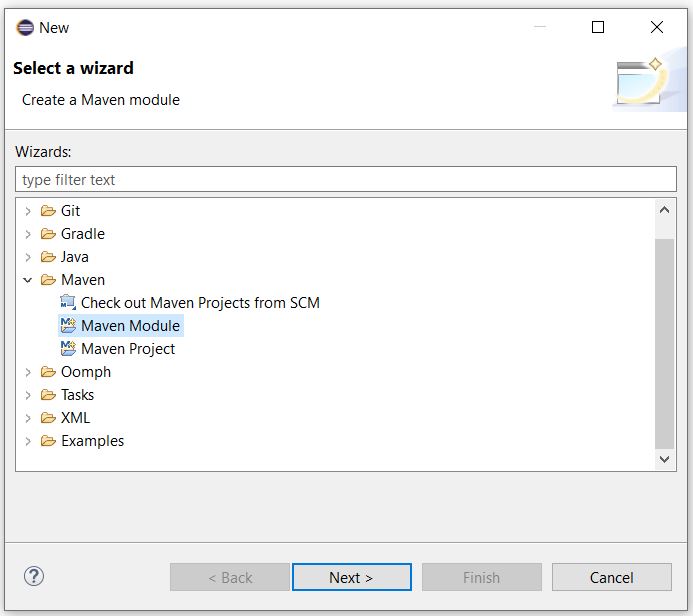
Select "Create a simple project (skip archetype selection)", input the Module name as "application", ensure that the selected "Parent Project" is the one created above and click on Finish.
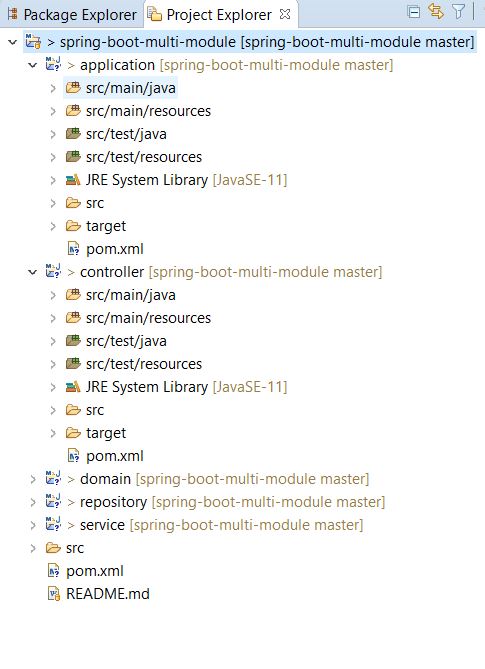
At this point, go to Windows in the top Toolbar in Eclipse and go to Show View --> Project Explorer. This view is better when working with multi-module projects.
Similarly, create other sub-modules like controller, domain, service, repository.
At this point, your Project Explorer view would look like this:
Editing Pom.xml(s)
Edit your parent pom, spring-boot-multi-module/pom.xml, to look like below.
Add the properties section to set the Java version as 11. Properties are inherited from parent to child, so we need not mention Java version in any of our child poms.
Add the dependency spring-boot-starter-web in the dependencies section.
<project xmlns="http://maven.apache.org/POM/4.0.0"
xmlns:xsi="http://www.w3.org/2001/XMLSchema-instance"
xsi:schemaLocation="http://maven.apache.org/POM/4.0.0 https://maven.apache.org/xsd/maven-4.0.0.xsd">
<modelVersion>4.0.0</modelVersion>
<parent>
<groupId>org.springframework.boot</groupId>
<artifactId>spring-boot-starter-parent</artifactId>
<version>2.2.6.RELEASE</version>
</parent>
<groupId>com.purnima.jain</groupId>
<artifactId>spring-boot-multi-module</artifactId>
<version>0.0.1-SNAPSHOT</version>
<packaging>pom</packaging>
<properties>
<project.build.sourceEncoding>UTF-8</project.build.sourceEncoding>
<java.version>11</java.version>
</properties>
<dependencies>
<dependency>
<groupId>org.springframework.boot</groupId>
<artifactId>spring-boot-starter-web</artifactId>
</dependency>
</dependencies>
<modules>
<module>application</module>
<module>controller</module>
<module>domain</module>
<module>service</module>
<module>repository</module>
</modules>
</project>
Edit your child pom, application/pom.xml, to look like below.
In the dependencies section, add the dependency to controller, service, and repository modules. This is needed for auto-wiring and dependency injection.
xxxxxxxxxx
<project xmlns="http://maven.apache.org/POM/4.0.0"
xmlns:xsi="http://www.w3.org/2001/XMLSchema-instance"
xsi:schemaLocation="http://maven.apache.org/POM/4.0.0 https://maven.apache.org/xsd/maven-4.0.0.xsd">
<modelVersion>4.0.0</modelVersion>
<parent>
<groupId>com.purnima.jain</groupId>
<artifactId>spring-boot-multi-module</artifactId>
<version>0.0.1-SNAPSHOT</version>
</parent>
<artifactId>application</artifactId>
<dependencies>
<dependency>
<groupId>com.purnima.jain</groupId>
<artifactId>controller</artifactId>
<version>${project.version}</version>
</dependency>
<dependency>
<groupId>com.purnima.jain</groupId>
<artifactId>service</artifactId>
<version>${project.version}</version>
</dependency>
<dependency>
<groupId>com.purnima.jain</groupId>
<artifactId>repository</artifactId>
<version>${project.version}</version>
</dependency>
</dependencies>
</project>
Edit your child pom controller/pom.xml to look like below.
In the dependencies section, add the dependency to the domain because the domain is where your Service Interfaces would reside which Controller will have to call.
xxxxxxxxxx
<project xmlns="http://maven.apache.org/POM/4.0.0"
xmlns:xsi="http://www.w3.org/2001/XMLSchema-instance"
xsi:schemaLocation="http://maven.apache.org/POM/4.0.0 https://maven.apache.org/xsd/maven-4.0.0.xsd">
<modelVersion>4.0.0</modelVersion>
<parent>
<groupId>com.purnima.jain</groupId>
<artifactId>spring-boot-multi-module</artifactId>
<version>0.0.1-SNAPSHOT</version>
</parent>
<artifactId>controller</artifactId>
<dependencies>
<dependency>
<groupId>com.purnima.jain</groupId>
<artifactId>domain</artifactId>
<version>${project.version}</version>
</dependency>
</dependencies>
</project>
Leave your child pom domain/pom.xml as-it-is, no changes needed here.
xxxxxxxxxx
<project xmlns="http://maven.apache.org/POM/4.0.0"
xmlns:xsi="http://www.w3.org/2001/XMLSchema-instance"
xsi:schemaLocation="http://maven.apache.org/POM/4.0.0 https://maven.apache.org/xsd/maven-4.0.0.xsd">
<modelVersion>4.0.0</modelVersion>
<parent>
<groupId>com.purnima.jain</groupId>
<artifactId>spring-boot-multi-module</artifactId>
<version>0.0.1-SNAPSHOT</version>
</parent>
<artifactId>domain</artifactId>
</project>
Edit your child pom repository/pom.xml to look like below.
In the dependencies section, add the dependency to the domain because the domain is where your Repository Interfaces would reside which Repository implementations will have to implement.
xxxxxxxxxx
<project xmlns="http://maven.apache.org/POM/4.0.0"
xmlns:xsi="http://www.w3.org/2001/XMLSchema-instance"
xsi:schemaLocation="http://maven.apache.org/POM/4.0.0 https://maven.apache.org/xsd/maven-4.0.0.xsd">
<modelVersion>4.0.0</modelVersion>
<parent>
<groupId>com.purnima.jain</groupId>
<artifactId>spring-boot-multi-module</artifactId>
<version>0.0.1-SNAPSHOT</version>
</parent>
<artifactId>repository</artifactId>
<dependencies>
<dependency>
<groupId>com.purnima.jain</groupId>
<artifactId>domain</artifactId>
<version>${project.version}</version>
</dependency>
</dependencies>
</project>
Edit your child pom service/pom.xml to look like below.
In the dependencies section, add the dependency to the domain because the domain is where your Service Interfaces would reside which Service implementations will have to implement.
xxxxxxxxxx
<project xmlns="http://maven.apache.org/POM/4.0.0"
xmlns:xsi="http://www.w3.org/2001/XMLSchema-instance"
xsi:schemaLocation="http://maven.apache.org/POM/4.0.0 https://maven.apache.org/xsd/maven-4.0.0.xsd">
<modelVersion>4.0.0</modelVersion>
<parent>
<groupId>com.purnima.jain</groupId>
<artifactId>spring-boot-multi-module</artifactId>
<version>0.0.1-SNAPSHOT</version>
</parent>
<artifactId>service</artifactId>
<dependencies>
<dependency>
<groupId>com.purnima.jain</groupId>
<artifactId>domain</artifactId>
<version>${project.version}</version>
</dependency>
</dependencies>
</project>
Our multi-module-maven Spring Boot project is created.
Seeing It in Action
To see it in action, we will have to add some classes in the various modules.
Go to the application module and create a package "com.purnima.jain.customer" in src/main/java and create the main @SpringBootApplication class here called CustomerApplication.java.
xxxxxxxxxx
package com.purnima.jain.customer;
import org.slf4j.Logger;
import org.slf4j.LoggerFactory;
import org.springframework.boot.SpringApplication;
import org.springframework.boot.autoconfigure.SpringBootApplication;
public class CustomerApplication {
private static final Logger logger = LoggerFactory.getLogger(CustomerApplication.class);
public static void main(String[] args) {
SpringApplication.run(CustomerApplication.class, args);
logger.info("CustomerApplication Started........");
}
}
Go to the controller module and create a package "com.purnima.jain.customer.controller" in src/main/java and create your controller here:
xxxxxxxxxx
package com.purnima.jain.customer.controller;
import org.slf4j.Logger;
import org.slf4j.LoggerFactory;
import org.springframework.beans.factory.annotation.Autowired;
import org.springframework.web.bind.annotation.GetMapping;
import org.springframework.web.bind.annotation.PathVariable;
import org.springframework.web.bind.annotation.RestController;
import com.purnima.jain.customer.domain.aggregate.Customer;
import com.purnima.jain.customer.domain.service.CustomerService;
public class CustomerController {
private static final Logger logger = LoggerFactory.getLogger(CustomerController.class);
private CustomerService customerService;
("customer/{customerId}")
public Customer getCustomer( Integer customerId) {
logger.info("Inside CustomerController........");
return customerService.getCustomerById(customerId);
}
}
Go to domain module and create a package "com.purnima.jain.customer.domain.aggregate" in src/main/java and create your Aggregate here:
xxxxxxxxxx
package com.purnima.jain.customer.domain.aggregate;
public class Customer {
private Integer customerId;
private String customerName;
public Customer(Integer customerId, String customerName) {
super();
this.customerId = customerId;
this.customerName = customerName;
}
public Integer getCustomerId() {
return customerId;
}
public String getCustomerName() {
return customerName;
}
}
In the same domain module, create another package "com.purnima.jain.customer.domain.service" in src/main/java and create your Service interface here:
xxxxxxxxxx
package com.purnima.jain.customer.domain.service;
import com.purnima.jain.customer.domain.aggregate.Customer;
public interface CustomerService {
public Customer getCustomerById(Integer customerId);
}
In the same domain module, create another package "com.purnima.jain.customer.domain.repository" in src/main/java and create your Repository interface here:
xxxxxxxxxx
package com.purnima.jain.customer.domain.repository;
import com.purnima.jain.customer.domain.aggregate.Customer;
public interface CustomerRepository {
public Customer getCustomerById(Integer customerId);
}
Go to the service module and create a package "com.purnima.jain.customer.service.implementation" in src/main/java and create your service implementation here:
xxxxxxxxxx
package com.purnima.jain.customer.service.implementation;
import org.slf4j.Logger;
import org.slf4j.LoggerFactory;
import org.springframework.beans.factory.annotation.Autowired;
import org.springframework.stereotype.Service;
import com.purnima.jain.customer.domain.aggregate.Customer;
import com.purnima.jain.customer.domain.repository.CustomerRepository;
import com.purnima.jain.customer.domain.service.CustomerService;
public class CustomerServiceImpl implements CustomerService {
private static final Logger logger = LoggerFactory.getLogger(CustomerServiceImpl.class);
private CustomerRepository customerRepository;
public Customer getCustomerById(Integer customerId) {
logger.info("Inside CustomerServiceImpl........");
Customer customer = customerRepository.getCustomerById(customerId);
return customer;
}
}
Go to the repository module and create a package "com.purnima.jain.customer.repository.implementation" in src/main/java and create your repository implementation here:
xxxxxxxxxx
package com.purnima.jain.customer.repository.implementation;
import org.slf4j.Logger;
import org.slf4j.LoggerFactory;
import org.springframework.stereotype.Repository;
import com.purnima.jain.customer.domain.aggregate.Customer;
import com.purnima.jain.customer.domain.repository.CustomerRepository;
public class CustomerRepositoryImpl implements CustomerRepository {
private static final Logger logger = LoggerFactory.getLogger(CustomerRepositoryImpl.class);
public Customer getCustomerById(Integer customerId) {
logger.info("Inside CustomerRepositoryImpl........");
// Replace this code to retrieve from database
Customer customer = new Customer(100, "A New Customer");
return customer;
}
}
Once all of this is done, run your Main class in the application module, CustomerApplication.java and you should see your code running.
To test it from a browser, go to http://localhost:8080/customer/100
You should see the JSON representation of Customers in the browser.
Source Code
You can download the source-code here.
Opinions expressed by DZone contributors are their own.
Comments