Deploy a Hyperledger Fabric v2 Web App Using the Node.js SDK
Develop a web app that works with Hyperledger Fabric v2
Join the DZone community and get the full member experience.
Join For FreeIntroduction
One of the main highlights of Hyperledger Fabric v2 is the concept of decentralized governance for smart contracts. It introduces peer chaincode lifecycle, which focuses on improving chaincode management between multiple organizations. Using the new lifecycle, installation, and upgrading of chaincodes requires approval from multiple organizations before the chaincode can be interacted with.
The latest fabric-sdk-node update also removed the fabric-client library, which was mainly responsible for handling administrative tasks such as chaincode and channel management on the network. These tasks now instead have to be carried out through the peer CLI.
This article uses the Freedom Dividend chaincode as an example to show you how to build a complete Hyperledger Fabric v2 application using the new peer chaincode lifecycle together with the fabric-sdk-node and a network spun up with the Chainstack platform.
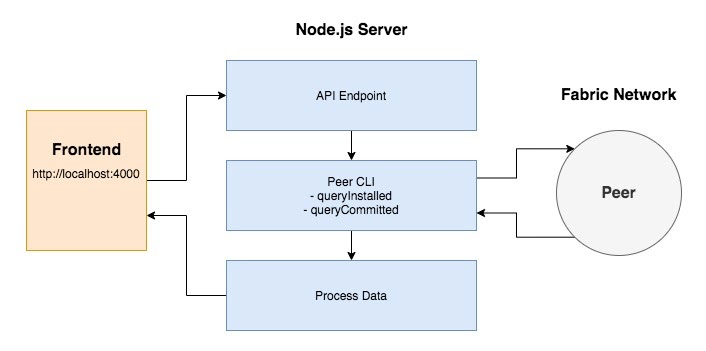
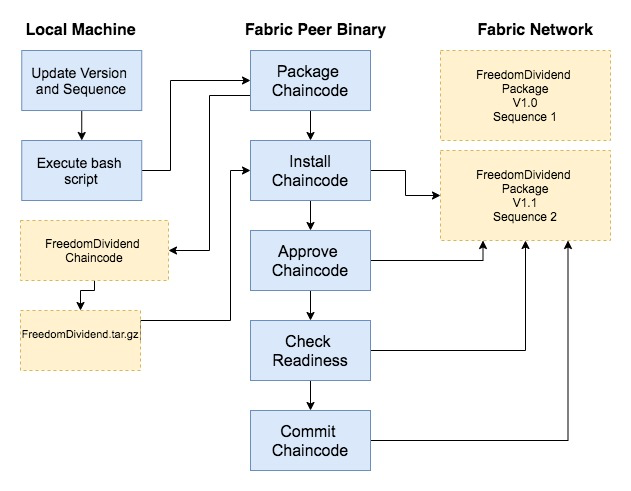
The main difference from developing a Hyperledger Fabric v1.4 application is the integration of the peer lifecycle commands into the application flow as illustrated in the diagram below.
Prerequisites
- A Chainstack account.
- Node.js 12.13.1 or higher.
- NPM 6 or higher.
- nodemon.
Overview
- Set up a Hyperledger Fabric network with Chainstack.
- Set up the environment.
- Set up the back end application.
- Set up the front end client.
- Install the chaincode.
- Interact with the installed chaincode through the front end.
- Upgrade the chaincode.
- Interact with the upgraded chaincode through the front end.
1. Set Up a Hyperledger Fabric Network With Chainstack
- Create a consortium project with Chainstack. See Create a project.
- Deploy a Hyperledger Fabric network. See Deploy a consortium network.
2. Set Up the Environment
Clone the freedomDividend repository on your local machine:
xxxxxxxxxx
git clone git@github.com:chainstack/freedom-dividend-chaincode.git
Install the Hyperledger Fabric v2 binaries using the downloadPeerBinary.sh script in the repository:
macOS:
xxxxxxxxxx
sudo bash downloadPeerBinary.sh
Linux:
xxxxxxxxxx
sudo bash downloadPeerBinary.sh linux
The script will download a set of Hyperledger Fabric v2 binaries that you can execute to interact with the network.
Set up the repository using the TLS and MSP certificates together with the peer and orderer details from your Hyperledger Fabric v2 network deployed with Chainstack.
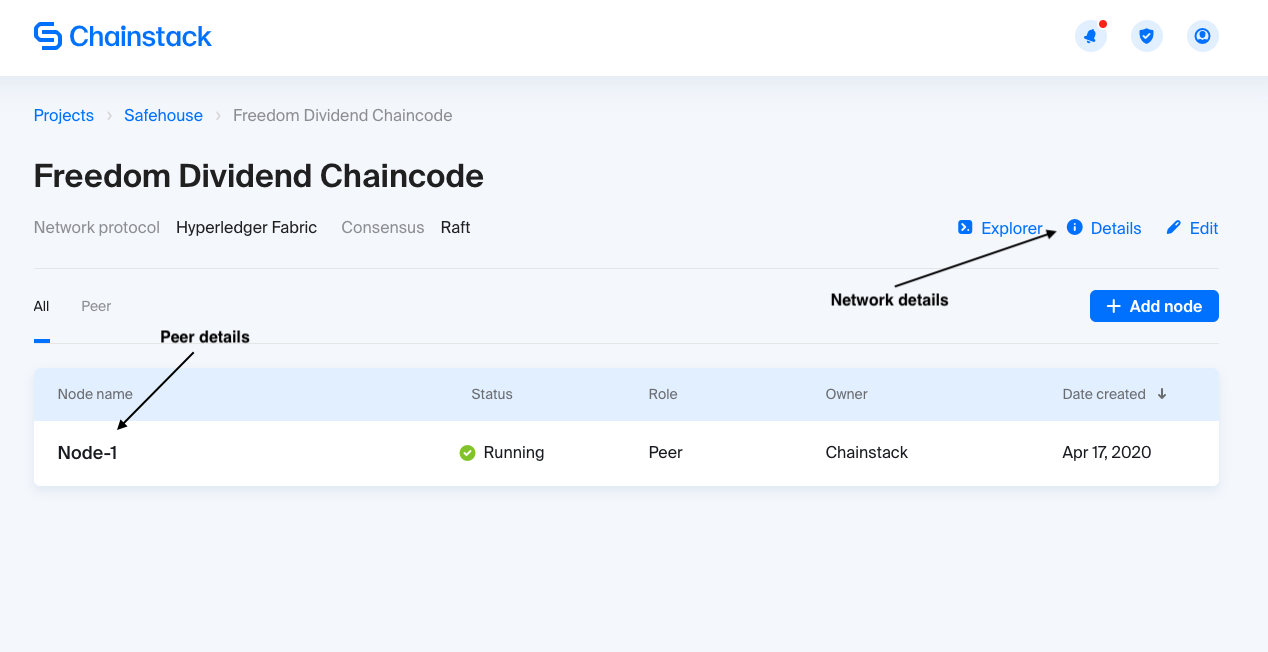
Click on the network details to retrieve the orderer details.
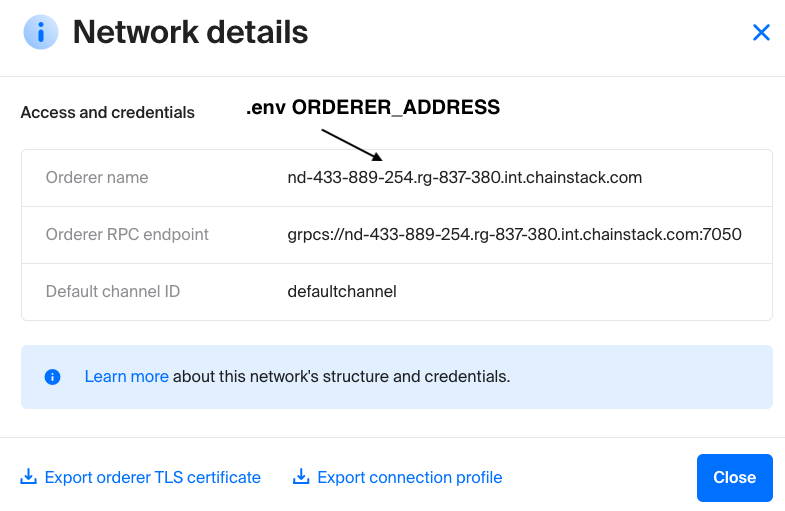
From the network details pop-up:
- Replace the
ORDERER_ADDRESSin theserver/.env.templatewith the orderer name. - Export the orderer TLS certificate to the repository’s
webapp/certsdirectory. - Export the connection profile to the repository’s
webapp/certsdirectory.
Next, access the node details for the peer you want to use to interact with the network.
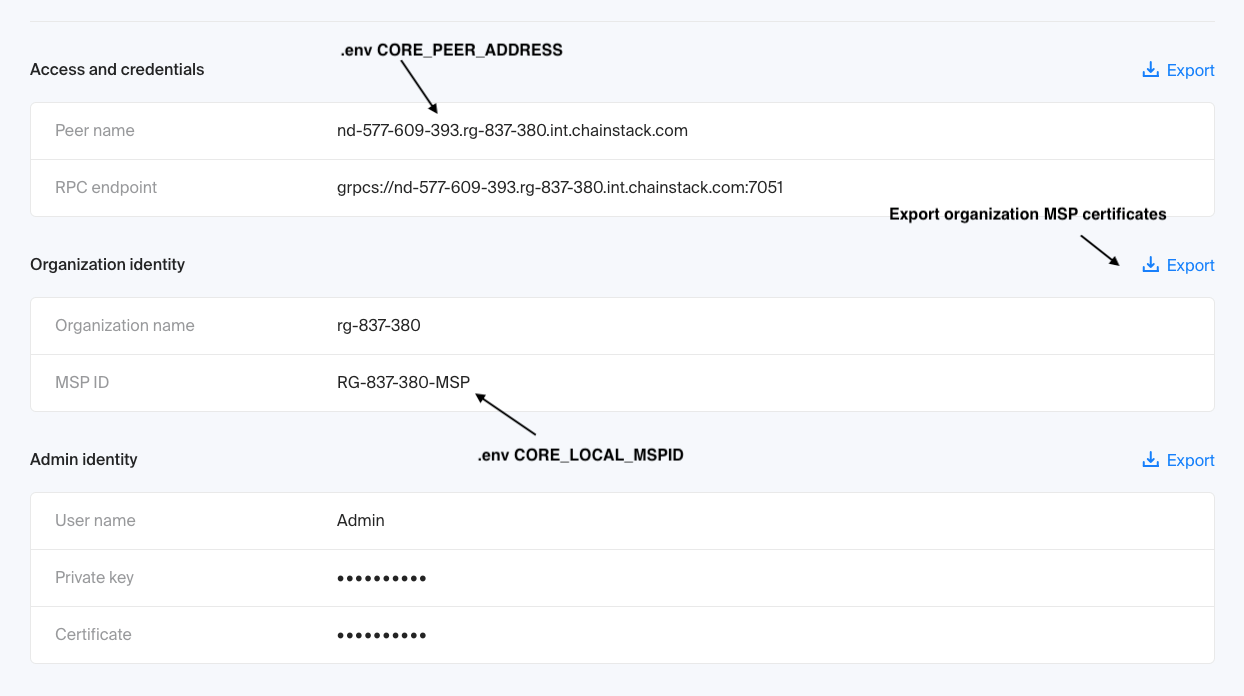
From the node details page:
- Replace
CORE_PEER_ADDRESSin theserver/.env.templatewith the peer name. - Replace
CORE_LOCAL_MSPIDin theserver/.env.templatewith the MSP ID. - Export and unzip the organization MSP certificates to the repository’s
webapp/certsdirectory.
Your directory structure should look like the following:
xxxxxxxxxx
freedom-dividend-chaincode
|__ contract
|__ webapp
| |__ certs
| |__ RG-837-380-MSP
| |__ connection-profile.json
| |__ nd-433-899-254-cert.pem
Your .env file should look like the following:
xxxxxxxxxx
AS_LOCALHOST=false
FABRIC_CFG_PATH=/etc/hyperledger/config
ORDERER_CA=/nd-433-889-254-cert.pem
ORDERER_ADDRESS=nd-433-889-254.rg-837-380.int.chainstack.com:7050
# Chaincode
CHANNEL_ID=defaultchannel
CHAINCODE_NAME=freedomDividendContract
CHAINCODE_VERSION=1
CHAINCODE_SEQUENCE=1
# Admin
ADMIN_CERT=/RG-837-380-MSP/users/[email protected]/msp/admincerts/[email protected]
ADMIN_PRIVATE_KEY= /RG-837-380-MSP/users/[email protected]/msp/keystore/priv_sk
# Peer
CORE_PEER_TLS_ENABLED=true
CORE_PEER_ADDRESS=nd-577-609-393.rg-837-380.int.chainstack.com:7051
CORE_PEER_MSPCONFIGPATH=/RG-837-380-MSP/users/[email protected]/msp/
CORE_PEER_LOCALMSPID=RG-837-380-MSP
CORE_PEER_TLS_ROOTCERT_FILE=/RG-837-380-MSP/peers/nd-577-609-393.rg-837-380.int.chainstack.com/tls/ca.crt
3. Set Up the Backend Application
In the cloned repository, install the required dependencies:
xxxxxxxxxx
cd webapp/server
npm i
Start the back end server:
xxxxxxxxxx
npm run start
You should see the following output in the terminal, which indicates that the wallet and gateway have been successfully initiated using the Hyperledger Fabric v2 SDK library together with the values you set in the .env file:
xxxxxxxxxx
Setting up fabric wallet and gateway...
Server running at http://localhost:4000/
==========AS_LOCALHOST: false==========
Set up complete!
You should also note that a wallet with the label user01 has been created in the directory webapp/server/fabric/wallets/; this is the wallet identity that Hyperledger Fabric v2 SDK uses to authenticate the user with the network.
4. Set Up the Frontend Client
In the cloned repository, install the required dependencies:
xxxxxxxxxx
cd webapp/client
npm i
Compile and build the front end client:
xxxxxxxxxx
npm run build
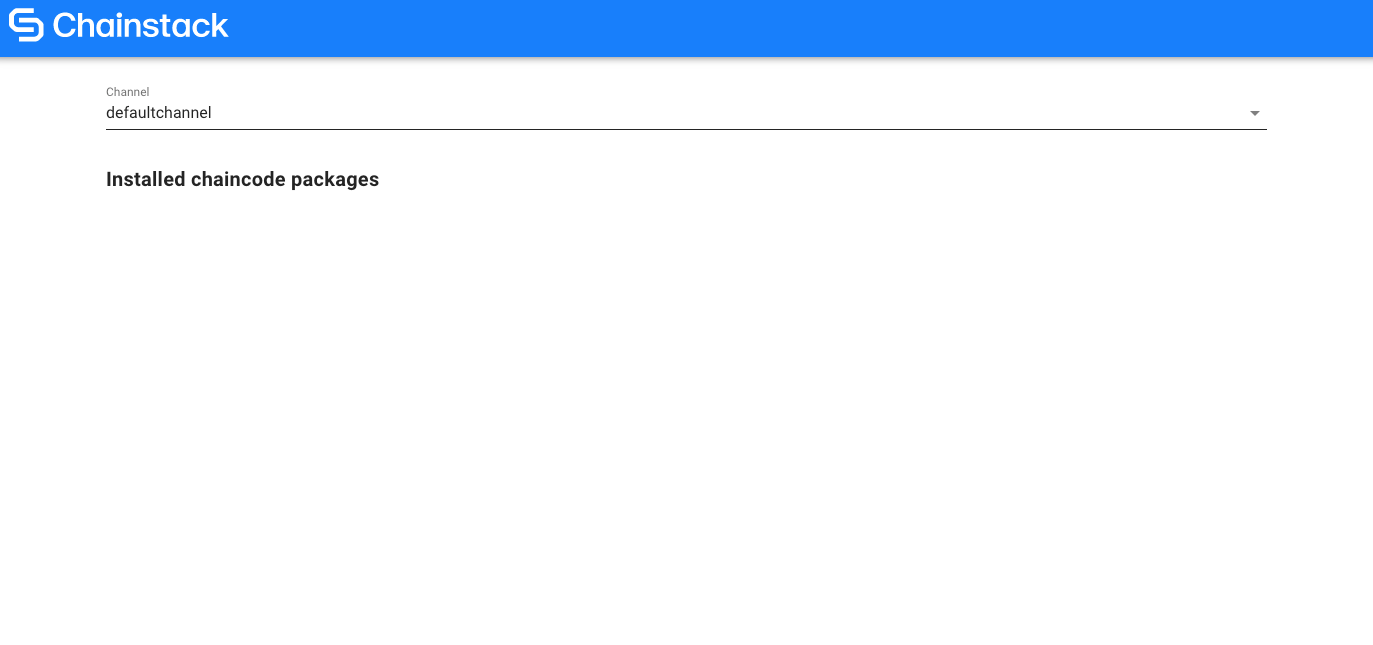
Head on over to http://localhost:4000 in your browser, and you should see the following:
5. Install the Chaincode
The cloned repository includes the bash script that automates the process of installing or upgrading the chaincode with the peer lifecycle process.
Install the Freedom Dividend chaincode with the following command:
xxxxxxxxxx
node webapp/server/cli/peer install
You should see the following on the terminal to indicate that the chaincode has been successfully installed on the network:
xxxxxxxxxx
$ node webapp/server/cli/peer install
executing cli - install command
PACKAGE_ID: freedomDividend1:b5dc7b4864baf9909295ffc177bd6da448c6000907f9e879f5d2270f9a7593e3
Chaincode definition for chaincode 'freedomDividend', version '1', sequence '1' on channel 'defaultchannel' approval status by org:
RG-837-380-MSP: true
Committed chaincode definitions on channel 'defaultchannel':
Name: freedomDividend, Version: 1, Sequence: 1, Endorsement Plugin: escc, Validation Plugin: vscc
Name: freedomDividend, Version: 1, Sequence: 1, Endorsement Plugin: escc, Validation Plugin: vscc
Name: freedomDividendContract, Version: 1, Sequence: 1, Endorsement Plugin: escc, Validation Plugin: vscc
Name: fabcar, Version: 1, Sequence: 1, Endorsement Plugin: escc, Validation Plugin: vscc
2020-04-20 02:01:30.874 +08 [cli.lifecycle.chaincode] submitInstallProposal -> INFO 001 Installed remotely: response:<status:200 payload:"\nRfreedomDividend1:b5dc7b4864baf9909295ffc177bd6da448c6000907f9e879f5d2270f9a7593e3\022\021freedomDividend1" >
2020-04-20 02:01:30.874 +08 [cli.lifecycle.chaincode] submitInstallProposal -> INFO 002 Chaincode code package identifier: freedomDividend1:b5dc7b4864baf9909295ffc177bd6da448c6000907f9e879f5d2270f9a7593e3
2020-04-20 02:01:33.333 +08 [chaincodeCmd] ClientWait -> INFO 001 txid [6633ee972019298183eb18489bfb56d5b7b13abf1211cea4ff88cdac7540d3d2] committed with status (VALID) at
2020-04-20 02:01:35.715 +08 [chaincodeCmd] ClientWait -> INFO 001 txid [ab6e47c549ca543e344f6d12b00c3bf16c3fb83e3093762d3a905af3c30973bc] committed with status (VALID) at nd-577-609-393.rg-837-380.int.chainstack.com:7051
The command will execute the following flow:
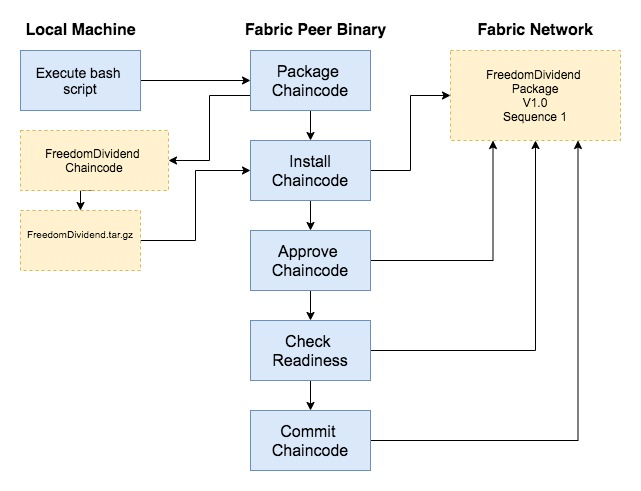
The chaincode.sh bash script uses the data from the .env file to communicate with the network using the peer binary. The script executes the entire flow from packaging the raw chaincode JavaScript to committing it to the network.
Note that we are using one organization in this example. If there are multiple parties involved and the endorsement policy requires more than one endorser, the chaincode package will have to be approved by others before it can be committed to the network.
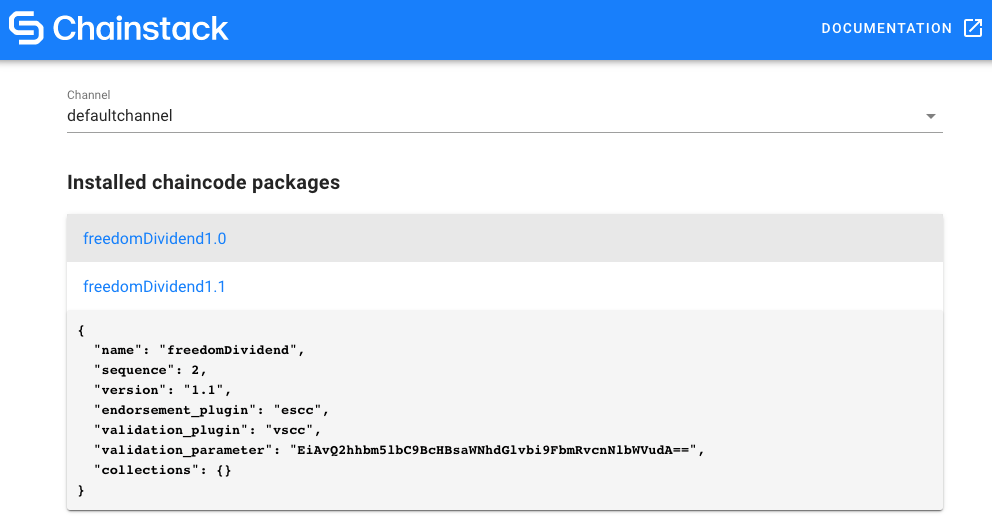
Go to http://localhost:4000. You should see the freedomDividend chaincode contract with version 1.0 and sequence 1:
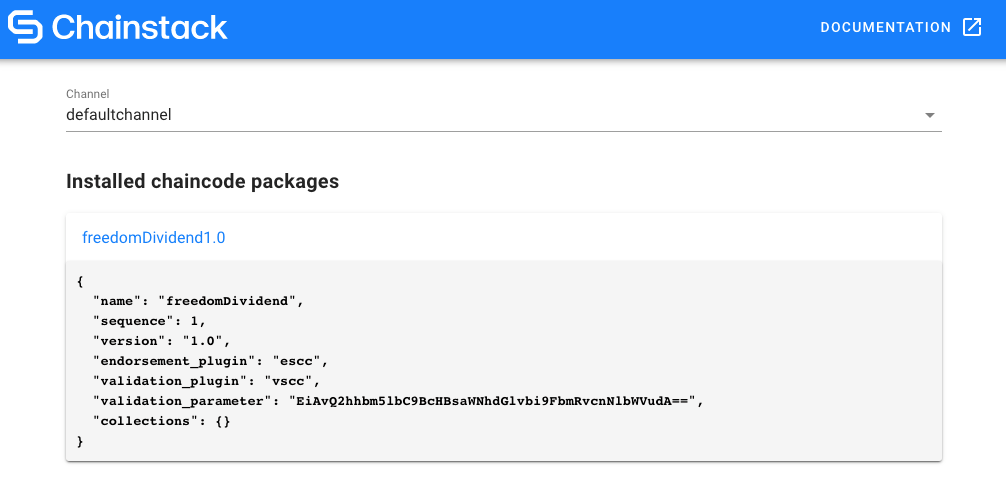
Retrieving chaincodes on the [email protected] was as simple as calling the queryInstalledChaincodes function. But this function, which is part of the Hyperledger Fabric SDK, does not work with the new peer chaincode lifecycle (at the time of writing). So the chaincode details have to be retrieved using the peer CLI.
6. Interact With the Installed Chaincode Through the Frontend
You can now interact with the installed chaincode. To read more about the chaincode and the arguments, see the chaincode tutorial at Chainstack Docs.
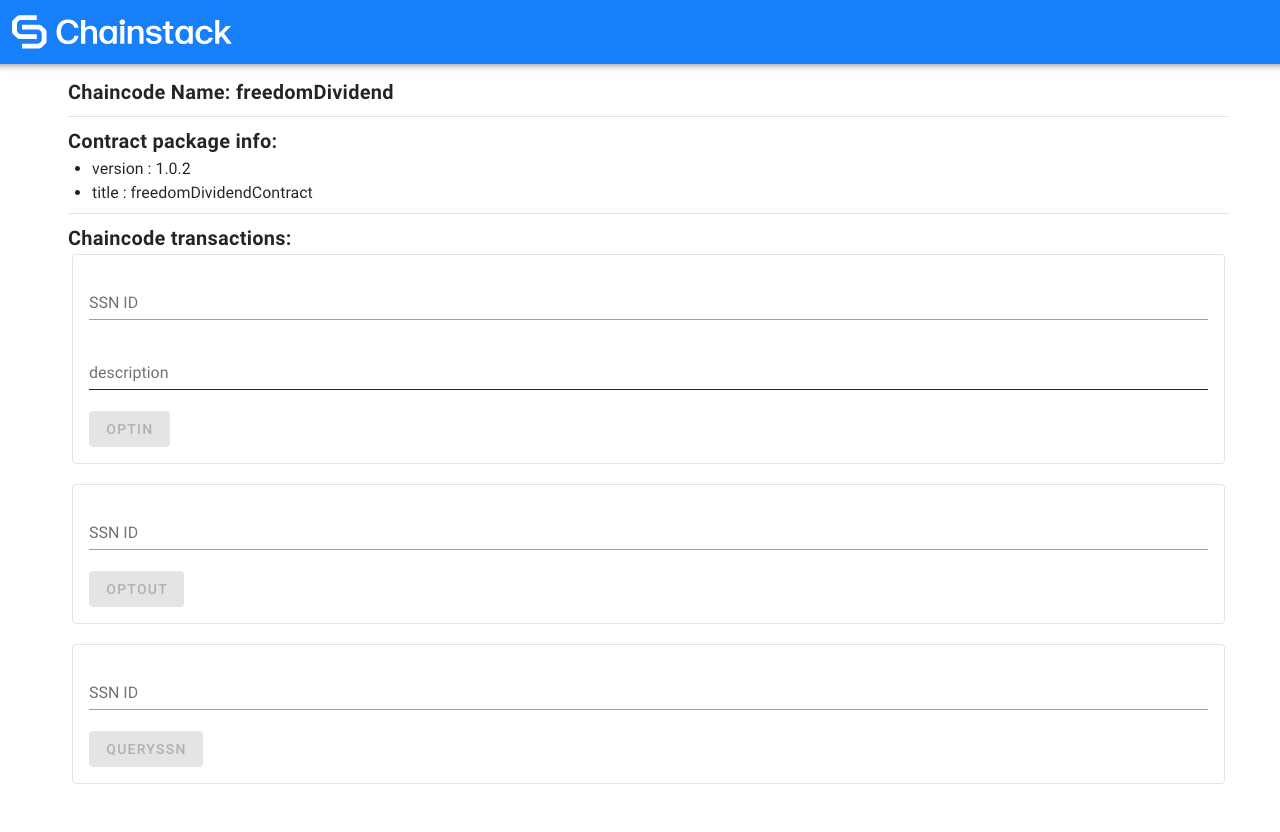
Access the chaincode interface by clicking on the chaincode label — freedomDividend1.0. You will see the following:

A dynamic set of forms are automatically generated using the contract.evaluateTransaction('org.hyperledger.fabric:GetMetadata') function based on the chaincode you are accessing. In this example, we are using the Freedom Dividend chaincode which includes three transactions:
OptInOptOutQuerySSN
Note that this will only work if your chaincode uses the fabric-contract-api.
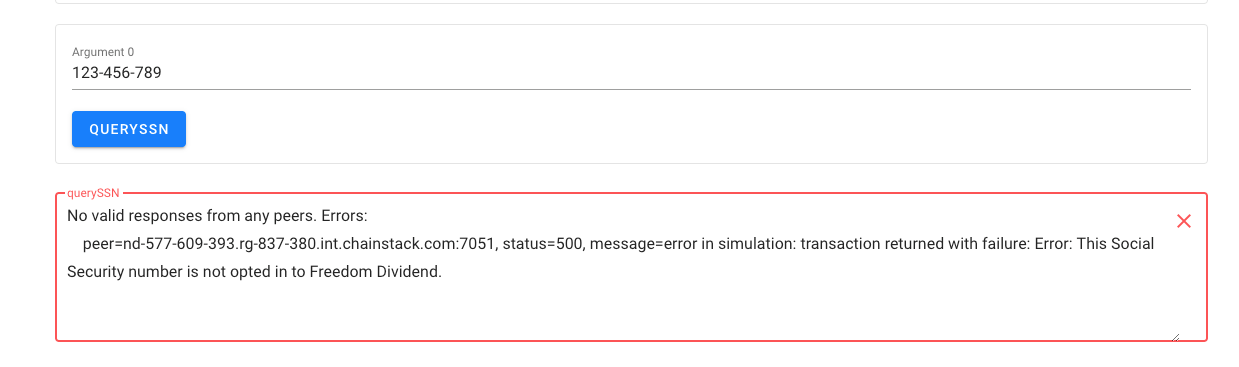
Execute the QuerySSN function with a random value; we will use 123-456-789 as an example. You should see an error as shown below. This error indicates that there is no record on the ledger with SSNID 123-456-789.
Next, execute the OptIn function with a random value; we will use 123-456-789 with a random statement as an example.
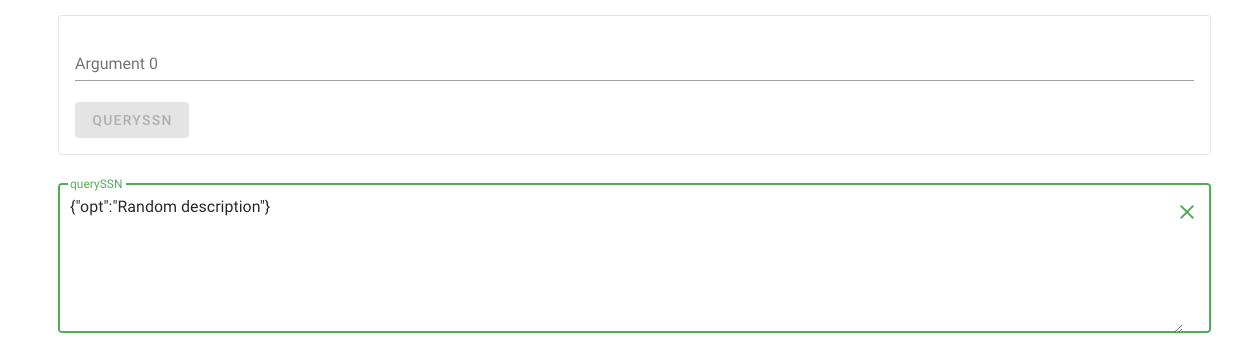
Next, execute the QuerySSN function with 123-456-789 again. You should see the following:
7. Upgrade the Chaincode
Now create a more descriptive metadata to override the one inferred from the source code to provide more meaningful parameters for the generated forms.
Retrieve the current metadata with the following API call in your browser, http://localhost:4000/api/v1/chaincode/freedomDividendContract.
You should see the following:
xxxxxxxxxx
{
"$schema": "https://fabric-shim.github.io/master/contract-schema.json",
"contracts": {
"FreedomDividendContract": {
"name": "FreedomDividendContract",
"contractInstance": {
"name": "FreedomDividendContract",
"default": true
},
"transactions": [
{
"name": "optIn",
"tags": [
"submitTx"
],
"parameters": [
{
"name": "arg0",
"description": "Argument 0",
"schema": {
"type": "string"
}
},
{
"name": "arg1",
"description": "Argument 1",
"schema": {
"type": "string"
}
}
]
},
{
"name": "optOut",
"tags": [
"submitTx"
],
"parameters": [
{
"name": "arg0",
"description": "Argument 0",
"schema": {
"type": "string"
}
}
]
},
{
"name": "querySSN",
"tags": [
"submitTx"
],
"parameters": [
{
"name": "arg0",
"description": "Argument 0",
"schema": {
"type": "string"
}
}
]
}
],
"info": {
"title": "",
"version": ""
}
},
"org.hyperledger.fabric": {
"name": "org.hyperledger.fabric",
"contractInstance": {
"name": "org.hyperledger.fabric"
},
"transactions": [
{
"name": "GetMetadata"
}
],
"info": {
"title": "",
"version": ""
}
}
},
"info": {
"version": "1.0.2",
"title": "freedomDividendContract"
},
"components": {
"schemas": {}
}
}
Copy the JSON schema and create a metadata.json file the repository directory contract/contract-metadata. Your contract directory structure should look like this:
xxxxxxxxxx
freedom-dividend-chaincode
|__ contract
| |__ contract-metadata
| |__ metadata.json
Replace:
Arg 0withssnIdArgument 0withSSN IDArg 1withdescriptionArgument 1withdescription
Next, upgrade the Freedom Dividend chaincode with the following command:
xxxxxxxxxx
node webapp/server/cli/peer upgrade
The command will automatically increase CHAINCODE_VERSION in the .env file by 0.1 and CHAINCODE_SEQUENCE by 1.
You should see the following on the terminal to indicate that chaincode has been successfully upgraded on the network:
xxxxxxxxxx
$ node webapp/server/cli/peer upgrade
executing cli - upgrade command
PACKAGE_ID: freedomDividend1.1:5176145e7db42a2459ccb23145212c481faa2e6a60011e6476f7bedf1d58b652
Chaincode definition for chaincode 'freedomDividendA', version '1.1', sequence '2' on channel 'defaultchannel' approval status by org:
RG-837-380-MSP: true
Committed chaincode definitions on channel 'defaultchannel':Name: fabcar, Version: 1, Sequence: 1, Endorsement Plugin: escc, Validation Plugin: vscc
Name: freedomDividend, Version: 1, Sequence: 1, Endorsement Plugin: escc, Validation Plugin: vscc
Name: freedomDividendA, Version: 1.1, Sequence: 2, Endorsement Plugin: escc, Validation Plugin: vscc
Name: freedomDividendContract, Version: 1, Sequence: 1, Endorsement Plugin: escc, Validation Plugin: vscc
2020-04-20 02:42:35.647 +08 [cli.lifecycle.chaincode] submitInstallProposal -> INFO 001 Installed remotely: response:<status:200 payload:"\nTfreedomDividend1.1:5176145e7db42a2459ccb23145212c481faa2e6a60011e6476f7bedf1d58b652\022\023freedomDividend1.1" >
2020-04-20 02:42:35.648 +08 [cli.lifecycle.chaincode] submitInstallProposal -> INFO 002 Chaincode code package identifier: freedomDividend1.1:5176145e7db42a2459ccb23145212c481faa2e6a60011e6476f7bedf1d58b652
2020-04-20 02:42:38.068 +08 [chaincodeCmd] ClientWait -> INFO 001 txid [cdef7a33a27a51b26592112a4bb878f764d38641010830a9fc6f4ed3b324f87f] committed with status (VALID) at
2020-04-20 02:42:40.563 +08 [chaincodeCmd] ClientWait -> INFO 001 txid [eca032257e82cc2a53abc6a9475012de33ee098064afbf6bd8b2757aa4cb87d7] committed with status (VALID) at nd-577-609-393.rg-837-380.int.chainstack.com:7051
The command will execute the following flow:
By using a different CHAINCODE_SEQUENCE and CHAINCODE_VERSION number, the peer lifecycle command initiates an upgrade process to override the existing Freedom Dividend chaincode with the new changes.
8. Interact With the Upgraded Chaincode Through the Frontend
Access the chaincode interface by clicking on the chaincode label — freedomDividend1.1.
You should see the changes made previously are reflected in the automatically generated forms:
Conclusion
The concept of integrating CLI commands as a part of the application can be challenging to understand. Hopefully this Freedom Dividend application helps you understand the process of building a Hyperledger Fabric v2 application.
Opinions expressed by DZone contributors are their own.
Comments