Slimming Down Docker Images: Base Image Choices and The Power of Multi-Stage Builds
Multi-stage Docker builds separate build-time dependencies from runtime requirements, dramatically reducing production image sizes.
Join the DZone community and get the full member experience.
Join For FreeIntroduction
Let's talk about an uncomfortable truth: most of us are shipping Docker images that are embarrassingly large. If you're deploying ML models, there's a good chance your containers are over 2GB. Mine were pushing 3GB until recently.
The thing is, we know better. We've all read the best practices. But when you're trying to get a model into production, it's tempting to just FROM pytorch/pytorch and call it a day. This article walks through the practical reality of optimizing Docker images, including the trade-offs nobody mentions.
In this article, we embark on two pivotal expeditions into the world of Docker optimization. First, we'll explore the immediate and gratifying gains from choosing a leaner "slim" base image, using our slim_image project as our guide. Then, as complexities often arise when we trim the fat (especially in AI), we'll unveil the elegant power of multi-stage builds with our multistage_image project, a technique that truly separates the workshop from the showroom.
The "Slim" Advantage
A Lighter Foundation (Project: slim_image)
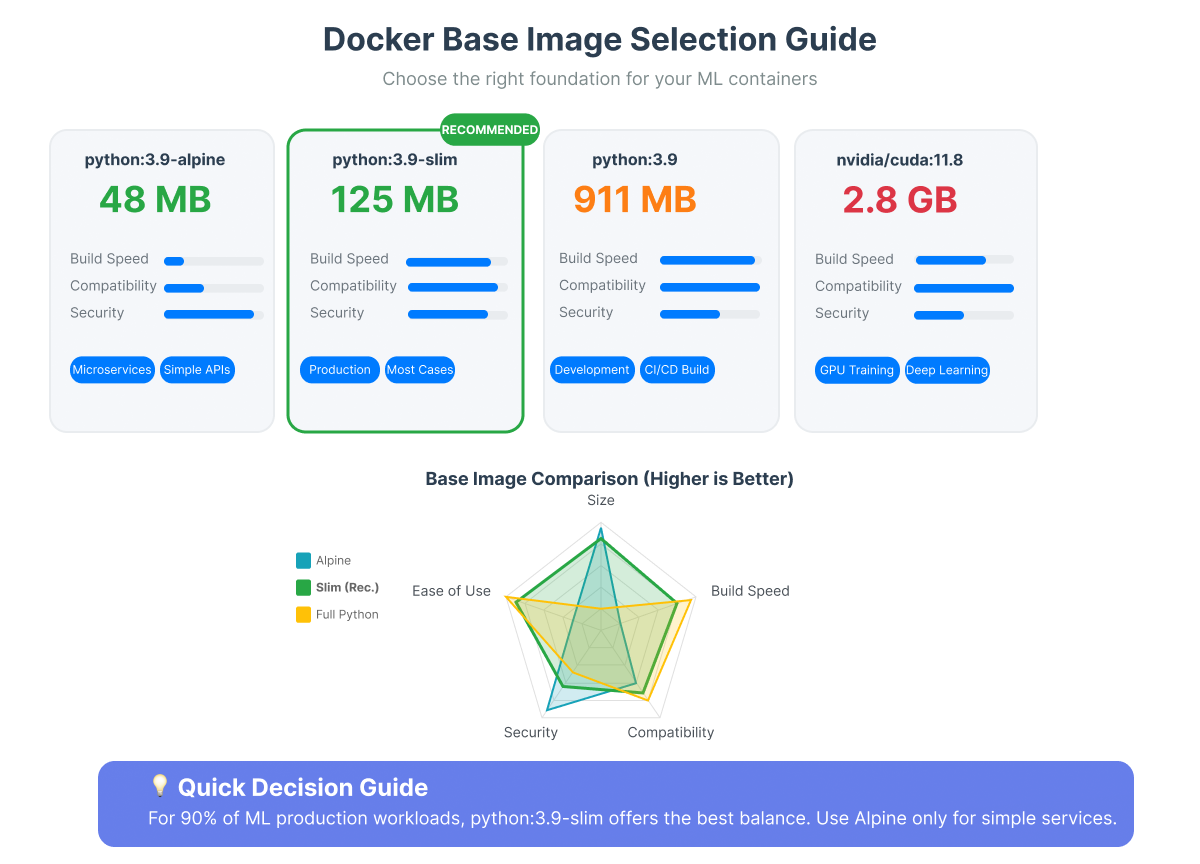
It seems almost too simple, doesn't it? Like choosing a lighter frame for a vehicle to improve its mileage. The Python maintainers offer "slim" variants of their official Docker images. These are akin to their full-bodied siblings but have shed many non-essential components like documentation, development headers, and miscellaneous tools that, while useful in a general-purpose environment, are often just passengers in a dedicated application container.
You'll see tags like python:3.10-slim, and also more specific ones like python:3.10-slim-bookworm or python:3.10-slim-bullseye. What's the difference? The -slim tag on its own typically points to the latest stable Debian release paired with that Python version. Using an explicit version like -slim-bookworm (Debian 12) or -slim-bullseye (Debian 11) pins the underlying operating system, giving us more predictable and reproducible builds, a cornerstone of good software practice. For our demonstration, we'll use python:3.10-slim, but we encourage you to adopt explicit distro tagging in your own projects.
Consider the Dockerfile from our slim_image project:
# Use the slim Python image instead of the full one.
FROM python:3.10-slim

WORKDIR /app

COPY slim_image/requirements.txt ./requirements.txt
COPY slim_image/app/ ./app/
COPY slim_image/sample_data/ ./sample_data/

RUN pip install --no-cache-dir -r requirements.txt

CMD ["python", "app/predictor.py", "sample_data/sample_text.txt"]
Building this using docker build -t bert-classifier:slim -f slim_image/Dockerfile slim_image/ command yields a striking difference:
-
bert-classifier-naive: 2.54GB (56s build) -
bert-classifier-slim: 1.66GB (51s build)
Run
docker image ls
If you also build the naive_image, you can compare the two images and see the difference made by -slim .
docker image ls
REPOSITORY                   TAG       IMAGE ID       CREATED             SIZE
bert-classifier-slim         latest    5111f608f68b   59 minutes ago      1.66GB
bert-classifier-naive        latest    e16441728970   About an hour ago   2.54GB
Just by altering that single FROM line, we've shed 880MB and shaved 5 seconds off the build time! It’s a compelling first step, like the initial, satisfying clearing of rubble from an archaeological site.
We encourage you to run dive on both of these images and see exactly where did all the 880 go.
The Inevitable Catch
And yet, as with many seemingly straightforward paths in the world of software, a subtlety emerges. The very leanness of -slim images can become a challenge. Many powerful AI libraries, or indeed custom components like our dummy_c_extension within the slim_image project, require compilation from C/C++ source. This compilation demands tools: a C compiler (gcc), Python development headers (python3-dev), build-essential, and sometimes more. Our svelte -slim image, by design, often lacks these. Attempting to install our dummy_c_extension directly in the simple slim_image/Dockerfile would falter.
The slim_image/Dockerfile.fixed project demonstrates a common, albeit somewhat cumbersome, solution:
# slim_image/Dockerfile.fixed
RUN apt-get update && apt-get install -y --no-install-recommends \
    # Essential build tools for C compilation
    build-essential \
    gcc \
    # Python development headers (needed for C extensions)
    python3-dev \
    # Now install Python packages
    && pip install --no-cache-dir -r requirements.txt \
    # Install our dummy C extension (this would fail without build tools)
    && pip install --no-cache-dir ./dummy_c_extension/ \
    # Clean up build dependencies to keep image small
    && apt-get purge -y --auto-remove \
        build-essential \
        gcc \
        python3-dev \
    # Remove package lists and cache
    && rm -rf /var/lib/apt/lists/* \
    && rm -rf /root/.cache/pip
This intricate RUN command temporarily inflates the layer with build tools, performs the necessary compilations and installations, and then meticulously cleans up after itself, all within that single layer to avoid permanent bloat. The resulting bert-classifier-slim-fixed image comes in at 1.67GB, accommodating our C extension. It works, but it feels like carefully packing and then unpacking tools for every single task on an assembly line. But there must be a better way to organize our workshop.
Multi-Stage Builds
The Art of Separation (Project: multistage_image)
Enter the multi-stage build – a concept so elegantly simple, yet so powerful, it often feels like discovering a hidden passage to a cleaner workspace. Multi-stage builds allow us to define distinct phases within a single Dockerfile, each starting with its own FROM instruction. We can name these stages (e.g., AS builder) and, crucially, copy artifacts from one stage to another (COPY --from=builder ...). Only the final stage contributes to the image you ultimately run.
Let's examine the Dockerfile from our multistage_image project:
# This version implements a multi-stage build to separate build-time dependencies
# ====== BUILD STAGE ======
FROM python:3.10 AS builder
WORKDIR /app
COPY multistage_image/requirements.txt runtime_requirements.txt ./
RUN pip install --no-cache-dir -r requirements.txt
COPY multistage_image/app/ ./app/

# ====== RUNTIME STAGE ======
# Use slim image for the final runtime
FROM python:3.10-slim AS runtime
WORKDIR /app
# Copy only the runtime requirements
COPY multistage_image/runtime_requirements.txt ./
RUN pip install --no-cache-dir -r runtime_requirements.txt
COPY multistage_image/app/ ./app/
COPY multistage_image/sample_data/ ./sample_data/
CMD ["python", "app/predictor.py", "sample_data/sample_text.txt"]
Observe the two distinct acts:
- The
builderStage: Here, we usepython:3.10(the full python image, suitable for compilation). It installs all dependencies frommultistage_image/requirements.txt. If thisrequirements.txtincluded packages needing C compilation (or ourdummy_c_extension), this is where they would be built, leveraging the comprehensive environment of thebuilder. - The
runtimeStage: This stage begins anew withpython:3.10-slim. It only installs packages listed inmultistage_image/runtime_requirements.txt– precisely those needed for the application to run, excluding any development tools or build-time-only Python packages that might have been in the builder'srequirements.txt. The application code is then copied.
This separation is profound. The builder stage acts as our fully equipped workshop, handling all the messy compilation and preparation. The runtime stage is the clean, minimalist showroom, receiving only the polished final product. If our dummy_c_extension (or any other compiled library) was built in the builder, we would then COPY the necessary compiled files (like .so files or an installed package directory from the builder's site-packages) into the runtime stage. We encourage you to experiment: try adding the dummy_c_extension to the builder stage and copy its output to the runtime stage to see this in action.
Let's build this (docker build -t bert-classifier:multistage -f multistage_image/Dockerfile multistage_image/):
-
bert-classifier:multistage: 832MB (23s build)
Now lets list all images
docker image ls
You will get:
REPOSITORY                   TAG       IMAGE ID       CREATED             SIZE
bert-classifier-multistage   latest    7a6dd03b3310   48 minutes ago      832MB
bert-classifier-slim-fixed   latest    fe857de45a1a   55 minutes ago      1.67GB
bert-classifier-slim         latest    5111f608f68b   59 minutes ago      1.66GB
bert-classifier-naive        latest    e16441728970   About an hour ago   2.54GB
The results speak volumes: an 832MB image, our smallest yet, and the fastest build time at a mere 23 seconds.
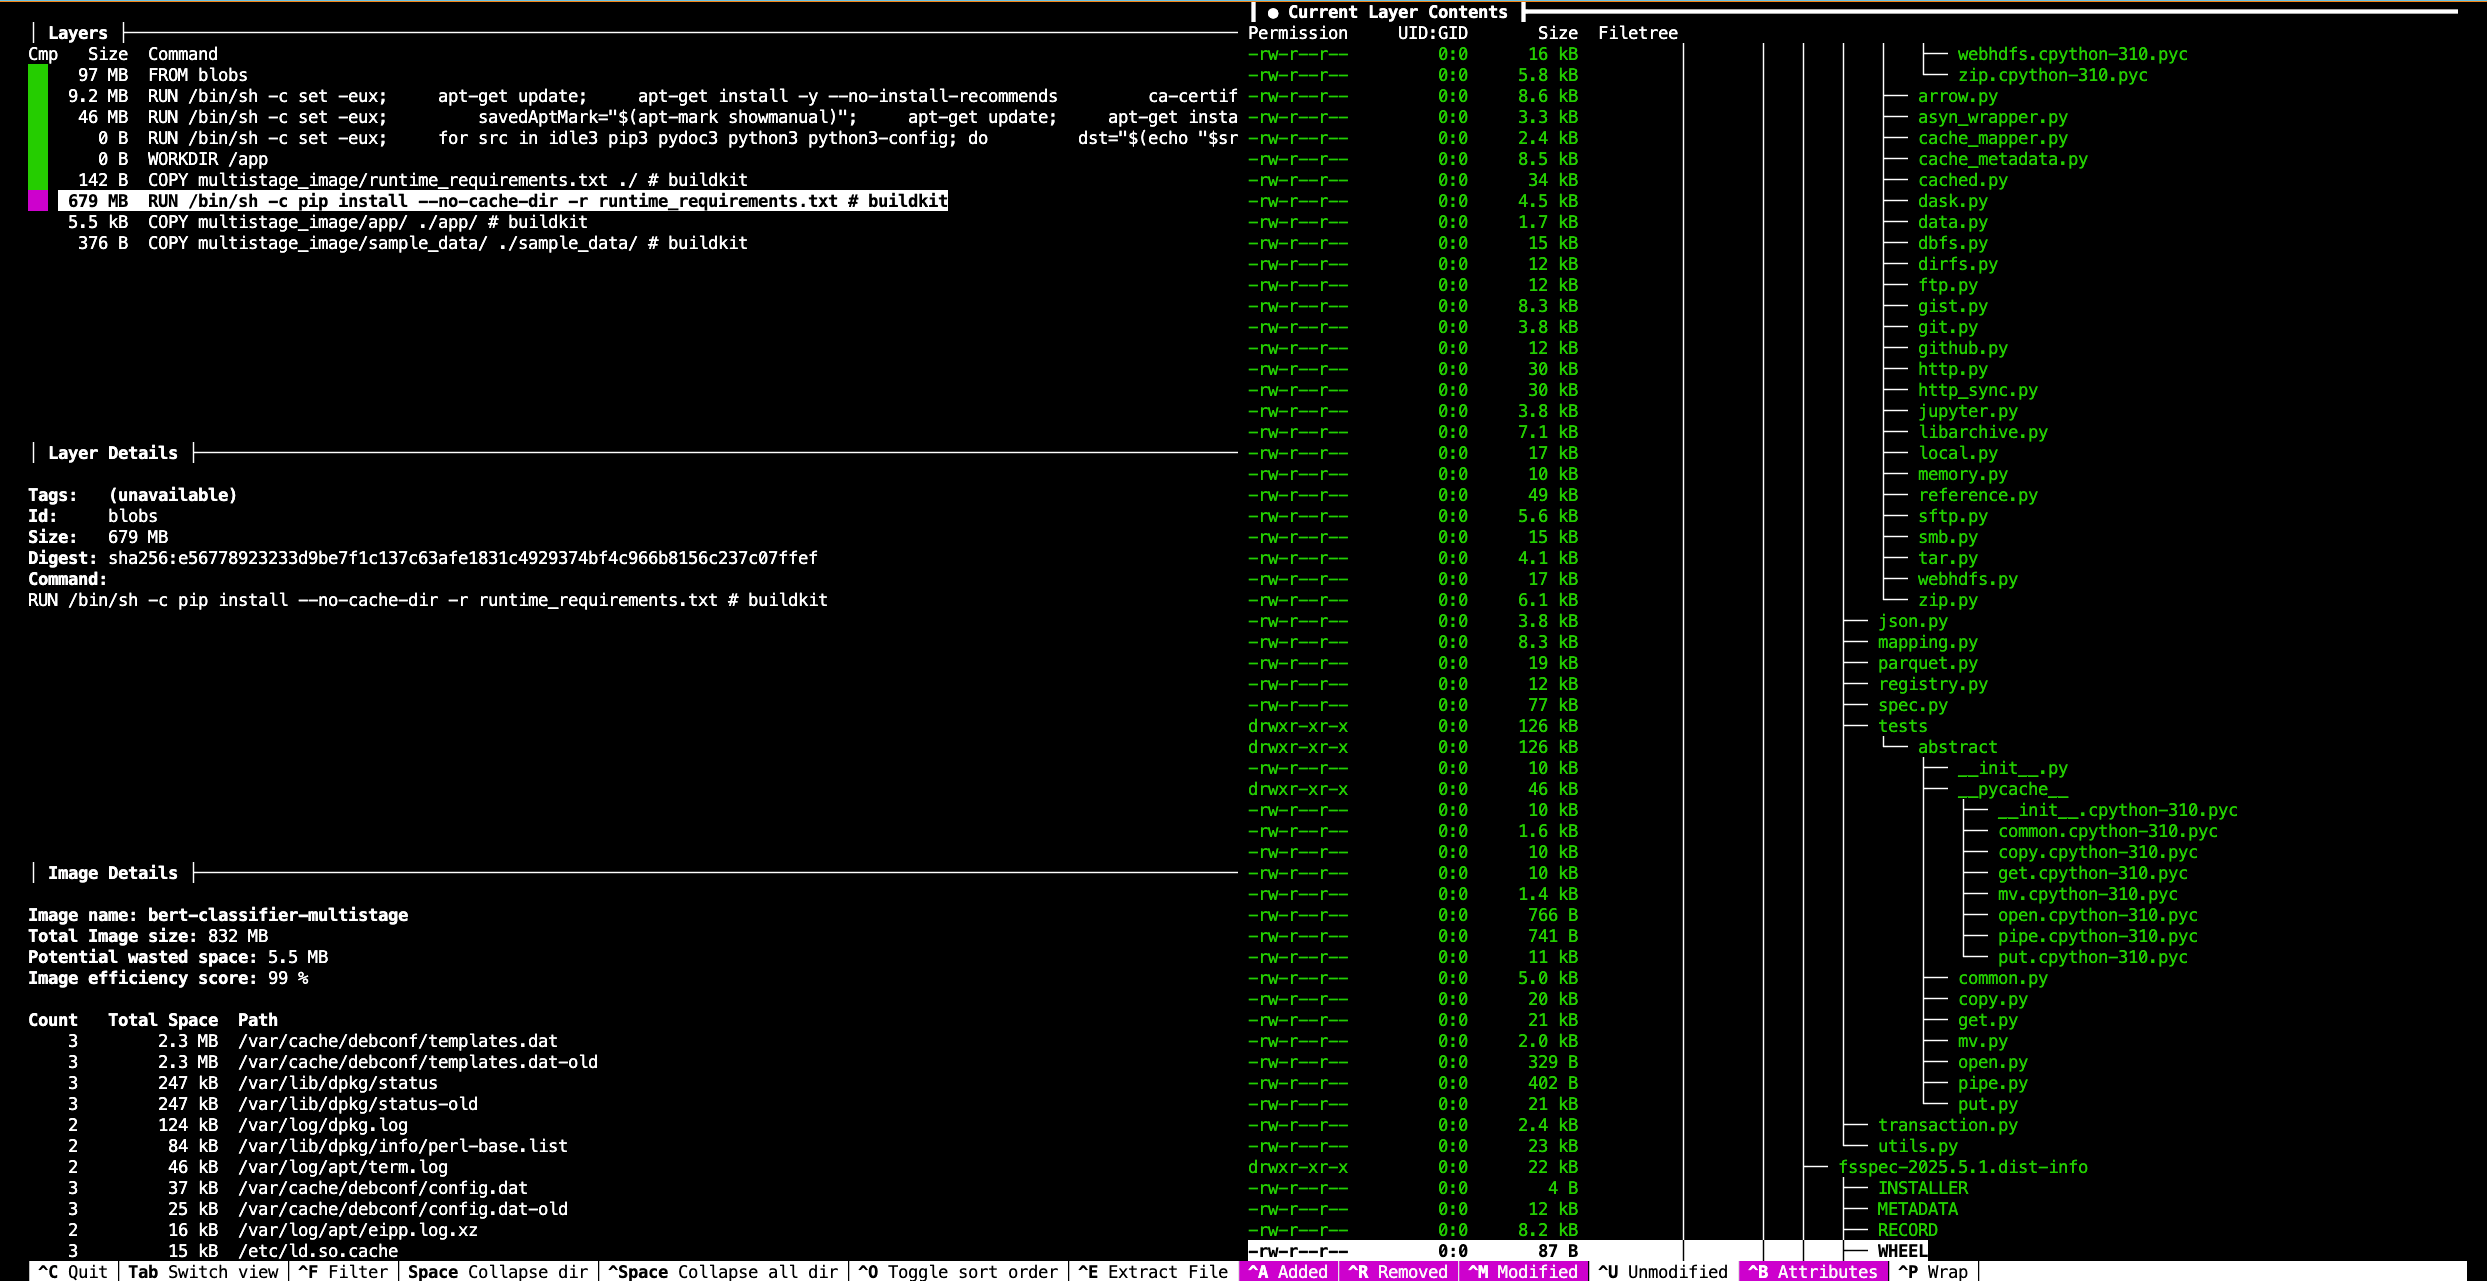
A Glimpse Inside With dive
We strongly encourage you to run dive bert-classifier-multistage yourself. You'll be able to confirm that the final stage is indeed based on python:3.10-slim. Critically, you will find no traces of build-essential, gcc, or other build tools in its layers. The largest layer in this final image, as seen in our own dive exploration, is the RUN pip install --no-cache-dir -r runtime_requirements.txt command, contributing 679MB – this is the home of PyTorch, Transformers, and their kin. The surrounding OS layers are minimal. The image details from dive for bert-classifier-multistage (ID 7a6dd03b3310) report a total image size of 832MB with an efficiency score of 99% and only 5.5MB of potential wasted space, likely inherent to the base slim image layers or minor filesystem artifacts.
Weighing the Options
Choosing a slim base image is almost always a net positive, offering significant size reduction with minimal effort, provided you are prepared to handle potential compilation needs.
Multi-stage builds, while adding a little length to your Dockerfile, bring clarity, robustness, and substantial size savings by ensuring your final image is unburdened by build-time apparatus. For AI applications with their often complex dependencies, this technique is less a luxury and more a necessity for professional-grade containers.
Opinions expressed by DZone contributors are their own.
Comments