Docker Multi-Stage Builds: Optimizing Development and Production Workflows
Traditional Docker images are bloated with unnecessary build tools, dev dependencies, and source code.
Join the DZone community and get the full member experience.
Join For FreeHey there, fellow Docker enthusiasts! If you've been containerizing applications for a while, you've probably run into this all-too-familiar frustration: your Docker images are absolutely massive, they take forever to build and deploy, and you're left wondering if there's got to be a better way. Trust me, I've been there—staring at a 1.4GB image thinking "surely this can't be right?"
After years of wrestling with bloated containers (and some very unhappy DevOps teammates), I finally embraced multi-stage builds—and honestly, it's been a complete game-changer. In this article, I'll share what I've learned about this powerful but often overlooked Docker feature that could revolutionize your containerization workflow.
The Problem: Those Darn Bloated Docker Images
Let's face it—we've all written a Dockerfile like this at some point:
FROM node:18

WORKDIR /app

# Install build tools and dependencies
COPY package*.json ./
RUN apt-get update && apt-get install -y build-essential python3
RUN npm install

# Copy source code
COPY . .

# Build the application
RUN npm run build

EXPOSE 3000
CMD ["npm", "start"]
Sure, it works. Your app runs. But this approach is like packing your entire workshop into your car just to change a lightbulb at a friend's house. You're lugging around:
- All those dev dependencies: Your production container is stuffed with packages you only needed during build time.
- Build tools galore: Why is Python in your Node.js production image? (We've all been there!)
- Source code that's already been compiled: Just dead weight at this point.
- A mountain of unnecessary baggage: I've actually seen Node.js apps balloon to well over 1GB this way! One project I worked on hit 1.14GB for what was essentially a simple Express server.
The worst part? This isn't just about wasted disk space (though your cloud storage bill will definitely feel it). These bloated images slow down your CI/CD pipelines, make deployments feel like watching paint dry, and create a larger attack surface for potential security vulnerabilities. Plus, try explaining to your team why a "quick deployment" takes 10 minutes to download.
The Solution: Multi-Stage Builds to the Rescue
This is where multi-stage builds come in—and they're exactly what they sound like: building your Docker image in stages, where each stage can cherry-pick only what it needs from previous stages.
Here's a simplified example of the same Node.js application, but with a multi-stage approach:
FROM node:18 AS builder

WORKDIR /app
COPY package*.json ./
RUN npm install
COPY . .
RUN npm run build

# Stage 2: Production environment
FROM node:18-alpine

WORKDIR /app
COPY --from=builder /app/dist /app/dist
# Only production dependencies
COPY package*.json ./
RUN npm install --only=production

EXPOSE 3000
CMD ["node", "dist/server.js"]
The difference? This approach creates an image that's often 88% smaller (around 130MB), significantly more secure, and deploys in a fraction of the time. It's like Marie Kondo for your Docker images—keeping only what "sparks joy" in production.
You can find this example and others in this Docker Multi-Stage Examples repository, which includes complete, runnable applications for multiple languages.
How Multi-Stage Builds Work: The Magic Behind the Scenes
The beauty of multi-stage builds lies in their simplicity. Here's what's happening:
- Multiple FROM statements: Each one starts a fresh stage in your build
- AS keyword: Gives your stage a name so you can reference it later
- COPY --from: The secret sauce—this copies only specific files from a previous stage
- Final FROM: Only the last stage actually produces your output image
Everything else—your build tools, development dependencies, source code—gets discarded after it's served its purpose. It's like having a professional kitchen to prepare your meal, but only taking the finished dish home.
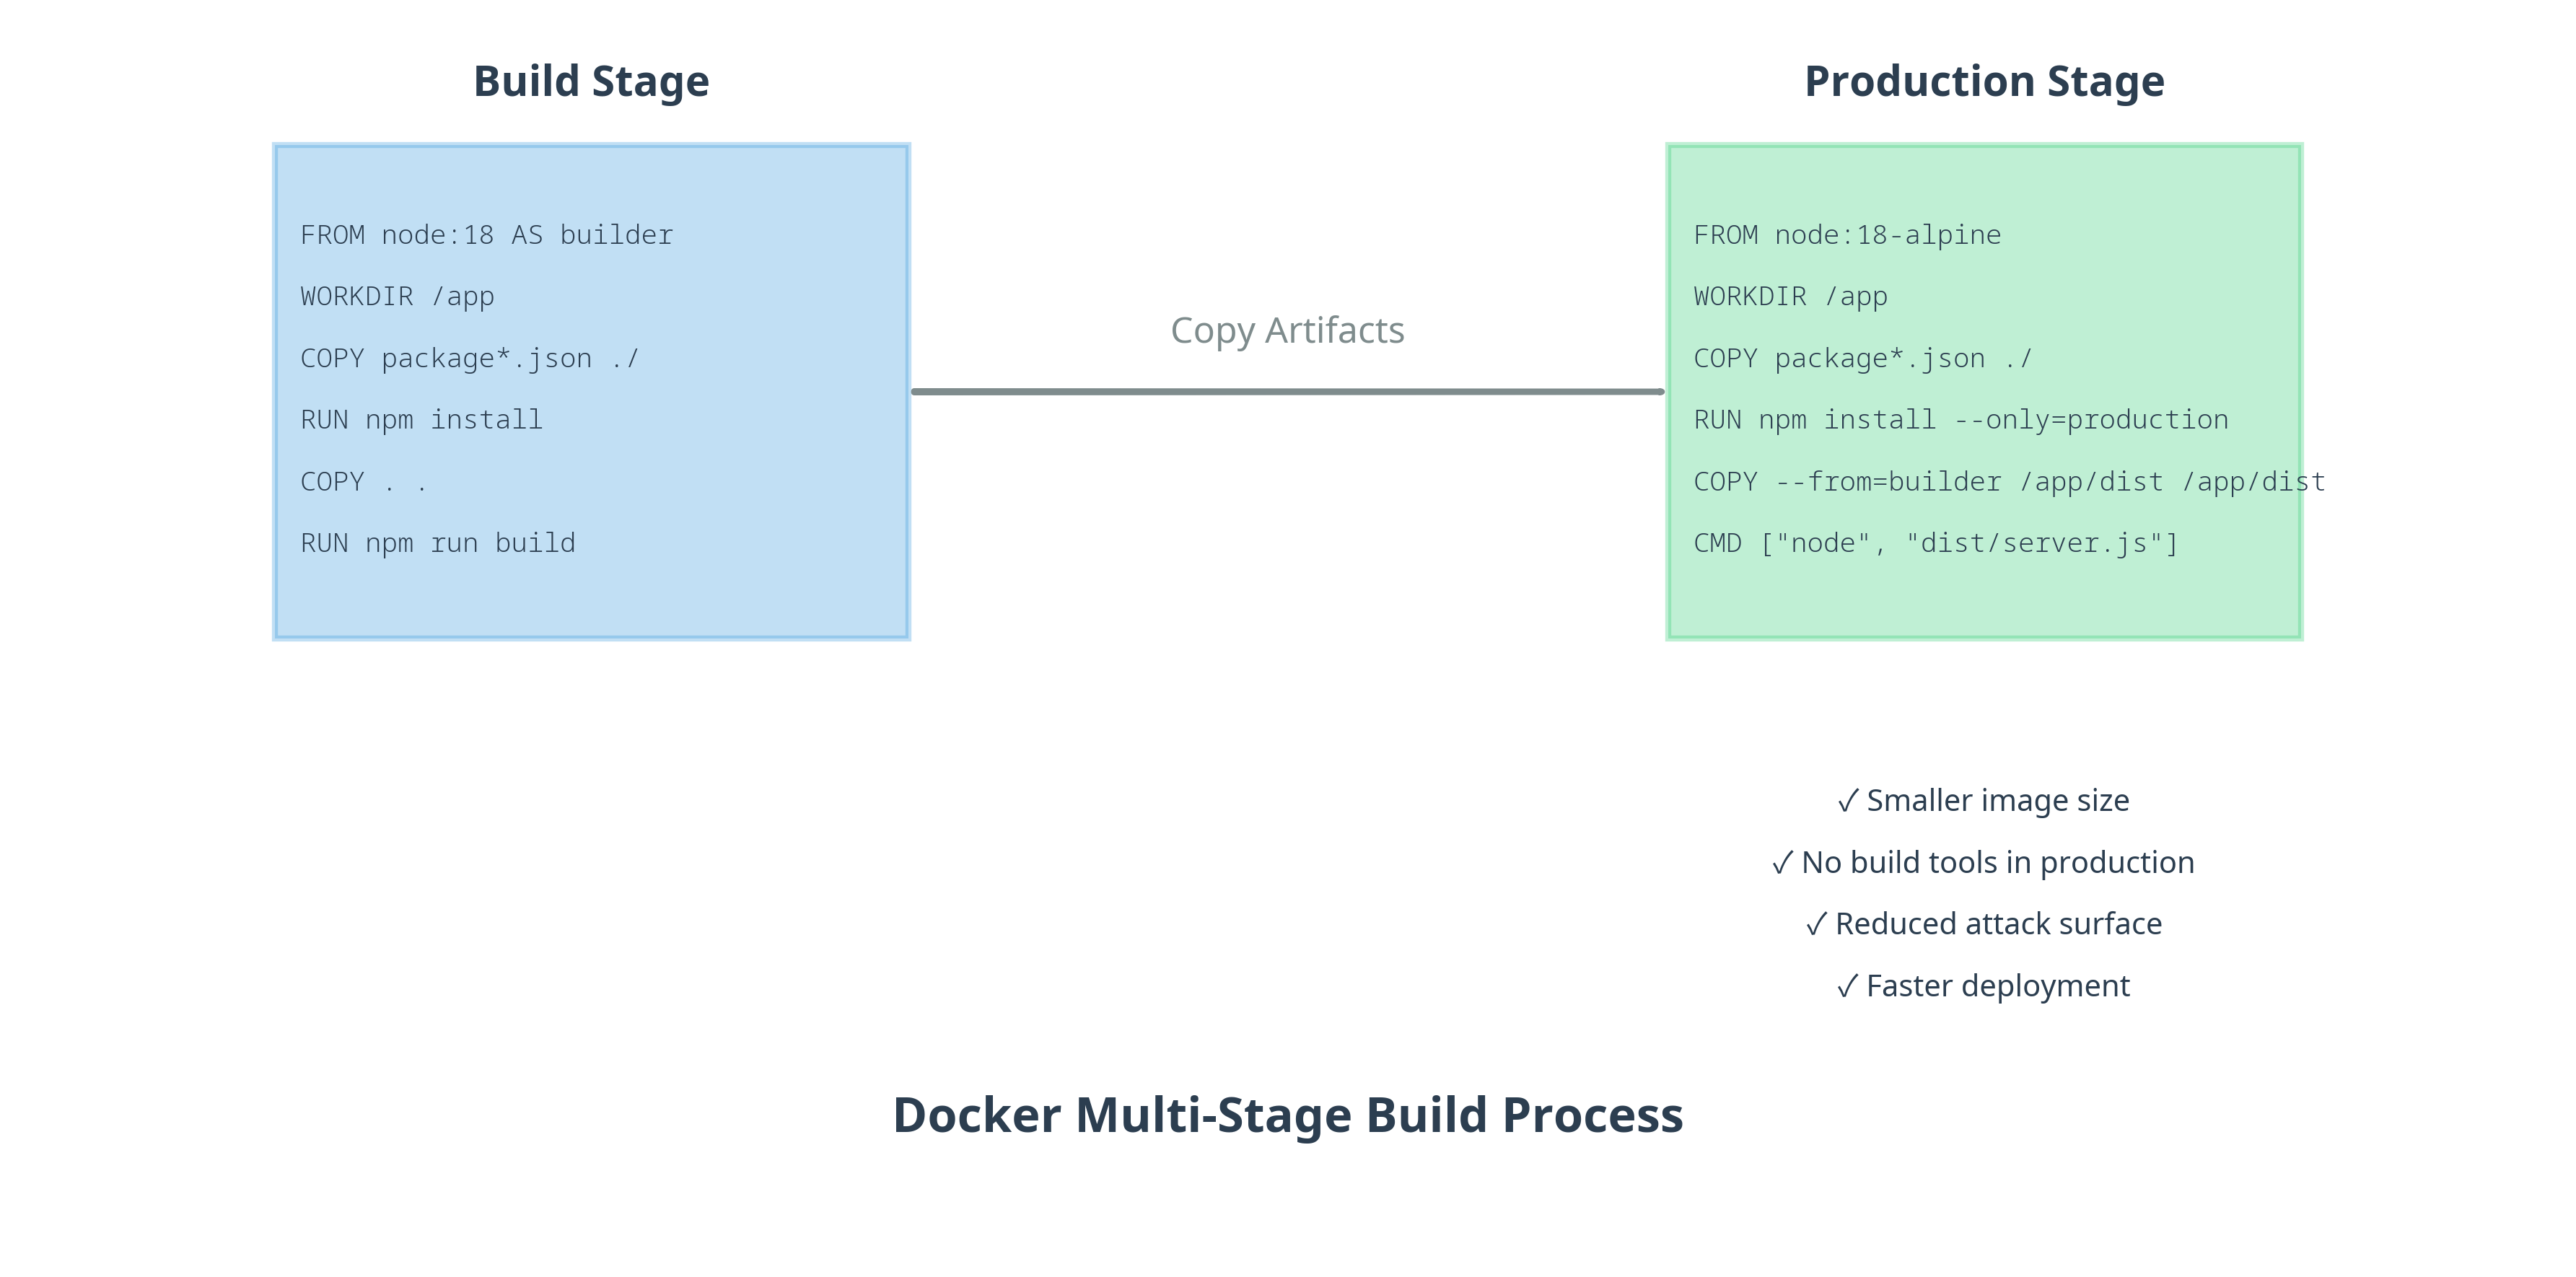
I've created this diagram to show exactly how artifacts move between stages. Notice how the final image contains only what's needed to run the application, not what's needed to build it.
Real-World Examples: Multi-Stage Builds Across Languages
One thing I love about multi-stage builds is how well they work across different programming languages. Let me highlight a few examples from my repository:
Python With Poetry
For Python applications using Poetry, multi-stage builds can reduce image size by about 81%. The key is separating the Poetry installation and dependency management from the runtime environment. I've watched teams cut their Python images from over 1.3GB down to just 250MB—that's the kind of improvement that makes deployment teams do a happy dance.
Check out the complete Python example in the repository to see how Poetry and multi-stage builds work together.
Java With Maven
Java applications often include large build tools like Maven or Gradle that aren't needed at runtime. With multi-stage builds, you can compile your application in one stage and only copy the resulting JAR file to a slim JRE image. We're talking about going from a hefty 1.4GB image down to a much more reasonable 297MB.The Java example in the repository demonstrates this approach with a Spring Boot application.
Go Applications
Go's compilation model makes it perfect for multi-stage builds. Since Go compiles to a single binary, you can use the empty "scratch" image as your final stage, resulting in incredibly small images. This is where things get really exciting!
# Build stage
FROM golang:1.23 AS builder
WORKDIR /app
COPY . .
RUN CGO_ENABLED=0 GOOS=linux go build -a -installsuffix cgo -o app .

# Production stage - using scratch (empty) image
FROM scratch
COPY --from=builder /app/app .
EXPOSE 8080
CMD ["./app"]
This Go example is my personal favorite—we're talking about shrinking a 1.13GB build image down to just 9.08MB. That's not a typo! That's a mind-blowing 99.2% reduction. Check out the Go example in the repository for the complete implementation.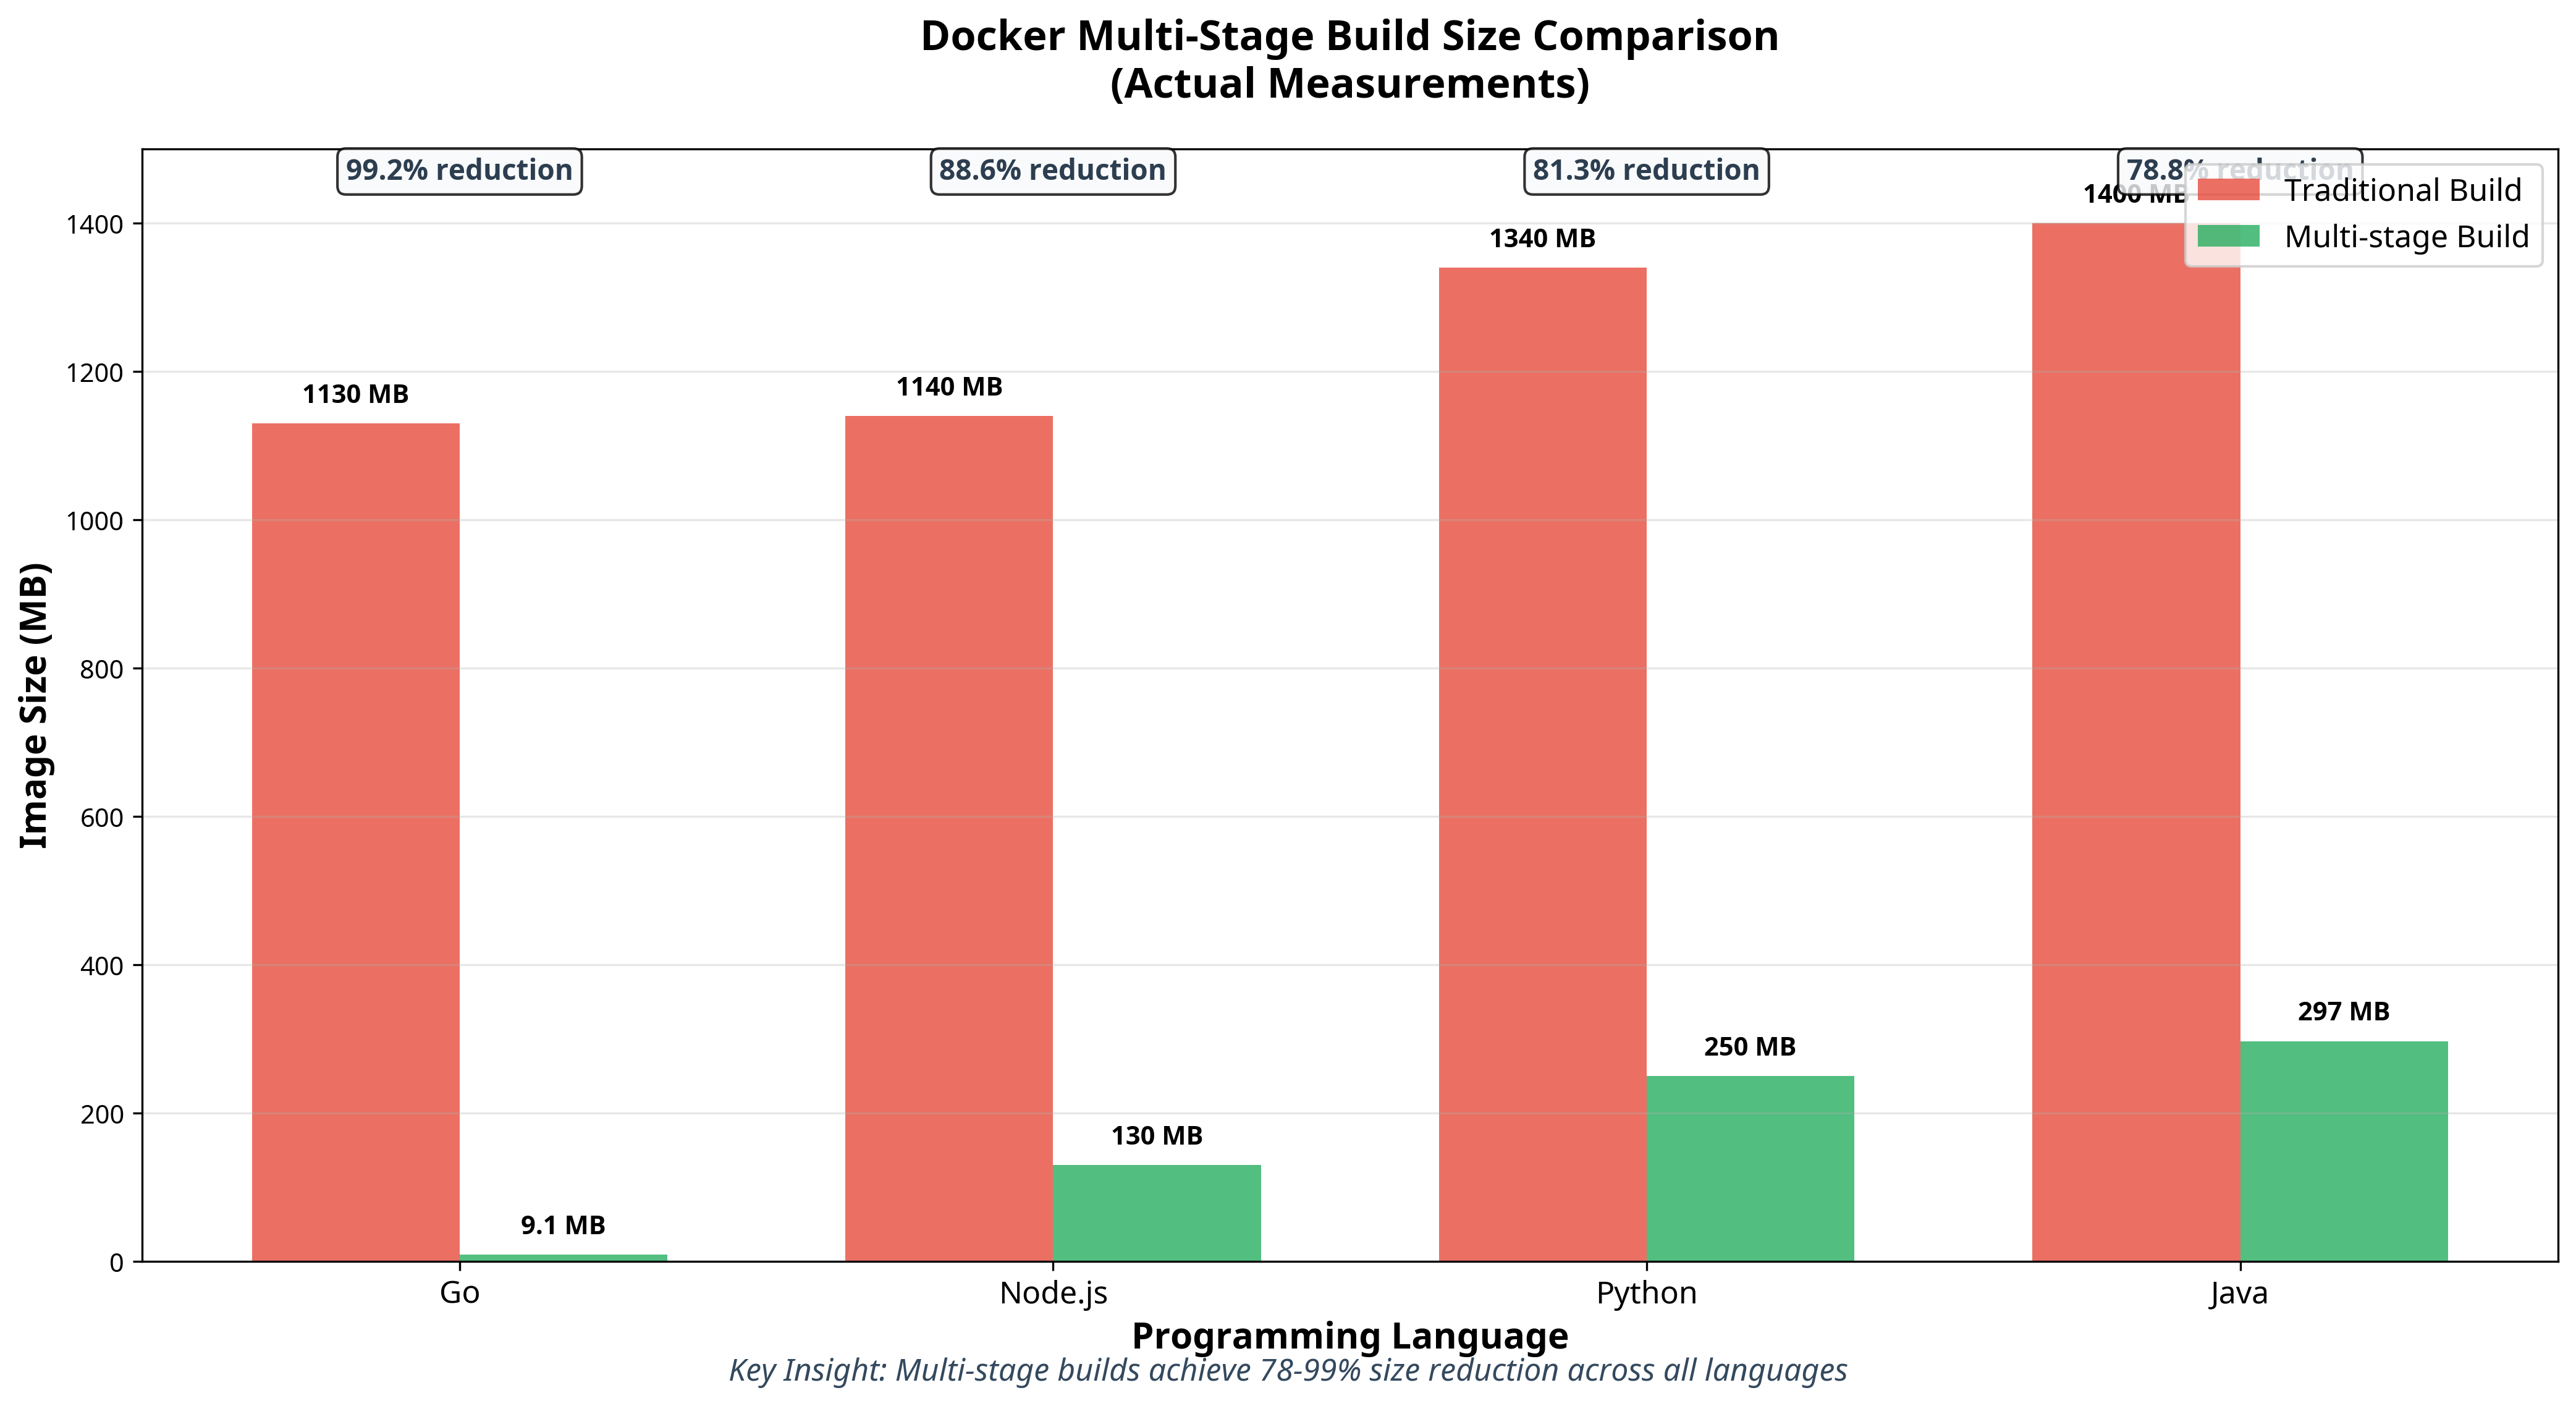
As you can see from this chart, the size reductions are dramatic across all languages. The Go example achieves a truly mind-blowing 99.2% reduction—that's the kind of optimization that makes you question everything you thought you knew about container images!
Advanced Techniques: Taking Multi-Stage Builds Further
Once you've mastered the basics, there are some really cool advanced techniques you can use:
Using Build Arguments Across Stages
Need to keep versions consistent? Pass build arguments between stages:
ARG VERSION=latest

FROM node:${VERSION} AS builder
# Build stage instructions...

FROM node:${VERSION}-alpine
# Production stage instructions...
Creating Debug Variants
Sometimes you need a debug version with extra tools. With multi-stage builds, you can create multiple targets from the same Dockerfile:
# Production stage
FROM node:18-alpine AS production
# Production instructions...

# Debug stage - extends production
FROM production AS debug
RUN apk add --no-cache curl htop strace
# Add debugging tools and configurations
You can find this example in the advanced directory of this repository.
Build the variant you need:
docker build --target production -t myapp:prod .
docker build --target debug -t myapp:debug .
I've used this technique countless times during late-night debugging sessions. It's honestly so much cleaner than maintaining separate Dockerfiles for every possible scenario.
Real-World Results: What You Can Actually Expect
Let me share the real numbers from this demonstration project. I tested multi-stage builds across four different languages, and honestly, the results still surprise me every time I look at them:
| Language | Traditional Size | Multi-Stage Size | Size Reduction |
|---|---|---|---|
| Go | 1.13GB | 9.08MB | 99.2% |
| Node.js | 1.14GB | 130MB | 88.6% |
| Python | 1.34GB | 250MB | 81.3% |
| Java | 1.4GB | 297MB | 78.8% |
These aren't theoretical numbers—these are actual, reproducible results you can get by running the demo script in this repository. The Go result in particular makes people think I've made a mistake when I show it to them. But nope, we really did go from over a gigabyte down to 9 megabytes.
What this means in practice:
- Faster deployments: Your containers download and start in seconds, not minutes
- Happy DevOps teams: Less bandwidth usage, faster CI/CD pipelines
- Lower costs: Smaller images mean reduced storage and transfer costs
- Better security: Fewer packages in production = smaller attack surface
The smaller images also reduced infrastructure costs significantly. When you're deploying dozens or hundreds of containers, these size differences add up fast—both in terms of money and sanity.
Best Practices I've Learned the Hard Way
After implementing multi-stage builds across dozens of projects, here are my top tips:
- Name your stages for clarity and maintainability—your future self will thank you
- Use specific base image tags rather than 'latest' to ensure consistency
- Minimize the number of layers by combining related commands
- Order instructions by change frequency to optimize caching
- Use .dockerignore to prevent unnecessary files from being copied
- Consider distroless or scratch images for the final stage when possible
- Pin dependency versions for reproducible builds
When to Use Multi-Stage Builds (And When Not To)
Multi-stage builds are your best friend when you have:
- Applications with complex build processes
- Projects with large development dependencies
- Environments where deployment speed matters
- Security-sensitive applications
- Microservice architectures with many containers
But honestly? They might be overkill for:
- Simple applications with minimal dependencies
- Development-only containers
- Scenarios where image size genuinely isn't a concern
Here's my take: I generally recommend starting with multi-stage builds by default and simplifying only if needed. The benefits almost always outweigh the small amount of additional Dockerfile complexity. Plus, your future self will thank you when you inevitably need to optimize later.
If you're still using single-stage Dockerfiles, I can't recommend multi-stage builds enough. The benefits are immediate and substantial: smaller images, faster deployments, improved security, and cleaner Dockerfiles.
Best of all, implementing multi-stage builds requires minimal changes to your existing workflow. It's one of those rare optimizations that gives you massive benefits for relatively little effort.
Try out this Docker Multi-Stage Examples repository to get started with working examples across multiple languages. I've included everything you need to experiment with these techniques in your own projects—just run ./scripts/demo.sh to see the magic happen!
Your operations team, security team, and cloud billing department will thank you. And honestly, you'll thank yourself the next time you're not sitting around waiting for a deployment to complete.
Opinions expressed by DZone contributors are their own.
Comments