Dynamic Configuration Management in Microservice Architecture With Spring Cloud
Improve your own dynamic configuration management with Spring Cloud while learning how easy it is to reconfigure your application live without rebuilding or rebooting it.
Join the DZone community and get the full member experience.
Join For FreeIn the scary world of monolithic applications, we succeeded in working out numerous design patterns and good practices. When we move towards distributed systems, we should apply them carefully, bearing in mind that in microservice infrastructure we need to deploy, scale, and reconfigure our systems much quicker. In this article I will focus on configuration issues, emphasizing why keeping properties/yml files with your codebase is good, and when it might not suffice. I will also give you an overview of how you can improve your configuration management with Spring Cloud, and how easy it is to reconfigure your application live without rebuilding or rebooting it.
Configuration Files
It seems to be obvious now to keep your configuration outside of the code so that anyone can update it without the struggle to find a proper line to be modified. However, I find it not so evident for people to build applications independently from the environments they are running on. Anyway, making your build environment-dependent is not a good idea, as you won't know what environment is a particular package supposed to be used for (unless you provide some crazy naming strategy for your artifacts, but don't tell me about them, I'm frightened enough while thinking of it). It should be a natural thing to create profiles related to your environments and split the config among profile-dependent .properties files (or separate them within the .yml file), building one profile-agnostic deployment package, passing a proper profile/config file to your application while running it. If you do so, you will see a light in the tunnel. But the light is dimmed as there is still a couple of things you should be aware of.
Please note that environment is not the only thing that may define the profile. As an example: in projects that I was working on, we had to deploy the same application for three different countries, where each country had its own configuration. Then we had 9 combinations of profiles: dev, test, prod for each of the three countries.
First of all, having config files bounded with the deployment package, you need to rebuild and redeploy it each time some property changes. It is a horror when your configuration changes more frequently than the code. Although you can always keep some of your configuration outside of the jar file, it will usually require rebooting your app after updating your properties there.
Moreover, having a distributed system, where scalability is one of its key features you need to be able to react to configuration changes quickly and apply them to all instances that are currently running. Redeploying them one by one can be a tough task if it is not properly automated.
It might also be a case that developers have restricted access to credentials to production databases, external services, etc. In one of the monolithic applications that I was working on, the production deployment required client's administrator to set particular properties in an external config file before starting the application. No one had any trace about what was changed there, when it happened and by whom. I hope you don't need any more arguments to see that this is a very bad idea to do so.
You can see now how complicated and confusing configuration issues might be. Microservices are by definition small independent applications realizing some business logic within a bounded context. Each microservice, before being deployed, must be a bundled unit that can be run on any desired environment: dev, test, prod, etc. without the need of rebuilding it for each of them. We should be able to scale and reconfigure them at will and keep all sensitive settings secured if needed. This is the moment when Spring Cloud Config comes to the rescue. But before that, let's have a look at our simple infrastructure example, that you can find on my GitHub account.
Example Overview
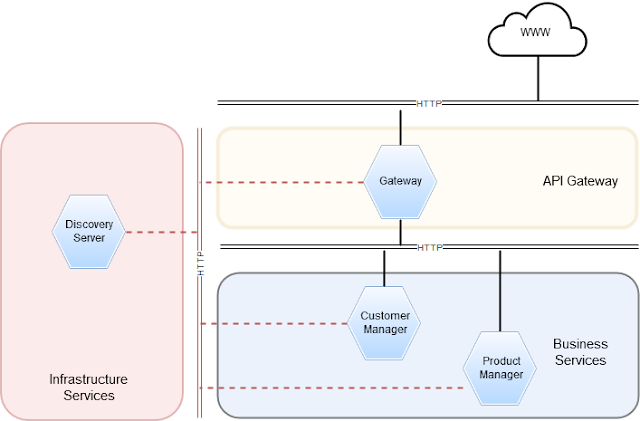
We have two simple microservices: Customer Manager and Product Manager, that realize some business logic regarding Customers and Products respectively. The access to both of our applications is available from the WWW only through the Gateway, which is an implementation of API Gateway pattern with the help of Zuul Router. Each application registers itself (we are using client-side service discovery) in Eureka Discovery Server, which maintains service registry. In our case, all microservices communicate with each other via HTTP protocol, and all of them are, of course, SpringBoot applications.
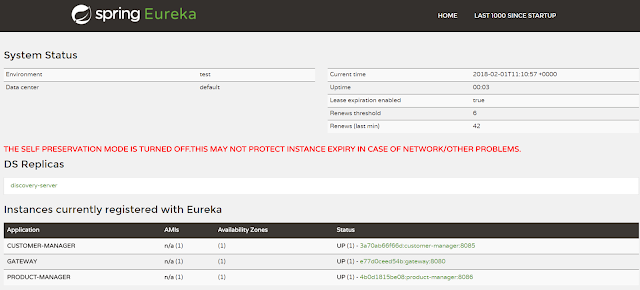
When we set up our environment we can take a look at Discovery Server dashboard, where we can see that all three microservices successfully registered themselves in Eureka. This, in turn, means that they will be able to communicate with each other without preconfiguring their exact URLs, but using application names to find them out from Eureka Server instead.
Spring Cloud Config
Having our example in place, and bearing in mind all configuration issues that we've discussed, let's get straight to the solution. Spring Cloud Config is a tool that provides both server and client-side support for managing configuration in a distributed environment in a centralized manner.
EnvironmentRepository
Config server can be treated as a remote property source. It can be backed by numerous storage providers, like Git (which is the default setting), SVN, or distributed file system. You can even have more than one storage at the same time. With Git we can easily manage configuration files for any application and any environment. Moreover, we gain access control, which means we can decide who can modify particular files (for example restricting access to production properties). We also have full traceability - we know who changed what, and when, and we can easily revert those changes.
The way we want to store our data is defined by EnvironmentRepository interface:
public interface EnvironmentRepository {
  Environment findOne(String application, String profile, String label);
}
It tells us a lot about how things are organized on both config server and backing service. You can see that in order to get a particular environment, we need to locate it with the following variables:
- application - application name
- profile - application profile
- label - additional parameter used by the backing service (branch name, tag, etc. in case of Git repository)
In order to get proper configuration clients can use following endpoints:
/{application}-{profiles}.[properties|yml|yaml|json]/{label}/{application}-{profiles}.[properties|yml|yaml|json]/{application}/{profile}[/{label}]
Embedded Config Server
Benefiting from spring's convention over configuration approach, we can set up our Config Server in just a few steps. First of all, you need to declare following dependency:
org.springframework.cloud:spring-cloud-config-server
and mark the config class with @EnableConfigServer annotation:
@SpringBootApplication
@EnableConfigServer
public class ConfigServerApplication {

  public static void main(String[] args) {
    SpringApplication.run(ConfigServerApplication.class, args);
  }
}
We will also need to define some properties inside our application.yml file, like below:
spring:
  application:
    name: config-server
  cloud:
    config:
      server:
        git:
          uri: https://github.com/bslota/config-repository.git
          clone-on-start: true
          search-paths: 'config/{application}'

server:
  port: 8888
You can see here that we set port number to 8888, which is a conventional and recommended setting. We also told our application to look for config files in a GitHub repository, and clone it right after the startup. Cloning might take a while increasing the booting time, but as soon as the server is up it will be able to serve configuration quickly from the very first request. There is also a search-paths property specified, which tells that config files for each application will be placed in proper folders under the config/directory. While configuring Git as backing service, you can use {application},{profile} and {label} placeholders, so that it fits your needs. Here we have a very basic configuration, where properties for all applications are being held in one common repository, but you could easily apply one repo per profile or one repo per application strategy by using {profile} and {application} placeholders in spring.cloud.config.server.git.uri property respectively. More details you will find in documentation.
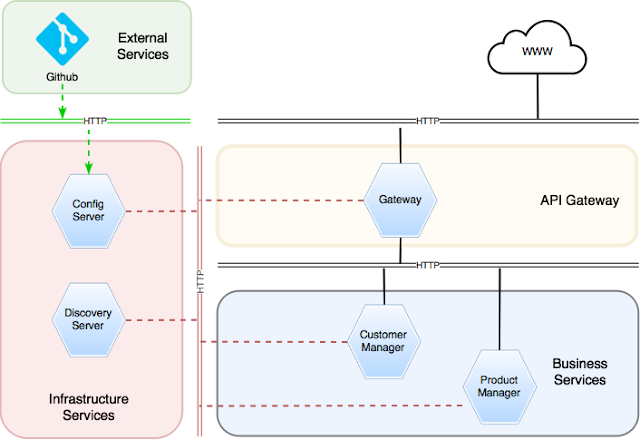
In order to keep the Config Server consistent with our existing infrastructure, we will register it in Eureka Discovery Server. Now our system looks like this:
Here is the shot from Eureka Server dashboard:
Config Server is now the central part of our infrastructure that is supposed to both store and serve configuration for all other microservices. Thus, you should always scale it properly, so that your system stays resilient.
Spring Cloud Config Client
Now that we have our Git repository in place, and we have our Config Server up and running. It's high time we start using it. Before I show you how to connect our applications with the server, I need to tell you a few words about so-called bootstrap context. In a big short, a bootstrap context in Spring Cloud applications is a parent for main application context and it is used for the purpose of loading and decrypting (if needed) properties from external sources. It is defined inbootstrap.yml file unless otherwise specified. What you should put in this file is information about how to locate config server, and properties that are necessary to properly identify environment there. Do you remember application, profile, and label placeholders? This is exactly what we need to pass to the server, and we can do it with following properties:
spring.cloud.config.name- by default it is equal tospring.application.nameproperty valuespring.cloud.config.profile- by default equal to comma separated list of currently active profilesspring.cloud.config.label- its default value is valuated on the server side and is equal to master if Git is used as backing service
Having such well assumed defaults, all we need to set in bootstrap.yml is spring.application.name property.
In order to connect to the config server, we need to declare following dependency:
org.springframework.cloud:spring-cloud-starter-configAs soon as we have it, we need to choose one of two available bootstrap strategies. First one (the default one) is config first bootstrap. It assumes that you define config server URI explicitly in the bootstrap.yml file with the spring.cloud.config.uri property. In this setup, the bootstrap.yml file will have the following content:
spring:
  application:
    name: # microservice name
  cloud:
    config:
      uri: http://localhost:8888
The drawback of this strategy is that we cannot benefit from Config Server being registered in service discovery as we are defining its URI explicitly (this problem won't apply if we are using server-side service discovery). We can get rid of this problem by using discovery first bootstrap strategy. In this approach, our application will resolve config server's URI by its name with the help of service discovery. Of course, this option has its costs as well. In order to get the configuration, we need an extra network roundtrip as we need to communicate with discovery server. Now our bootstrap.yml file looks like this:
spring:
  application:
    name: # microservice name
  cloud:
    config:
      discovery:
        service-id: config-server

eureka:
  client:
    service-url:
      default-zone: http://localhost:8761/eureka/
Now we can easily move the configuration of our services to our GitHub repository.
Manual Refresh
Thanks to the actuator endpoints, we can easily trigger numerous actions on each of our applications. Sending POST request to the /refresh endpoint we can tell the service to reload the bootstrap context (updating the environment both from remote and local property sources), rebinding @ConfigurationProperties and log levels, and refreshing all beans annotated with@RefreshScope annotation.
To give some concrete examples, let's take a look at the Customer Manager service, which has the following property set in its application.yml file in remote property source:
"premium-email-suffix": "yahoo.com"
and a service class annotated with the @RefreshScope annotation, that depends on this property's value.
@Service
@RefreshScope
class CustomerService {

  private final CustomerRepository customerRepository;
  private final String premiumEmailSuffix;

  CustomerService(CustomerRepository customerRepository,
                  @Value("${premium-email-suffix}") String premiumEmailSuffix) {
    this.customerRepository = customerRepository;
    this.premiumEmailSuffix = premiumEmailSuffix;
  }

  List<Customer> findAll() {
     return customerRepository.findAll();
  }

  List<Customer> findAllPremium() {
    return findAll()
             .stream()
             .filter(it -> it.getEmail().endsWith(premiumEmailSuffix)).collect(toList());
  }

  // ... other methods
}
The service is used by CustomerController, so we can easily check if our change, that we will apply in a minute, works as expected.
@RestController
@RequestMapping("/customers")
public class CustomerController {

  private final CustomerService customerService;

  public CustomerController(CustomerService customerService) {
    this.customerService = customerService;
  }

  @GetMapping
  public List<Customer> customers() {
     return customerService.findAll();
  }

  @GetMapping(params = "premium")
  public List<Customer> premiumCustomers() {
     return customerService.findAllPremium();
  }

  // ... other methods
}
Now if we send the following request:
curl http://localhost:8085/customers?premiumwe get this response:
[
  {
    "id": 2,
    "name": "Steve Harris",
    "email": "steve@yahoo.com"
  }
]
Let's make an update to the premium-email-suffix property so that its value is now equal to gmail.com, commit it, and push into the remote repository. As we had mentioned before, in order to make it visible by our application, we need to send the following request:
curl -X POST http://localhost:8085/refresh
And we can see the updated properties straight away in the response body:
["config.client.version","premium-email-suffix"]
To be 100% sure that the manual update worked, let's try to get all premium customers again hoping that this time their emails will end with gmail.com
[
  {
    "id": 1,
    "name": "Bruce Dickinson",
    "email": "bruce.dickinson@gmail.com"
  }
]
Note that similar behavior would be observed with @ConfigurationProperties components.
You see, it is easy, but if you have several services scaled up to a couple of instances it can make the manual refreshment a terrible experience. You need to find a proper service url and make sure that you performed the refresh to all instances. We can surely agree that it is not something that we would eagerly do. Fortunately, we can automate this process. Read on.
Dynamic Changes Propagation
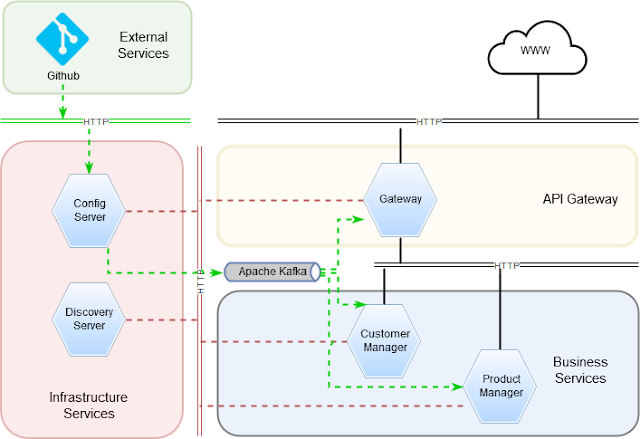
The desired scenario would be that all services, whose properties get updated within a push into a remote repository, get notified and refreshed automatically. Thus, first of all, we need to find a way to propagate configuration changes to proper services. To solve this problem we will use Spring Cloud Bus, which was built to propagate management instructions. It makes use of both actuator (by adding new management endpoints) and Spring Cloud Stream (by enabling communication with AMQP message brokers). In our case, we will use Apache Kafka as a message broker, and now the desired architecture would look like this:
In order to enable Spring Cloud Bus and connect to Kafka broker, Gateway, Customer Manager, and Product Manager services need to be altered with following dependency (don't worry, this one has a transitive dependency on spring-cloud-bus):
org.springframework.cloud:spring-cloud-starter-bus-kafka
and configure Zookeeper nodes and Kafka binders (unless you are fine with defaults)
spring:
  cloud:
    stream:
      kafka:
        binder:
          zkNodes: "localhost:2181"
          brokers: "localhost:9092"
Right after the startup, our services will connect to the springCloudBus topic.
Now our applications are ready to listen and react to refresh requests coming from the message broker and determine if a particular event is dedicated to them or not.
In order enable Config Server to publish this kind of events (RefreshRemoteApplicationEvent, to be specific), we need to declare two dependencies:
 org.springframework.cloud:spring-cloud-config-monitor
 org.springframework.cloud:spring-cloud-starter-bus-kafka
and configure Zookeeper nodes and Kafka binders in the same way as we did in the other services:
spring:
  cloud:
    stream:
      kafka:
        binder:
          zkNodes: "localhost:2181"
          brokers: "localhost:9092"
You already know what spring-cloud-starter-bus-kafka is used for. The second dependency, though, spring-cloud-config-monitor adds something more - the /monitor endpoint that accepts POST requests with information about what service needs to be refreshed. If this request gets to Config Server it publishes RefreshRemoteApplicationEvent to a message broker. Then the target application consumes it and performs refreshment. Yep, you guessed - we can create webhooks that call this endpoint whenever anything changes in Git! Now here we have a few options. The first one is a simple form-based request:
curl -X POST localhost:8888/monitor -d 'path=customer-manager'
The remaining options are Git provider specific. In GitHub, for example, the request might be of the following form:
curl -X POST localhost:8888/monitor
  | -H "X-Github-Event: push"
  | -H "Content-Type: application/json"
  | -d '{"commits": [{"modified": ["customer-manager.yml"] }]}'
If you are interested in details about how to build Github Push Webhooks, please visit this page.
Summary
In this article, you got an overview of how complex configuration issues may be. I gave you an explanation of why keeping configuration in external files is good, and when it might not be enough. You saw an evolving microservice system which we improved step-by-step by adding advanced configuration management with the use of spring-cloud-config and Git as a backing service. You can also see that a simple setup with manual refresh ability is fairly easy to provide, but in a much bigger architecture where your services are scaled up to a couple of nodes, you simply won't be able to control it. Then, a good solution would be to use a message broker like Apache Kafka and spring-cloud-bus with a proper broker abstraction (spring-cloud-stream) on the client side, and spring-cloud-config-monitor on the server side. If you add a proper Webhook to your Git platform, everything will work automatically as a commit to a proper repository/branch gets pushed.
Further Considerations
When you read articles like this, you should always keep in mind that software development is about trade-offs before you apply it in your infrastructure. You need to know that keeping configuration in a central place is helpful when it comes to maintenance, traceability, and all the stuff that we discussed at the very beginning, but it complicates the CI and CD processes as you have a second place where you keep things connected with the deployed application. Another thing is that you need to plan how to organize your Git repository and decide if you want to have a repository per application, or maybe one common repository with application-dependent folders and branches that will apply to profiles - there are lots of strategies and it is up to you to pick the one that will suit you best. If you need some more information about spring-cloud-config, I recommend visiting this page. Cheers!
Published at DZone with permission of Bartłomiej Słota, DZone MVB. See the original article here.
Opinions expressed by DZone contributors are their own.


Comments