ESP8266 WiFi Touchscreen Thermostat
Learn to make your own touchscreen thermostat controlled by WiFi with this guide to the parts and code required to build it from scratch.
Join the DZone community and get the full member experience.
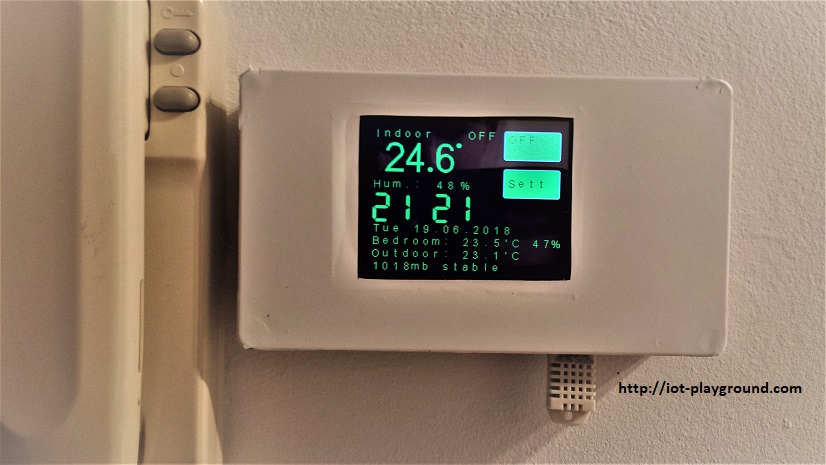
Join For Freein this tutorial, we will show how to build a wifi touchscreen thermostat. this esp8266 wifi touchscreen thermostat is an example of complex sensor build by esp8266, arduino mega 2560 and tft 3.2" touch screen display. the thermostat is connected to easyiot cloud and can be controlled over the internet.
main features
- 6 modes - auto, off, lolo, lo, hi, hihi.
- touchscreen.
- wifi connected.
- four set temperatures (lolo, lo, hi, hihi) and weekly schedule.
- time display.
- additional data display - temperature in another room, air pressure, and weather forecast.
- connected to easyiot cloud and can be controlled in a web interface or native mobile application over the internet.

materials
-arduino mega 2560 $9.97, $8.68
-esp8266 wifi module
esp8266 esp-01 serial wifi wireless transceiver module
$2.19,
$17.00
esp8266 esp-03 serial wifi wireless transceiver module $2.07, $2.15
esp8266 esp-12 serial wifi wireless transceiver module
$2.08,
$1.95
esp8266 esp-05 serial wifi wireless transceiver module
$1.88,
$3.89
esp8266 esp-07 serial wifi wireless transceiver module
$2.18,
$1.87
-bmp180 digital barometric pressure sensor
bmp180 digital barometric pressure sensor
$1.59,
$1.49
-dht22 digital temperature and humidity sensor
dht22 digital temperature and humidity sensor
$2.72,
$2.52
-1 channel isolated 5v relay module
1 channel isolated 5v relay module
$1.34,
$0.58
-rtc ds1302 real time clock module
rtc ds1302 real time clock module
$0.99,
$0.84
-3.2" tft lcd module touch panel+ tft 3.2" lcd shield expansion board for arduino
3.2 tft lcd + 3.2 tft lcd shield
$22.99,
$16.77
build
connections:
arduino mega 2560 tft display
this is easy, because we will use a shield. just put the tft 3.2" lcd shield expansion board and 3.2" tft lcd module touch panel on top of the arduino mega 2560.
esp8266
esp8266 is used as the wifi gateway to easyiot cloud. it is loaded with firmware written in arduino ide. in this case, we will use hw serial1 on arduino mega 2560 to connect the module. follow it to connect the esp module to the arduino. the arduino serial1 rx pin is 19, tx 18 and the reset pin is 12. for the 3.3v power supply, we will use the 3.3 v from the tft shield expansion board. see the picture below for where to connect the 3.3 v.
bmp180
arduinobmp180 module vcc vcc gnd gnd 20 sda 21 slc
dht22
arduinodht22 vcc 1 vcc gnd 4 gnd 8 2 data
relay module
the relay module input is connected to pin 51 on the arduino. we also connect vcc and gnd.
rtc ds1302
arduinods1302 vcc vcc gnd gnd 11 ce 10 io 9 clk
source code
additional libraries are here .
esp8266 source code can be found on github . upload the program with the esp8266 arduino ide . if you are using esp-01, then keep debug in the comments. to enable debug to use the esp8266 node mcu, which allows one additional software serial.
the arduino mega 2560 program is available on github .
before you upload the program to the arduino, it is recommended to change the following lines:
#define default_ap_ssid "xxxx"
#define default_ap_password "xxxx"
#define default_cloud_username "xxxx"
#define default_cloud_password "xxxx"
set the access point name and password and easyiot cloud username and password. you can later set those settings on the thermostat touch screen (settings->wifi cloud), but it's easier to change it in the program. the program will automatically add the thermostat to the easyiot cloud and configure the module parameters. of course, you need to register to easyiot cloud first.
configure easyiot cloud
automation
our thermostat also shows the temperature and humidity in another room and outside. first, add those modules to easyiot cloud. add three automation programs to forward the value of the sensors (temperature 1, humidity 1 and temperature 2) to the thermostat. in automation (configure->automation), add a new program and select the program type to "forward value." then select the appropriate module and parameter to forward values. the thermostat parameters are as follows:
sensor.parameter4 - temperature 1
sensor.parameter5 - temperature 2
sensor.parameter6 - humidity 1
future improvements
this is the first version of the thermostat. for future versions, there is an idea to add multiple zones to the thermostat. also, the display graphic design is basic. if we use an sd card attached to the tft display, we can create screens with nice graphics.
Published at DZone with permission of Igor Jarc. See the original article here.
Opinions expressed by DZone contributors are their own.
Comments