Event-Driven Microservices With Vert.x and Kubernetes (Part 1 of 3)
Learn how to set up an event-driven microservices architecture using Vert.x's Verticle class. This introductory post covers how to use and configure Vert.x.
Join the DZone community and get the full member experience.
Join For FreeThis is the first in a series of articles where we will build an entire microservice architecture using Vert.x and Kubernetes. Part one will focus on Vert.x and how to create microservices communicating via messages/events in a local environment. In part two, we will move the example from Part 1 to Kubernetes and we will learn how to configure Vert.x and its cluster provider Hazelcast to run in a Kubernetes cluster. Part three will extend the example with a more "enterprise-ready" architecture by mixing event-driven and “classical” REST (micro-)services using service-discovery and cluster partitioning. In part 3, I will also introduce vxms, a Vert.x extension with a JAX-RS like endpoint definition style, which provides many useful extensions to create resilient microservices on top of Vert.x.
Part 1: Create an Event-Driven Architecture With Vert.x
Before we start, I’ll give you a brief overview of the example we will build and deploy in Part 1 & 2. To keep this example simple, I decided to reuse the Vert.x/AngularJS example from the Vert.x example GitHub repository. This example is a small User admin page with one Verticle (see Vert.x intro) hosting the static content and handling the REST requests.
Architecture Overview
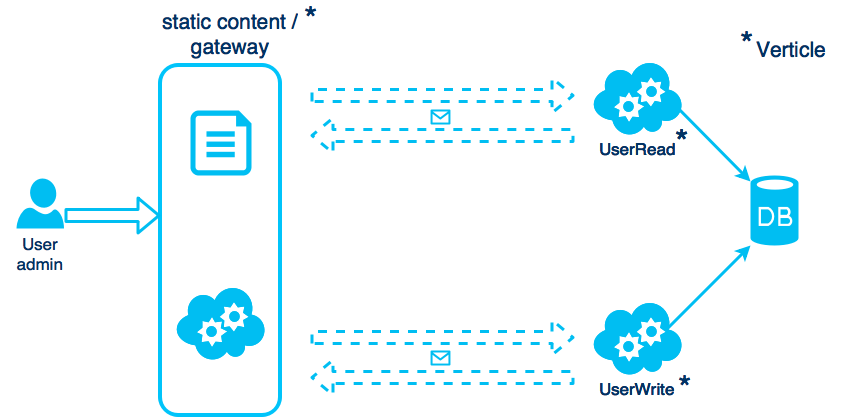
The original (Vert.x/AngularJS) example handles everything in one Verticle, so I decided to split it up to three different (micro-)service projects. Usually, we would divide our microservice across domains; because we have only one domain here (the User), we will create a UserRead service, a UserWrite service and a Gateway service. The Gateway service will also host the static content and act as a REST gateway to the other Verticles by using events for internal communication.
Before we proceed, let’s talk about the reasons to use Event-driven (micro-)services. One might be the asynchronous behavior and the absence of an active service discovery. Additional advantages are, that we can dynamically add new subscribers/services and easily add resilient aspects to our code and the whole architecture. In reality, you shouldn’t focus only on one architecture style. In many cases, a simple request/response is the way to go and for many other cases handling REST calls is the proper approach.
Traditionally event-driven architectures are handled by a message broker. The approach we pursue here is to use an in-memory data grid with its capabilities for auto-discovery, shared data, and events.
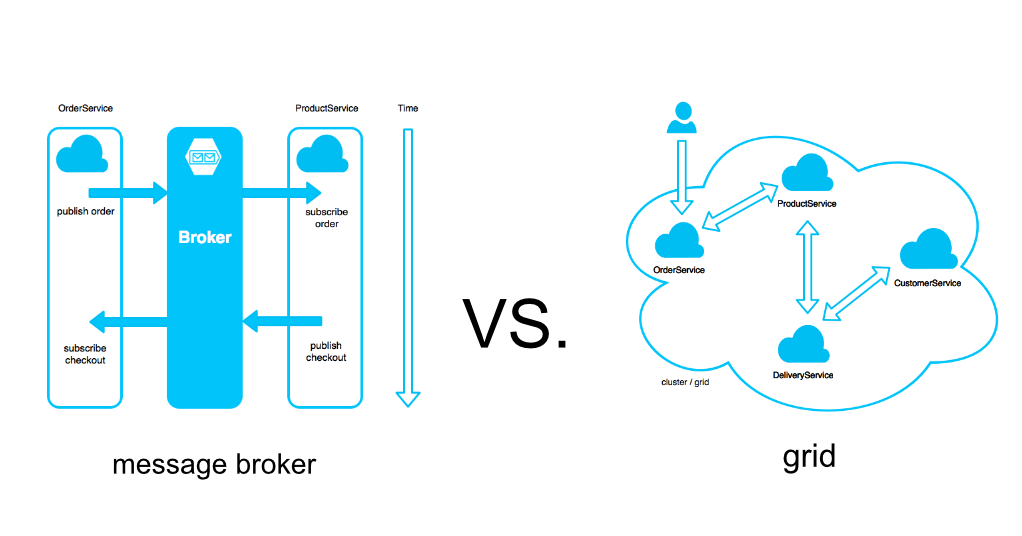
In a scenario in which a message-broker is involved, you need to ensure its reliability and each client must know the address of the broker. In contrast to an in-memory data grid approach, were each component is scanning for nodes in the network. As soon as one remote peer was found, the node knows also the rest about the topology. This approach fits quite well in a cloud scenario where new nodes/containers are often created and destroyed.
A Short Introduction to Vert.X
This in-memory data grid approach is used by Vert.x (by the help of Hazelcast), a toolkit for reactive applications on the JVM. Vert.x is event-driven, non-blocking, lightweight, and fast. It is polyglot and you can use it for many different scenarios from embedded to web framework.
In this article series, we will use Vert.x as a web framework and deploy so-called "Verticles" to handle REST-requests, static content and messages. A Verticle is comparable to a Servlet, while the Servlet-request will be handled in a request thread (taken from a pool), each Verticle instance has its own event-loop thread, which should not be blocked. Since not all Java APIs are non-blocking, there are ways to execute blocking code inside Verticles or to deploy the instances in a worker thread mode.
Create a Verticle
A Verticle Class extends an AbstractVerticle:
public class MyVerticle extends AbstractVerticle {
    @Override
    public void start(Future<Void> start) throws Exception {
    start.complete();
    }
}
Optionally you can overwrite the *start* method and complete the deployment manually. This gives you the ability to coordinate other tasks during startup, with the goal to finish the whole deployment when other asynchronous tasks are done.
Deploy a Verticle
The deployment of a Verticle is very easy. During development you may prefer to add a *main* method to deploy the Verticle:
public static void main(String[] args) {
        // simple deploy
Vertx.vertx().deployVerticle(MyVerticle.class.getName());

        // or with options and 10 instances
Vertx.vertx().
deployVerticle(MyVerticle.class.getName(),new DeploymentOptions().
setConfig(new JsonObject().
put("foo", "bar")).setInstances(10));
 }
Since we need the clustered environment in this article series, the deployment looks like this:
public static void main(String[] args) {
    Vertx.clusteredVertx(new VertxOptions().setClustered(true), cluster -> {
        if (cluster.succeeded()) {
            final Vertx result = cluster.result();
            result.deployVerticle(UsersReadFromMongo.class.getName());
        }
    }
}
Once the development is finished, you typically create a fat-jar (using maven shade) and deploy it by using command line:
java -jar MyVerticle.jar -instances=4 -clusterUsing the Event Bus
The event bus is the nervous system of Vert.x, and each Vert.x instance creates one single event bus instance. The event bus allows different parts of your application to communicate with each other irrespective of what language they are written in, and whether they’re in the same Vert.x instance, or in a different one. In clustered mode, the event bus forms a distributed peer-to-peer messaging system spanning multiple server nodes and multiple browsers.
To register an event handler in Vert.x, we can do following:
EventBus eb = vertx.eventBus();
eb.consumer("my.endpoit.one", message -> {
    System.out.println("I have received a message: " + message.body());
});
This code can be embedded in any Java application, but, be aware that the handler will be executed on the event loop thread of Vert.x (UI, transactions,…).
The event bus supports publish/subscribe, but also point to point / request-response messaging. Messages are published to an address and routed to one of the registered handlers (in case of p2p). If more than one handler is registered, a single handler will be selected by a non-strict round robin mechanism. Optionally you can define a reply handler when sending a message, so the receiver can reply directly.
The Receiver
EventBus eb = vertx.eventBus();
eb.consumer("my.endoit.one", message -> {
  message.reply(„hello“);
});
The Sender
eventBus.send("my.endoit.one", „Hi!“, ar -> {
  if (ar.succeeded()) {
    System.out.println("Received reply: " + ar.result().body());
  }
});
Create a REST Service Endpoint
In Vert.x, you can easily create different types of sockets (TCP, UDP, and HTTP(S)). For a REST service, we need to create a HTTP server to handle all requests directly. Because this might be quite low-level to work with, we use the Vert.x-Web extension to define REST services in Vert.x:
    @Override
    public void start(Future<Void> startFuture) throws Exception {
        Router router = Router.router(vertx);
        // define some REST API
        router.get("/api/users/:id").handler(handler -> {
            String id= handler.request().getParam("id");
            handler.response().end("OK");
        });
        vertx.createHttpServer().
              requestHandler(router::accept).
              listen(8080,"0.0.0.0");
        startFuture.complete();
    }
Bring it all Together
Now that we have learned some basics of Vert.x (needed for this article), we create three Maven projects for the Read-, Write-, and Gateway-Verticle (or clone the complete code from here). You can create a Vert.x project by using a maven *java quickstart project* like this:
mvn archetype:create
    -DgroupId=org.jacpfx.demo
    -DartifactId=read
    -DarchetypeArtifactId=maven-archetype-quickstart
Now add following dependencies:
<dependencies>
        <dependency>
            <groupId>io.vertx</groupId>
            <artifactId>vertx-mongo-client</artifactId>
            <version>${vertx.version}</version>
        </dependency>
        <dependency>
            <groupId>io.vertx</groupId>
            <artifactId>vertx-hazelcast</artifactId>
            <version>${vertx.version}</version>
        </dependency>
        <dependency>
            <groupId>io.vertx</groupId>
            <artifactId>vertx-core</artifactId>
            <version>${vertx.version}</version>
        </dependency>
        <dependency>
            <groupId>io.vertx</groupId>
            <artifactId>vertx-web</artifactId>
            <version>${vertx.version}</version>
        </dependency>
    </dependencies>
    <build>
        <plugins>
            <plugin>
                <groupId>org.apache.maven.plugins</groupId>
                <artifactId>maven-shade-plugin</artifactId>
                <version>2.3</version>
                <executions>
                    <execution>
                        <phase>package</phase>
                        <goals>
                            <goal>shade</goal>
                        </goals>
                        <configuration>
                            <transformers>
                                <transformer
                                      implementation="org.apache.maven.plugins.shade.resource.ManifestResourceTransformer">
                                    <manifestEntries>
                                        <Main-Class>io.vertx.core.Launcher</Main-Class>
                                        <Main-Verticle>org.jacpfx.demo.service.ReadVerticle</Main-Verticle>
                                    </manifestEntries>
                                </transformer>
                            </transformers>
                            <artifactSet/>
                            <outputFile>${project.build.directory}/${project.artifactId}-fat.jar
                            </outputFile>
                        </configuration>
                    </execution>
                </executions>
            </plugin>
        </plugins>
    </build>
Create the ReadVerticle
The *ReadVerticle* uses a Vert.x MongoDB-Client to access the user data. Furthermore, it defines two consumers to retrieve all users and users by id. We simply pass the user ID, retrieved from the REST call, and pass it inside the message body as a string to the *ReadVerticle*. In a more sophisticated example, you should use a transfer object and pass JSON or binary values.
public class ReadVerticle extends AbstractVerticle {
    private MongoClient mongo;


    @Override
    public void start(Future<Void> startFuture) throws Exception {
        mongo = …;
        vertx.eventBus().consumer("/api/users", getAllUsers());
        vertx.eventBus().consumer("/api/users/:id", getUserById());
        startFuture.complete();
    }

…
    private Handler<Message<Object>> getUserById() {
        return handler -> {
            final String id = handler.body().toString();
            mongo.findOne("users", new JsonObject().put("_id", id), null, lookup -> getDBResultAndReply(handler, lookup));
        };
    }

    private void getDBResultAndReply(Message<Object> handler, AsyncResult<JsonObject> lookup) {
        if (lookup.failed()) {
            handler.fail(500, "lookup failed");
            return;
        }
        JsonObject user = lookup.result();
        if (user == null) {
            handler.fail(404, "no user found");
        } else {
            handler.reply(user.encode());
        }
    }

}
The *getDBResultAndReply* methods are called when the MongoDB search operation is finished. If no result was found or the lookup failed, we respond with an error reply (500 or 404) to the caller, otherwise we reply with a message containing the requested User.
Build the Gateway and Add the UI
The *GatewayVerticle* serves the static content (AngularJS) and provides a REST API, used by the front end. All REST requests are passed from the gateway to the Read- / Write-Verticle. The response from those Verticles will be written to the REST response. Keep in mind that Vert.x is reactive, so you define handlers, which are called on a specific event, while the entire process is non-blocking (no active waiting).
public class GatewayVerticle extends AbstractVerticle {

    @Override
    public void start(Future<Void> startFuture) throws Exception {
        Router router = Router.router(vertx);
        // define some REST API
        router.get("/api/users/:id").handler(this::getUserById);
…
        // enable static contant handling
       router.route().handler(StaticHandler.create());
   vertx.createHttpServer().
   requestHandler(router::accept).
   listen(9090,"0.0.0.0");

        startFuture.complete();
    }

    private void getUserById(RoutingContext ctx) {
       // route REST request to event bus
        vertx.eventBus().
        send("/api/users/:id", ctx.request().getParam("id"),
        responseHandler -> defaultResponse(ctx, responseHandler));
    }
…
    private void defaultResponse(RoutingContext ctx, AsyncResult<Message<String>> responseHandler) {
        if (responseHandler.failed()) {
            ctx.fail(500);
        } else {
           // respond to REST request
            final Message<String> result = responseHandler.result();
            ctx.response().end(result.body());
        }
    }
}
With *router.route().handler(StaticHandler.create());* we tell Vert.x to serve all static contents from the *webroot* folder, typically located in *src/main/resources*. The AngularJS application itself uses relative paths to access the REST endpoints. If your UI runs from a different host you can define a CORSE handler in Vert.x too.
The interesting part here is the *defaultResponse* method. It checks whether the event bus request fails or succeeds. On a success, you pass the result message to the REST response. On an error, you return an HTTP 500 response;
But what is the error case here? Remember the error response we defined in the *ReadVerticle* when the MongoDB lookup fails or no result was found? In this case, the responseHandler here would fail, and you return an HTTP 500 response. The other case (relevant for cloud deployments) is that no consumer was registered in the cluster (or the node is not accessible). In that case, then the responseHandler would also fail.
To summarize it, we can handle all failures starting from a MongoDB "connection error", "no results error," to "no service available error." It is up to you to decide what you do with the ability to handle those errors. Remember, resilient means not only the capability technical wise, it means you must know what you want to do instead.
Run all Verticles in a Local Cluster
Now that we’ve finished the implementation (or cloned it from GitHub), we want to run the application and all the services. For local testing, I assume you have a running MongoDB and built all three projects with *mvn clean package*. If you cloned the GitHub repo you can try the *main* method to start each verticle. If you prefer the command line, do following:
cd frontend-verticle && mvn clean package && java -jar target/frontend-verticle-fat.jar -cluster -conf local.json The parameter *-conf local.json* is specific to this showcase to handle the local MongoDB access. If you have configured the MongoDB connection on your own, you don’t have to specify this. The *-cluster* parameter activates the cluster deployment in Vert.x, so *Hazelcast* will be activated, using multicast to find other nodes in the network.
When all your Verticles are started, you should see a log output like this:
Members [3] {
    Member [172.20.46.23]:5702
    Member [172.20.46.23]:5701
    Member [172.20.46.23]:5703 this
}
In this log output, we see, that Hazelcast has found three node members (the gateway, the read-, and the write-Verticle). Now you can open the browser and test the application (http://localhost:8181).
As long as you are operating in a multicast-enabled network, you do not need to provide additional configurations to run Vert.x/Hazelcast in a clustered setup.
In container environments like Kubernetes multicast is not always available, so you have to provide additional steps to run this demo. In part two, I will proceed with a brief introduction of Hazelcast and Kubernetes and show all steps to run this demo in Kubernetes.
Opinions expressed by DZone contributors are their own.
Comments