Exploring Real-Time Data Ingestion Into Snowflake Using CockroachDB, Redpanda, and Kafka Connect
Explore Kafka Connect as a solution to stream changefeeds into Snowflake for greater control over how messages are delivered to Snowflake.
Join the DZone community and get the full member experience.
Join For Free- Emitting Protocol Buffers with CockroachDB CDC Queries
- Using CockroachDB CDC with Apache Pulsar
- Using CockroachDB CDC with Azure Event Hubs
- SaaS Galore: Integrating CockroachDB with Confluent Kafka, FiveTran, and Snowflake
- Using CockroachDB CDC with Confluent Cloud Kafka and Schema Registry
- CockroachDB CDC using Minio as cloud storage sink
- CockroachDB CDC using Hadoop Ozone S3 Gateway as cloud storage sink
This article builds upon the previous discussion in "Tour of Snowflake ingestion using CockroachDB and Redpanda Connect," where we investigated the process of streaming changefeeds from CockroachDB to Snowflake using Redpanda Connect and Snowpipe in batch mode. Here, we will shift our focus to Kafka Connect and demonstrate how both batch and streaming modes can be utilized for data ingestion into Snowflake.
- Deploy a CockroachDB cluster with enterprise changefeeds
- Deploy Snowflake
- Deploy Kafka Connect
- Verify
- Conclusion
Start by either launching a CockroachDB instance or utilizing a managed service.
- To enable CDC, execute the following commands:
SET CLUSTER SETTING cluster.organization = '<organization name>';
SET CLUSTER SETTING enterprise.license = '<secret>';
SET CLUSTER SETTING kv.rangefeed.enabled = true;
- Verify that changefeeds are enabled:
SHOW CLUSTER SETTING kv.rangefeed.enabled;
If the value is false, update it to true.
- Create a source table:
CREATE TABLE cockroachdb (
     id INT PRIMARY KEY,
     value STRING DEFAULT md5(random()::text),
     created_at TIMESTAMPTZ DEFAULT now(),
     updated_at TIMESTAMPTZ DEFAULT NULL);
- Insert random data:
INSERT INTO cockroachdb SELECT
   (generate_series(1, 10000));
- Update a row:
UPDATE cockroachdb SET value = 'UPDATED', updated_at = now() WHERE id = 1;
- Create a changefeed job pointing to a local instance of Redpanda:
CREATE CHANGEFEED FOR TABLE cockroachdb INTO 'kafka://redpanda:29092';
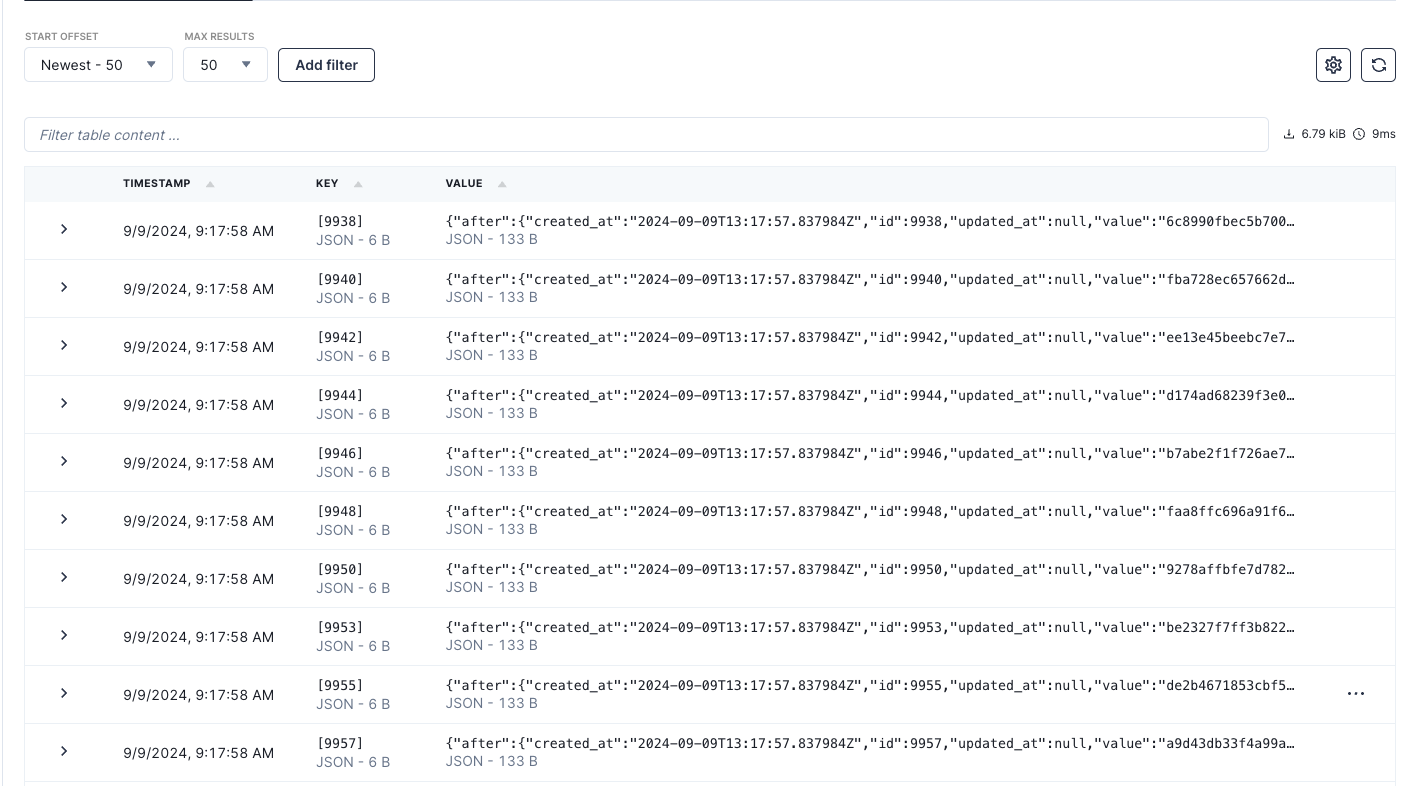
- Inspect the data:
SELECT * FROM cockroachdb LIMIT 5;
  id |              value               |          created_at           |          updated_at
-----+----------------------------------+-------------------------------+--------------------------------
   1 | UPDATED                          | 2024-09-09 13:17:57.837984+00 | 2024-09-09 13:17:57.917108+00
   2 | 27a41183599c44251506e2971ba78426 | 2024-09-09 13:17:57.837984+00 | NULL
   3 | 3bf8bc26a750a15691ec4d7ddbb7f5e5 | 2024-09-09 13:17:57.837984+00 | NULL
   4 | b8c5786e8651ddfb3a68eabeadb52f2e | 2024-09-09 13:17:57.837984+00 | NULL
   5 | 3a24df165773639ce89d0d877e7103b7 | 2024-09-09 13:17:57.837984+00 | NULL
(5 rows)
The next step is to set up the Snowflake Kafka connector.
- Create a database and schema for outputting changefeed data:
USE ROLE SYSADMIN;
CREATE OR REPLACE DATABASE KAFKADB;
CREATE OR REPLACE SCHEMA kafka_schema;
Follow the Snowflake documentation to configure the Kafka connector.
- Create the necessary tables:
create or replace table kafkatb_batch(
    RECORD_METADATA VARIANT,
    RECORD_CONTENT VARIANT
);

create or replace table kafkatb_streaming(
    RECORD_METADATA VARIANT,
    RECORD_CONTENT VARIANT
);
- Set up roles and permissions:
-- Use a role that can create and manage roles and privileges.
USE ROLE securityadmin;

-- Create a Snowflake role with the privileges to work with the connector.
CREATE OR REPLACE ROLE kafka_connector_role_1;

-- Grant privileges on the database.
GRANT USAGE ON DATABASE kafkadb TO ROLE kafka_connector_role_1;

-- Grant privileges on the schema.
GRANT USAGE ON SCHEMA KAFKADB.kafka_schema TO ROLE kafka_connector_role_1;
GRANT CREATE TABLE ON SCHEMA KAFKADB.kafka_schema TO ROLE kafka_connector_role_1;
GRANT CREATE STAGE ON SCHEMA KAFKADB.kafka_schema TO ROLE kafka_connector_role_1;
GRANT CREATE PIPE ON SCHEMA KAFKADB.kafka_schema TO ROLE kafka_connector_role_1;

-- Only required if the Kafka connector will load data into an existing table.
GRANT OWNERSHIP ON TABLE KAFKADB.KAFKA_SCHEMA.kafkatb_batch TO ROLE kafka_connector_role_1;
GRANT OWNERSHIP ON TABLE KAFKADB.KAFKA_SCHEMA.kafkatb_streaming TO ROLE kafka_connector_role_1;

-- Grant the custom role to an existing user.
GRANT ROLE kafka_connector_role_1 TO USER username;

-- Set the custom role as the default role for the user.
-- If you encounter an 'Insufficient privileges' error, verify the role that has the OWNERSHIP privilege on the user.
ALTER USER username SET DEFAULT_ROLE = kafka_connector_role_1;
Ensure you follow the documentation for setting up key pair authentication for the Snowflake Kafka connector.
- Run Redpanda using Docker Compose.
docker compose -f compose-redpandadata.yaml up -d
- Once up, navigate to the Redpanda Console.
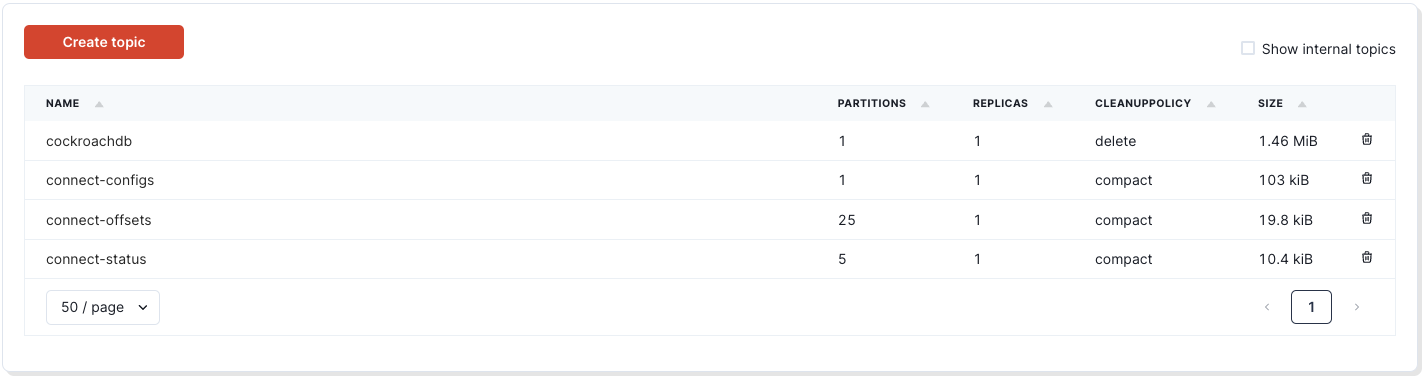
- Click into the
cockroachdbtopic:
- Install the Snowflake Kafka connector:
confluent-hub install --no-prompt snowflakeinc/snowflake-kafka-connector:latest
- Use the following configuration for Kafka Connect in distributed mode, saved as
connect-distributed.properties:
bootstrap.servers=172.18.0.3:29092
group.id=connect-cluster
key.converter=org.apache.kafka.connect.json.JsonConverter
value.converter=org.apache.kafka.connect.json.JsonConverter
key.converter.schemas.enable=true
value.converter.schemas.enable=true
offset.storage.topic=connect-offsets
offset.storage.replication.factor=1
config.storage.topic=connect-configs
config.storage.replication.factor=1
status.storage.topic=connect-status
status.storage.replication.factor=1
offset.flush.interval.ms=10000
plugin.path=/usr/share/confluent-hub-components,plugin.path=/usr/local/share/kafka/plugins,/usr/share/filestream-connectors
- Deploy Kafka Connect in distributed mode:
./kafka-connect/bin/connect-distributed.sh connect-distributed.properties
- Register the Snowflake connector with the following configuration, saved as
snowflake-sink-batch.json:
{
    "name":"snowflake-sink-batch",
    "config":{
      "connector.class":"com.snowflake.kafka.connector.SnowflakeSinkConnector",
      "tasks.max":"8",
      "topics":"cockroachdb",
      "snowflake.topic2table.map": "cockroachdb:kafkatb_batch",
      "buffer.count.records":"10000",
      "buffer.flush.time":"60",
      "buffer.size.bytes":"5000000",
      "snowflake.url.name":"account-name:443",
      "snowflake.user.name":"username",
      "snowflake.private.key":"private-key",
      "snowflake.private.key.passphrase":"",
      "snowflake.database.name":"kafkadb",
      "snowflake.schema.name":"kafka_schema",
      "snowflake.role.name":"kafka_connector_role_1",
      "key.converter":"org.apache.kafka.connect.storage.StringConverter",
      "value.converter":"com.snowflake.kafka.connector.records.SnowflakeJsonConverter"
    }
  }
- Publish the connector configuration:
curl -d @"snowflake-sink-batch.json" -H "Content-Type: application/json" -X POST http://kafka-connect:8083/connectors
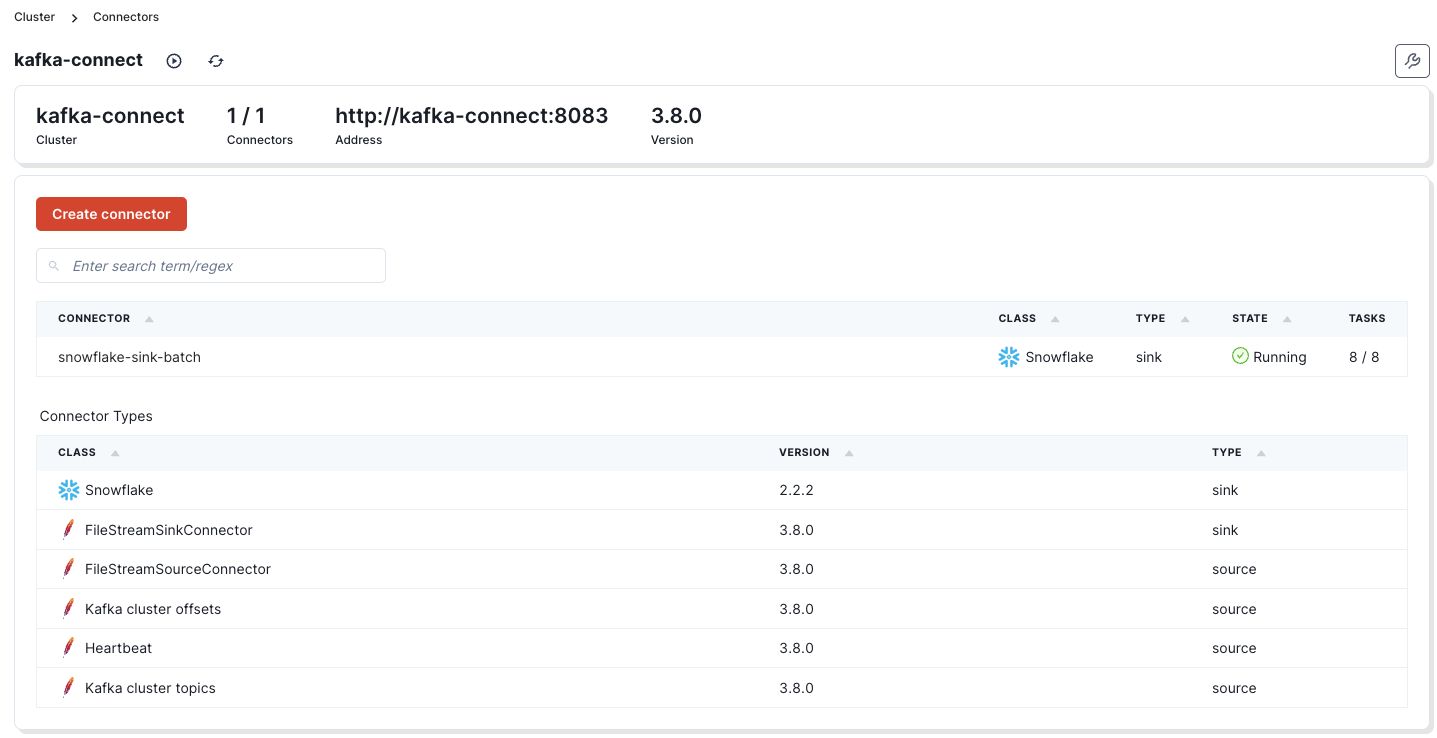
- Verify the connector in the Kafka Connect UI and in the Kafka Connect section of the Redpanda Console.
If you click on the snowflake-sink-batch sink, you can see additional information.
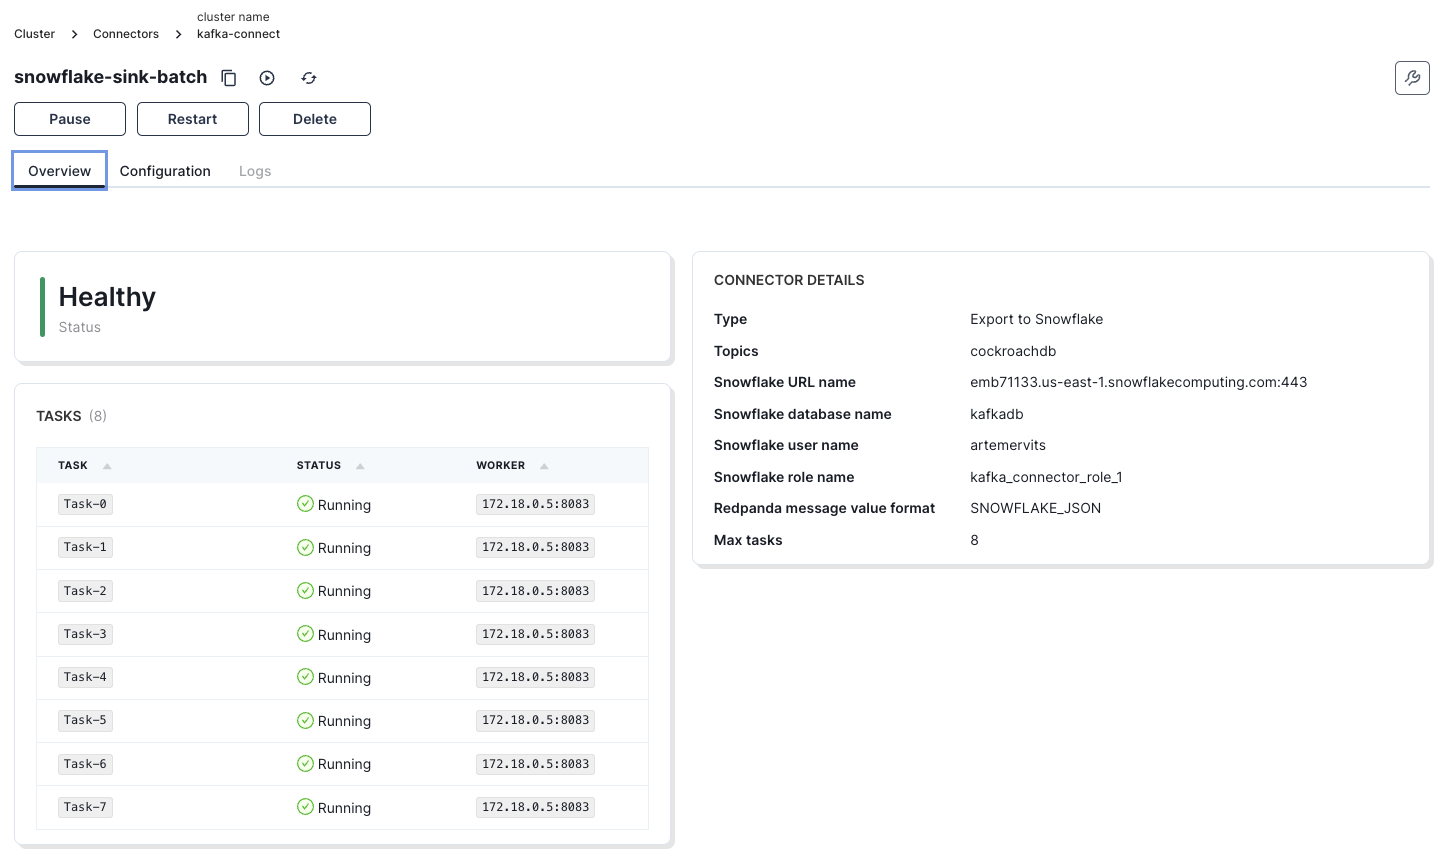
The comprehensive steps needed to set this up are thoroughly outlined in the tutorial.
Data will now flow into Snowflake in batch mode, with updates occurring every 60 seconds as determined by the buffer.flush.time parameter.
You can now query the data in Snowflake:
select * from kafkatb_batch limit 5;
If everything is configured correctly, the data from CockroachDB should be available in Snowflake in real-time or in batches, depending on your configuration.
record_metadata:
{
  "CreateTime": 1725887877966,
  "key": "[3]",
  "offset": 30007,
  "partition": 0,
  "topic": "cockroachdb"
}
record_content:
{
  "after": {
    "created_at": "2024-09-09T13:17:57.837984Z",
    "id": 1,
    "updated_at": "2024-09-09T13:17:57.917108Z",
    "value": "UPDATED"
  }
}
- The next step is to configure the connector in streaming mode. First, stop the current connector with the following command:
curl -X DELETE http://localhost:8083/connectors/snowflake-sink-batch
- The updated connector configuration will appear as follows:
{
    "name":"snowflake-sink-streaming",
    "config":{
      "connector.class":"com.snowflake.kafka.connector.SnowflakeSinkConnector",
      "tasks.max":"8",
      "topics":"cockroachdb",
      "snowflake.topic2table.map": "cockroachdb:kafkatb_streaming",
      "buffer.count.records":"10000",
      "buffer.flush.time":"10",
      "buffer.size.bytes":"5000000",
      "snowflake.url.name":"<snowflake-account>:443",
      "snowflake.user.name":"username",
      "snowflake.private.key":"private-key",
      "snowflake.private.key.passphrase":"",
      "snowflake.database.name":"kafkadb",
      "snowflake.schema.name":"kafka_schema",
      "snowflake.role.name":"kafka_connector_role_1",
      "key.converter":"org.apache.kafka.connect.storage.StringConverter",
      "value.converter":"org.apache.kafka.connect.json.JsonConverter",
      "value.converter.schemas.enable":"false",
      "snowflake.ingestion.method": "SNOWPIPE_STREAMING",
      "errors.log.enable":"true",
      "schemas.enable":"false"

    }
  }
Take note of the snowflake.ingestion.method parameter. This feature removes the need to wait 60 seconds to push data to Snowflake, allowing us to reduce the buffer.flush.time to 10 seconds.
- To deploy the connector, use the following command:
curl -d @"snowflake-sink-streaming.json" -H "Content-Type: application/json" -X POST http://kafka-connect:8083/connectors
Shortly after deployment, the data will be available in the Snowflake table.
The previous examples demonstrated how data was ingested into predefined Snowflake tables. The following method will automatically infer the schema from the Kafka messages:
  {
    "name":"snowflake-sink-streaming-schematized",
    "config":{
      "connector.class":"com.snowflake.kafka.connector.SnowflakeSinkConnector",
      "tasks.max":"8",
      "topics":"cockroachdb",
      "snowflake.topic2table.map": "cockroachdb:kafkatb_streaming_schematized",
      "buffer.count.records":"10000",
      "buffer.flush.time":"10",
      "buffer.size.bytes":"5000000",
      "snowflake.url.name":"<snowflake-account>:443",
      "snowflake.user.name":"username",
      "snowflake.private.key":"private-key",
      "snowflake.private.key.passphrase":"",
      "snowflake.database.name":"kafkadb",
      "snowflake.schema.name":"kafka_schema",
      "snowflake.role.name":"kafka_connector_role_1",
      "key.converter":"org.apache.kafka.connect.storage.StringConverter",
      "value.converter":"org.apache.kafka.connect.json.JsonConverter",
      "value.converter.schemas.enable":"false",
      "snowflake.ingestion.method": "SNOWPIPE_STREAMING",
      "errors.log.enable":"true",
      "schemas.enable":"false",
      "snowflake.enable.schematization": "TRUE"
    }
  }
- Save this as
snowflake-sink-streaming-schematized.jsonand deploy it using:
curl -d @"snowflake-sink-streaming-schematized.json" -H "Content-Type: application/json" -X POST http://kafka-connect:8083/connectors
- Upon deployment, a new table will be created in Snowflake with the following schema:
create or replace TABLE KAFKADB.KAFKA_SCHEMA.KAFKATB_STREAMING_SCHEMATIZED (
    RECORD_METADATA VARIANT COMMENT 'created by automatic table creation from Snowflake Kafka Connector',
    AFTER VARIANT COMMENT 'column created by schema evolution from Snowflake Kafka Connector'
);
- To inspect the table, use the following query:
SELECT after AS record FROM kafkatb_streaming_schematized LIMIT 5;
Sample result:
{
  "created_at": "2024-09-09T16:39:34.993226Z",
  "id": 18712,
  "updated_at": null,
  "value": "0d6bd8a4a790aab95c97a084d17bd820"
}
- We can flatten the data for easier manipulation using the following query:
USE ROLE securityadmin;
GRANT CREATE VIEW ON SCHEMA KAFKADB.kafka_schema TO ROLE kafka_connector_role_1;

USE ROLE kafka_connector_role_1;
USE DATABASE KAFKADB;
USE SCHEMA KAFKA_SCHEMA;
CREATE VIEW v_kafkatb_batch_flattened AS
    SELECT PARSE_JSON(record_content:after):id AS ID,
        PARSE_JSON(record_content:after):value AS VALUE,
        PARSE_JSON(record_content:after):created_at AS CREATED_AT,
        PARSE_JSON(record_content:after):updated_at AS UPDATED_AT
    FROM kafkatb_batch;

SELECT * FROM v_kafkatb_batch_flattened limit 1;
ID    VALUE        CREATED_AT                      UPDATED_AT
1   "UPDATED"    "2024-09-09T13:17:57.837984Z"    "2024-09-09T13:17:57.917108Z"
- Alternatively, for the schematized table, the view creation statement would be:
CREATE VIEW v_kafkatb_streaming_schematized_flattened AS
    SELECT PARSE_JSON(after):id AS ID,
        PARSE_JSON(after):value AS VALUE,
        PARSE_JSON(after):created_at AS CREATED_AT,
        PARSE_JSON(after):updated_at AS UPDATED_AT
    FROM kafkatb_streaming_schematized;
- To verify the data flow, make an update in CockroachDB and check for the changes in Snowflake:
UPDATE cockroachdb
  SET value = 'UPDATED', updated_at = now()
WHERE
  id = 20000;
- In Snowflake, execute the following query to confirm the update:
SELECT * FROM v_kafkatb_streaming_schematized_flattened where VALUE = 'UPDATED';
Sample result:
ID    VALUE        CREATED_AT                      UPDATED_AT
20000    "UPDATED"    "2024-09-09T18:15:13.460078Z"    "2024-09-09T18:16:56.550778Z"
19999    "UPDATED"    "2024-09-09T18:15:13.460078Z"    "2024-09-09T18:15:27.365272Z"
The architectural diagram is below:
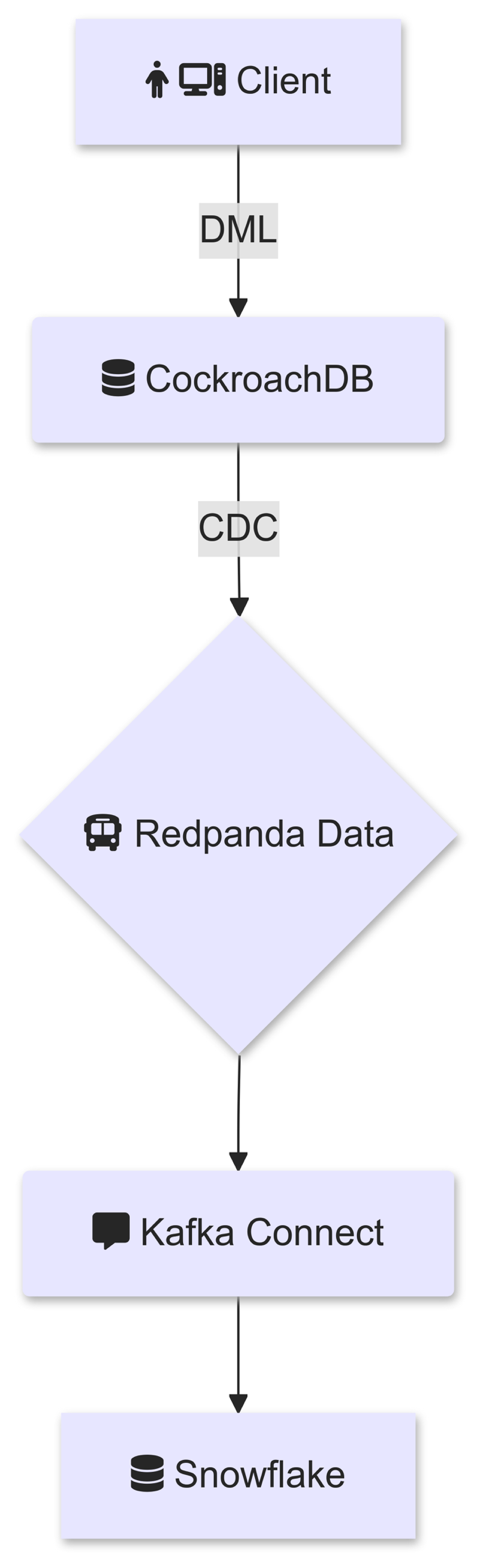
In this process, we explored Kafka Connect as a solution to stream changefeeds into Snowflake. This approach provides greater control over how messages are delivered to Snowflake, leveraging the Snowflake Kafka Connector with Snowpipe Streaming for real-time, reliable data ingestion.
Published at DZone with permission of Artem Ervits. See the original article here.
Opinions expressed by DZone contributors are their own.
Comments