Tour of Snowflake Ingestion Using CockroachDB and Redpanda Connect
This is an exploratory article delving into various ways to ingest real-time data into Snowflake and the levels of difficulty and effort required.
Join the DZone community and get the full member experience.
Join For FreePrevious Articles on Snowflake
Previous Articles on CockroachDB CDC
- Using CockroachDB CDC with Apache Pulsar
- Using CockroachDB CDC with Azure Event Hubs
- SaaS Galore: Integrating CockroachDB with Confluent Kafka, FiveTran, and Snowflake
- Using CockroachDB CDC with Confluent Cloud Kafka and Schema Registry
- CockroachDB CDC using Minio as cloud storage sink
- CockroachDB CDC using Hadoop Ozone S3 Gateway as cloud storage sink
Motivation
I work with financial services clients, and it's common to encounter a need for streaming changes in the operational data store into a data warehouse or a data lake. A former colleague recently reached out for advice on the fastest and most efficient way to load trade data into Snowflake. I've come up with at least three methods, which I will explore in a follow-up series of articles. However, I've decided to first explore Redpanda Connect, a solution that has recently caught my attention. This is by no means a conclusive guide on how changefeed data must be loaded into Snowflake; we're merely exploring the possibilities and discussing the pros and cons in later articles.
CockroachDB changefeeds are an enterprise feature and require a license. In this tutorial, I'm using a free-to-start version of CockroachDB Serverless, which has enterprise changefeeds enabled.
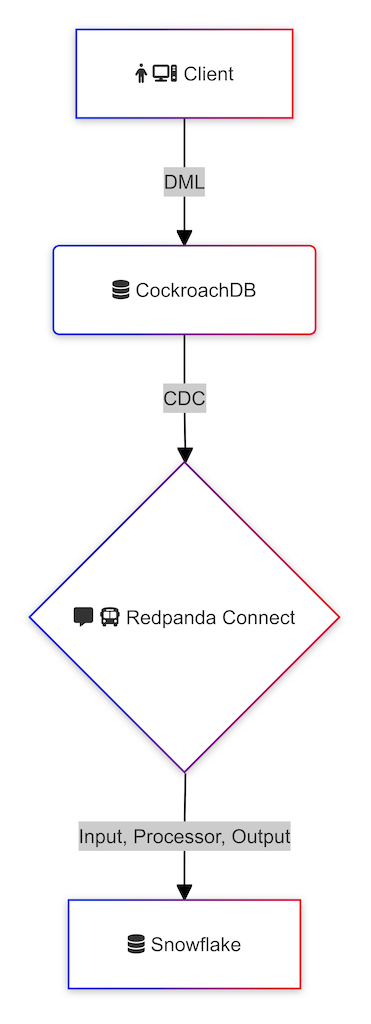
High-Level Steps
- Deploy a CockroachDB cluster with enterprise changefeeds
- Deploy Redpanda Connect
- Deploy Snowflake
- Verify
- Conclusion
Step-By-Step Instructions
Deploy a CockroachDB Cluster With Enterprise Changefeeds
Start an instance of CockroachDB or use the managed service.
To enable CDC we need to execute the following commands:
SET CLUSTER SETTING cluster.organization = '<organization name>';

SET CLUSTER SETTING enterprise.license = '<secret>';

SET CLUSTER SETTING kv.rangefeed.enabled = true;
I am using CockroachDB Serverless and the above steps are not necessary. You may confirm whether the changefeeds are indeed enabled using the following command:
SHOW CLUSTER SETTING kv.rangefeed.enabled;
If the value is false, change it to true.
Generate sample data:
CREATE TABLE office_dogs (
     id INT PRIMARY KEY,
     name STRING);

INSERT INTO office_dogs VALUES
   (1, 'Petee'),
   (2, 'Carl');

UPDATE office_dogs SET name = 'Petee H' WHERE id = 1;
We've populated the table and then updated a record. Let's add more data to make it interesting:
INSERT INTO office_dogs SELECT generate_series(3, 10000), md5(random()::string);
SELECT * FROM office_dogs LIMIT 5;
id,name
1,Petee H
2,Carl
3,6e19280ae649efffa7a58584c7f46032
4,5e4e897f008bb752c8edfa64a3aed356
5,abc0d898318d27f23a43060f89d62e34
SELECT COUNT(*) FROM office_dogs;
Deploy Redpanda Connect
I'm running Redpanda Connect in a Docker Compose file.
docker compose -f compose-redpanda.yaml up -d
The contents of the file are:
services:

  redpanda:
    container_name: redpanda-connect
    hostname: redpanda-connect
    image: docker.redpanda.com/redpandadata/connect
    volumes:
      - ./redpanda/connect.yaml:/connect.yaml
      - /Users/aervits/.ssh/rsa_key.pem:/rsa_key.pem
I will be using the connect.yaml file as the foundation to connect all the components in this article. For more detailed information, you can refer to the documentation provided by Redpanda.
The most basic configuration looks like so:
input:
  stdin: {}

pipeline:
  processors: []

output:
  stdout: {}
Since I'm using CockroachDB input, mine looks like this:
input:
  # CockroachDB Input
  label: ""
  cockroachdb_changefeed:
    dsn: postgresql://<user>:<password>@<cockroachdb-cluster>:<port>/<database>?sslmode=verify-full
    tls:
      skip_cert_verify: true
      #enable_renegotiation: false
      #root_cas: ""
      #root_cas_file: ""
      client_certs: []
    tables: [table_for_cdc] # No default (required)
    cursor_cache: "" # No default (optional)
    auto_replay_nacks: true

pipeline:
  processors: []

output:
  stdout: {}
Leave the pipeline and output as default.
For reference, I'm including the repo with my source code where you can reference the values.
If you have been following along, you may have noticed that I haven't started a changefeed job in CockroachDB. The cockroachdb_changefeed input directly subscribes to the table, which can be observed by examining the logs using the command docker logs redpanda-connect --follow. If you look at the connect.yaml file, the output is sent to stdout:
{"primary_key":"[9998]","row":"{\"after\": {\"id\": 9998, \"name\": \"0794a9d1c99e8e47ee4515be6e0d736f\"}}","table":"office_dogs"}
{"primary_key":"[9999]","row":"{\"after\": {\"id\": 9999, \"name\": \"c85a6b38154f7e3085d467d567141d45\"}}","table":"office_dogs"}
{"primary_key":"[10000]","row":"{\"after\": {\"id\": 10000, \"name\": \"aae9e0849fff8f47e0371a4c06fb255b\"}}","table":"office_dogs"}
The next step is to configure Snowflake. We are not going to look at the available processors today.
Deploy Snowflake
I'm using a Snowflake trial account. You get a generous credit which should be sufficient to complete this tutorial.
We need to create a database and a table where we will output the changefeed data.
CREATE OR REPLACE DATABASE FROM_COCKROACH;
CREATE OR REPLACE TABLE OFFICE_DOGS (RECORD variant);
We also need to create a user with key-pair authentication as we're going to be using the Snowpipe service.
openssl genrsa 2048 | openssl pkcs8 -topk8 -v2 des3 -inform PEM -out rsa_key.p8
We must use an encrypted key as Redpanda doesn't support unencrypted versions.
Generate a public key:
openssl rsa -in rsa_key.p8 -pubout -out rsa_key.pub
Lastly, generate a pem file from the private key:
openssl pkcs8 -in rsa_key.p8 -out rsa_key.pem
In Snowflake, alter the user to use the key pair generated in the previous step.
ALTER USER username SET rsa_public_key='MIIB...';
We can now populate the connect.yaml file with the required information for the snowflake_put output. This output type is for commercial use and requires a license, but since we're using it for demo purposes, we are able to proceed.
output:
  # Snowflake Output
  label: ""
  snowflake_put:
    account: <snowflake-account>
    user: <user>
    private_key_file: rsa_key.pem
    role: ACCOUNTADMIN
    database: <database>
    warehouse: <warehouse>
    schema: <schema>
    stage: "@%implicit_table_stage_name"
    path: "path"
    upload_parallel_threads: 4
    compression: NONE
    batching:
      count: 10
      period: 3s
      processors:
        - archive:
            format: json_array
    max_in_flight: 1
If we restart the compose environment and tail the logs, we can see the following:
level=info msg="Running main config from specified file" @service=benthos benthos_version=v4.32.1 path=/connect.yaml
level=info msg="Listening for HTTP requests at: http://0.0.0.0:4195" @service=benthos
level=info msg="Launching a Redpanda Connect instance, use CTRL+C to close" @service=benthos
level=info msg="Output type snowflake_put is now active" @service=benthos label="" path=root.output
level=info msg="Input type cockroachdb_changefeed is now active" @service=benthos label="" path=root.input
Let's look at the implicit table stage and observe if anything has changed.
list @%office_dogs
| dogs/f2f3cf47-d6bc-46f4-88f2-c82519b67481.json | 1312 | 30f709e4962bae9d10b48565d22e9f32 | Wed, 14 Aug 2024 18:58:43 GMT |
| dogs/f6adbf39-3955-4848-93c3-06f873a88078.json | 1312 | 28be7a619ef1e139599077e977ea130b | Wed, 14 Aug 2024 18:58:13 GMT |
| dogs/f8705606-eb07-400a-9ffe-da6834fa1a30.json | 1296 | 5afbdce0e8929fc38a2eb5e0f12b96d6 | Wed, 14 Aug 2024 18:57:29 GMT |
| dogs/f9e5c01a-7dda-4e76-840d-13b8a1e4946a.json | 1296 | 5480c01f1578f67afe2761c7619e9123 | Wed, 14 Aug 2024 18:57:32 GMT |
| dogs/fad4efe7-3f3f-48bc-bdb4-9f0310abcf4d.json | 1312 | 5942c6e2dbaef5ee257d4a9b8e68827d | Wed, 14 Aug 2024 18:58:04 GMT |
The files are ready to be copied into a table. Let's create a pipe:
CREATE OR REPLACE PIPE FROM_COCKROACH.PUBLIC.cockroach_pipe AUTO_INGEST = FALSE AS COPY INTO FROM_COCKROACH.PUBLIC.OFFICE_DOGS FROM (SELECT * FROM @%office_dogs) FILE_FORMAT = (TYPE = JSON COMPRESSION = AUTO STRIP_OUTER_ARRAY = TRUE);
The last remaining step is to refresh the pipe.
ALTER PIPE cockroach_pipe REFRESH;
| dogs/ff0871b1-6f49-43a4-a929-958d07f74046.json | SENT   |
| dogs/ff131d8d-3781-4cf6-8700-edd50dbb87de.json | SENT   |
| dogs/ff216da1-4f9d-4b37-9776-bcd559dd4a6f.json | SENT   |
| dogs/ff221430-4c3a-46be-bbc2-d335cc6cc9e3.json | SENT   |
| dogs/ffbd7d45-5084-4e36-8907-61874ac652b4.json | SENT   |
| dogs/fffb5fa6-23cc-4450-934a-29ccf01c67b9.json | SENT   |
Let's query the table in Snowflake:
SELECT * FROM OFFICE_DOGS LIMIT 5;
| {                                                                                       |
|   "primary_key": "[5241]",                                                              |
|   "row": "{\"after\": {\"id\": 5241, \"name\": \"5e0360a0d10d849afbbfa319a50bccf2\"}}", |
|   "table": "office_dogs"                                                                |
| }                                                                                       |
| {                                                                                       |
|   "primary_key": "[5242]",                                                              |
|   "row": "{\"after\": {\"id\": 5242, \"name\": \"62be250249afe74bfbc5dd356e7b0ad9\"}}", |
|   "table": "office_dogs"                                                                |
| }                                                                                       |
| {                                                                                       |
|   "primary_key": "[5243]",                                                              |
|   "row": "{\"after\": {\"id\": 5243, \"name\": \"7f286800a8a03e74938d09fdba52f869\"}}", |
|   "table": "office_dogs"                                                                |
| }                                                                                       |
| {                                                                                       |
|   "primary_key": "[5244]",                                                              |
|   "row": "{\"after\": {\"id\": 5244, \"name\": \"16a330b8f09bcd314f9760ffe26d0ae2\"}}", |
|   "table": "office_dogs"                                                                |
| }
We expect 10000 rows:
SELECT COUNT(*) FROM OFFICE_DOGS;
+----------+
| COUNT(*) |
|----------|
|    10000 |
+----------+
The data is in JSON format. Let's create a view and flatten the data out.
CREATE VIEW v_office_dogs AS
    SELECT PARSE_JSON(record:row):after:id::INTEGER AS id,
           PARSE_JSON(record:row):after:name::STRING AS name FROM OFFICE_DOGS;
Query the view:
SELECT * FROM v_office_dogs WHERE id < 6;
+----+----------------------------------+
| ID | NAME                             |
|----+----------------------------------|
|  1 | Petee H                          |
|  2 | Carl                             |
|  3 | 6e19280ae649efffa7a58584c7f46032 |
|  4 | 5e4e897f008bb752c8edfa64a3aed356 |
|  5 | abc0d898318d27f23a43060f89d62e34 |
+----+----------------------------------+
Verify
Let's make things a bit more interesting and delete data in CockroachDB.
DELETE FROM office_dogs WHERE name = 'Carl';
DELETE FROM office_dogs WHERE id = 1;
In Snowflake, let's refresh the pipe as of a few minutes ago:
ALTER PIPE cockroach_pipe REFRESH MODIFIED_AFTER='2024-08-14T12:10:00-07:00';
Notice there are a couple of files.
+------------------------------------------------+--------+
| File                                           | Status |
|------------------------------------------------+--------|
| dogs/2a4ee400-6b37-4513-97cb-097764a340bc.json | SENT   |
| dogs/8f5b5b69-8a00-4dbf-979a-60c3814d96b4.json | SENT   |
+------------------------------------------------+--------+
I must caution that if you run the REFRESH manually, you may cause duplicates in your Snowflake data. We will look at better approaches in a future article.
Let's look at the row count:
+----------+
| COUNT(*) |
|----------|
|    10002 |
+----------+
The removal process didn't properly update in Snowflake as anticipated; it recognized the deleted records but failed to mirror the state in CockroachDB. We need to incorporate additional logic to achieve this. This will be a task for another time.
Lastly, I would like to note that using Redpanda Connect as a compose file is optional. You have the option to run the Docker container by executing the following command:
docker run --rm -it -v ./redpanda/connect.yaml:/connect.yaml -v ./snowflake/rsa_key.pem:/rsa_key.pem docker.redpanda.com/redpandadata/connect run
Conclusion
Today, we explored Redpanda Connect as a means to deliver streaming changefeeds into Snowflake. We've only just begun to delve into this topic, and future articles will build upon the foundations laid today.
Published at DZone with permission of Artem Ervits. See the original article here.
Opinions expressed by DZone contributors are their own.
Comments