Flutter Theme Made Easy
Flutter provides you with a way to customize your app theme. It is extremely focused on material design, but you can still customize it to fit your needs.
Join the DZone community and get the full member experience.
Join For FreeFlutter provides you with a way to customize your app theme. It is extremely focused on material design, but you can still customize it to fit your needs.
The Problem
Flutter provides you with a great theme to let you customize your app. The problem is when you want to start getting out of material and customize your app theme. Most designers will want to customize the theme to fit their needs and tastes.
You create your theme directly without any factory. This means you will have many developers copy and paste colors throughout the app and the themeData file.
You can't switch the theme without restarting the app (dark/light?). You don't have a way to set different themes for different platforms. The good news is that we can fix all of this.
Handling Dark and Light Theme
Switching from light to dark mode should be easy.
The best way to do this is not to duplicate your theme but to create a factory that will create the theme from a color palette.
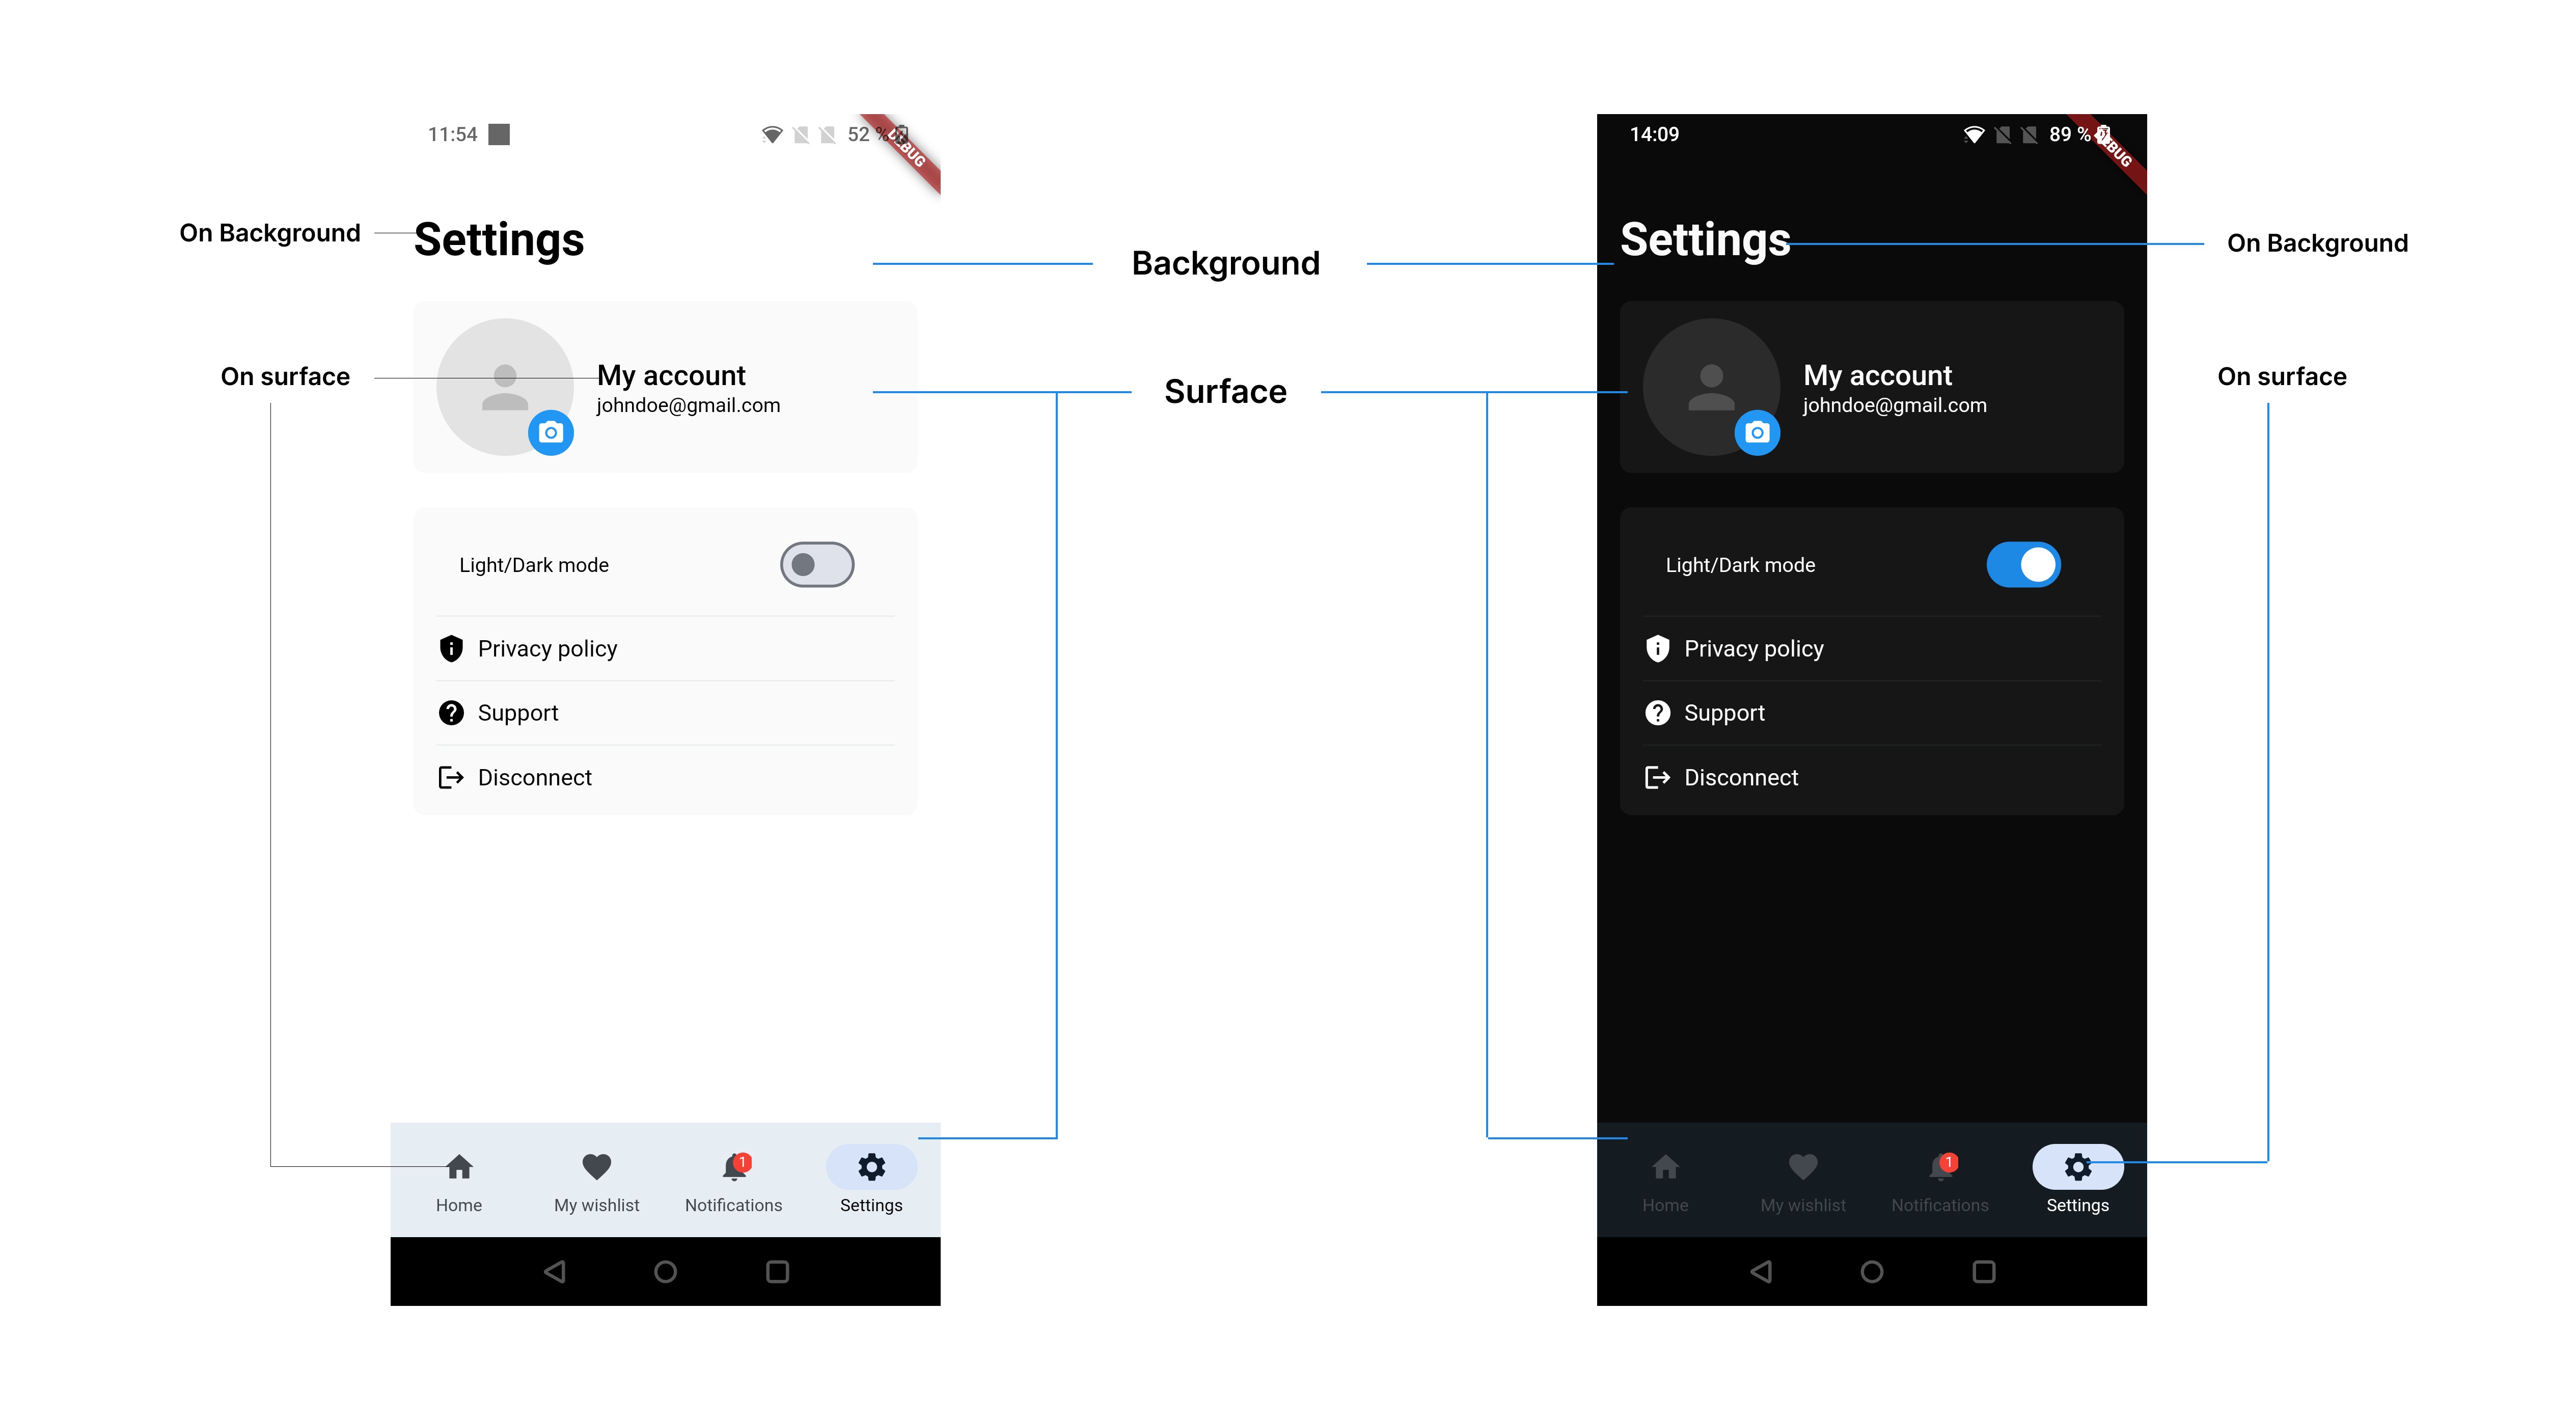
Flutter and Material provide you with a nice, logical way to handle an app theme — every color is an 'on' color. Meaning that if you have a white background, you should have a black text color.
Switching from light to dark should only rely on switching some colors.
You should not have to handle a case in your code.
Limit the Number of Colors
The more colors you have, the more difficult it will be to maintain your app. Simplicity is often the best way to go.
Instead of having a primary, secondary, accent, secondaryAccent, ... try making your app with one or two colors.
The more colors you incorporate, the more challenging it becomes to maintain your app. Simplicity is often the best approach. Instead of using primary, secondary, accent, secondaryAccent, and so forth, consider designing your app with just one or two colors.
(Please note that black, white, and greys are exceptions and are not considered as colors.)
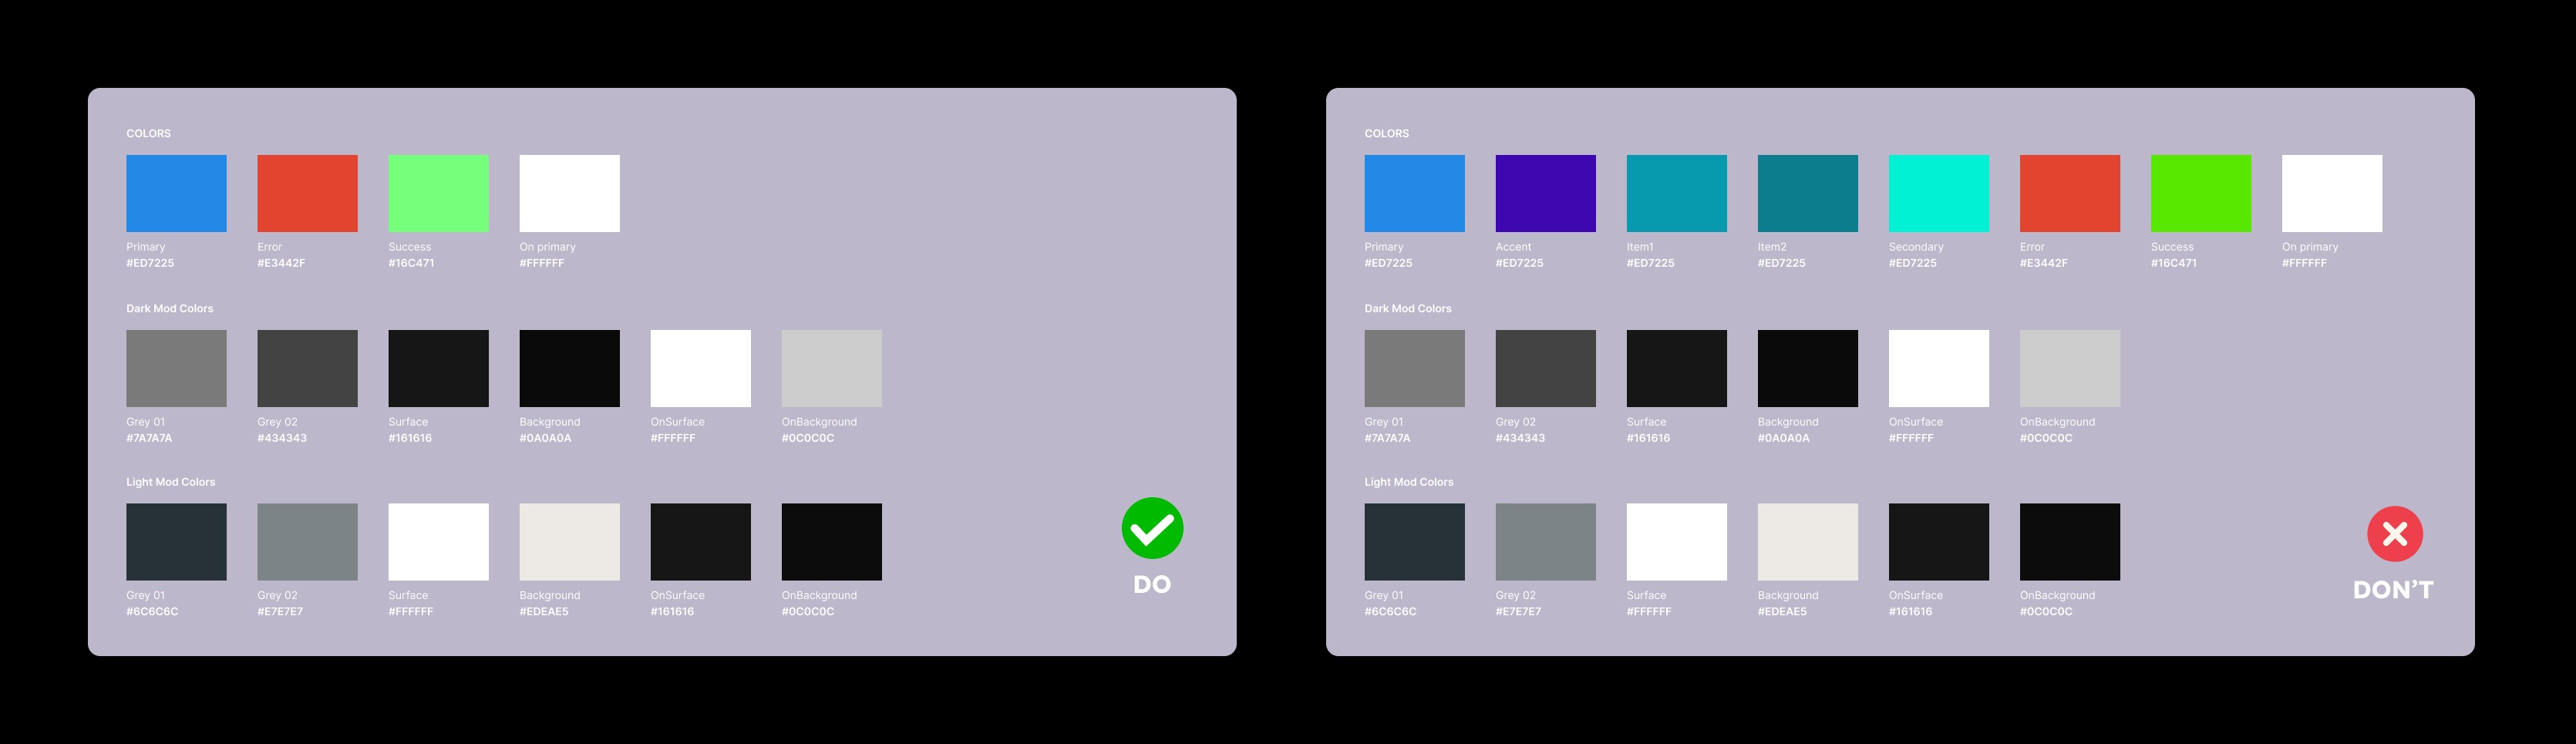
For example, you can check some of the most popular apps. Facebook, Instagram, Twitter, YouTube, etc... They don't use a lot of colors.
Creating a Theme Factory
As we want to create our theme for different platforms or different color palettes, we will create a factory.
abstract class ApparenceKitThemeDataFactory {
  const ApparenceKitThemeDataFactory();

  ApparenceKitThemeData build({
    required ApparenceKitColors colors,
    required ApparenceKitTextTheme defaultTextStyle,
  });
}
This factory will take a color palette and a default text theme and will create a theme.
The default text theme contains the default text style and fonts for all our text. As for the colors, I also recommend limiting the number of fonts you use.
Our designer at Apparence tends to limit his usage to two fonts. (There is some website that gives you inspirations for two fonts that go well together...)
Using Our Factory
Now that we have our factory, we can use it to create our theme.
class UniversalThemeFactory extends ApparenceKitThemeDataFactory {
  const UniversalThemeFactory();

  @override
  ApparenceKitThemeData build({
    required ApparenceKitColors colors,
    required ApparenceKitTextTheme defaultTextStyle,
  }) {
    return ApparenceKitThemeData(
      colors: colors,
      defaultTextTheme: defaultTextStyle,
      materialTheme: ThemeData(
        colorScheme: ColorScheme.fromSeed(seedColor: colors.primary).copyWith(
          surface: colors.surface,
          onSurface: colors.onSurface,
          background: colors.background,
          onBackground: colors.onBackground,
          primary: colors.primary,
          error: colors.error,
        ),
        elevatedButtonTheme: elevatedButtonTheme(
          colors: colors,
          textTheme: defaultTextStyle,
        ),
        inputDecorationTheme: inputDecorationTheme(
          colors: colors,
          textTheme: defaultTextStyle,
        ),
        textTheme: textTheme(
          colors: colors,
          defaultTextStyle: defaultTextStyle,
        ),
      ),
      ...
    );
As you can see, we are using the color palette and the default text theme to create our theme. Now, changing colors or text style won't be done here.
We have defined our own color palette and default text files separately.
Providing Our Theme Through the App
As we want to access our theme from anywhere in our app we will use an InheritedNotifier. This will allow us to access our theme from the BuildContext. But also to switch the mode of our theme without restarting the app.
/// We use this to access the theme from the BuildContext in all our widgets
/// We don't use riverpod here so we can get the theme from the context and regular widgets
class ThemeProvider extends InheritedNotifier<AppTheme> {
  const ThemeProvider({
    super.key,
    super.notifier,
    required super.child,
  });

  @override
  bool updateShouldNotify(covariant InheritedNotifier<AppTheme> oldWidget) {
    ...
  }

  static AppTheme of(BuildContext context) =>
      context.dependOnInheritedWidgetOfExactType<ThemeProvider>()!.notifier!;
}
Using Our Theme ThemeProvider
Now that we have our ThemeProvider we can use it in our app. It will be above our MaterialApp.
class MyApp extends StatelessWidget {
  const MyApp({
    super.key,
  });

  // This widget is the root of your application.
  @override
  Widget build(BuildContext context, WidgetRef ref) {
    return ThemeProvider(
      notifier: AppTheme.uniform(
        themeFactory: const UniversalThemeFactory(),
        lightColors: ApparenceKitColors.light(),
        darkColors: ApparenceKitColors.dark(),
        textTheme: ApparenceKitTextTheme.build(),
        defaultMode: ThemeMode.light,
      ),
      child: Builder(builder: (context) {
        return MaterialApp(
          title: 'Flutter Pro Starter Kit',
          initialRoute: 'home',
          theme: ThemeProvider.of(context).light,
          darkTheme: ThemeProvider.of(context).dark,
          themeMode: ThemeProvider.of(context).mode,
If you don't want to use dark mode, you can just remove it. This way, we can access our theme from anywhere in our app.
Using, for example:
ThemeProvider.of(context).currentOr still using the regular Theme.of(context)
Theme.of(context).textTheme.headline1Creating Theme Shortcuts
As we want to access our theme from anywhere in our app, we will create some shortcuts. This will allow us to access our theme from the BuildContext. But also to switch the mode of our theme without restarting the app.
extension ThemeExtension on BuildContext {
  // access the theme from anywhere in the app using context.theme
  ApparenceKitThemeData get theme => ThemeProvider.of(this).current;
  // access the color palette from anywhere in the app using context.colors
  ApparenceKitColors get colors => ThemeProvider.of(this).current.colors;
  // access the text theme from anywhere in the app using context.textTheme
  ApparenceKitTextTheme get textTheme => ThemeProvider.of(this).current.textTheme;
  // access the theme mode from anywhere in the app using context.themeMode
  ThemeMode get themeMode => ThemeProvider.of(this).mode;
  // toggle the theme mode from anywhere in the app using context.toggleTheme
  void toggleTheme() => ThemeProvider.of(this).toggle();
}
Conclusion
There are many things to say about handling themes from design to code.
Multiplatform theme, gradients, shadows,...
I hope this article will help you start creating a great multiplatform theme. This way of handling the theme is the one we use at Apparence, and we included it in our starter kit.
Published at DZone with permission of Gautier Siclon. See the original article here.
Opinions expressed by DZone contributors are their own.
Comments