Guide to E-Commerce Mobile App Development: Steps, Features, and Costs
Discover a step-by-step guide to e-commerce app development through a case study of this user-friendly and cost-effective nopCommerce mobile app.
Join the DZone community and get the full member experience.
Join For FreeA distinctive mobile app is crucial for success in today's competitive e-commerce environment. Emerging businesses need to gain an advantage in the online retail market, which is dominated by industry giants like Amazon and Alibaba. But how to create a feature-rich yet cost-effective e-commerce mobile app?
In this post, you can follow the process of e-commerce mobile app development by the nopCommerce core team. Here, developers examine key features, technology stack, design, and architecture using their mobile app case study as an example.
Steps to Mobile Commerce App Development
In this section, we’ll break down the development of the nopCommerce mobile app into a few steps. This guide will be helpful for developers who want to recreate the procedure for their own e-commerce website or those who want to learn more about the nopCommerce product from the inside out.
Step 1. Select the Right Technology Stack and Framework
Choosing a technology or framework for creating an e-commerce app is one of the most important tasks for a developers’ team. While the technical aspects are important, it's also crucial to consider the business requirements of a particular project.
At the first stage, it comes down to the choice between cross-platform app development and native app development. Both options have their pros and cons, staff and budget requirements.
- Native application development: Creating native apps requires separate development teams for Android and iOS, which can lengthen the time to launch the app and complicates further updates. This strategy works best for large-scale businesses that have enough resources for handling Swift (iOS) and Kotlin (Android) teams. Despite higher costs, the end result will be an application that is well-optimized and tailored to each operating system.
- Cross-platform application development: Under this strategy, a single codebase is used for both iOS and Android devices. This choice is more time-efficient and cost-effective, with the potential to save up to 50% of a company's resources. Although cross-platform apps adopt new features more slowly than native apps, the majority of e-commerce functions can be handled by third-party libraries and plugins. So this strategy ensures a quicker time to market without compromising on functionality.
For the cross-platform approach, there are a number of frameworks, including React Native, Ionic, or Flutter. Before deciding on Flutter for the nopCommerce mobile app, our team held thorough discussions.
Here are the factors we considered and prioritized in e-commerce application development:
- A shallow learning curve and technical maturity make it simpler for developers to master the Flutter framework in the shortest possible time.
- Flutter seamlessly integrates with numerous code editors (for example, VSCode that is popular among .NET developers). This integration improves the development experience by making it easier to code, debug, view the widget tree, and analyze memory leaks.
- Flutter's hot reload feature helps developers see any changes made to the code immediately within the app. In comparison to native app development, where the build process can be time-consuming, this significantly accelerates the development process.
- Flutter boasts a 60 FPS, which is consistent with the performance of Swift and Kotlin.
The nopCommerce team opted for Flutter after carefully weighing the business needs, time to market, and development resources. With the help of a rich development environment, we managed to produce a flexible and fully functional product in less time.
Step 2. Build a Stable and Scalable Architecture
Choosing the proper architecture is crucial for building an e-commerce application from scratch. After all, the project's scalability, code organization, and team coordination will be significantly impacted by the chosen architecture.
Our strategy was to follow the generally accepted standards outlined in the Android documentation to ensure a maintainable and scalable codebase. The standard architecture did not fully comply with Flutter's specifics, which posed a certain challenge for our team.
Consequently, we made adjustments and added a new level to create a well-structured and effective architecture for our app.
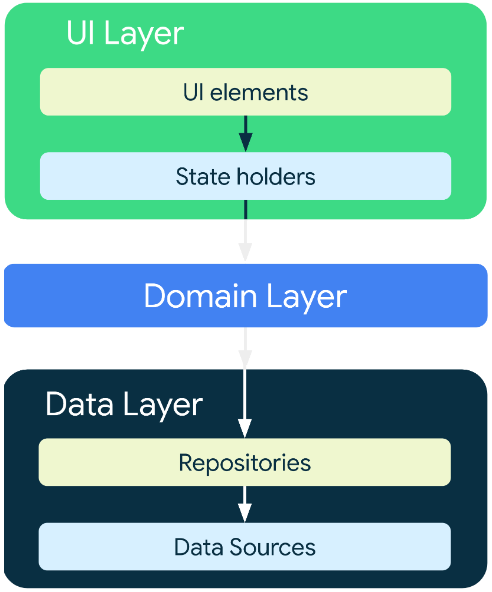
Standard three-level architecture
- The UI Layer contains UI elements, including widgets and UI-related logic, and demonstrates how they interact with users.
- The Domain Layer separates the application's business logic from the user interface. It includes business logic objects and controllers.
- The Data Layer is concerned with managing and gaining access to data sources and repositories.
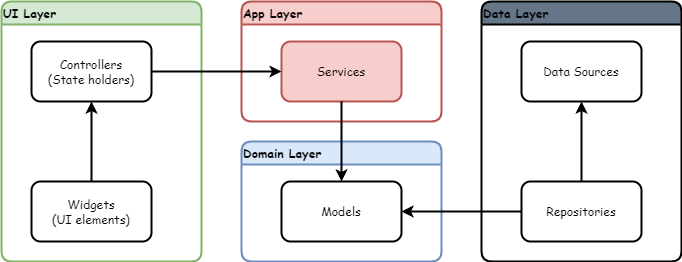
The updated architecture with Riverpod
We introduced the Riverpod library for state management and dependency injection to modify the architecture for Flutter. As a result, we got the following structure:
- The UI Layer is still present and consists of UI elements and their user interactions, which are made possible by widgets and UI-related logic.
- The Application Layer in our updated architecture performs similar functions of the original Domain layer in the Android architecture. It contains service classes that outline the controller-specific methods. When several widgets control the same logic or when the logic is dependent on various repositories, this becomes especially helpful. However, the Application layer might not always be required. In some circumstances, controllers don't need the Application layer to request data directly from repositories. The Application layer might not be necessary if the services are simply used to direct method calls from controllers to the repository.
- The Domain Layer is equivalent to domain models that can be altered by services at the Application layer and filled with data from data repositories at the Data layer. The business logic objects accessed through repositories are subject to these models.
By rearranging the original architecture to meet Flutter's specific requirements and integrating Riverpod, we achieved a structure that not only encourages code maintainability and scalability but also improves team collaboration. The domain-specific modifications allowed for a smooth development process while ensuring that the app can still be expanded with new features and improved in the future.
Step 3. Design a User Interface
The wide-ranging widget library of Flutter was a major benefit among the many factors that led us to choose this framework for e-commerce application development. It was surprisingly easy to create a user-friendly interface with the help of this library. Impeller, a special rendering engine for Flutter, makes sure that the app's look is maintained across all devices.
We used Material 3 (Material You), the most recent version of Google's design system, as the foundation for the nopCommerce app's design. Material 3 brings revamped component renderings, fresh color palettes, and captivating animations, all of which seamlessly integrate with Flutter.
We also took advantage of the design tokens offered by Material 3 to maintain a unified and uniform appearance across various devices. We can use the same style values in both design file and code thanks to the ability of these tokens to store styles, fonts, and animation values.
Our main goal was to develop an e-commerce app that offers users a seamless and immersive experience while preserving a consistent visual identity across different devices. We managed to accomplish that by utilizing design tokens.
To create design tokens, we used the Material Theme Builder, which automatically creates a theme with default colors and styles. On this basis, we built a custom theme adjusted to the needs and branding of the nopCommerce app.
We had two options when choosing brand colors:
- Manual specification: We can manually specify the base colors to match the brand's identity and preferred visual style.
- Dynamic colors: As an alternative, we can use dynamic colors, i.e. a color scheme will be chosen based on the images provided, like the company's logo. The app's visuals become more distinctive thanks to this dynamic approach.
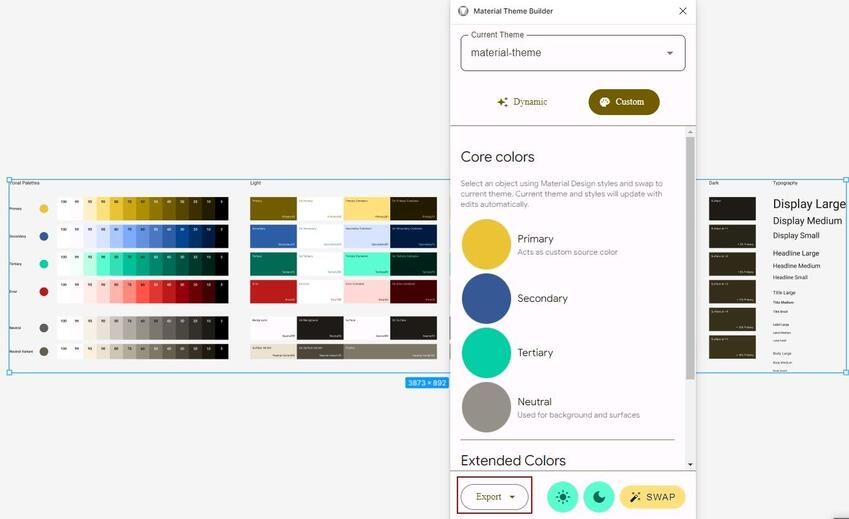
Color scheme generated through tokens
The design tokens allowed us to generate a full palette of styles, maintaining visual coherence throughout the app, while still allowing for individualized tweaks and adjustments.
The adaptability and versatility of design tokens are among their most notable advantages. Without sacrificing design or user experience, the nopCommerce app can be adapted to various modes, such as Dark mode or Light mode.

Mode control in Material 3
Here are some key benefits of applying design tokens:
- Streamlined development and design: Design tokens eliminate the need to delve into platform-specific design manuals. Simply use Material 3 for development and design to save time and effort.
- Quick redesign: If it is necessary to redesign the app, design tokens make the process remarkably effective, enabling quick updates and changes.
- Simple style maintenance: Design tokens make it simple to maintain styles, manage and update the app's visual components.
With these techniques, developing an e-commerce app that looks good on any device becomes a simple and satisfying process. Our selection of Flutter and Material 3, along with the use of design tokens, made sure that the user interface for the nopCommerce mobile app was aesthetically pleasing.
Step 4. Ensure Robust Security
By using Bearer tokens, the nopCommerce mobile app gives priority to protecting transmitted data. Only authorized users are granted access to these tokens, which are essential for secure communication between the client (mobile application) and the server.
Clients can access server-side protected resources by using bearer tokens for authentication and authorization. The server-side token may be revoked if necessary, requiring the client to go through the authorization process once more in order to obtain a new token. In this case, only authenticated users can access sensitive data.
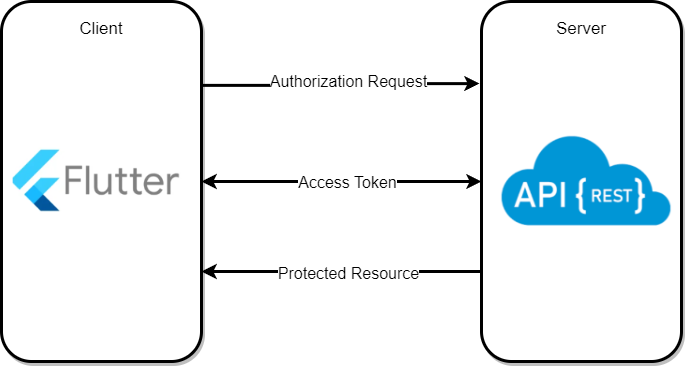
The client-server exchange through tokens
The client-side secure storage of tokens, however, is just as important. Since tokens do not require ownership documentation from the bearer, it is crucial to safeguard this data. Flutter uses secure local storage mechanisms for this purpose.
User data is kept in local storage until the application is removed. Different mobile operating systems have different ways of implementing local storage:
- Android security: To protect local storage, Android uses the Advanced Encryption Standard (AES). To provide the tokens with a high level of security, the secret key is encrypted with the RSA algorithm and stored in the KeyStore.
- iOS security: For iOS, the KeyChain acts as a safe way to access the application's cryptographic keys, giving the tokens that are being stored a high level of security.
The nopCommerce mobile app complies with the best practices and upholds the highest level of security token confidentiality by utilizing these secure local storage technologies.
Step 5. Automate Processes and Enabling Updates
The most efficient solution when developing an e-commerce app that needs ongoing automatic updates is to connect it to an API. The nopCommerce ecosystem, including its CMS, additional extensions, and the official Web API plugin, is fully integrated into our mobile app.
We also included the Web API plugin in the mobile app installation package with the source code available to ensure flexibility and transparency.
Implementing and maintaining an access client when interacting with an API can be difficult. To easier adapt the API to changes, we have streamlined this procedure.
To attain this end, we make sure that our API complies with the requirements of the OpenAPI 3 specification, which enables us to store an in-depth description of the API in JSON format. We can quickly create a client in the required language — in this case, Dart for Flutter — using the dart-dio Generator and OpenAPI Generator.
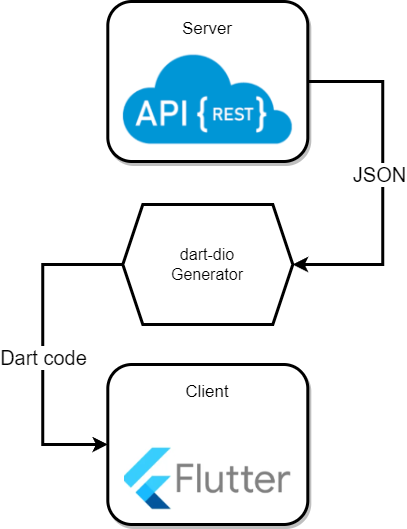
The interaction with the API in the nopCommerce mobile app
The generated client is configured as a package within the app to create the API Flutter connection. With this configuration, we have access to every API method that is supported, and it only requires integrating these methods into the repositories to leverage their functionality within the app.
The client can be easily rebuilt when the API methods go through structural changes or changes in their signature, ensuring seamless updates and efficient operation of the mobile app.
The "nopCommerce mobile app" plugin alongside the "Web API Frontend'' plugin gives users the ability to manage particular application settings directly from the admin panel of their nopCommerce webshop. For example, administrators can transfer specific settings to the mobile application or configure a slider on the home screen to highlight the chosen products.
Step 6. Test and Assess Performance
Our main goal was to assess how quickly and effectively the animated advertising slider could be rendered. To do this, we used the GameBench automation interface tool to monitor important metrics like memory usage, frame rate, and CPU load.
We used both React Native and Flutter to implement the same interface natively on an Android device for testing purposes. To ensure uniform conditions, the test duration was standardized, and image caching libraries were used in each language.
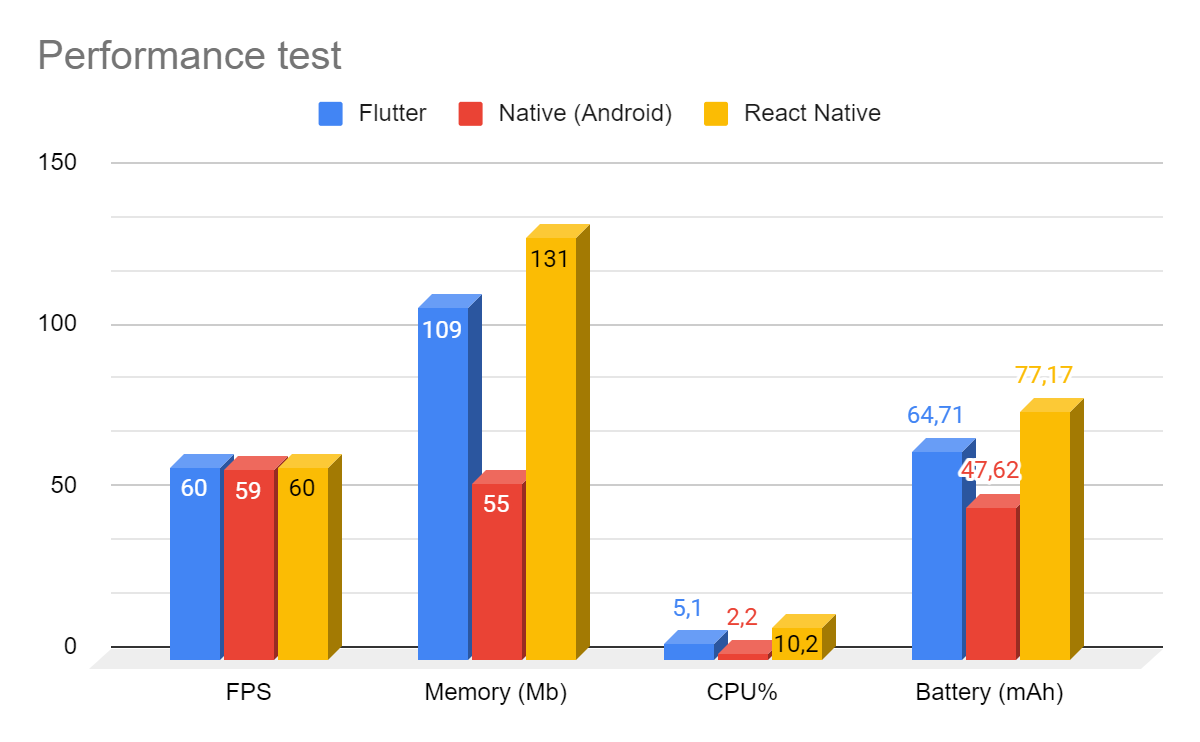
Comparison of framework performance
The performance testing results are shown below, with lower values indicating higher performance:
- FPS: The FPS values were essentially the same in each case, proving that Flutter's claimed capabilities closely match its actual performance metrics.
- Memory usage: Although Flutter needed twice as much memory as native apps did, it was still more effective than React Native, whose memory usage varied on a greater scale.
- CPU load: React Native showed differences in CPU usage, primarily as a result of the use of a JS Bridge to connect JavaScript and native code. Flutter, on the other hand, showed more consistent CPU performance.
Flutter was a strong runner-up in this category despite native Android apps having better battery consumption due to their consistent performance and efficiency.
It is crucial to understand that these performance characteristics differ noticeably when compared. Performance is important, but it is not the only factor to consider during e-commerce application development.
E-Commerce App Development Costs
Developing a mobile app from scratch requires careful consideration of various factors, including the choice between native, hybrid, or cross-platform app development. But one crucial aspect to consider is the cost associated with each approach.
In the case of the nopCommerce mobile app, a one-time payment of $2500 gives access to the mobile app package that is absolutely ready to go — this way, our users don’t need to worry about overstepping both timeline and budget constraints.
Moreover, the installation package of the nopCommerce mobile app includes the Web API plugin (regular price: $990), so developers don’t need to buy it as a stand-alone plugin.
What can you get for the same price if you decide to develop your own application? To answer this question, we need to consider the costs of custom app development (for reference, we used information from Upwork and Clutch).
To calculate the cost for an average project, we used the following formula:
Hourly rate x number of hours = final cost.
Stage |
Hourly rate |
Number of hours |
Final cost |
Planning & research |
$60+ |
340-505 |
>$20,000 |
UX Design |
$30-70+ |
340-670 |
>$10,000 |
Development |
$35-120 |
2,000-4,300 |
>$70,000 |
Testing |
$30-70+ |
340-505 |
>$10,000 |
Note: The costs above are calculated for a medium-level project by a full-fledged company (some stages can be missed or merged in case of development by freelancers). Of course, they can be lower for SMBs or much higher for enterprise-level mobile apps, where the cost upfront is almost unlimited.
In general, the cost for mobile app development can be anywhere from $30,000 to $100,000+, considering that e-commerce apps always require more expertise, time, and money.
Final Thoughts
If you're looking for advice on how to create an e-commerce app for your online store, our guide on e-commerce app development covers all the critical steps and offers insightful information on how the final product was made.
Stay tuned for new updates as we continue to add features and improve the functionality of the nopCommerce mobile app. Don't forget to look through our comprehensive mobile app documentation for more information.
Opinions expressed by DZone contributors are their own.

Comments