Guide for Voice Search Integration to Your Flutter Streaming App
Learn how to integrate voice search in your Flutter streaming app for Android and iOS platforms with these step-by-step guides.
Join the DZone community and get the full member experience.
Join For FreeAs the mobile app development world evolves, user engagement and satisfaction are at the forefront of considerations. Voice search, a transformative technology, has emerged as a key player in enhancing user experiences across various applications. In this step-by-step guide, we will explore how to seamlessly integrate voice search into your Flutter streaming app, providing users with a hands-free and intuitive way to interact with content.
Why Flutter for Your Streaming Project?
Flutter is a popular open-source framework for building cross-platform mobile applications, and it offers several advantages for streaming app development. Here are some reasons why Flutter might be a suitable choice for developing your streaming app:
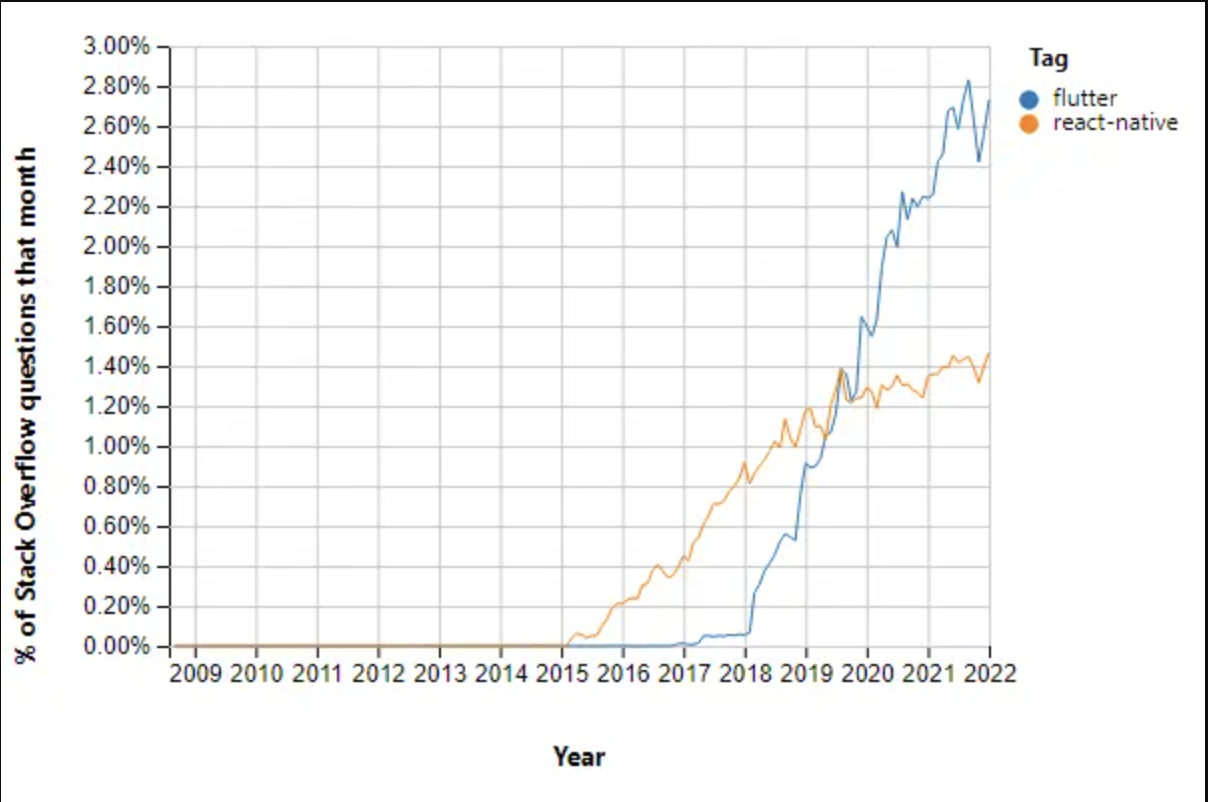
A 2022 survey by Statista shows that more than 46% of software developers used Flutter. It's also found that only one-third of mobile app developers used cross-platform technology, and the rest chose to go ahead with native tools.

It's found that 4.77% of entertainment apps are developed using Flutter. DDMusic, a music and audio app launched by Hitchhike Tech is also developed using this advanced technology. The music streaming platform is downloaded 5.1 million times by December 2022.
According to the Stack Overflow Developer Survey, Flutter was developers' 3rd most loved mobile SDK and framework. Flutter has seen a significant increase in its popularity, with over 147,000 stars on GitHub.
Flutter allows programmers to write a single codebase that can run on iOS as well as Android platforms. This significantly decreases development time and effort compared to maintaining separate codebases for each platform.
Steps To Follow for Integrating Voice Search Into Your Flutter Streaming App
Many well-known apps, including those streaming, have adopted Flutter. Video streaming platforms like Netflix and Alibaba have adopted this cross-platform language to provide improved experiences to their viewers. Besides, Tencent has also joined famous streaming giants in the race.
Incorporating cutting-edge features can significantly enhance the user experience in the ever-evolving mobile app development landscape. With its convenience and ease of use, voice search has become a pivotal aspect of modern applications. In this blog, we'll explore step-by-step how to integrate voice search into a Flutter streaming app, combining the power of Flutter with the versatility of voice-activated interactions.
Step 1: Create a Flutter App
If you haven't already, create a new Flutter project for your streaming app. You can consider the steps below to create a simple streaming app with Flutter.
- Open the IDE >> Select to start a new Flutter project.
- Select Flutter Application as the project type >> click Next.
- Enter a project name (for example, MyStreamingApp) >> click Next.
- Click Finish.
flutter create my_streaming_app

cd my_streaming_app
Step 2: Add Dependencies
Open your pubspec.yaml file and include the necessary dependencies:
dependencies:

  flutter:

    sdk: flutter

  speech_to_text: ^5.0.3

  # Add other dependencies for your streaming app
Run flutter pub get to install the dependencies.
Step 3: Design the User Interface
Design the main user interface of your streaming app. You might have a home screen with a list of available streams.
Step 4: Create a Streaming Player Widget
Implement a streaming player widget or use an existing one if you have it. Ensure it's capable of playing audio or video streams.
Step 5: Create a Voice Search Widget
Design a voice search widget where users can initiate voice commands. Create a new file named voice_search_widget.dart and implement the widget.
// voice_search_widget.dart

import 'package:flutter/material.dart';

import 'package:speech_to_text/speech_to_text.dart' as stt;


class VoiceSearchWidget extends StatefulWidget {

  final Function(String) onVoiceSearch;


  const VoiceSearchWidget({Key? key, required this.onVoiceSearch}) : super(key: key);


  @override

  _VoiceSearchWidgetState createState() => _VoiceSearchWidgetState();

}


class _VoiceSearchWidgetState extends State<VoiceSearchWidget> {

  stt.SpeechToText _speech;

  String _recognizedWords = "Press the microphone button to start speaking";


  _VoiceSearchWidgetState() : _speech = stt.SpeechToText();


  void _listen() async {

    if (!_speech.isListening) {

      bool available = await _speech.initialize();

      if (available) {

        _speech.listen(

          onResult: (result) {

            if (result.finalResult) {

              setState(() {

                _recognizedWords = result.recognizedWords;

              });

              widget.onVoiceSearch(_recognizedWords);

            }

          },

        );

      }

    } else {

      _speech.stop();

    }

  }


  @override

  Widget build(BuildContext context) {

    return Column(

      children: [

        Text(

          _recognizedWords,

          style: TextStyle(fontSize: 16.0),

        ),

        SizedBox(height: 20.0),

        ElevatedButton(

          onPressed: _listen,

          child: Icon(_speech.isListening ? Icons.mic : Icons.mic_none),

        ),

      ],

    );

  }
Step 6: Integrate Voice Search Into Your App
In your main app file, import the voice_search_widget.dart and include the VoiceSearchWidget within your streaming app.
// main.dart

import 'package:flutter/material.dart';

import 'voice_search_widget.dart';


void main() {

  runApp(MyApp());

}


class MyApp extends StatelessWidget {

  @override

  Widget build(BuildContext context) {

    return MaterialApp(

      title: 'Streaming App with Voice Search',

      theme: ThemeData(

        primarySwatch: Colors.blue,

      ),

      home: StreamingApp(),

    );

  }

}


class StreamingApp extends StatefulWidget {

  @override

  _StreamingAppState createState() => _StreamingAppState();

}


class _StreamingAppState extends State<StreamingApp> {

  String _searchQuery = "";


  void _handleVoiceSearch(String query) {

    setState(() {

      _searchQuery = query;

      // Implement logic to filter streams based on the search query

    });

  }


  @override

  Widget build(BuildContext context) {

    return Scaffold(

      appBar: AppBar(

        title: Text('Streaming App'),

      ),

      body: Column(

        children: [

          VoiceSearchWidget(onVoiceSearch: _handleVoiceSearch),

          // Include your streaming player widget and list of streams here

        ],

      ),

    );

  }

}
Step 7: Enhance the Streaming Experience
Implement logic within _handleVoiceSearch to filter streams based on the voice search query. You may update the UI to display relevant results.
Platform-Specific Consideration for Flutter Streaming App Development
While Flutter aims to provide a consistent experience across platforms, there may be some platform-specific considerations, especially when integrating features like voice search. Below are platform-specific details for Android and iOS:
Using Android
Step 1: Set Up Android Studio
Ensure you have Android Studio installed and configured for Flutter development.
Step 2: Android-Specific Dependencies
Flutter projects are generally cross-platform, but if you need specific Android dependencies, you can configure them in the android/app/build.gradle file.
android {

    // ...

    dependencies {

        implementation "your.android.library:version"

        // ...

    }

}
Step 3: Permissions
In your AndroidManifest.xml file, ensure you have the necessary permissions for voice recognition:
<uses-permission android:name="android.permission.RECORD_AUDIO" />Step 4: Android-Specific Implementation
If you need Android-specific behavior, you can leverage platform channels. Create a VoiceSearchPlugin class in android/app/src/main/java/com/example/my_streaming_app/:
package com.example.my_streaming_app;


import android.content.Context;

import android.speech.RecognitionListener;

import android.speech.RecognizerIntent;

import android.speech.SpeechRecognizer;

import android.util.Log;


import androidx.annotation.NonNull;


import java.util.ArrayList;


import io.flutter.embedding.engine.plugins.FlutterPlugin;

import io.flutter.plugin.common.MethodCall;

import io.flutter.plugin.common.MethodChannel;

import io.flutter.plugin.common.MethodChannel.MethodCallHandler;

import io.flutter.plugin.common.MethodChannel.Result;

import io.flutter.plugin.common.PluginRegistry.Registrar;


public class VoiceSearchPlugin implements FlutterPlugin, MethodCallHandler {

    private static final String CHANNEL = "voice_search_plugin";

    private Context context;

    private SpeechRecognizer speechRecognizer;


    @Override

    public void onAttachedToEngine(@NonNull FlutterPluginBinding flutterPluginBinding) {

        context = flutterPluginBinding.getApplicationContext();

        MethodChannel channel = new MethodChannel(flutterPluginBinding.getBinaryMessenger(), CHANNEL);

        channel.setMethodCallHandler(this);

    }


    @Override

    public void onMethodCall(@NonNull MethodCall call, @NonNull Result result) {

        if (call.method.equals("startListening")) {

            startListening(result);

        } else {

            result.notImplemented();

        }

    }


    private void startListening(final Result result) {

        speechRecognizer = SpeechRecognizer.createSpeechRecognizer(context);

        speechRecognizer.setRecognitionListener(new RecognitionListener() {

            @Override

            public void onReadyForSpeech(Bundle params) {

                Log.d("VoiceSearchPlugin", "Ready for speech");

            }


            @Override

            public void onBeginningOfSpeech() {

                Log.d("VoiceSearchPlugin", "Speech started");

            }


            @Override

            public void onEndOfSpeech() {

                Log.d("VoiceSearchPlugin", "Speech ended");

            }


            @Override

            public void onResults(Bundle results) {

                ArrayList<String> matches = results.getStringArrayList(SpeechRecognizer.RESULTS_RECOGNITION);

                if (matches != null && !matches.isEmpty()) {

                    result.success(matches.get(0));

                } else {

                    result.success("");

                }

            }


            @Override

            public void onError(int error) {

                Log.e("VoiceSearchPlugin", "Error: " + error);

                result.success("");

            }


            // Implement other RecognitionListener methods as needed


            @Override

            public void onPartialResults(Bundle partialResults) {

                // Implement if needed

            }


            @Override

            public void onEvent(int eventType, Bundle params) {

                // Implement if needed

            }

        });


        Intent intent = new Intent(RecognizerIntent.ACTION_RECOGNIZE_SPEECH);

        intent.putExtra(RecognizerIntent.EXTRA_LANGUAGE_MODEL, RecognizerIntent.LANGUAGE_MODEL_FREE_FORM);

        intent.putExtra(RecognizerIntent.EXTRA_PARTIAL_RESULTS, true);

        intent.putExtra(RecognizerIntent.EXTRA_MAX_RESULTS, 1);

        speechRecognizer.startListening(intent);

    }


    @Override

    public void onDetachedFromEngine(@NonNull FlutterPluginBinding binding) {

        if (speechRecognizer != null) {

            speechRecognizer.destroy();

        }

    }

}
Add the necessary dependencies in the android/app/build.gradle file:
implementation 'com.android.support:support-v4:28.0.0'

implementation 'com.android.support:appcompat-v7:28.0.0'
And in your AndroidManifest.xml:
<uses-permission android:name="android.permission.INTERNET" />

<uses-permission android:name="android.permission.RECORD_AUDIO" />

<application

    ...

    <activity

        ...

        <intent-filter>

            <action android:name="FLUTTER_NOTIFICATION_CLICK" />

            <category android:name="android.intent.category.DEFAULT" />

        </intent-filter>

    </activity>

</application>
Ensure the package name in AndroidManifest.xml corresponds to your Flutter app's package name.
Step 5: Use the Plugin in Dart Code
In your Dart code, call the Android-specific voice search plugin using a platform channel:
// Inside voice_search_widget.dart


import 'package:flutter/services.dart';


class VoiceSearchWidget extends StatefulWidget {

  final Function(String) onVoiceSearch;


  const VoiceSearchWidget({Key? key, required this.onVoiceSearch}) : super(key: key);


  @override

  _VoiceSearchWidgetState createState() => _VoiceSearchWidgetState();

}


class _VoiceSearchWidgetState extends State<VoiceSearchWidget> {

  static const platform = const MethodChannel('voice_search_plugin');


  void _listen() async {

    String result = await platform.invokeMethod('startListening');

    widget.onVoiceSearch(result);

  }


  // ... rest of the code remains the same

}
Using iOS
Step 1: Set Up Xcode
Ensure you have Xcode installed and configured for Flutter development.
Step 2: iOS-Specific Dependencies
Flutter projects are generally cross-platform, but if you need specific iOS dependencies, you can configure them in the ios/Podfile:
# ios/Podfile

platform :ios, '9.0'


target 'Runner' do

  use_frameworks!

  # Add your iOS-specific dependencies here

end
Run pod install in the iOS directory.
Step 3: Permissions
Ensure you have the necessary permissions for voice recognition. Open your Info.plist and add:
<key>NSMicrophoneUsageDescription</key>

<string>We need access to your microphone for voice search</string>
Step 4: iOS-Specific Implementation
Similarly to Android, you can create an iOS-specific voice search plugin using Swift. Create a new Swift file named VoiceSearchPlugin.swift in the ios/Runner directory:
// VoiceSearchPlugin.swift

import Flutter

import Speech


public class VoiceSearchPlugin: NSObject, FlutterPlugin {

    static var channel: FlutterMethodChannel?


    public static func register(with registrar: FlutterPluginRegistrar) {

        channel = FlutterMethodChannel(name: "voice_search_plugin", binaryMessenger: registrar.messenger())

        let instance = VoiceSearchPlugin()

        registrar.addMethodCallDelegate(instance, channel: channel!)

    }


    public func handle(_ call: FlutterMethodCall, result: @escaping FlutterResult) {

        if call.method == "startListening" {

            startListening(result: result)

        } else {

            result(FlutterMethodNotImplemented)

        }

    }


    private func startListening(result: @escaping FlutterResult) {

        let recognizer = SFSpeechRecognizer(locale: Locale(identifier: "en_US"))

        let request = SFSpeechAudioBufferRecognitionRequest()

        let audioEngine = AVAudioEngine()


        do {

            let audioSession = AVAudioSession.sharedInstance()

            try audioSession.setCategory(.record, mode: .measurement, options: .duckOthers)

            try audioSession.setActive(true, options: .notifyOthersOnDeactivation)


            guard let inputNode = audioEngine.inputNode else {

                fatalError("Audio engine has no input node")

            }


            let recordingFormat = inputNode.outputFormat(forBus: 0)

            inputNode.installTap(onBus: 0, bufferSize: 1024, format: recordingFormat) { (buffer, _) in

                request.append(buffer)

            }


            audioEngine.prepare()

            try audioEngine.start()


            guard let recognizer = recognizer else {

                fatalError("Speech recognizer not available")

            }


            if !recognizer.isAvailable {

                result("")

                return

            }


            let recognitionTask = recognizer.recognitionTask(with: request) { (result, error) in

                if let result = result {

                    result(result.bestTranscription.formattedString)

                } else if let error = error {

                    print("Error: \(error)")

                    result("")

                }

            }


            recognitionTask?.cancel()

        } catch {

            print("Error setting up audio session: \(error)")

            result("")

        }

    }

}
Ensure your Runner-Bridging-Header.h file includes:
#import <Flutter/Flutter.h>And update your AppDelegate.swift:
import UIKit

import Flutter

import AVFoundation


@UIApplicationMain

@objc class AppDelegate: FlutterAppDelegate {

  override func application(

    _ application: UIApplication,

    didFinishLaunchingWithOptions launchOptions: [UIApplication.LaunchOptionsKey: Any]?

  ) -> Bool {

    // ... existing code ...


    if let registrar = self.registrar(forPlugin: "VoiceSearchPlugin") {

        VoiceSearchPlugin.register(with: registrar)

    }


    return super.application(application, didFinishLaunchingWithOptions: launchOptions)

  }

}
Step 5: Use the Plugin in Dart Code
In your Dart code, call the iOS-specific voice search plugin using a platform channel, just like on Android:
// Inside voice_search_widget.dart


import 'package:flutter/services.dart';


class VoiceSearchWidget extends StatefulWidget {

  final Function(String) onVoiceSearch;


  const VoiceSearchWidget({Key? key, required this.onVoiceSearch}) : super(key: key);


  @override

  _VoiceSearchWidgetState createState() => _VoiceSearchWidgetState();

}


class _VoiceSearchWidgetState extends State<VoiceSearchWidget> {

  static const platform = const MethodChannel('voice_search_plugin');


  void _listen() async {

    String result = await platform.invokeMethod('startListening');

    widget.onVoiceSearch(result);

  }


  // ... rest of the code remains the same

}
By following these platform-specific steps for Android and iOS, you've successfully integrated voice search into your Flutter streaming app.
It's important to note that platform channels provide a way to communicate between Dart and native code, allowing you to leverage platform-specific features seamlessly. Customize the implementation further based on your specific requirements and continue providing a delightful user experience on Android and iOS platforms. Happy coding!
Conclusion
By following these steps, you've successfully integrated voice search into your Flutter streaming app. Users can now enjoy an interactive and accessible experience, allowing them to find and play their favorite streams with just their voice. Experiment with additional features, such as natural language processing or voice command customization, to further enhance the user experience. Happy coding!
Opinions expressed by DZone contributors are their own.
Comments