Generating a JSON Dataset Using Relational Data in Snowflake
One dev was tasked with finding a JSON dataset example to enliven his org's training course on getting and using semi-structured data within Snowflake. See how he did it!
Join the DZone community and get the full member experience.
Join For FreeRecently, I was tasked with finding a new JSON dataset example to refresh our training course on accessing and working with semi-structured data within Snowflake. I scoured the internet — Google, data.gov, etc.—searching high and low for the perfect JSON structure, with a slight level of complexity and somewhat of an interesting subject. But alas, it does not exist. Not a problem, I’ll make my own!
One of the great things about Snowflake is that it has all of the built-in functionality to reverse-engineer a JSON document from relational data. There are many functions available in Snowflake for use with semi-structured data, but these three come to mind when reverse-engineering relational data into JSON:
OBJECT_CONSTRUCT — Returns a VARIANT object, essentially a JSON document, as an output, with either the key:value pairs as inputs or an asterisk (as in SELECT *) from a relational query.
ARRAY_CONSTRUCT — Returns an array based on the inputs.
ARRAY_AGG — This function will accept input values and pivot them into an array, allowing a group of values to be returned for each row. Rather than performing an aggregate function against the values, such as SUM or AVG, they are pivoted into a list.
Excellent. I have the database and appropriate functions available to build out the JSON document. But I still don’t have a dataset. At least now I’m not limited to the JSON format as I was in my previous search for data. I was about to browse through all of my previous Googlings when it dawned on me; Data for Good. It’s a theme we at Snowflake love to see in practice and we enjoy sharing data for good customer stories. In fact, at the upcoming Snowflake Summit, our inaugural conference on all things Snowflake, we have a keynote specifically focused on “data for good.” With that, my data for good dataset is from DonorsChoose.org — a non-profit organization that allows teachers to submit requests for donations to their classrooms. Individuals like myself can then choose to donate based on the location, school poverty level, subject, or even the story of the classroom in need. DonorsChoose.org has provided their project data as an open dataset for years, making it an easy choice for use in a hands-on lab.
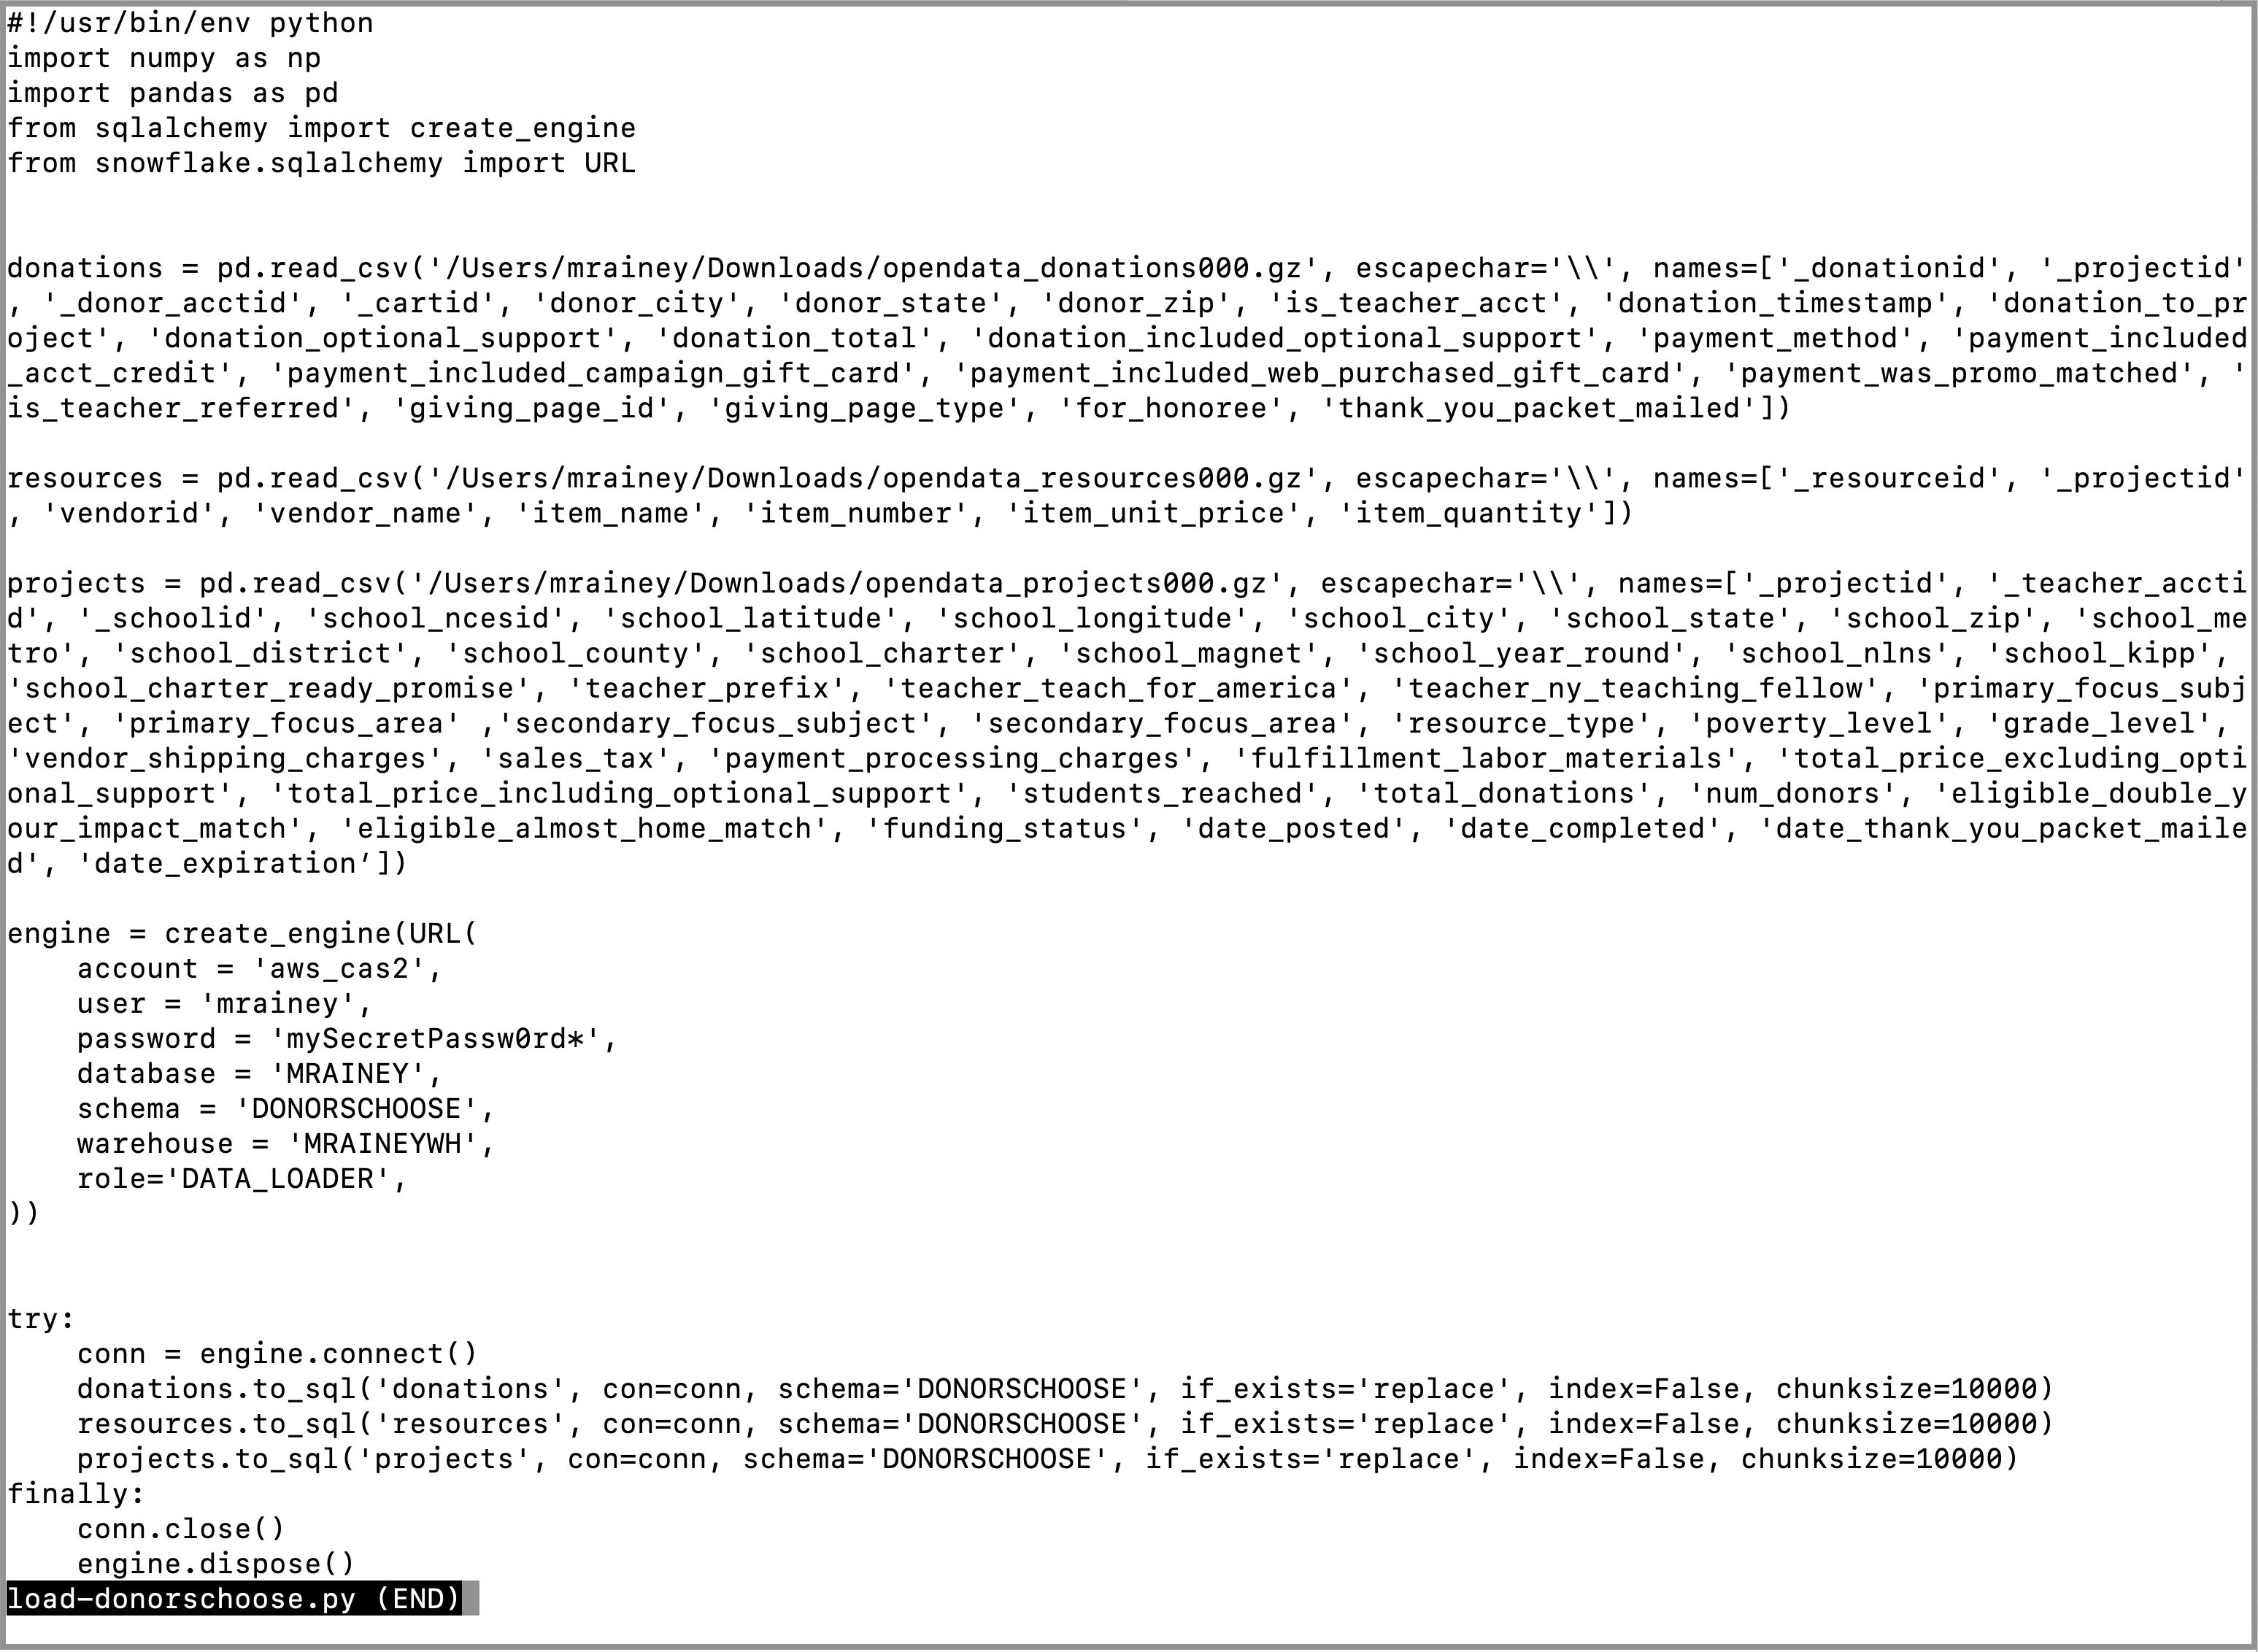
Now we’re ready to get started. I downloaded the files from DonorsChoose.org that I’ll use to create the JSON dataset. Their download page provides the easiest way to create each table definition and upload the data into a database schema using a Pandas function. No problem. Snowflake has a connector for Python, so it should be a breeze to get the data into the database and ready to use. Let’s take a look at how I did this before we dive further into creating the JSON dataset.

***
The first step is to download all required components for loading data into Snowflake. Make sure Python 2.7.9 (or higher) or 3.4.3 (or higher) is installed (as of the writing of this post). I ran Python 3.6.7. Then, install Snowflake SQLAlchemy for our database connection and Pandas to load the data.
DonorsChoose.org already provided the code to load the CSV files into a Pandas dataframe, so all we have to do is load the data into a Snowflake table. Here’s where we use SQLAlchemy to create a connection to Snowflake via the Engine object. The Engine allows access to a number of different databases and their DBAPI, including Snowflake. Using Snowflake SQLAlchemy has its advantages, such as the snowflake.sqlalchemy.URL method, which allows for simple construction of the Snowflake connection string. For my purposes, I added my username/password in plain text as parameters in the URL (as you’ll see further down in my sample code), but it’s highly recommended to use a more secure method, such as storing the password encrypted or key pair authentication.
Once the Engine is ready, simply connect and run the dataframe to_sql() command to load the data. Make sure the target schema exists on Snowflake, and the rest is taken care of by the load. To begin the command, we pass in the target table name, connection (engine) object, target schema name, and how to handle existing objects in the target. The remaining two options need a little more explanation.
Setting index=False is required for Snowflake targets because, well, Snowflake has no concept of traditional database indexes! While the previous statement is true about Snowflake, actually this option, when set to true, will add an identity column to the target table, which in this case I don’t need. Regarding Snowflake’s index independence…data is stored in an optimized, proprietary file format, as micro-partitions, that is automatically compressed (and encrypted). Data access takes advantage of filtering and pruning to only process and return the data required for the query executed. Read more on how Snowflake stores its data here.
Finally, the chunksize=10000 option allows us to control how many rows are processed at a time. Ten-thousand worked for me and got the data loaded in a decent period of time, but this is an option worth tinkering with to determine the sweet spot for your data volume being loaded.
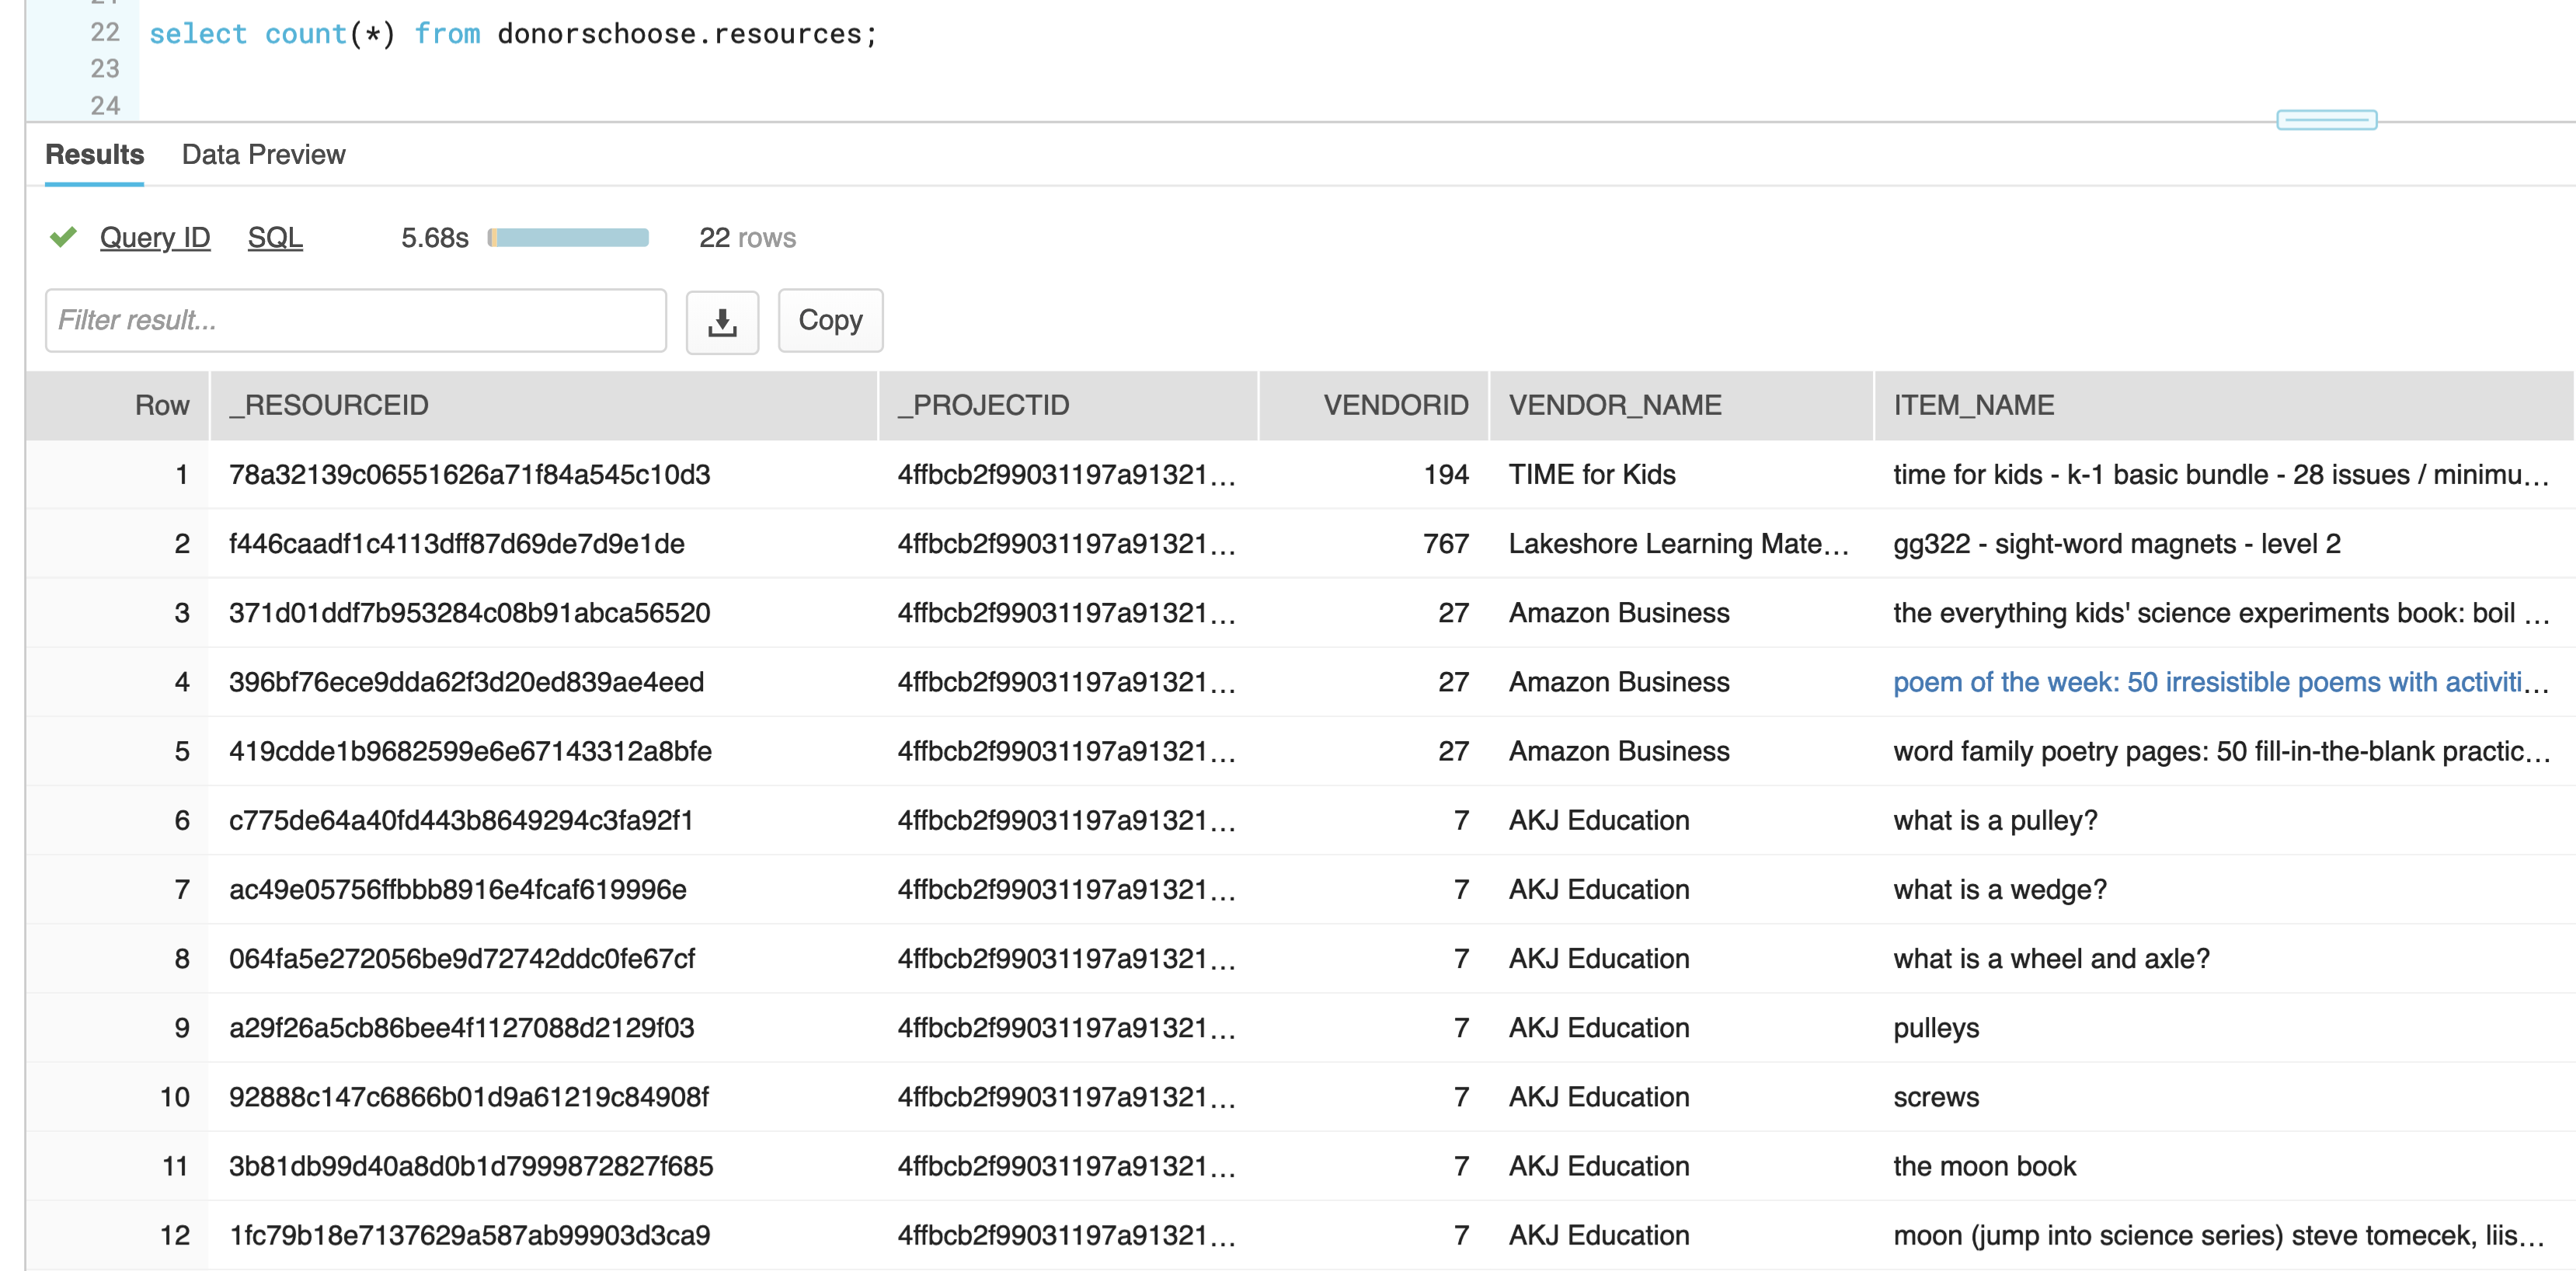
With that, we close the connection, get rid of our engine, and we’ve loaded our DonorsChoose.org data into Snowflake! Now I can use this data to generate the JSON document for the training dataset. Plus, with a little bit of data sleuthing, I was even able to find some of the donations that I made to DonorsChoose.org. Here’s a list of the resources purchased with my donation to a classroom that needed reading materials. Very cool!

***
Okay, back to the task at hand, generating the new JSON dataset for training purposes. The tables I plan to use are loaded and ready to query. I’m interested in a few different sets of data from the PROJECTS, DONATIONS, and RESOURCES tables. In order to make it easier to construct the JSON, I’ll initially break it down into three different queries.
First is the list of attributes I want from each project. Selecting the data with the OBJECT_CONSTRUCT() function, I use key:value pairs for each attribute and cast the numeric values to integers to ensure they are output correctly.
SELECT OBJECT_CONSTRUCT(
  '_projectid', p._projectid,
  '_schoolid', p._schoolid,
  'school_city', p.school_city,
  'school_state', p.school_state,
  'school_metro', p.school_metro,
  'primary_focus_subject', p.primary_focus_subject,
  'primary_focus_area', p.primary_focus_area,
  'resource_type', p.resource_type,
  'poverty_level', p.poverty_level,
  'grade_level', p.grade_level,
  'total_donations', p.total_donations::integer,
  'num_donors', p.num_donors,
  'students_reached', p.students_reached::integer,
  'date_posted', p.date_posted,
  'date_completed', p.date_completed
  )
FROM donorschoose.projects p
The result is a simple VARIANT output.
{
  "_projectid": "43e698e9241d908bf13d3e16c06b2a4b",
  "_schoolid": "8cb94865cec4349f050f61e6b63969af",
  "date_completed": "2008-09-09 00:00:00",
  "date_posted": "2008-09-08 00:00:00",
  "grade_level": "Grades 9-12",
  "num_donors": 1,
  "poverty_level": "moderate poverty",
  "primary_focus_area": "Literacy & Language",
  "primary_focus_subject": "Literacy",
  "resource_type": "Supplies",
  "school_city": "Petaluma",
  "school_metro": "suburban",
  "school_state": "CA",
  "students_reached": 1950,
  "total_donations": 325
}
Next, I want to add in the number of donations to each project by city. Using the ARRAY_AGG() function allows me to create a list of donor cities, states, and the number of donors grouped by project. I add the OBJECT_CONSTRUCT() around it to create the list as a nested set within the JSON output.
with dc as
(
select object_construct(
    '_projectid', _projectid,
    'donations_by_city', array_agg(object_construct(
                                    'donor_city', donor_city,
                                    'donor_state', donor_state,
                                    'donation_total', donation_total::number(10,2))
                                    )
  )
from donorschoose.donations
group by _projectid
)
select * from dc;
The result:
{
  "_projectid": "9e30603eb51015d609ca92825f311f75",
  "donations_by_city": [
    {
      "donation_total": 282.05,
      "donor_city": "New York",
      "donor_state": "NY"
    },
    {
      "donation_total": 10,
      "donor_state": "NJ"
    },
...
}
Finally, I need to add the resources purchased with the donations to the project. Again, I’ll use the ARRAY_AGG() function to list the items by project.
with rs as
(
select object_construct(
    '_projectid', _projectid,
    'items', array_agg(item_name)
  )
from resources
group by _projectid
)
select * from rs;
Output, a simple list of items:
{
  "_projectid": "817f97dc65126122702f7372d4b5ea97",
  "items": [
    "sharp notevision projector xr1s -- sharp  xr-1s mobile lcd projector",
    "sony vaio fs690b1 - cdw exclusive notebook!"
  ]
}
Now, I just put it all together in a single statement using the DonorsChoose.org project as the base. Using WITH statements helps keep the different sets organized, allowing them to be combined in the final SELECT.
with dc as
(
select _projectid,
    array_agg(object_construct(
                  'donor_city', donor_city,
                  'donor_state', donor_state,
                  'donation_total', donation_total::number(10,2))
              ) donations_by_city
from donorschoose.donations
group by _projectid
),
rs as
(
select _projectid,
  array_agg(item_name) items
from resources
group by _projectid
)
select object_construct(
    '_projectid', p._projectid,
    '_schoolid', p._schoolid,
    'school_city', p.school_city,
    'school_state', p.school_state,
    'school_metro', p.school_metro,
    'primary_focus_subject', p.primary_focus_subject,
    'primary_focus_area', p.primary_focus_area,
    'resource_type', p.resource_type,
    'poverty_level', p.poverty_level,
    'grade_level', p.grade_level,
    'total_donations', p.total_donations::integer,
    'num_donors', p.num_donors,
    'students_reached', p.students_reached::integer,
    'date_posted', p.date_posted,
    'date_completed', p.date_completed,
    'donations_by_city', dc.donations_by_city,
    'items', rs.items
    )
from donorschoose.projects p
    inner join dc on p._projectid = dc._projectid
    inner join rs on p._projectid = rs._projectid
There you have it, a well-formed JSON document that makes up a perfect dataset for use in a training hands-on lab on working with semi-structured data in Snowflake.
{
  "_projectid": "d4d9ba5c28d76a4b4364241628fc21d1",
  "_schoolid": "dc2588dfde7252fb08167586f1b1a660",
  "date_completed": "2009-02-12 00:00:00",
  "date_posted": "2009-01-27 00:00:00",
  "donations_by_city": [
    {
      "donation_total": 66.44,
      "donor_city": "Houston",
      "donor_state": "TX"
    },
    {
      "donation_total": 100,
      "donor_city": "Dallas",
      "donor_state": "TX"
    },
    {
      "donation_total": 226.51,
      "donor_city": "Carson",
      "donor_state": "CA"
    },
    {
      "donation_total": 10
    },
    {
      "donation_total": 50,
      "donor_city": "Houston",
      "donor_state": "TX"
    }
  ],
  "grade_level": "Grades PreK-2",
  "items": [
    "wt108 - write & wipe world wall map",
    "sf210x - desktop write & wipe u.s.a. map - set of 10",
    "sf215x - desktop write & wipe world map - set of 10",
    "gb303 - write & wipe giant inflatable globe",
    "tt988 - solar system activity tub",
    "cg854 - ready-to-plant growing kit",
    "cg853 - classroom greenhouse"
  ],
  "num_donors": 5,
  "poverty_level": "highest poverty",
  "primary_focus_area": "Literacy & Language",
  "primary_focus_subject": "ESL",
  "resource_type": "Supplies",
  "school_city": "Houston",
  "school_metro": "urban",
  "school_state": "TX",
  "students_reached": 20,
  "total_donations": 453
}
If this was interesting to you, it’s all very easy to try out. Start with a Snowflake trial account and then follow the instructions in this post to begin working with DonorsChoose.org data in JSON. Now, off to write the hands-on lab material!
Published at DZone with permission of Michael Rainey. See the original article here.
Opinions expressed by DZone contributors are their own.


Comments