Getting Started With Code Generation With Xpand
Join the DZone community and get the full member experience.
Join For Freehave you heard about model driven software development (mdd / mdsd) and are thinking "what's all this fuzz about models"? "why should models help me to be more productive," might be another thought you have.
people have been asking how to leverage models on and off on the web and in meetings i attended, so i thought i might share this little tutorial with you. in this tutorial, we will develop a little code generator that helps you to create (html) forms from models.
a short overview
xpand is a template engine, similar to freemarker, velocity, jet and jsp. however, it features some very unique properties that makes using xpand very well suited for generating code from models, such as type safety and polymorphic dispatch . if you haven't heard those terms before, fear not! i'll show you how to use xpand by way of an easy-to-follow example.
the usual process of writing a code generator with xpand is as follows:
- define the structure of the model you want to process. this is called a metamodel
- define one or more template(s) that teach the code generator how to translate your model into code.
easy, isn't it?
using the code generator is even easier:
- create a model
- start the code generator
it is worth mentioning that you can use xpand to generate code for almost any known programming language. everything you can express in text can be generated using xpand. so, while we will be generating html and java code in the following example, you can easily write code templates that generate code for c#, basic, lua, smalltalk, abap, or any other programming language. you can also generate manuals and other documentation artifacts from your models using xpand. i've successfully used xpand to create docbook files from models. those docbook files have then been converted to pdf files and online help files.
preparing your ide
- grab and install a recent copy of eclipse. at the time of writing, i am using eclipse 3.6 m6 .
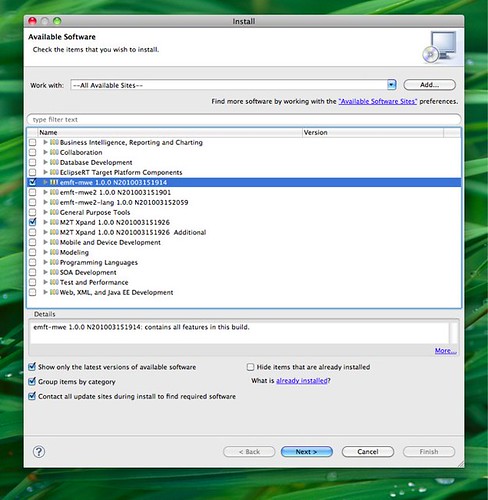
- install the latest version of xpand ( help -> install new software ... )
- add the xpand update site (at the time of this writing, i am using xpand 1.0 nightly builds from http://download.eclipse.org/modeling/m2t/xpand/updates/nightly/ )
- add the mwe update site ( http://download.eclipse.org/modeling/emft/mwe/updates/nightly/ )
-
select mwe and xpand:
- after the obligatory restart, do yourself the favour and set the platform encoding to utf-8 !
creating a generator project
xpand code generators are hosted in eclipse plug-ins, mainly because this makes handling the classpath a lot easier. people have reportedly used maven to run xpand code generators, but we won't go down this road today. let's create a simple generator project:
- open the new project wizard and choose xpand project from the list
- choose a meaningful name for your project (e.g. org.xpand.example.gettingstarted
- select create a sample emf based xpand project
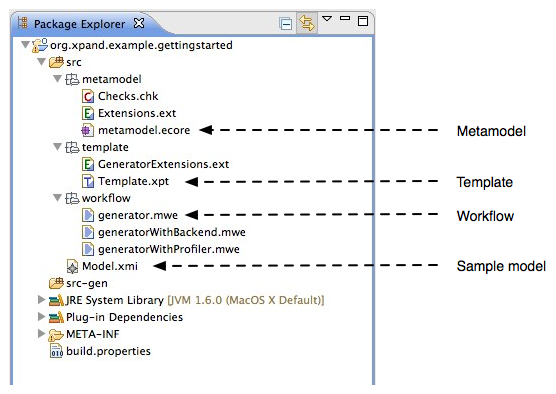
after clicking finish , the wizard will create an sample generator project for you:
before we can start working with this project, we need to perform some clean-up actions:
- open src/metamodel/checks.chk and delete all its contents
- open src/metamodel/extensions.chk and delete all its contents
- open src/template/generatorextensions.ext and delete all its contents
- delete src/model.xmi
- don't forget to save all modified files
creating the metamodel
as mentioned before, we need to define the structure of our models before we can actually start writing the code template.
xpand is capable of understanding a variety of metamodel types. for
example, if you have an xml schema file, you can use this as a
metamodel and thereby enable xpand to use xml files which are compliant
to your schema as input models. or, if you already have a bunch of java
files making up your data model, you can use those to drive xpand code
generation. in this tutorial, however, we will be using an ecore
metamodel to define the structure of our models. the project has
already been configured to support ecore metamodels, so all we need to
do is open
metamodel.ecore
and define the structure:
- please open src/metamodel/metamodel.ecore
-
remove the following elements from the metamodel:
feature
,
entity
,
datatype
,
type
,
model
. the metamodel should now be empty:
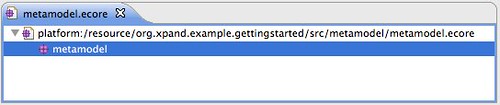
- select package metamodel (as depicted in the screenshot above) and add a new eclass ( context menu -> new child -> eclass ). use the properties view to change the name of the newly created eclass to model .
- create a new eclass form
-
select the newly created eclass
form
and add the following
eattribute
s:
- name , set the etype to estring
- description , etype = estring
- title , etype = estring
-
select eclass
form
and add a new
ereference
, setting its attributes as follows:
- name = forms
- etype = form
- containment = true
- upperbound = -1 (meaning: unlimited)
-
create a new eclass
field
and add the following eattributes to it:
- name , etype = estring
- lable , etype = estring
-
create another eclass
textfield
, setting its properties as follows:
- name = textfield
- esuper types = field
-
add one eattribute
text
to
textfield
:
- name = text , etype = estring
-
add an eclass
multilinetextfield
to the metamodel:
- name = multilinetexttield
- esuper types = textfield
-
now that we have everythign in place, we finally need to add a reference from
form
to
field
so we can later add fields to a form. select eclass
form
and add an ereference to it, setting its properties as follows:
- name = fields
- etype = field
- containment = true
- upperbound = -1 (meaning: unlimited)
.
creating a model
let's now create a model that follows the structure of the metamodel:
- in metamodel.ecore , select eclass model
- create a model instance by choosing create dynamic instance... from the context menu
- save the model file to src/model.xmi
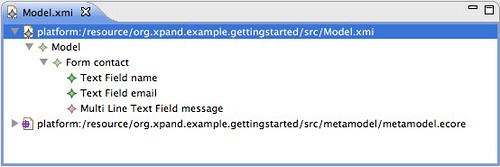
the model file editor will now open and you can use the tree editor to input the following model:
-
add a
form
to the model, seeting the following properties:
- name: context
- description: send your feedback
- title: contact form
-
add a
textfield
to the
form
, setting the following properties:
- name: name
- label: name
-
add another
textfield
to the
form
, setting the following properties:
- name: email
- label: email
-
add a
multilinetextfield
to the
form
, setting the following properties:
- name: message
- label: message
your model should now look like this:
creating a code generator
as mentioned before, we will create a code generator for simple forms. nothing too fancy, but enough to give you an idea of how to create generator templates.
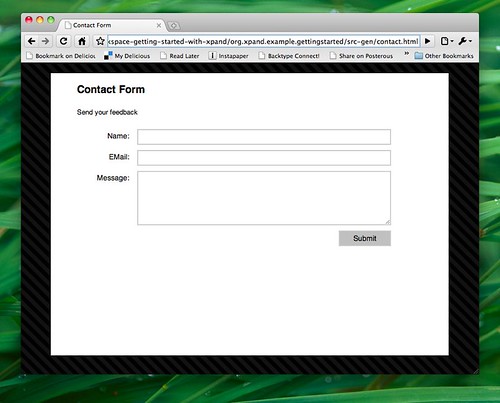
the result will look like this:
open src/template/template.xpt and replace its contents with the following text:
«import metamodel»
«define main for model»
«expand form foreach forms»
«enddefine»
on the first line, we import the metamodel so that the generator (and the editor as well) knows about the structure of our model. on line 2 - 4 we define a code template named main , making sure it is bound to model elements of type model . the template doesn't do much, except to call another template (which we will define in a minute) named form with the collection of form s, contained in the reference forms of the current form.
add the following lines to the template file, defining the template for the html file:
«define form for form»
«file name + ".html"»
<!doctype html public "-//w3c//dtd xhtml 1.0 transitional//en" "http://www.w3.org/tr/xhtml1/dtd/xhtml1-transitional.dtd">
<html xmlns="http://www.w3.org/1999/xhtml">
<head>
  <title>«this.title»</title>
  <meta http-equiv="content-type" content="text/html; charset=utf-8" />
  <link rel="stylesheet" type="text/css" href="../static/style.css" />
</head>
in the first line, we start the template by specifying its name ( form ) and the type it is bound to ( form ). on the next line, we use the file statement to specify the file the output is going to be written to. the name of the file is derived by concatenating the attribute name of the current form and the string literal ".html" .
continue the template by appending the following text:
<body>
  <div id="page-wrap">
    <h1>«this.title»</h1><br /><br />
    <p>«this.description»</p>
    <div id="form-area">
obviously, this piece of template code will create part of the body of the html page. again, we will access attributes of the current form (as read from the model) and insert their values into the template (in this case, the title and the description). by the way, you can omit the this. prefix in front of the variable names.
the template goes on with the following text:
      <form method="post" action="form.php">
        «expand field foreach this.fields»
        <input type="submit" name="submit" value="submit" class="submit-button" />
      </form>
      <div style="clear: both;"></div>
    </div>
  </div>
</body>
</html>
«endfile»
«enddefine»
the expand statement will invoke yet another subtemplate with the name field . this sub template will be called for each element in the fields attribute (reference) of the current form .
you might recall that we we defined three different kinds of >field s in the metamodel:
- field (which is the super class for the other two field types
- textfield
- multilinetextfield
as their names imply, a textfield will be a single line text entry field, whereas multilinetextfield will be a multiline text input field. we somehow need to be able to render different htmnl code for each of these different text field types.
as mentioned in the introduction, xpand is not only type safe, but also supports polymorphic dispatch . this basically means we will create three templates (one for each of the different field types) with the same name . when evaluating the code template, the xpand generator will dispatch to the appropriate template by matching the most concrete type of the current model element.
add the following code to the template file:
«define field for field»
«error "should not happen"»
«enddefine»
«define field for textfield»
        <label for="«this.name»">«this.label»:</label>
        <input type="text" name="«this.name»" id="«this.name»" />
«enddefine»
«define field for multilinetextfield»
        <label for="«this.name»">«this.label»:</label>
        <textarea name="«this.name»" id="«this.name»" rows="20" cols="20"></textarea>
«enddefine»
as you can see, all three templates have the same name. only the type they are bound to differs. this is enough to let xpand know which template to choose according to the type of the current model element. let's suppose xpand is iterating the model and the current model element is a textfield . although field is a direct super type of textfield , xpand will not invoke the first template ( «define field for field» ), but the second template ( «define field for textfield» ), as this is the most concrete match for the type of the model element.
running the code generator
if you have followed the above steps, running the code generator is a piece of cake:
open the context menu on src/workflow/workflow.mwe and select run as -> mwe workflow
this will start the code generator. you will see some log messages in the console view. if all went well, the output in the console reads something like this:
...
1503 info  generator          - written 1 files to outlet [default](src-gen)
1503 info  workflowrunner     - workflow completed in 650ms!
the result of the code generation can be found in src-gen/contact.html . as this file has some dependencies to css/image files, please download the files from the static folder ( here ) and place them in your project before opening contact.html in your browser.
where to go from here
if you want to learn more about xpand, be sure to attend my talk use models and let the computer do the grunt work with xpand at eclipsecon 2010. i'll show some more advanced topics in this talk (such as generator cartridges, using xtend to augment your models, partitioning your code templates, using other metamodels to define your models).
xpand comes with an extensive documentation (just go to help -> help contents -> xpand documentation in eclipse). you can also get help on xpand in the eclipse community forums
should you need help, itemis (the company i work with) offers training and consulting for xpand and a host of other modeling related technologies.
no doubt you have heard about xtext . xpand and xtext go together great: you can use xtext to define the structure of your models and create great-looking text editors to edit your models. then, use xpand to create code generators that take your textual models and turn them into running software. actually, xtext comes with a wizard that you to create a code generator project for your dsl.
downloads
the code for this tutorial can be found in my svn repository on google code .
Opinions expressed by DZone contributors are their own.
Comments