Getting Started With HERE Using Kotlin and the Android SDK
Kotlin is the new 'hotness' for Android app development.
Join the DZone community and get the full member experience.
Join For FreeAbout a month or so ago, I wrote a tutorial on getting started with HERE using Java and the Android SDK. Even though documentation for the job already existed, I wanted to put my own spin on the process to try to make it a little easier.
While Java is great, it is becoming a relic of time and is slowly being replaced with Kotlin, which is considered to be the new hotness. Kotlin can compile to bytecode for the JVM, and in these circumstances, we can reproduce all of our Java applications with Kotlin, an entirely different but increasingly popular language.
In this tutorial, we’re going to learn how to build an Android application using Kotlin that displays a HERE map.
To get some perspective, we’re going to try to accomplish the following:
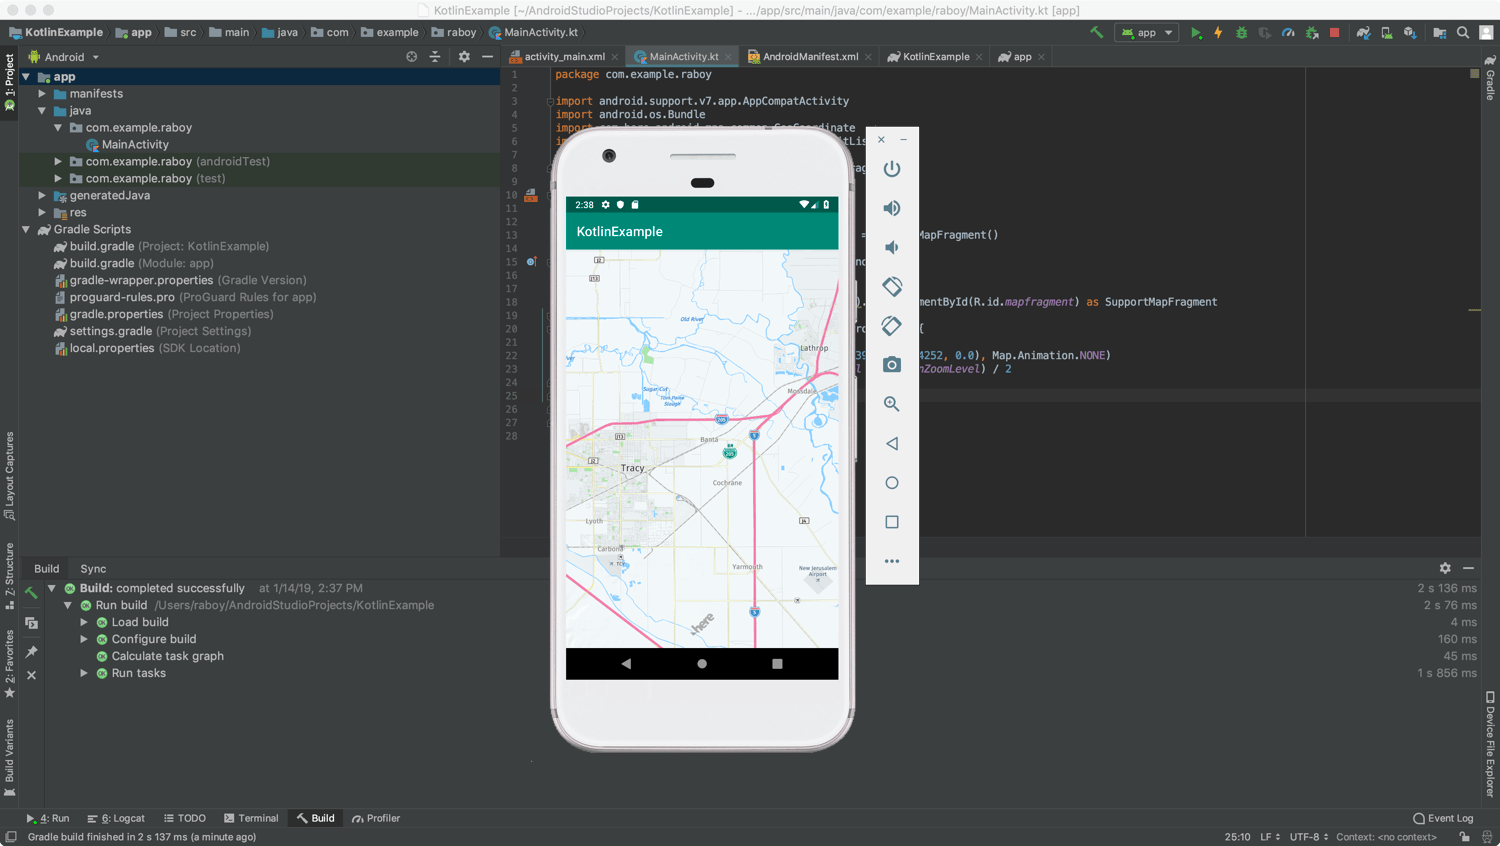
If you think the above image looks familiar, it is because it is the same example I used in my previous tutorial. We are literally just going to be displaying an interactive map. While it might sound easy, there is some configuration that must be done to make it possible.
Creating a New Android Studio Project With Kotlin Support
You don’t need Android Studio to work with Kotlin or to build Android applications, but it makes life a whole lot easier. For this reason, Android Studio will be the focus of our example.
I’m using Android Studio 3.3, so if you’re using a different version, you might have to fill in the gaps.
To start things off, choose to create a new project.
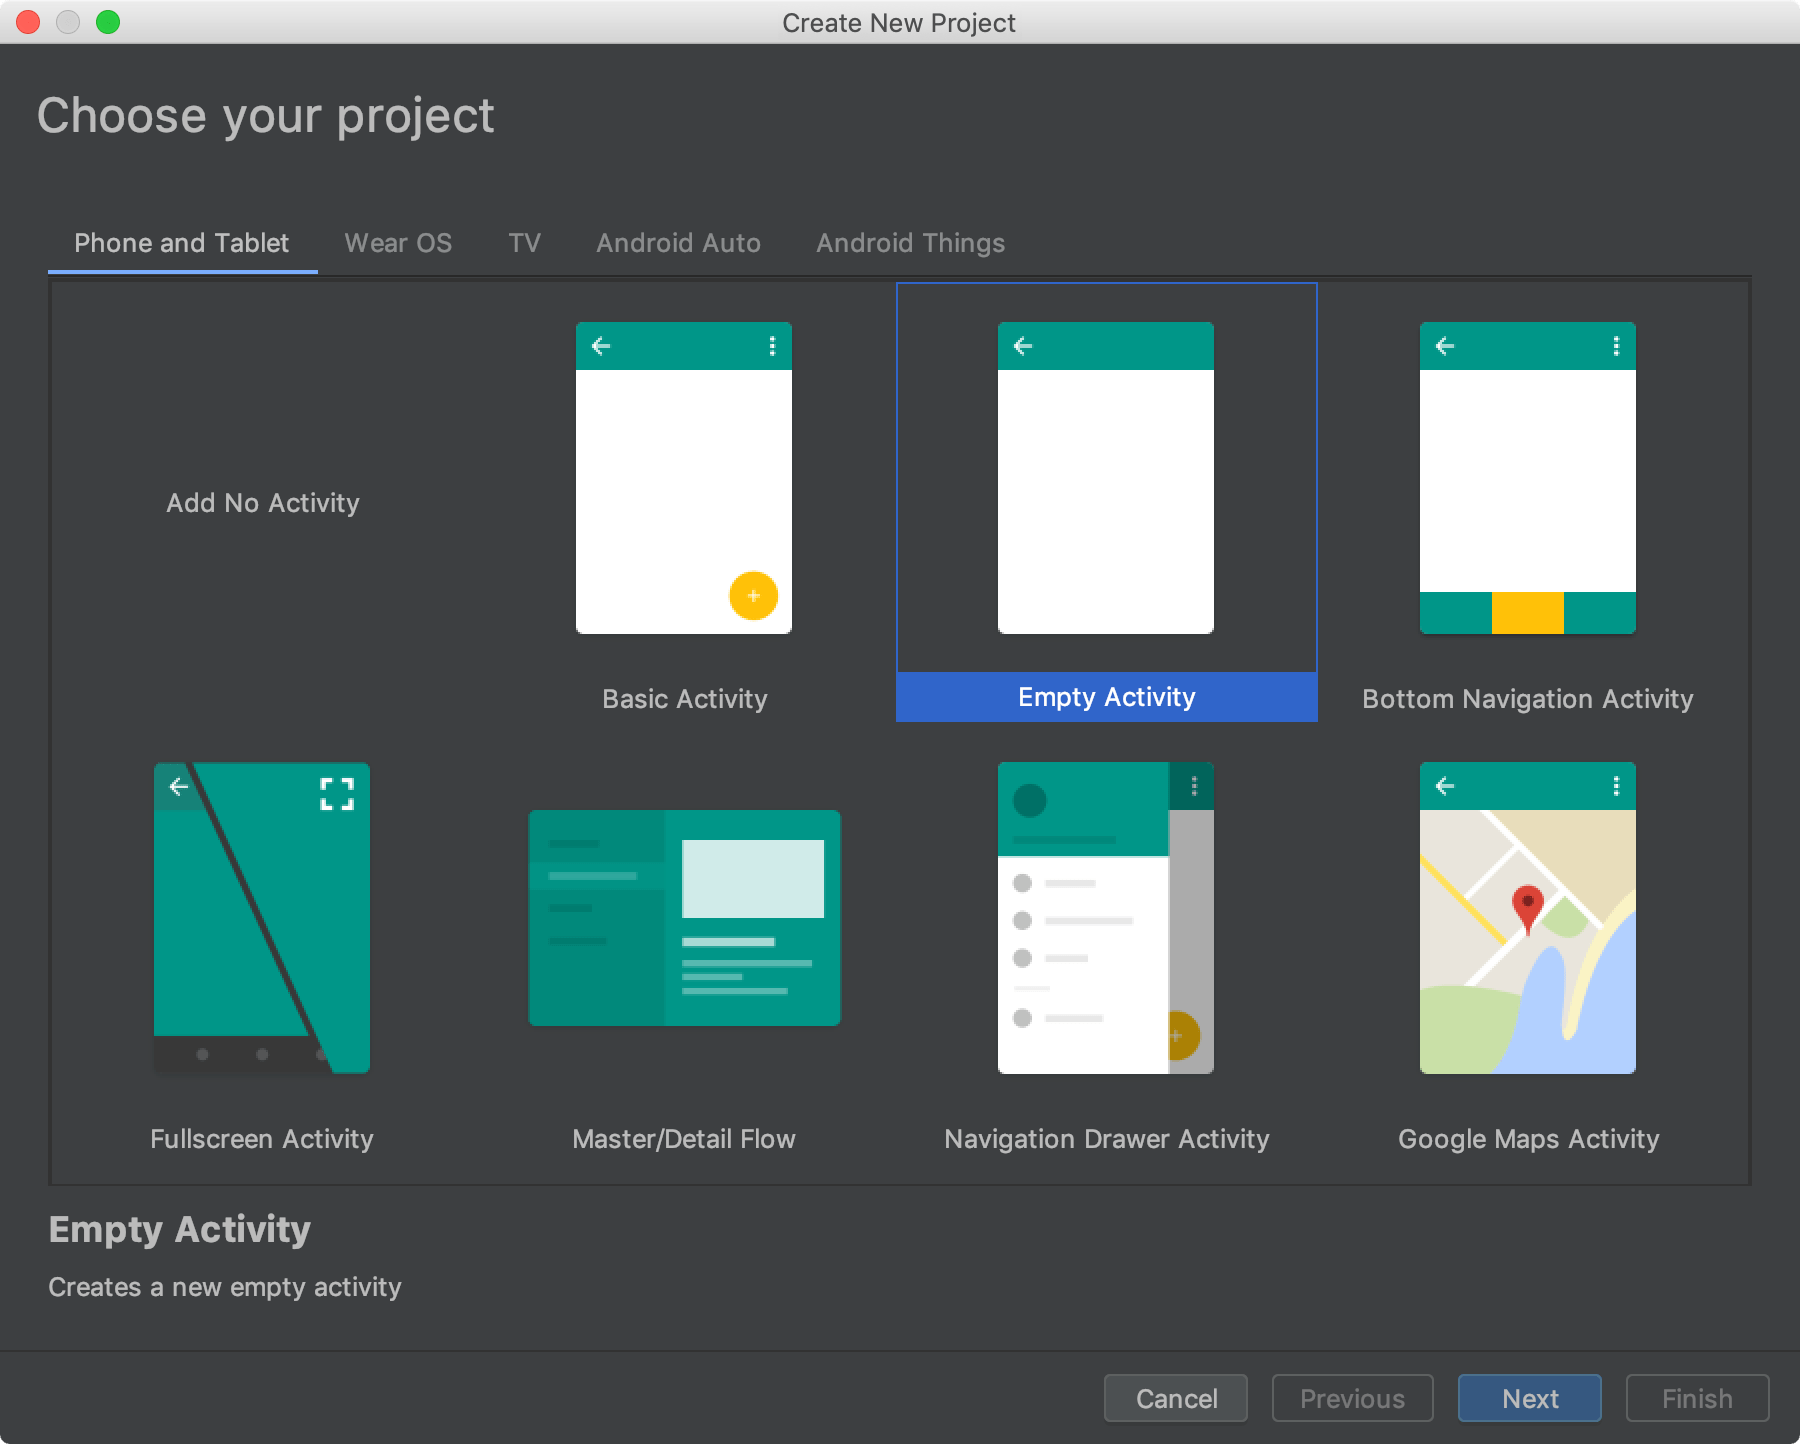
Because this is a very basic example, make sure to create a project with an empty activity. If you’re feeling adventurous, pick what you feel is the most appropriate or make an attempt to use your existing project.
After choosing to use an empty activity, we need to define our API versions, package naming, and language.
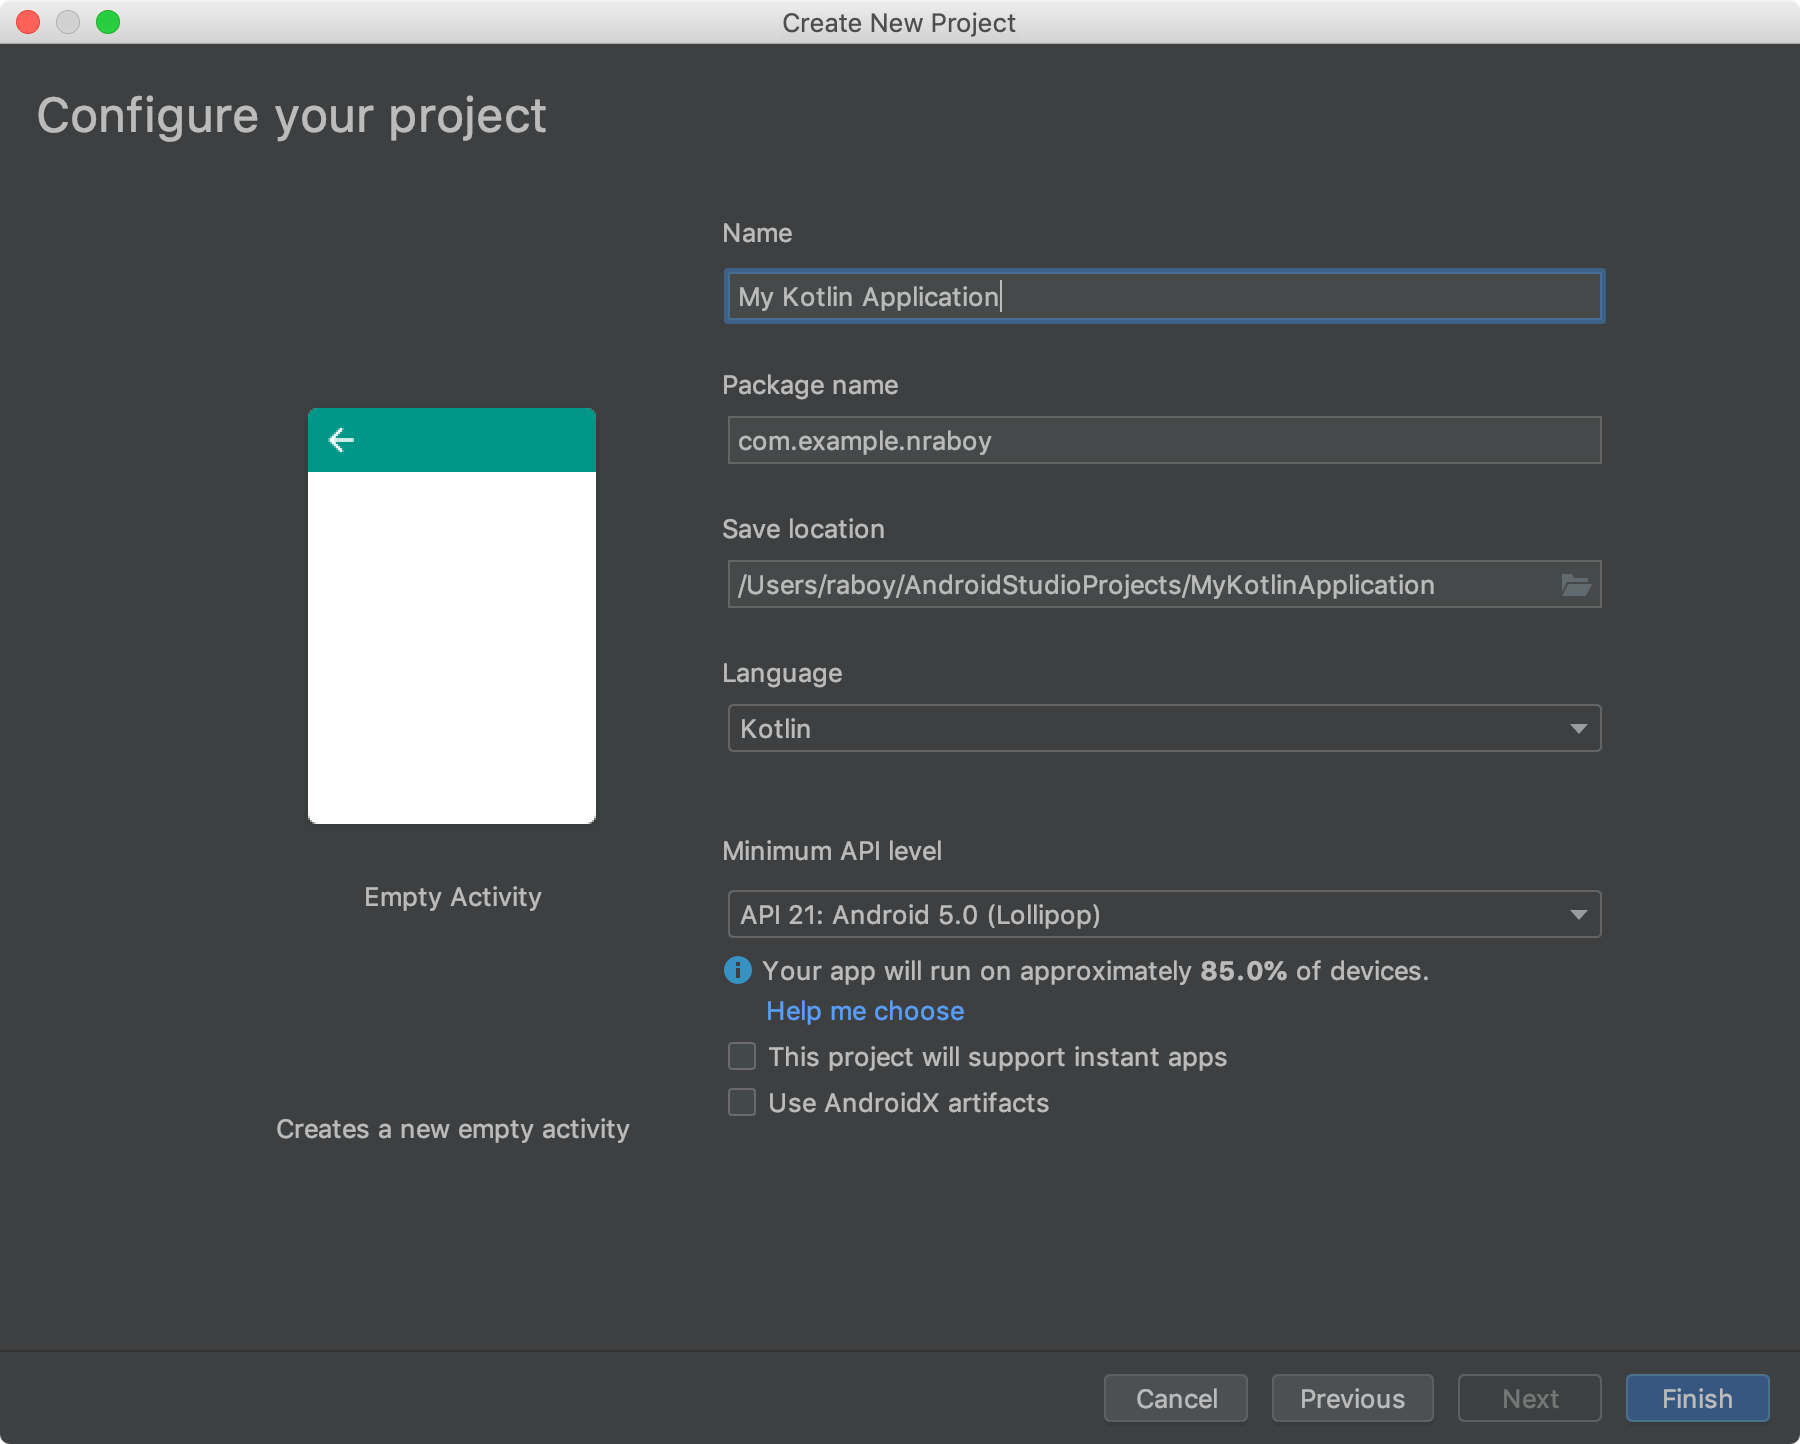
There are two very important things to take note of at this step. You need to carefully pick your package name and make note of it because this package name will need to be used in your HERE Developer Portal. Mismatching the package will cause your API keys to not work. You’ll also need to choose Kotlin as the language rather than Java.
At this point, your project should be created. Android Studio will probably spend a bit of time synchronizing your dependencies.
Installing and Configuring the HERE Android SDK
This is where we start integrating the HERE Android SDK so that it can be used in development. If you don’t already have a HERE developer account, make sure you create one here. Don’t worry, developer accounts are free and you don’t even need to provide a credit card.
You’ll want to create a new project in your developer account and generate a new Android SDK Starter.
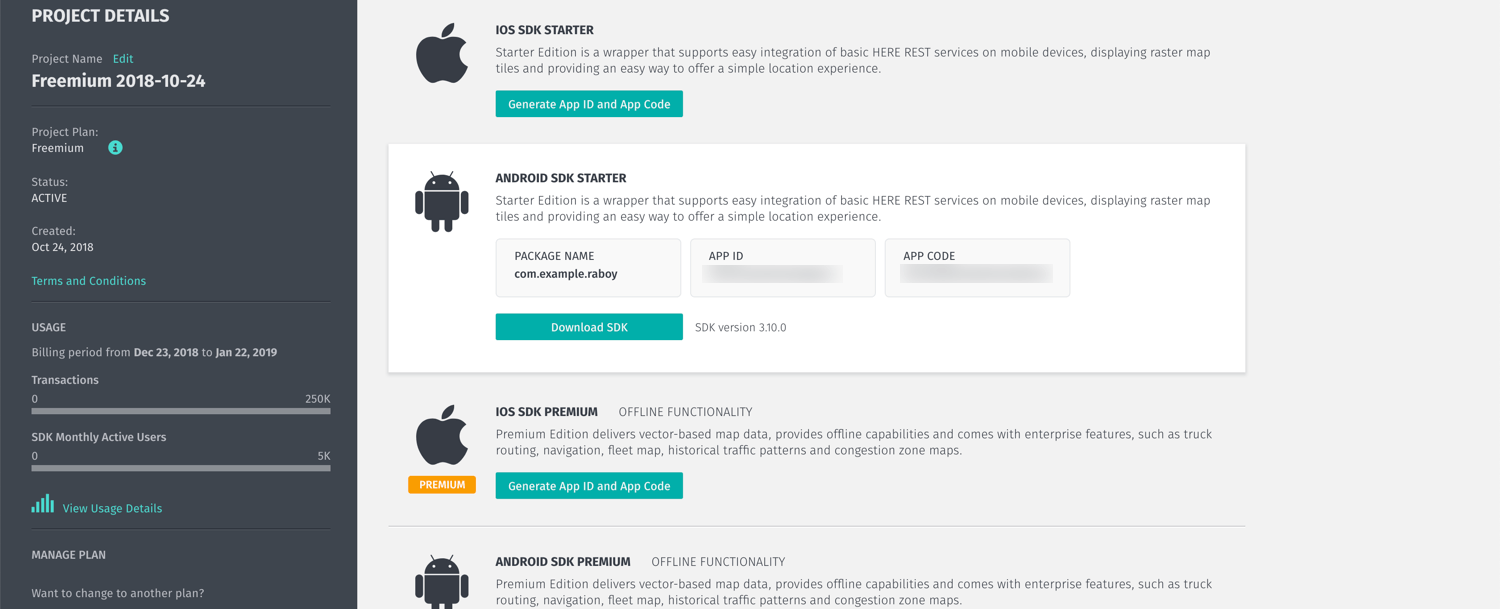
Remember to provide your Android package when generating your API tokens. After generating a new Android application in the portal, you’ll need to download the SDK.
After downloading the SDK, locate the HERE-sdk.aar file and place it in your project’s app/libs directory.
Within Android Studio, open the project’s build.gradle file and include the following:
apply plugin: 'com.android.application'

apply plugin: 'kotlin-android'

apply plugin: 'kotlin-android-extensions'

android {
    compileSdkVersion 28
    defaultConfig {
        applicationId "com.example.raboy"
        minSdkVersion 21
        targetSdkVersion 28
        versionCode 1
        versionName "1.0"
        testInstrumentationRunner "android.support.test.runner.AndroidJUnitRunner"
    }
    buildTypes {
        release {
            minifyEnabled false
            proguardFiles getDefaultProguardFile('proguard-android-optimize.txt'), 'proguard-rules.pro'
        }
    }
    repositories {
        flatDir {
            dirs 'libs'
        }
    }
}

dependencies {
    implementation fileTree(dir: 'libs', include: ['*.jar'])
    implementation"org.jetbrains.kotlin:kotlin-stdlib-jdk7:$kotlin_version"
    implementation 'com.android.support:appcompat-v7:28.0.0'
    implementation 'com.android.support.constraint:constraint-layout:1.1.3'
    testImplementation 'junit:junit:4.12'
    androidTestImplementation 'com.android.support.test:runner:1.0.2'
    androidTestImplementation 'com.android.support.test.espresso:espresso-core:3.0.2'
    implementation(name:'HERE-sdk', ext:'aar')
    implementation 'org.locationtech.jts:jts-core:1.15.0'
    implementation 'com.google.code.gson:gson:2.8.0'
}
Most of the above configuration already existed in our build.gradle file. We added the following so that we can use local libraries:
buildTypes {
    release {
        minifyEnabled false
        proguardFiles getDefaultProguardFile('proguard-android-optimize.txt'), 'proguard-rules.pro'
    }
}
After including our local libraries, we need to use them as dependencies, hence the following implementation lines:
implementation(name:'HERE-sdk', ext:'aar')
implementation 'org.locationtech.jts:jts-core:1.15.0'
implementation 'com.google.code.gson:gson:2.8.0'
As of now, the HERE Android SDK has been included for use in our project but not yet configured. The rest of the configuration will happen in the project’s AndroidManifest.xml file. Open the project’s AndroidManifest.xml file and include the following:
<?xml version="1.0" encoding="utf-8"?>
<manifest xmlns:android="http://schemas.android.com/apk/res/android"
    package="com.example.raboy">
    <uses-permission android:name="android.permission.WRITE_EXTERNAL_STORAGE"/>
    <uses-permission android:name="android.permission.ACCESS_NETWORK_STATE"/>
    <uses-permission android:name="android.permission.INTERNET"/>
    <uses-permission android:name="android.permission.ACCESS_WIFI_STATE"/>
    <application
            android:allowBackup="true"
            android:icon="@mipmap/ic_launcher"
            android:label="@string/app_name"
            android:roundIcon="@mipmap/ic_launcher_round"
            android:supportsRtl="true"
            android:theme="@style/AppTheme"
            android:hardwareAccelerated="true">
        <meta-data android:name="com.here.android.maps.appid" android:value="APP-ID-HERE"/>
        <meta-data android:name="com.here.android.maps.apptoken" android:value="APP-TOKEN-HERE"/>
        <activity android:name=".MainActivity">
            <intent-filter>
                <action android:name="android.intent.action.MAIN"/>
                <category android:name="android.intent.category.LAUNCHER"/>
            </intent-filter>
        </activity>
    </application>
</manifest>
There are a few things that we added to make using the HERE Android SDK possible. First, we needed to define permissions so that the application could use various location features on the device. These permissions are seen below:
<uses-permission android:name="android.permission.WRITE_EXTERNAL_STORAGE"/>
<uses-permission android:name="android.permission.ACCESS_NETWORK_STATE"/>
<uses-permission android:name="android.permission.INTERNET"/>
<uses-permission android:name="android.permission.ACCESS_WIFI_STATE"/>
After adding the appropriate permissions, we need to link our application to the credentials found in our HERE Developer Portal. This is where the app id and app code become important.
<meta-data android:name="com.here.android.maps.appid" android:value="APP-ID-HERE"/>
<meta-data android:name="com.here.android.maps.apptoken" android:value="APP-TOKEN-HERE"/>
Make sure that you use the tokens found in your account; otherwise, the map will not display and you won’t have all the great features that HERE has to offer.
Finally, you’ll notice that we have enabled hardware acceleration through the android:hardwareAccelerated="true" line.
We can start using the HERE Android SDK for development as of now. To be honest, most of the above configuration and setup was the same as the Java version found in my previous tutorial.
Displaying an Interactive Map on the Screen With Kotlin
Kotlin is great, but I’m far more fluent in Java and other programming languages. While everything you see next will work, go easy on me because I’m not a Kotlin professional and power user. I’m learning like everyone else, so if you find something that can be optimized, let me know in the comments.
We’re going to start by creating our simple UI. Open the project’s activity_main.xml and include the following:
<LinearLayout
    xmlns:android="http://schemas.android.com/apk/res/android"
    xmlns:tools="http://schemas.android.com/tools"
    android:layout_width="fill_parent"
    android:layout_height="fill_parent"
    android:orientation="vertical" >
    <fragment
        class="com.here.android.mpa.mapping.SupportMapFragment"
        android:id="@+id/mapfragment"
        android:layout_width="match_parent"
        android:layout_height="match_parent"/>
</LinearLayout>
Take note of the mapfragment fragment id because it will be used in our Kotlin code. With our super simple UI out of the way, let’s get into the bulk of our code.
Open the project’s MainActivity.kt file and include the following:
package com.example.raboy

import android.support.v7.app.AppCompatActivity
import android.os.Bundle
import com.here.android.mpa.common.GeoCoordinate
import com.here.android.mpa.common.OnEngineInitListener
import com.here.android.mpa.mapping.Map
import com.here.android.mpa.mapping.SupportMapFragment

class MainActivity : AppCompatActivity() {

    private var map : Map = Map()
    private var mapFragment : SupportMapFragment = SupportMapFragment()

    override fun onCreate(savedInstanceState: Bundle?) {
        super.onCreate(savedInstanceState)
        setContentView(R.layout.activity_main)
        mapFragment = getSupportFragmentManager().findFragmentById(R.id.mapfragment) as SupportMapFragment
        mapFragment.init { error ->
            if (error == OnEngineInitListener.Error.NONE) {
                map = mapFragment.map
                map.setCenter(GeoCoordinate(37.7397, -121.4252, 0.0), Map.Animation.NONE)
                map.zoomLevel = (map.maxZoomLevel + map.minZoomLevel) / 2
            }
        }
    }
}
In the above code, we are defining two private variables. The mapFragmentvariable will be tied to our UI component, while the map variable will allow us to interact with the map component residing in the UI component.
After the activity is created, we get our fragment and initialize it. If there are no errors, we can center the map and set the zoom level. Of course, we could do other things such as find places, but this is a simple example.
Run the application and see all of its simplistic glory!
Conclusion
You just saw how to use Kotlin and the HERE Android SDK to create an Android application with maps and location services support. For this particular example, most of the tutorial was preparation and it really wasn’t too different than the Java version that I had written about previously. However, the core application logic used Kotlin instead of Java.
Published at DZone with permission of Nic Raboy. See the original article here.
Opinions expressed by DZone contributors are their own.
Comments