Getting Started With Microsoft Tool Playwright for Automated Testing
In this blog, we will deep dive into the various features of Playwright and how we can perform end-to-end testing with Playwright with detailed examples.
Join the DZone community and get the full member experience.
Join For FreeIntroduction to Playwright Testing
Playwright is a powerful and versatile automation library developed by Microsoft. It enables developers and testers to automate web applications across multiple browsers with ease. This guide will walk you through the basics of using Playwright for test automation, from installation to writing and running your first tests. Playwright automation supports Chromium, Firefox, and WebKit, allowing you to test across different browsers.
In this blog, we will deep dive into the various features of Playwright and how we can perform end-to-end testing with Playwright with detailed examples.
Key Features of Playwright
Below are some of the key features of the Playwright testing tool:
- Cross-browser testing: Playwright supports all major browsers out of the box, including Chromium, Firefox, and WebKit (Safari). This cross-browser support allows you to write tests once and run them across multiple browsers without any additional configuration or setup. Playwright ensures consistent behavior and API across all supported browsers, making it easier to maintain and scale your test suite. Playwright provides built-in support for device emulation using browsers like Safari and Chrome.
- Headless and headful modes: Playwright allows you to run tests in headless mode (without a visible browser window) or headful mode (with a visible browser window). Headless mode is useful for running tests in CI/CD pipelines. Headful mode is beneficial for debugging, visual inspection, or when you need to interact with the browser during test execution.
- Automatic waiting: Playwright automatically waits for elements to be ready before interacting with them, reducing the risk of test flakiness caused by timing issues. It employs intelligent waiting strategies, such as waiting for network requests to complete or DOM mutations to occur, ensuring that tests are executed reliably and consistently.
- Network interception: Playwright provides powerful network interception capabilities, allowing you to intercept and modify network requests and responses during test execution. This feature is useful for testing scenarios involving APIs, mocking responses, simulating network conditions, or bypassing authentication mechanisms.
- Multiple contexts: Playwright allows you to create multiple browser contexts within a single test run, effectively simulating different user sessions or environments. This feature is particularly useful for testing scenarios involving multi-user interactions, such as chat applications or collaborative tools.
- Powerful selectors: Playwright offers a rich set of selector strategies, including CSS selectors, XPath, text selectors, and more. It also provides advanced selector options, such as handling dynamic elements, selecting elements based on their visibility or accessibility, and selecting elements within iframes and shadow DOMs, which are common in modern web applications.
- Screenshot and video capture: Playwright enables you to capture screenshots and record videos of your test runs with a single line of code. This feature is invaluable for debugging, visual regression testing, and generating visual artifacts for documentation or reporting purposes.
- Isolation and parallelism: Playwright provides built-in support for running tests in isolation and in parallel. Test isolation ensures that each test run is independent and doesn't interfere with other tests, preventing state pollution and improving test reliability. Parallel test execution can significantly speed up your test suite by utilizing multiple CPU cores or machines, reducing overall test execution time.
Playwright Test Automation Framework
Playwright's architecture is designed to provide a robust, flexible, and high-performance framework for browser automation. Its support for multiple browser engines, isolated browser contexts, and powerful API makes it an excellent choice for web scraping, automated testing, and other browser automation tasks. The architecture ensures that tests and scripts are reliable, efficient, and easy to maintain.
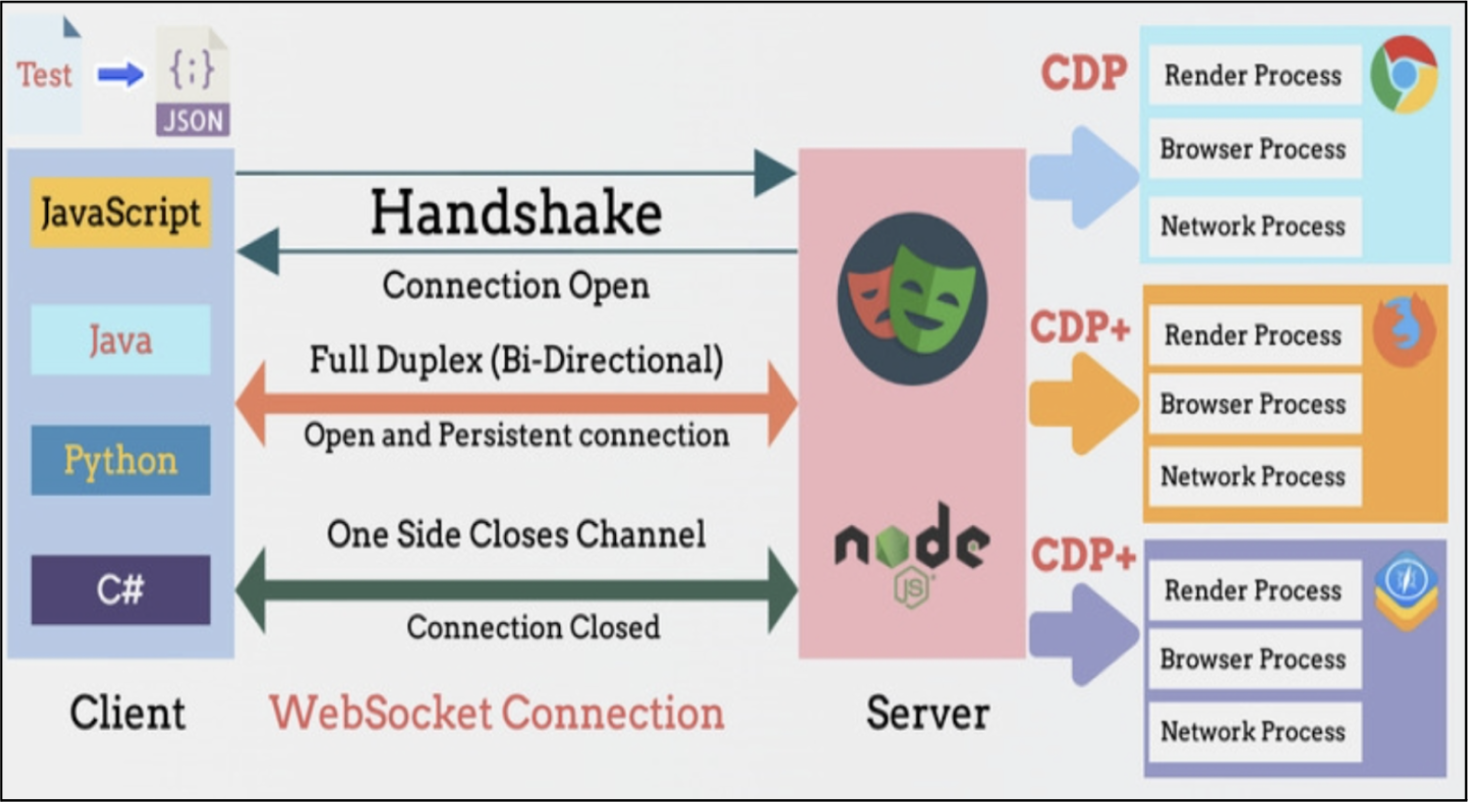
Credit: ProgramsBuzz
Key Components and Processes
1. Client Side (Automation Scripts)
- Languages supported: Playwright supports JavaScript and TypeScript "natively", while also providing "bindings" for Java, Python, and C# for writing automation scripts.
- Test script creation: Users write test scripts in their preferred language. These scripts include test cases, interaction commands, and assertions. JSON is often used for configuration and data exchange.
2. WebSocket Connection
- Handshake: When a test script is executed, it initiates a connection to the Playwright server (Node.js). This connection involves an initial handshake to establish communication.
- Full duplex (bi-directional) communication: Once connected, there is a bi-directional communication channel between the client and the server. This is essential for sending commands to the browser and receiving responses or events in real-time.
- Open and persistent connection: The WebSocket connection remains open and persistent throughout the session, allowing continuous interaction between the test scripts and the browser.
- Connection closure: After test execution, the connection can be closed either by the client or the server, marking the end of the session.
3. Server Side (Node.js)
- Node.js server: The server side is managed by a Node.js application, which orchestrates the interaction between the client scripts and the browsers.
- Handling commands and events: The Node.js server receives commands from the client, processes them, and sends appropriate instructions to the browsers. It also listens for events from the browser and relays them back to the client.
4. Browser Automation (CDP and CDP+)
- CDP (Chrome DevTools Protocol): Playwright utilizes the CDP for interacting with Chromium-based browsers. CDP manages the render, browser, and network processes, which are essential for rendering pages, managing browser sessions, and handling network interactions.
- CDP+: The image also mentions CDP+ for browsers like Firefox and WebKit (Safari). Playwright extends support to these browsers by using protocols similar to CDP, ensuring a consistent API across different browsers. Each browser process (render, browser, network) is managed to simulate user interactions accurately.
How Playwright Test Execution Works
- The client (test script) sends instructions to the server over the WebSocket connection.
- The server receives these instructions and translates them into commands that can be understood by the browser instances.
- The server communicates with the browser instances using either CDP or CDP+, depending on the requirements.
- The browser instances execute the commands, such as navigating to web pages, interacting with elements, or capturing screenshots.
- The results or data from the browser instances are sent back to the server.
- The server relays the results or data back to the client over the WebSocket connection.
Getting Started With Playwright Testing
Below are the steps for performing Playwright installation on a Windows machine:
Step 1: Installation of Node.JS
Playwright is code is based on Node.js, so we need node.js installed in our system, we can do this using the official website and download the latest version (https://nodejs.org/), after installing it be can validate the installation status using a command on the terminal.
node -v
npm -v
// These commands will display installed Node.js and npm versions
Step 2: Create a New Node.js Project
In this step, we will create a new directory for the playwright project and navigate to it using the terminal.
mkdir my-playwright-project
cd my-playwright-project
npm init -y
The above commands will create a new Node.js project with a `package.json` file.
For detailed steps on installation follow the link.
Folder Structure of Playwright Automation Tool
The below screenshots demonstrate how Playwright creates a default folder hierarchy when it first launches. Below is a detailed description of each of these files and folders that the Playwright framework has.
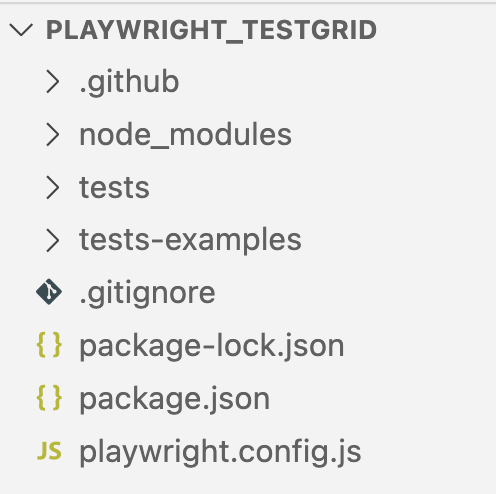
The image shows the folder structure of a Playwright automation tool project. Here's an explanation of each item in the structure:
.github: This directory typically contains GitHub-specific files and configurations, such as GitHub Actions workflows.node_modules: This directory contains all the Node.js modules installed for the project. These are the dependencies specified in package.json.tests: This directory likely contains the Playwright test files. These files define the tests that will be executed using Playwright. We normally create a new test file in this folder.tests-examples: This directory contains example test files or templates that can be used as references when writing new tests..gitignore: This file specifies which files and directories should be ignored by Git. Commonly ignored files include node_modules, logs, and build directories.package-lock.json: This file is automatically generated and includes the exact versions of installed dependencies. It ensures that the project is consistently installed across different environments.package.json: This file contains metadata about the project, including its dependencies, scripts, and other configurations. It is crucial for managing the project with Node.js.playwright.config.js: This configuration file is specific to Playwright. It defines settings and options for running Playwright tests, such as the browser settings, test directory, timeout configurations, etc.
Create First Script in Playwright With Detailed Example
Before creating the first script we need to understand a few concepts in Playwright.
Async and Await
async and await are used to work with asynchronous code in JavaScript. They are essential when dealing with operations that take time to complete, such as network requests or file operations.
async: This keyword is used to define an asynchronous function.await: This keyword is used to wait for a Promise to resolve before continuing execution.
Example
const { chromium } = require('playwright');

(async () => {
const browser = await chromium.launch();
const page = await browser.newPage();
await page.goto('https://www.example.com');
// Wait for the page to load and get the title
const title = await page.title();
console.log(`Page title: ${title}`);
await browser.close();
})();
test()
In Playwright's test runner (@playwright/test), the test is used to define individual test cases.
Example
const { test, expect } = require('@playwright/test');

test('basic test', async ({ page }) => {
await page.goto('https://example.com');
const title = await page.title();
expect(title).toBe('Example Domain');
});
This example defines a basic test that navigates to a page and checks if the title is "Example Domain."
describe()
describe is used to group related tests together. This helps in organizing tests better, especially when you have a large number of tests.
const { test, expect } = require('@playwright/test');
test.describe('Example Group', () => {
test('first test', async ({ page }) => {
await page.goto('https://example.com');
const title = await page.title();
expect(title).toBe('Example Domain');
});

test('second test', async ({ page }) => {
await page.goto('https://example.com');
const content = await page.textContent('h1');
expect(content).toBe('Example Domain');
});
});
Hooks
Hooks are functions that are executed at specific points in the test lifecycle. Common hooks include beforeAll, afterAll, beforeEach, and afterEach.
const { test, expect } = require('@playwright/test');

test.describe('Example Group with Hooks', () => {
test.beforeAll(async () => {
console.log('Setup before all tests');
});

test.afterAll(async () => {
console.log('Cleanup after all tests');
});

test.beforeEach(async ({ page }) => {
await page.goto('https://example.com');
});

test.afterEach(async ({ page }) => {
await page.close();
});

test('test with hooks', async ({ page }) => {
const title = await page.title();
expect(title).toBe('Example Domain');
});
});
Assertions
Assertions are used to verify that the application behaves as expected. Playwright uses except for assertions. The expect function takes an actual value and provides various matcher methods to assert against the expected value.
const { test, expect } = require('@playwright/test');

test('assertion test', async ({ page }) => {
await page.goto('https://example.com');
const title = await page.title();
expect(title).toBe('Example Domain');

const content = await page.textContent('h1');
expect(content).toBe('Example Domain');
});
Automate Your First Playwright Test Case
Let’s create a .spec file ‘testGrid.spec.js’ under the folder tests.
We are covering the scenario where the user is able to log in, navigate to the codeless automation section, verify the navigation to a new tab by clicking on the link ‘Real Device Cloud,’ return to the parent page, and log out successfully
Let’s take Playwright testing examples to test end-to-end test scenarios from login to the site with valid credentials, Navigate to the codeless automation section, verifying the navigation to a new tab by clicking on the link ‘Real Device Cloud,’ returning to the parent page, and log out successfully
Test Scenario
- Visit the Site
- Login into the site valid credential
- Verify the user is logged in by varying the text “dashboard”
- Click on the ‘codeless’ link under the automation section
- Verify the text “let's get you started with codeless automation”
- Open the link 'real device cloud' in the new tab and then back to the parent page
- Verify the text “selenium” to make sure the user is back on the parent page
- Logout from the application
Write a simple Playwright test in file ‘testGrid.spec.js’ which is covered below functionality for the website.
const { chromium, test, expect } = require("@playwright/test");

test("Testgrid.io Scenario", async ({ browser }) => {
const context = await browser.newContext();
const page = await context.newPage();

// 1. Visit the Site https://testgrid.io/
await page.goto("https://public.testgrid.io/");

// 2. Login into the site with valid credentials
await page.fill('input[name="email"]', "[email protected]");
await page.fill('input[name="password"]', "Test@1234");
await page.click('button:has-text("Sign in")');
await page.waitForTimeout(7000);


 // 3. Verify user is logged in by verifying the text "Dashboard"
await expect(page.locator("text=Dashboard")).toBeVisible();

// 4. Click on 'Codeless' link under Automation section
await page.click("text=Codeless");

// 5. Verify the text "Let's get you started with codeless automation"
await expect(
page.locator("text=Lets get you started with codeless automation")
).toBeVisible();
await page.click('[id="testcase_back_button"]');

// 6. Open the link 'Real Device Cloud' in a new tab and then back to the parent page
const [newPage] = await Promise.all([
context.waitForEvent("page"),
page.click("text=Real Device Cloud"),
]);
await newPage.waitForLoadState("domcontentloaded");
await newPage.close();
await page.bringToFront();

// 7. Verify the text "Selenium" to make sure the user is back on the parent page
await expect(page.locator("text=Selenium")).toBeVisible();

// 8. Logout from the application
await page.click('[data-toggle="dropdown"]');
 page.click("text=Logout");

await expect(page.locator("text=Forgot Password?")).toBeVisible();
await context.close();
});
Code Walkthrough
To understand the Playwright testing example script in detail. Let's undertake the above code walkthrough.
Imports the necessary Playwright modules for browser automation, testing, and assertions.
Import Required Modules:
const { chromium, test, expect } = require("@playwright/test");
Defines a test named "Testgrid.io Scenario" that uses a browser instance.
Define a Test Scenario:
test("Testgrid.io Scenario", async ({ browser }) => {Setup Browser Context and Page: Creates a new browser context and a new page within that context.
const context = await browser.newContext();
const page = await context.newPage();
Navigate to Testgrid.io: Opens the Testgrid.io website.
await page.goto("https://public.testgrid.io/");Log in to the Site: Fill in the login form with your email and password, click the sign-in button, and wait for 7 seconds.
await page.fill('input[name="email"]', "[email protected]");
await page.fill('input[name="password"]', "xxxx@1234");
await page.click('button:has-text("Sign in")');
await page.waitForTimeout(7000);
Verify Successful Login: Checks if the "Dashboard" text is visible, indicating a successful login.
await expect(page.locator("text=Dashboard")).toBeVisible();Navigate to Codeless Automation: Click on the "Codeless" link under the Automation section.
await page.click("text=Codeless");Verify Codeless Automation Page: Verify the presence of the text related to codeless automation and click the back button.
Open Real Device Cloud in New Tab: Opens the "Real Device Cloud" link in a new tab, waits for the new page to load, closes the new page, and returns to the original page.
const [newPage] = await Promise.all([
context.waitForEvent("page"),
page.click("text=Real Device Cloud"),
]);
await newPage.waitForLoadState("domcontentloaded");
await newPage.close();
await page.bringToFront();
Verify Return to Parent Page: Check if the "Selenium" text is visible to confirm the user is back on the parent page.
await expect(page.locator("text=Selenium")).toBeVisible();Logout from the Application: Clicks on the dropdown menu, selects "Logout", and closes the browser context.
await page.click('[data-toggle="dropdown"]');
page.click("text=Logout");

await expect(page.locator("text=Forgot Password?")).toBeVisible();
await context.close();
Execute The Test Cases Locally
To execute the test cases, you can use Playwright commands in your terminal. Playwright supports both headed mode (where you can see the browser window) and headless mode (where tests run in the background without a visible browser window).
In the section below you will see how we can run playwright test automation in headed and headless mode.
Run Test Cases in Headed Mode
In headed mode, you can see test cases are executed in the visible browser window.
- Open your terminal.
- Navigate to the directory where your Playwright tests are located.
- Run the command to execute the tests in headed mode.
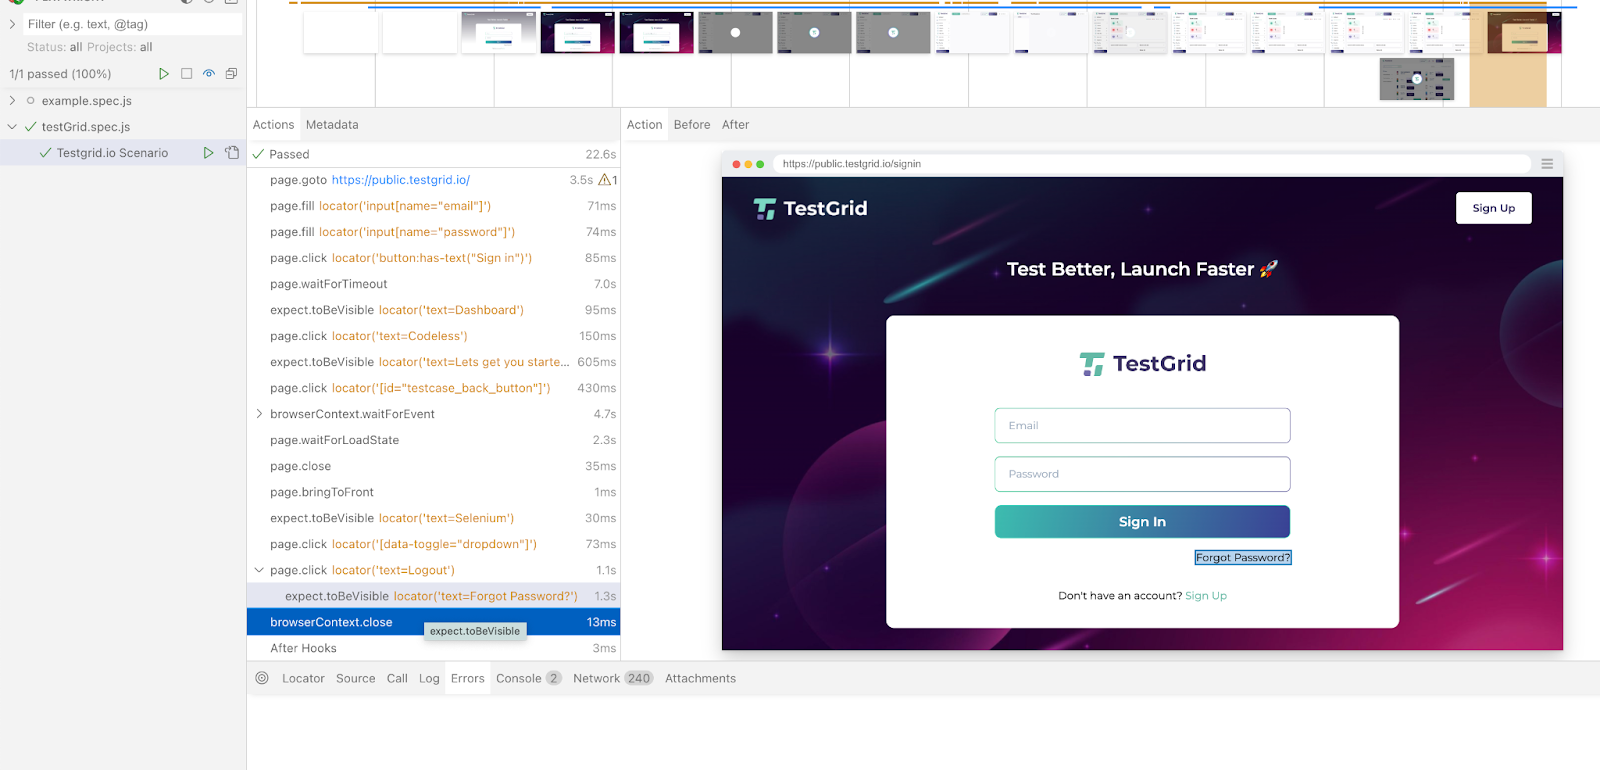
Run the command npx playwright test --ui or yarn playwright test --ui as we run the command it will open below screen. Click on the .spec file ‘testGrid.spec.js’ to run the test case in headed mode.
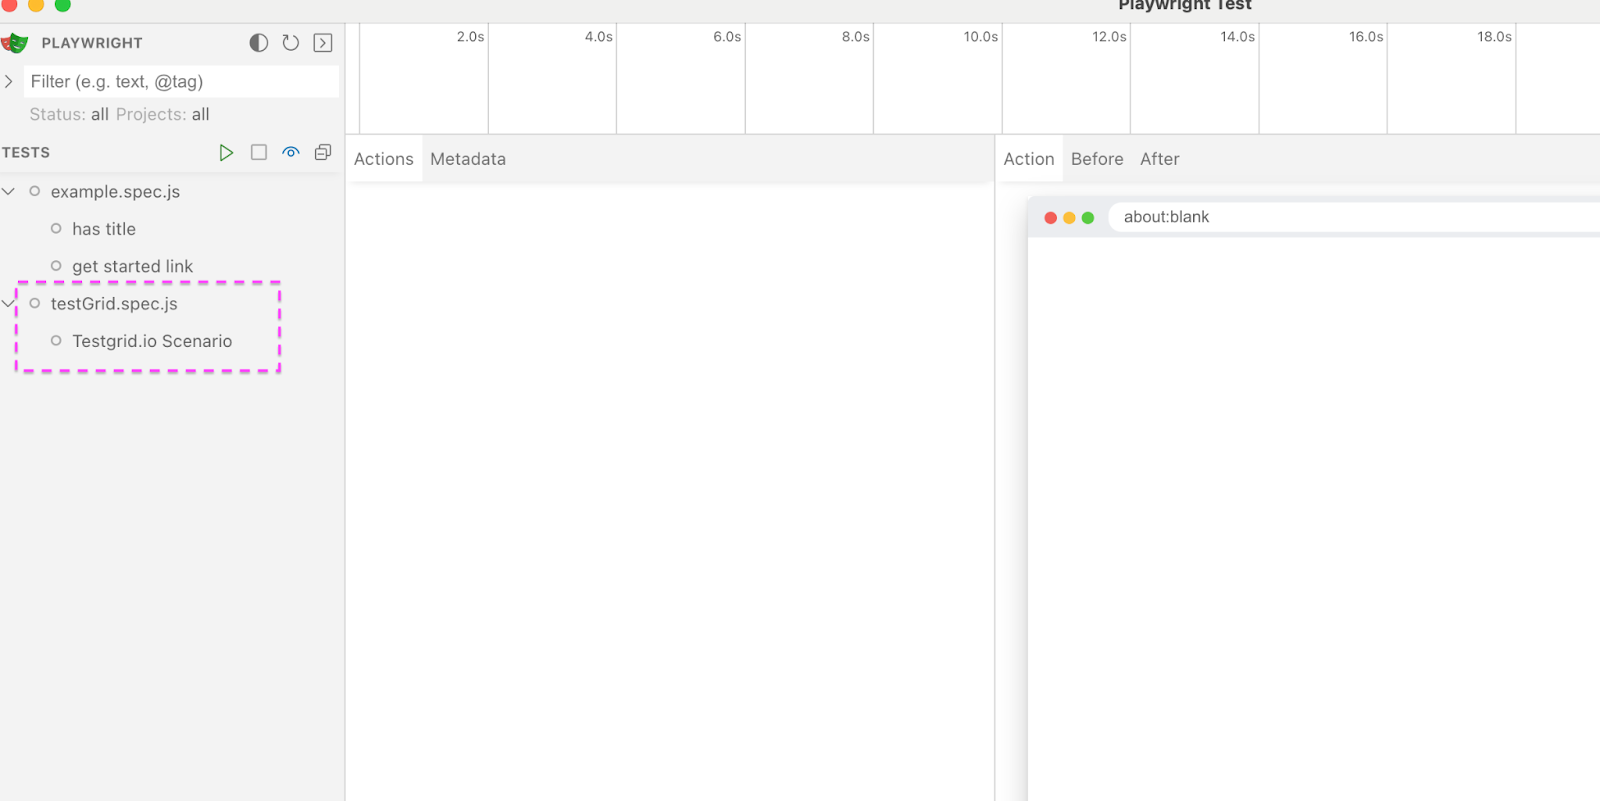
Below are the screenshots of the test case execution locally.
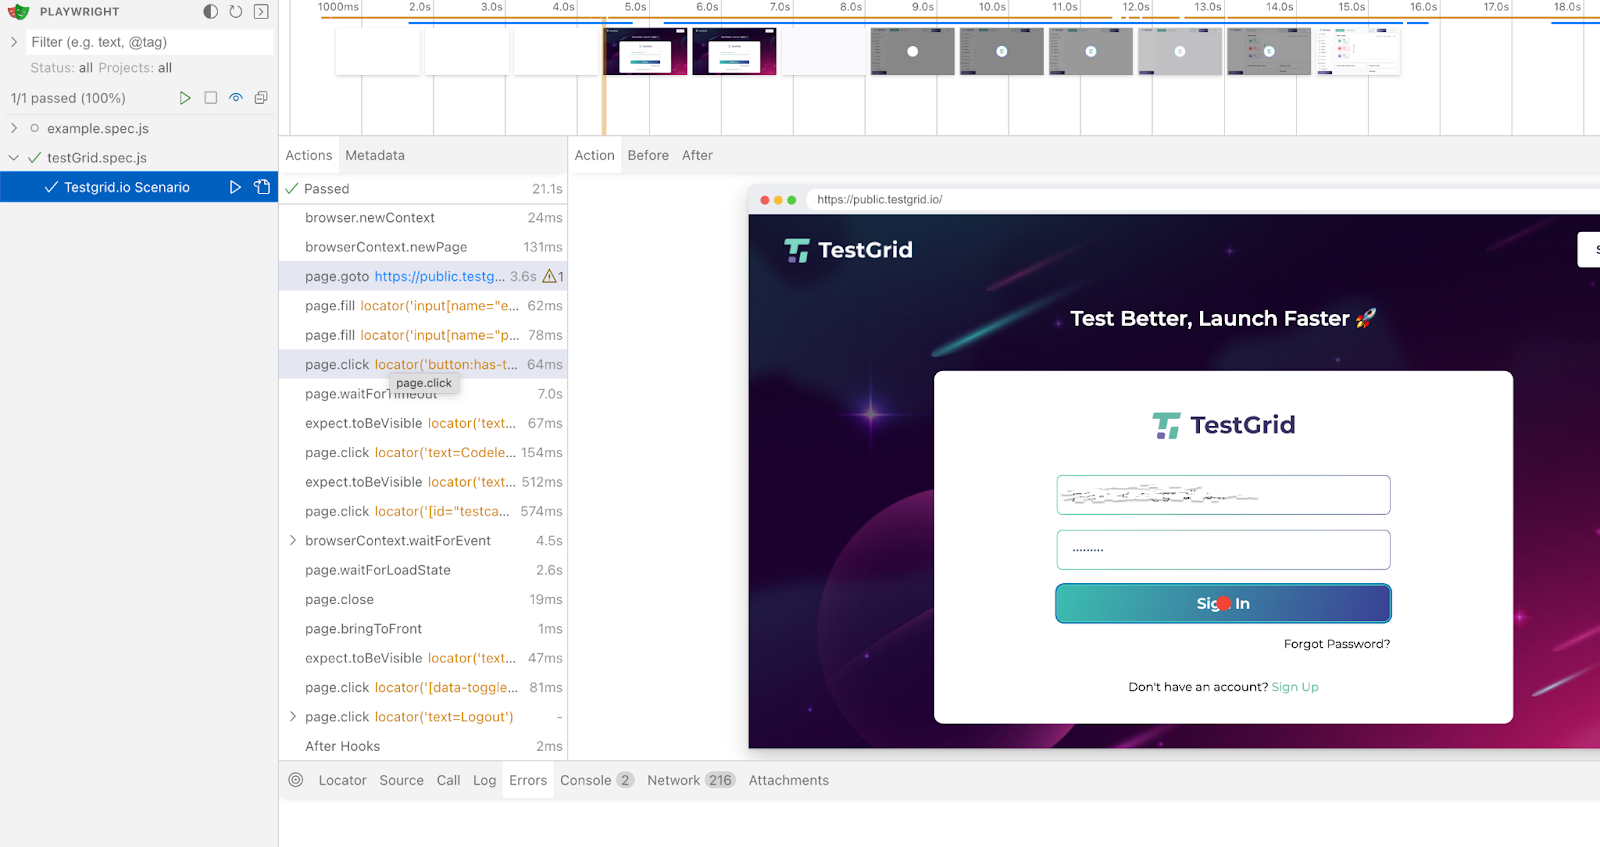
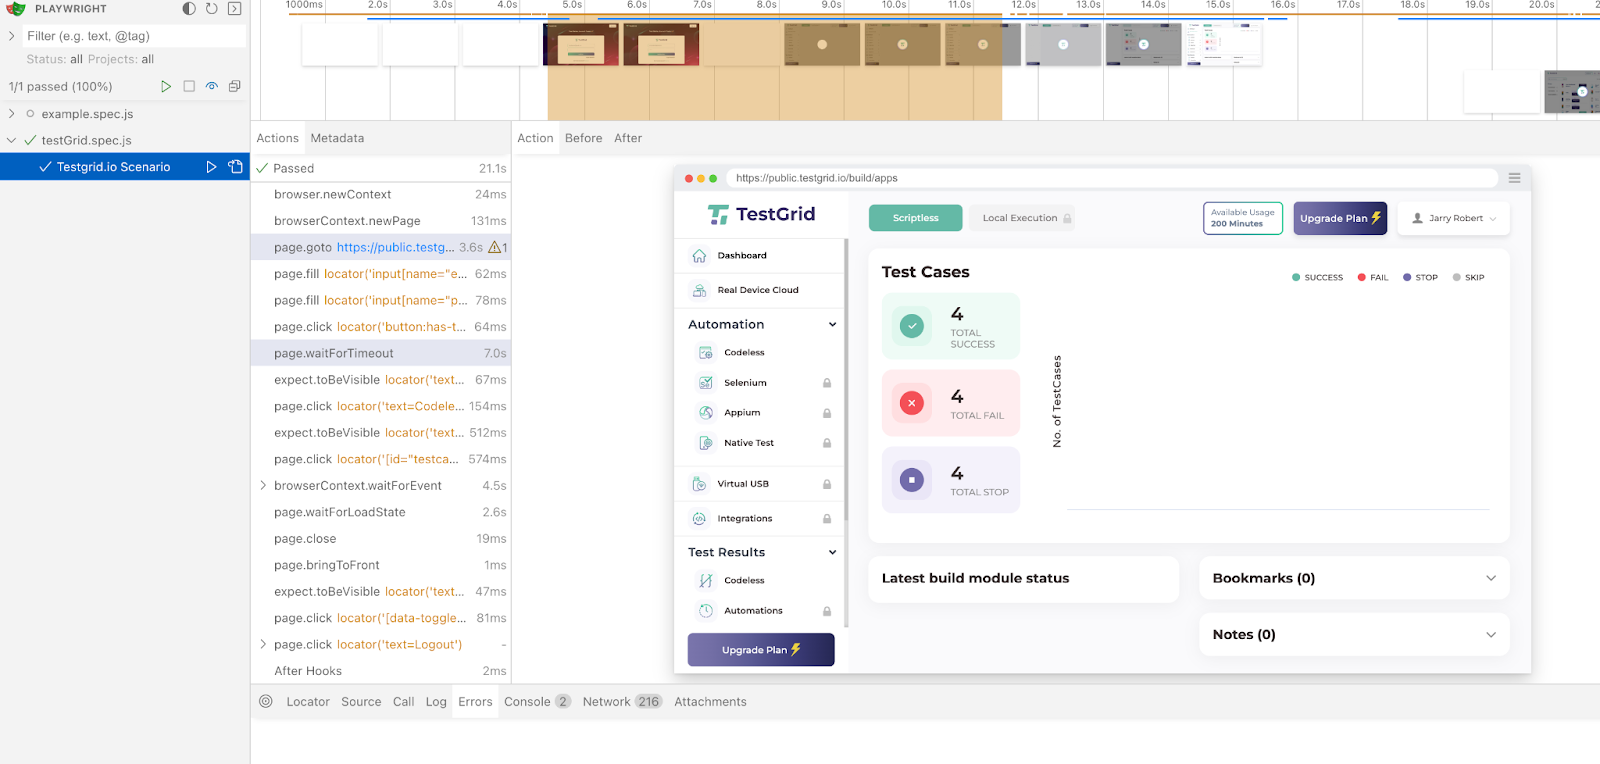
In the final step, the user is logged out of the application.
Run Test case In Headless Mode
By default, Playwright runs in "headless mode," where the browser runs in the background without opening a visible browser window.
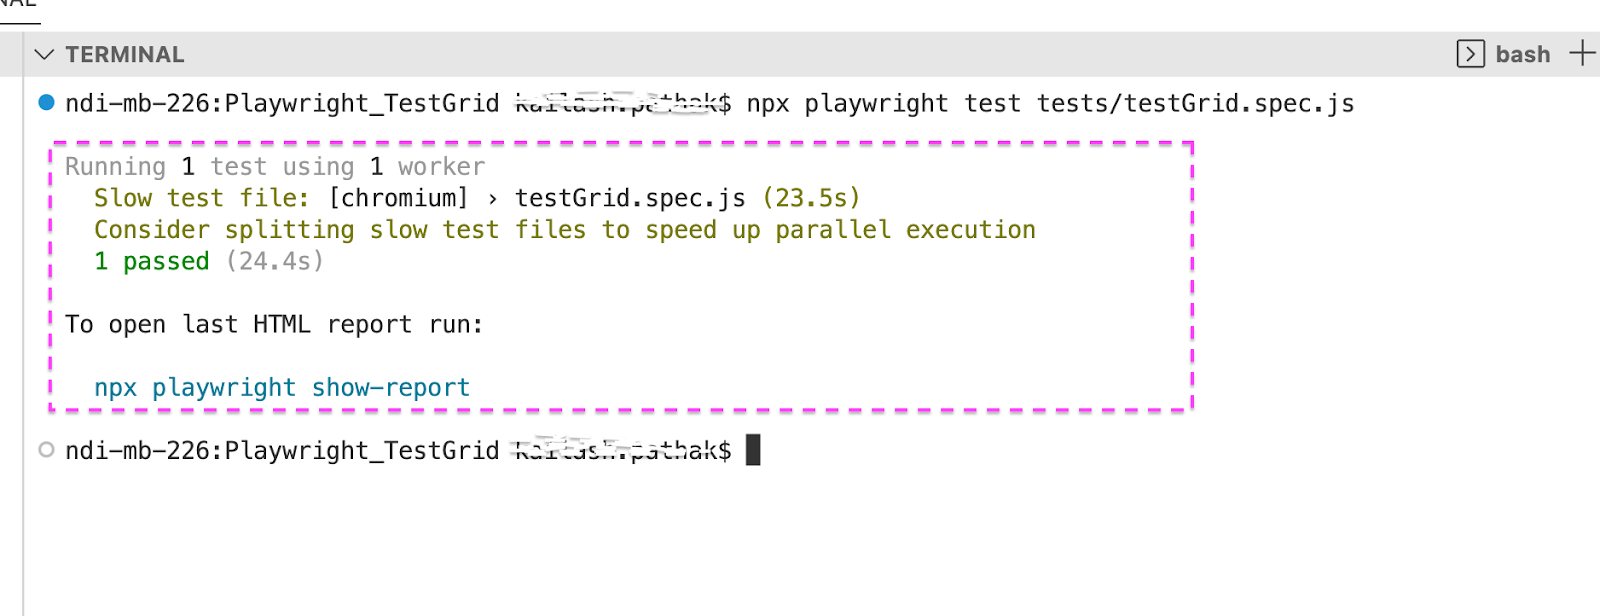
Command to run the test case in headless mode npx playwright test or yarn playwright test.
Run the command:
‘npx playwright test tests/testGrid.spec.js’. As you execute this command, the test case starts executing in headless mode.
In the below screenshot, you can see the test case starts executing in headless mode in Chrome browser once execution is completed the test cases pass in Chrome.
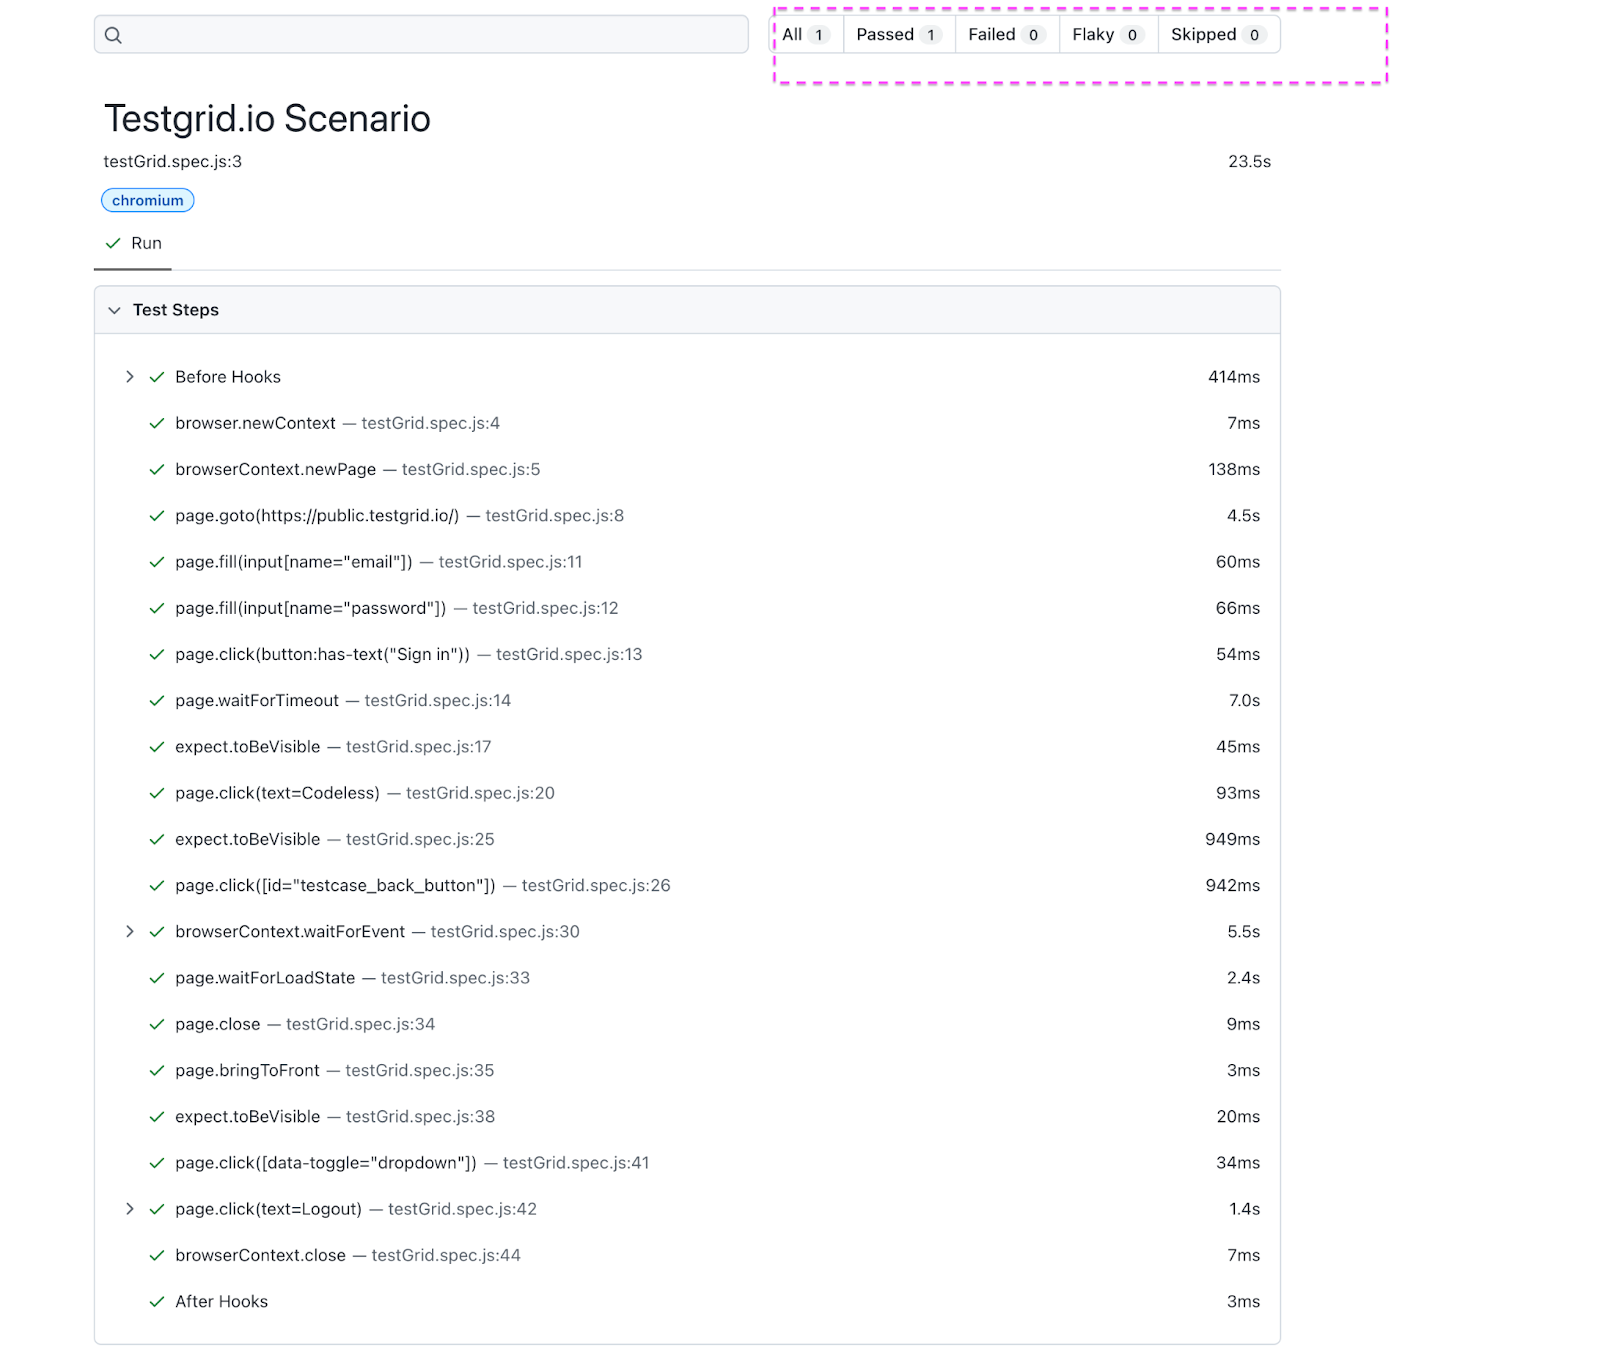
Run the command ‘npx playwright show-report’ Below is the attached HTML report.
Playwright Best Practices
Below are a few best practices of Playwright. By following these best practices, you can streamline your testing process, enhance reliability, and maintain code readability:
Leverage Playwright's Assertions
Playwright provides built-in assertions like toBeVisible, toHaveText, and toHaveURL to validate the application state after user interactions. This simplifies test logic and improves maintainability.
test('login form is displayed', async ({ page }) => {
await page.goto('https://your-app.com/login');
await expect(page.locator('#username')).toBeVisible();
  await expect(page.locator('#password')).toBeVisible();

  await expect(page).toHaveText('Thank you for your order!')
});
Leverage Playwright's Wait Strategies
Playwright offers functionalities like waitForSelector, waitForNavigation, and expect timeouts to ensure elements are loaded and ready before interaction. This improves test reliability.
Example
Use the await page.waitForSelector('#submit-button') before clicking the submit button.
Keep Tests Independent
Each test should function independently, with its own data, cookies, and local storage. This makes tests more reliable and easier to debug. Playwright offers hooks like beforeEach and afterEach to set up and tear down test environments.
test.beforeEach(async ({ page }) => {
// Login before each test
await page.goto('https://your-app.com/login');
await page.fill('#username', 'user1');
await page.fill('#password', 'password123');
await page.click('button[type="submit"]');
});
test('profile page loads correctly', async ({ page }) => {
// Navigate to profile page after login (already done in beforeEach)
await page.goto('https://your-app.com/profile');
// Assert elements on profile page
await expect(page).toHaveURL(/profile/);
});
Take Advantage of Playwright's Tooling
Playwright offers tools like Playwright Inspector for debugging tests visually, Trace Viewer for analyzing test failures, and Codegen for generating test code from recorded browser actions.
Use Chaining and Filtering
Locators can be combined to focus the search on a specific section of the page.
const product = page.getByRole('listitem').filter({ hasText: 'Product 2' });You can also use filter locators by text or by another locator.
await page
.getByRole('listitem')
.filter({ hasText: 'Product 2' })
.getByRole('button', { name: 'Add to cart' })
.click();
Conclusion
Playwright offers a powerful and versatile framework for test automation, making it a valuable tool for developers and testers alike. Its ability to handle multiple browsers, provide cross-platform support, and offer rich APIs for interaction and validation makes it stand out in the test automation landscape. By following the step-by-step guide, users can leverage Playwright's capabilities to create reliable, efficient, and scalable automated tests, ultimately enhancing the quality and performance of their applications. Embracing Playwright can streamline testing processes, reduce manual effort, and ensure a more robust and seamless user experience.
Opinions expressed by DZone contributors are their own.
Comments