Beyond the Chatbot: Engineering a Real-World GitHub Auditor in TypeScript
Learn to architect and build an autonomous GitHub triage agent using TypeScript and LangChain that is intelligent enough to be a senior maintainer.
Join the DZone community and get the full member experience.
Join For FreeAI agents have taken the world by storm and are making positive gains in all domains such as healthcare, marketing, software development, and more. The chief reason for their prominence lies in being able to automate routine tasks with intelligence. For example, in software development, stories and bugs have automated tracking in tools such as GitHub, Rally, and Jira; however, this automation lacks intelligence, often requiring engineers and project managers to triage them.
Using an AI agent, as you will learn in this article, smart triaging can be carried out using generative AI. AI agents can be developed using many techniques and in several programming languages. Python has been a leader in the AI and ML space, whereas JavaScript has been the undisputed king in web development and has been prominent in back-end development as well.
Historically, popular AI agent development frameworks have had their roots in Python, but their JavaScript ports have become mature in the recent past. This emergence allows a large number of JavaScript engineers to create their own AI agents without switching stacks. This article focuses on this shift, showing you how to develop an AI agent using JavaScript. Before you learn the agent, it is important to understand the similarities between an AI agent and a pure LLM, though.
Basic Anatomy of an Agent
An AI agent is capable of going beyond just querying an LLM for an answer. Before returning an answer, the agent takes several autonomous actions:
- Unlike an LLM, an agent can follow tasks via a loop (known as ReAct) where it can plan, observe, and rerun to get the output of a task before a final answer.
- An agent can query data, run commands on a terminal, call an API, and more. This feature is known as tool calling.
- Furthermore, an agent remembers details through extended memory and can build a longer working memory by leveraging vector databases.
- The agent can handle failures and initiate smart error handling and self-corrections.
Please refer to the illustration below to understand an AI agent. Please note that task status is technically part of the agent only, but here it is used to clearly highlight the ReAct loop.
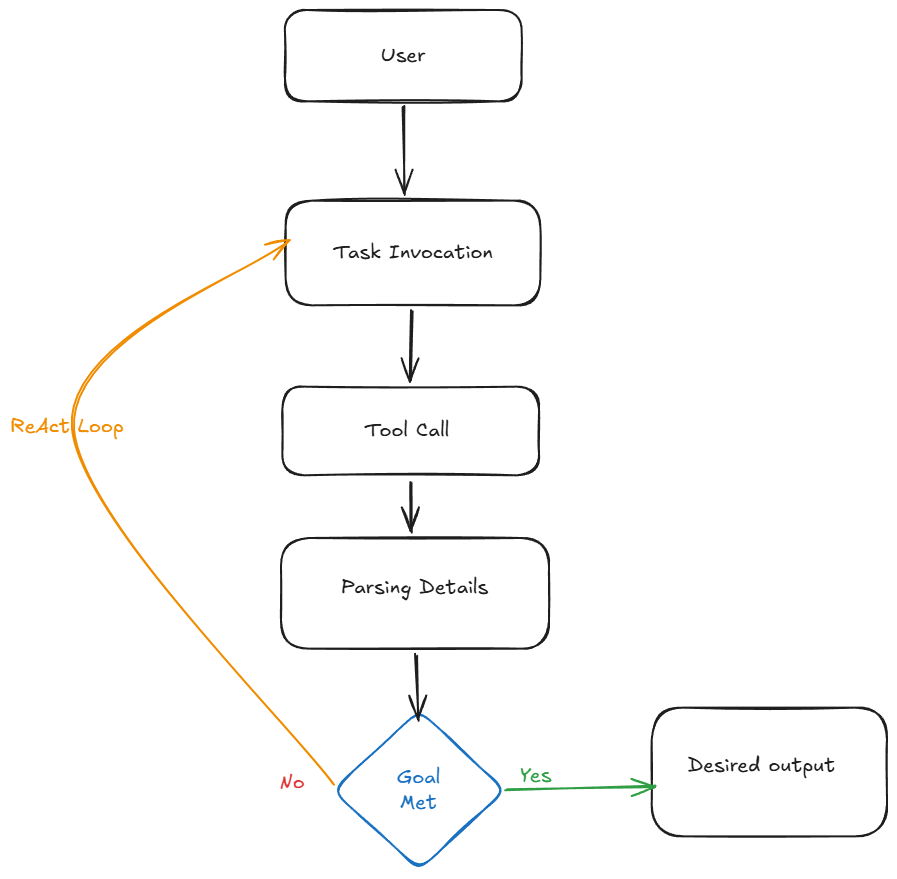
In the next section, you will implement an actual AI agent to understand each of these parts in more detail.
Scaffolding a New Project
You are going to build this project using TypeScript, which is a superset of JavaScript. You get all the freedom of JavaScript while gaining extra checks to maintain structure. Additionally, TypeScript helps avoid common JavaScript errors caused by a lack of typing, a feature that most modern programming languages support.
Create a new project by running the npm init command in your terminal. This will initialize the project and generate a package.json file in the project root.
Replace the content of your package.json with the following:
{
  "name": "github-agent",
  "version": "1.0.0",
  "type": "module",
  "main": "index.js",
  "scripts": {
    "test": "echo \"Error: no test specified\" && exit 1",
    "start": "npx tsx src/agent.ts"
  },
  "keywords": [],
  "author": "",
  "license": "ISC",
  "description": "",
  "dependencies": {
    "@langchain/community": "^1.1.1",
    "@langchain/core": "^1.1.8",
    "@langchain/google-genai": "^2.1.3",
    "@langchain/openai": "^1.2.0",
    "@octokit/core": "^7.0.6",
    "dotenv": "^16.6.1",
    "langchain": "^1.1.0",
    "octokit": "^5.0.5"
  },
  "devDependencies": {
    "@types/node": "^25.0.3",
    "ts-node": "^10.9.2",
    "typescript": "^5.9.3"
  }
}
There are several dependencies defined in the package.json:
- LangChain family: Core dependencies that provide the framework for building your agent.
- Octokit: Leveraged to authenticate with GitHub when the agent needs to access current issues.
- Dotenv: Helps you parameterize the project by managing sensitive API keys.
- Dev dependencies: Mainly focus on converting TypeScript code to JavaScript for final execution.
Run npm install to actually install these dependencies.
Before writing the logic, create a .env file in your root directory. This is where you store sensitive credentials. I have included an .env.example file for your reference. You can rename it to .env and replace details with your personal details. Ensure to never commit this file.
GOOGLE_API_KEY=<GOOGLE-API-KEY>
GITHUB_TOKEN=<GITHUB_TOKEN>
With these settings, you are now ready to build the actual agent.
Creating the GitHub Agent
Step 1: Build the Tool
The first thing you will need is the resources the agent is going to need to communicate with GitHub to fetch the issues. These resources are known as tools, as you learned earlier.
Create a directory in the root of the project and name it src. Inside the src directory, create another directory named tools. Inside this tools directory, create a file named github.ts and add the code below:
import { tool } from "@langchain/core/tools";
import { Octokit } from "@octokit/core";

const octokit = new Octokit({ auth: process.env.GITHUB_TOKEN });

export const fetchRepoIssues = tool(
  async ({ owner, repo, count = 5 }) => {
    try {
      console.log(`[SYSTEM]: Fetching live issues (excluding PRs) from ${owner}/${repo}...`);

      const { data } = await octokit.request("GET /repos/{owner}/{repo}/issues", {
        owner,
        repo,
        state: "open",
        per_page: count * 2,
      });

      const onlyIssues = data
        .filter((item: any) => !item.pull_request)
        .slice(0, count);

      if (onlyIssues.length === 0) return `No open issues found in ${owner}/${repo}.`;

      const digest = onlyIssues.map((issue: any) => {
        return `Issue #${issue.number}: "${issue.title}"
Author: ${issue.user?.login}
Labels: ${issue.labels.map((l: any) => l.name).join(", ") || "None"}
Body: ${issue.body?.substring(0, 300) || "No description provided"}...`;
      }).join("\n\n---\n\n");

      return `Successfully fetched ${onlyIssues.length} issues from ${owner}/${repo}:\n\n${digest}`;

    } catch (error: any) {
      return `Error fetching GitHub issues: ${error.message}`;
    }
  },
  {
    name: "fetch_repo_issues",
    description: "Fetches live open issues (excluding PRs) from a GitHub repository.",
    schema: {
      type: "object",
      properties: {
        owner: { type: "string", description: "The repo owner (e.g., 'facebook')" },
        repo: { type: "string", description: "The repo name (e.g., 'react')" },
        count: { type: "number", description: "Number of real issues to return" }
      },
      required: ["owner", "repo"]
    }
  }
);- You are using the Octokit library to authenticate with GitHub before actual issues from a repository can be fetched.
- Furthermore, you are filtering for truly open issues, which is achieved by looking at issues that don’t have an associated pull request.
- Additionally, you are trimming the issue body to 300 characters, which provides the agent with enough context about the issue while keeping LLM token usage limited and cost-effective.
- You are also creating the schema that the agent will leverage when calling the tool, so that the interaction between the agent and the tool can be more deterministic.
Step 2: Build the Agent
Now it is time to build the agent. Create a file named agent.ts inside the srcdirectory and add the code below to it:
import "dotenv/config";
import { ChatGoogleGenerativeAI } from "@langchain/google-genai";
import { createReactAgent } from "@langchain/langgraph/prebuilt";
import { fetchRepoIssues } from "./tools/github.js";

const model = new ChatGoogleGenerativeAI({
  model: "gemini-3-flash-preview",
  temperature: 0,
});

const SYSTEM_PROMPT = `
You are a Senior GitHub Maintainer.
Your goal is to help users understand the status of their repositories.
When asked about issues, use the fetch_repo_issues tool.
Always provide a technical summary of the top issue you find.
`;

const agent = createReactAgent({
  llm: model,
  tools: [fetchRepoIssues],
  messageModifier: SYSTEM_PROMPT,
});

async function runAuditor() {
  console.log("--- Starting GitHub Auditor ---");

  const response = await agent.invoke({
    messages: [
      { role: "user", content: "What are the latest issues in the facebook/react repo?" }
    ],
  });

  const lastMessage = response.messages[response.messages.length - 1];

  console.log("\nMaintainer's Report:");
  console.log(lastMessage.content);
}

runAuditor();
This code uses the LangChainframework to create the agent. The first step is to tell the agent which LLM model to work with. The code above uses the gemini-3-flash-preview model, which is one of the fastest flagship models at the time of writing this.
Additionally, you set the temperatureof the model, which tells the model how creative or deterministic it should be. Setting it to 0 makes the model more deterministic, which aligns well with the technical nature of the task this agent is going to perform.
The next step is to create the brain of the agent, which is nothing but the promptthe agent will use to act. This prompt tells the agent what its role is, what tools it can use, and what constraints it should adhere to. Moreover, it needs to be told how the output should be formatted.
Now that all the magical ingredients are ready, it's time to make the soup — the agent itself. You create the agent by invoking the createReactAgent function and passing it the model you selected, the tools the agent can use, and the system prompt as a messageModifier. By passing the tools array directly into createReactAgent, LangGraph automatically handles the conversion of your TypeScript tool definitions into the JSON schemas that the LLM expects.
You learned about the ReAct loop of an AI agent earlier. The createReactAgent function is responsible for not only creating the agent but also managing this loop. This function acts as an orchestrator of the tasks the agent and LLM perform, handling state and schema management while also taking care of the termination logic.
Note: Even though the tool file is named github.ts, you import it using the .js extension. This is a requirement of modern Node.js ECMAScript Modules
With this, you are ready to start running your agent.
Running the Agent
On your terminal, start the agent with the npm startcommand. You should see output produced similar to the illustration given below.
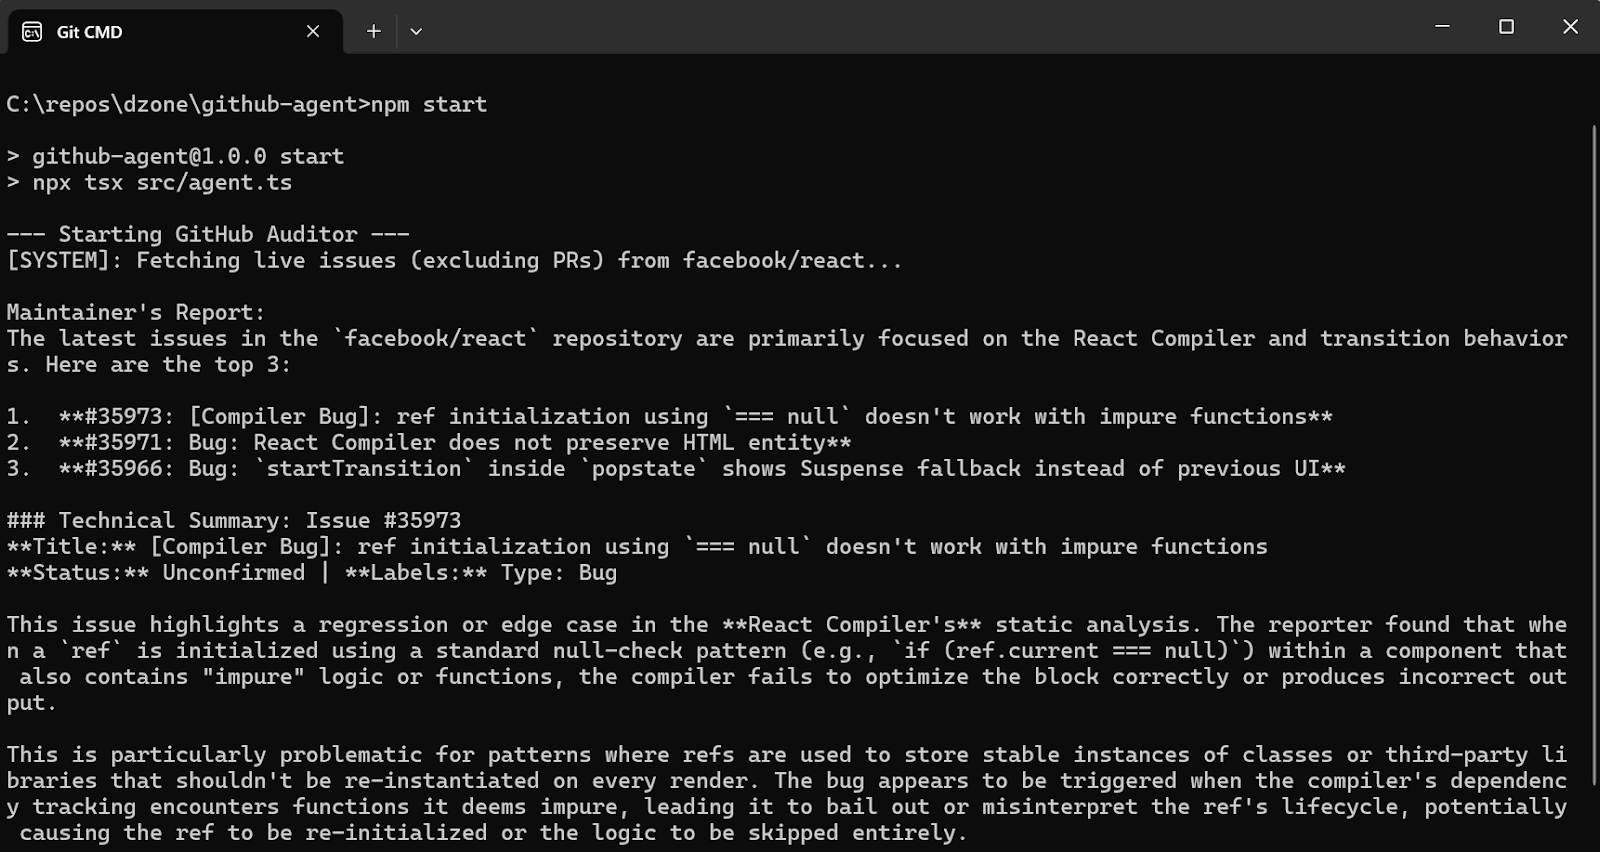
As you can see in the illustration above, the agent logs its internal actions, such as the tool call, highlighting that it intelligently understood the need for live data from GitHub. After retrieving the data, it parses and analyzes the information to create a structured report on the top issues, just like a Senior Maintainer.
Conclusion
In this article, you have learned what an AI agent is, how to build one, and, most importantly, how to use it in a real-world scenario. It's like having a co-worker assisting you with complex tasks.
The entire code for the project you built here is available at this GitHub Link, but I highly recommend you follow along with the steps above rather than just cloning and running the project. Building it piece by piece is the best way to truly understand how the "brain" and "hands" of an agent work together.
Opinions expressed by DZone contributors are their own.
Comments