How to Run a MySQL Database in a Docker Container
Learn how to set up a containerized MySQL database with Docker, including steps for running, accessing, connecting from your host, and cleaning up the container.
Join the DZone community and get the full member experience.
Join For FreeUsing a local containerized database provides flexibility and simplifies setup. It allows for close replicating production environments without the complexity of traditional database installations. Docker streamlines this process, making it easy to deploy, manage, and scale databases in isolated containers with just a few commands.
In this guide, you'll learn how to:
- Run a local containerized database
- Access the shell of a containerized database
- Connect to a containerized database from your host
- Persist database data in a volume
- Cleanup lab
Prerequisites
To follow this guide, you must have Docker installed. For installation instructions, please refer to the Docker website.
Step-by-Step Guide to Setting Up Containerized Databases
1. Run a Local Containerized Database
Most popular database systems, such as MySQL, PostgreSQL, and MongoDB, have official Docker images available on Docker Hub. These curated images adhere to best practices, ensuring you have access to the latest features and security updates.
To get started, visit Docker Hub and search for the database you are interested in. Each image's page provides detailed instructions on how to run the container, customize your setup, and configure the database to meet your needs. For more information about the MySQL image provided in this guide, refer to the MySQL image page on Docker Hub.
To run a database container, you can use either the Docker Desktop GUI or CLI. To run a container using the CLI, run the following command in a terminal:
$ docker run --name my-mysql -e MYSQL_ROOT_PASSWORD=my-secret-pw -e MYSQL_DATABASE=mydb -d mysql:latest
In this command:
--name my-mysqlassigns the namemy-mysqlto your container for easier reference.-e MYSQL_ROOT_PASSWORD=my-secret-pwsets the root password for MySQL tomy-secret-pw. Replacemy-secret-pwwith a secure password of your choice.-e MYSQL_DATABASE=mydboptionally creates a database namedmydb. You can changemydbto your desired database name.-druns the container in detached mode, meaning it runs in the background.mysql:latestspecifies that you want to use the newest version of the MySQL image.
To verify that your container is running, run docker ps in a terminal:
run docker ps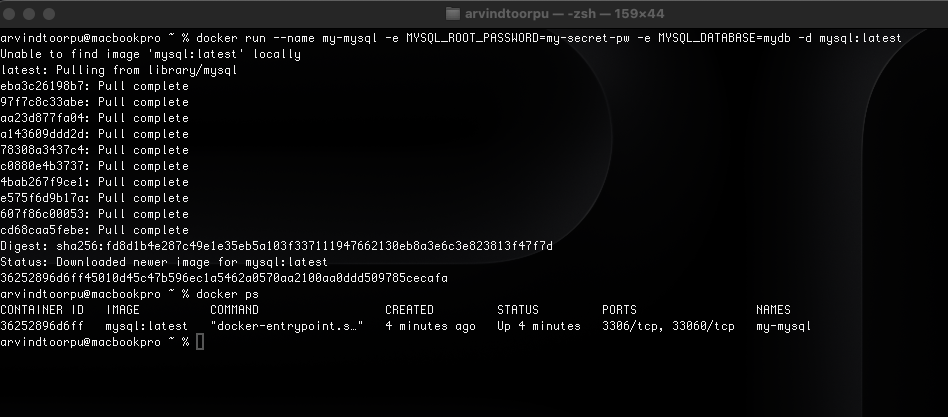
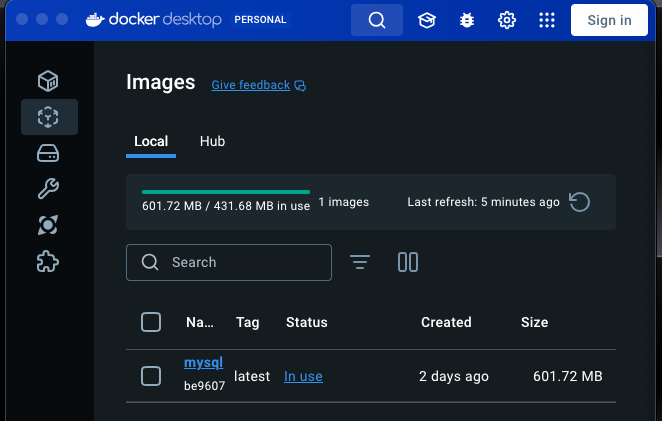
You can also check the same in the Docker Desktop console:
2. Access the Shell of a Containerized Database
When a database runs inside a Docker container, you may need to access its shell to manage the database, execute commands, or perform administrative tasks. Docker provides a straightforward way to do this using the docker exec command. Additionally, you can use Docker Desktop's GUI if you prefer a graphical interface.
If you don't yet have a database container running, refer to Run a Local Containerized Database. To access the terminal of a MySQL container using the CLI, you can use the following docker exec command.
docker exec -it my-mysql bash In this command:
docker execinforms Docker that you want to execute a command in a running container.-itensures that the terminal you're accessing is interactive so you can type commands into it.my-mysqlis the name of your MySQL container. If you named your container differently when you ran it, use that name instead.- The command you want to run inside the container is bash. It opens a Bash shell that lets you interact with the container's file system and installed applications.
- After executing this command, you will be given access to the bash shell inside your MySQL container, from which you can manage your MySQL server directly. You can run Exit to return to your terminal.
Check if the Docker container is running.
run docker psOnce you've accessed the container's terminal, you can run any tools available in that container. The following (Image) example shows using MySQL in the container to list the databases.
Mysql -u root -pmysql> SHOW DATABASES;
+--------------------+
| Database |
+--------------------+
| information_schema |
| mydb |
| mysql |
| performance_schema |
| sys |
+--------------------+
5 rows in set (0.00 sec)
mysql> create database testdb;
Query OK, 1 row affected (0.11 sec)
mysql> SHOW DATABASES;
+--------------------+
| Database |
+--------------------+
| information_schema |
| mydb |
| mysql |
| performance_schema |
| sys |
| testdb |
+--------------------+
6 rows in set (0.00 sec)
mysql> connect testdb;
Connection id: 12
Current database: testdb
mysql> SHOW TABLES;
Empty set (0.02 sec)
mysql> create table test (id numeric,fname varchar(20));
Query OK, 0 rows affected (0.10 sec)
mysql> SHOW TABLES;
+------------------+
| Tables_in_testdb |
+------------------+
| test |
+------------------+
1 row in set (0.00 sec)
mysql> insert into test values (1,'arvind');
Query OK, 1 row affected (0.08 sec)
mysql> commit;
Query OK, 0 rows affected (0.00 sec)
mysql> select * from test;
+------+--------+
| id | fname |
+------+--------+
| 1 | arvind |
+------+--------+
1 row in set (0.00 sec)The table we created and the data we saved in the test table are only persistent until we use the same container; all data will be lost once we recreate or build a new container.
You can validate by exiting the container and re-logging back into the container database to see if data exists. You will then see that data still exists in the database as long as the container is running.
3. Connect to a Containerized Database From Your Host
Connecting to a containerized database from your host machine involves mapping a port inside the container to a port on your host machine. This process ensures that the database inside the container is accessible via the host machine's network. For MySQL, the default port is 3306. By exposing this port, you can use various database management tools or applications on your host machine to interact with your MySQL database.
Before you begin, you must remove any containers you previously ran for this guide. To stop and remove a container, either:
- In a terminal, run docker remove
--force my-mysqlto remove the container namedmy-mysql; - Or, in the Docker Dashboard, select the Delete icon next to your container in the Containers view.
Next, you can use the Docker Desktop GUI or CLI to run the container with the mapped port.
docker run -p 3307:3306 --name my-mysql -e MYSQL_ROOT_PASSWORD=my-secret-pw -e MYSQL_DATABASE=mydb -d mysql:latestIn this command, -p 3307:3306 maps port 3307 on the host to port 3306 in the container.
4. Persist Database Data in a Volume
Persisting database data in a Docker volume is necessary for ensuring that your data survives container restarts and removals. A Docker volume lets you store database files outside the container’s writable layer, making it possible to upgrade the container, switch bases, and share data without losing it. You can attach a volume to your database container using either the Docker CLI or the Docker Desktop GUI.
Note: Again, as done previously in the Connect to a Containerized Database section, before you begin, you must remove any containers you previously ran for this guide.
Next, you can use the Docker Desktop GUI or CLI to run the container with a volume.
To run your database container with a volume attached, include the —v option with your docker run command. This specifies a volume name and the path where the database stores its data inside the container. If the volume doesn’t exist, Docker automatically creates it for you.
To run a database container with a volume attached, verify that the data persists. Run the container and attach the volume.
docker run –name my-mysql -e MYSQL_ROOT_PASSWORD=my-secret-pw -e MYSQL_DATABASE=mydb -v my-db-volume:/var/lib/mysql -d mysql:latestThis command mounts the volume named my-db-volume to the /var/lib/mysql directory in the container.
Create some data in the database. Use the docker exec command to run MySQL inside the container and create a table.
docker exec my-mysql mysql -u root -pmy-secret-pw -e "CREATE TABLE IF NOT EXISTS mydb.mytable (column_name VARCHAR(255)); INSERT INTO mydb.mytable (column_name) VALUES ('value');"
This command uses the MySQL tool in the container to create a table named mytable with a column named column_name, and finally, it inserts a value of value.
Stop and remove the container. Without a volume, the table you created will be lost when you remove the container.
docker remove --force my-mysqlStart a new container with the volume attached. This time, you don't need to specify any environment variables as the configuration is saved in the volume.
docker run --name my-mysql -v my-db-volume:/var/lib/mysql -d mysql:latestVerify that the table you created still exists. Then, use the docker exec command again to run MySQL inside the container.
docker exec my-mysql mysql -u root -pmy-secret-pw -e "SELECT * FROM mydb.mytable;"
This command uses the MySQL tool in the container to select all the records from the table table. You should see output like the following.
column_name

value
5. Cleanup the MySQL Container Image
To remove a container, use the docker remove command with the container names or IDs separated by spaces. For example:
docker remove --force 90b8831a4b8
docker remove --force 36252896d6ff
docker remove --force d86dff3809e8
Conclusion
Ultimately, running MySQL with Docker provides a portable, scalable, and efficient solution for database management. Docker's isolated containers help streamline deployment, reduce compatibility issues, and optimize resource usage. By allowing easy version control and environment resets, Docker supports fast development and testing. It’s ideal for managing MySQL databases in microservices, making them easier to deploy and scale while maintaining strong performance.
Opinions expressed by DZone contributors are their own.
Comments