Home Lab Deployment: OpenShift/OKD 4.4.x on RHVM/Ovirt 4.3
If you’re interested in building your own home lab server, read on to learn how to get OpenShift 4.4x running on RHVM 4.3.
Join the DZone community and get the full member experience.
Join For FreeThe following developer notes outline and detail the steps necessary to get OpenShift 4.4.x (or OKD 4.4.x) running on RHVM 4.3 (or Ovirt 4.3).
These notes cater to individuals who are interested in building their own home lab servers.
OKD is simply the open-source upstream community distribution of OpenShift, whereas OpenShift Container Platform is a Red Hat-supported product that has paid support granted by a subscription from Red Hat.
The official installation documentation are as follows:
- Openshift installation: https://docs.openshift.com/container-platform/4.4/installing/installing_rhv/installing-rhv-default.html
- OKD installation: https://docs.okd.io/latest/installing/installing_rhv/installing-rhv-default.html
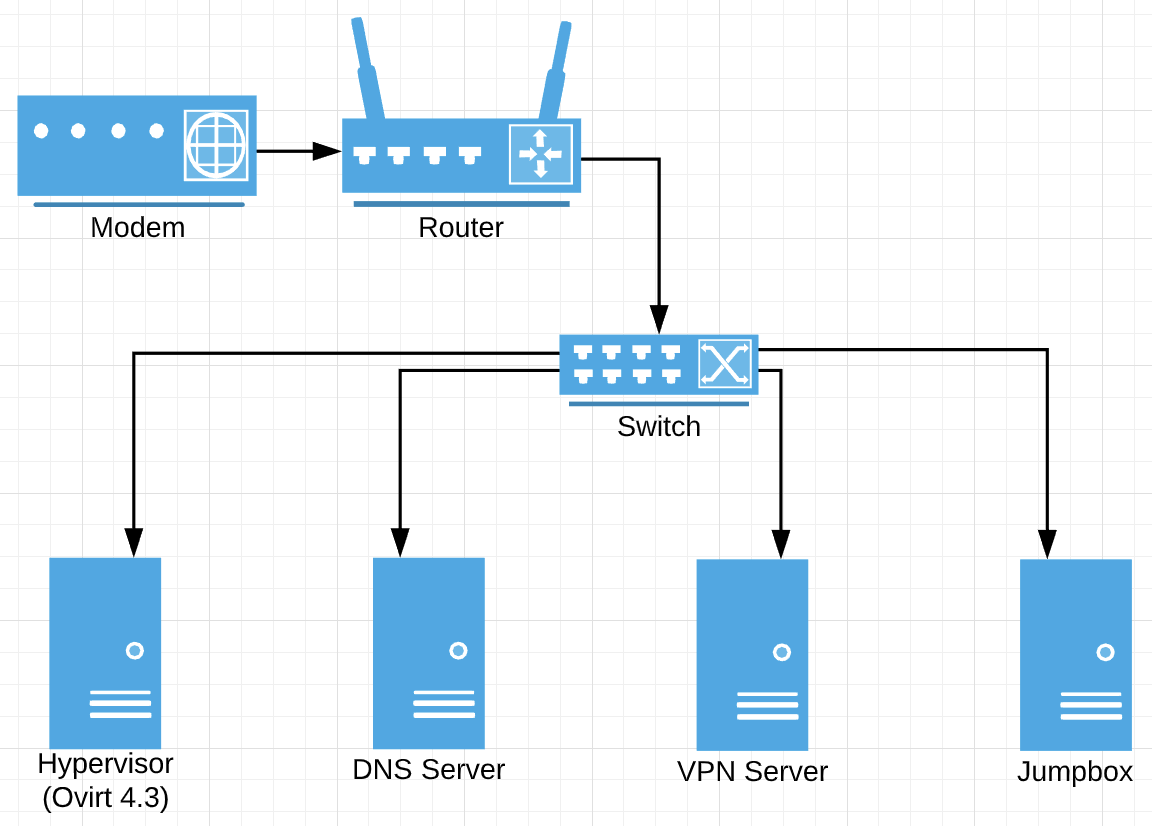
The Rigg
"This is my 'rigg'. There are many like it, but this one is mine."
- Cable Modem
- Wireless Router
- 5 port switch
- Home Desktop PC - Jumpbox
- Raspberry PI 4 - DNS Server
- 4GB RAM
- 128GB SD card
- Raspberry PI 4 - VPN Server
- 4GB RAM
- 128GB SD card
- HP Proliant ML350P Gen8 - Hypervisor
- 128GB RAM (8gb x 16)
- 2xE5-2690 8-Cores
- 1.5tb SAS (300gb x 5)
- 1.5tb SSD (500gb x 3)
Prerequisites
- Deployed and running RHVM 4.3+ (or Ovirt 4.3+)
- Enough hypervisor resources to accomodate:
- 3 Master Nodes.
- 3 Worker Nodes.
- 1x Node = 16GB RAM, 4 vCPU, 100GB solid state volume.
Step-By-Step Installation
Create DNS Entries
Openshift/OKD DNS Guidelines
Follow the directions from the official documentation (to a tee): https://docs.openshift.com/container-platform/4.4/installing/installing_rhv/installing-rhv-default.html#installing-rhv-preparing-the-network-environment_installing-rhv-default
Sample Setup
Depending on your DNS server, you may need to add DNS entries a bit differently.
For this rigg, we are using the following:
- Raspberry PI 4.
- Pi-Hole Network-Wide Ad Blocking + DNS Server (https://pi-hole.net/).
- To configure DNS and wild card entries, see the following resources:
Set Up a CA Certificate
Follow the directions from the official documentation (to a tee): https://docs.openshift.com/container-platform/4.4/installing/installing_rhv/installing-rhv-default.html#installing-rhv-setting-up-ca-certificate_installing-rhv-default
Ultimately, you will have added your CA in the following location: /etc/pki/ca-trust/source/anchors/ca.pem.
Generate an SSH Private Key
Follow the directions from the official documentation (to a tee): https://docs.openshift.com/container-platform/4.4/installing/installing_rhv/installing-rhv-default.html#ssh-agent-using_installing-rhv-default
Doing the above simply allows you to be able to SSH directly into your cluster nodes from your jumpbox (the computer you’re using to install OpenShift).
# i.e. passwordless logins to your nodes
ssh [email protected] # worker node 00
ssh [email protected] # worker node 01
ssh [email protected] # worker node 02
Obtain Openshift/OKD
You can download release distributions from either one of the following resources (Openshift or OKD):
- Openshift releases: https://openshift-release.svc.ci.openshift.org/
- OKD release: https://origin-release.svc.ci.openshift.org/
For all intents and purposes, the installations between the two above are virtually the same.
For this example, we'll be using Openshift 4.4.7.
Depending on where you'll be running your installer from (in this case a Linux box), make sure to grab the right client and installer.
For example:
xxxxxxxxxx
openshift-client-linux-4.4.7.tar.gz
openshift-install-linux-4.4.7.tar.gz
Extract the Client
Extract the client and make it accessible in your PATH:
xxxxxxxxxx
tar zxvf openshift-client-linux-4.4.7.tar.gz
sudo mv kubectl /usr/local/bin
sudo mv oc /usr/local bin
Extract the Installer
Extract the installer to any location of your choosing (e.g. /home/user1/workspace/ocp).
xxxxxxxxxx
tar zxvf openshift-install-linux-4.4.7.tar.gz
mv openshift-installer /home/user1/workpace/ocp
A few observations about the installer. During the installation of your cluster, the following installation artifacts may be created:
~/.ovirt~/.cache/openshift-installer
You can safely delete these anytime after your installation is complete.
Create the Installation Configuration
We will create an installation configuration file before creating the cluster.
Obtain a Pull Secret
Go here to obtain a pull secret: https://cloud.redhat.com/openshift/install/pull-secret.
You will need this in order to create an installation configuration.
Create an Installation Configuration
Run the following:
xxxxxxxxxx
./openshift-install create install-config --dir=install --log-level=debug
This command will ultimately create an installation cofinguration file inside the specified installation directory specified by the argument --dir. The install directory will be created if it doesn't exist.
xxxxxxxxxx
.
├── install
│ └── install-config.yaml
This will create a hidden folder in your home directory: ~/.ovirt. If for any reason you've foo-barred your installation config file, you can start fresh by deleting this directory as well as the install directory.
During the creation of the installation config, you may be asked to enter the contents of the cert you pulled down from RHVM 4.3 (or Ovirt 4.3). If so, you can enter the contents of that cert here. Otherwise, you can opt out.
Upon successful creation of the installation configuration, open and examine the contents of the file ~/.ovirt/ovirt-config.yaml. If you do not have the ovirt_ca_bundle parameter as shown below, add it. It will look similar to the following in its entirety.
xxxxxxxxxx
ovirt_url: https://labs.thekeunster.local/ovirt-engine/api
ovirt_username: admin
ovirt_password: super-duper-password
ovirt_insecure: true
ovirt_ca_bundle: |
-----BEGIN CERTIFICATE-----
MIID2zCCAsOgAwIBAgICEAAwDQYJKoZIhvcNAQELBQAwUDELMAkGA1UEBhMCVVMxGjAYBgNVBAoM
MIID2zCCAsOgAwIBAgICEAAwDQYJKoZIhvcNAQELBQAwUDELMAkGA1UEBhMCVVMxGjAYBgNVBAoM
MIID2zCCAsOgAwIBAgICEAAwDQYJKoZIhvcNAQELBQAwUDELMAkGA1UEBhMCVVMxGjAYBgNVBAoM
MIID2zCCAsOgAwIBAgICEAAwDQYJKoZIhvcNAQELBQAwUDELMAkGA1UEBhMCVVMxGjAYBgNVBAoM
MIID2zCCAsOgAwIBAgICEAAwDQYJKoZIhvcNAQELBQAwUDELMAkGA1UEBhMCVVMxGjAYBgNVBAoM
MIID2zCCAsOgAwIBAgICEAAwDQYJKoZIhvcNAQELBQAwUDELMAkGA1UEBhMCVVMxGjAYBgNVBAoM
MIID2zCCAsOgAwIBAgICEAAwDQYJKoZIhvcNAQELBQAwUDELMAkGA1UEBhMCVVMxGjAYBgNVBAoM
MIID2zCCAsOgAwIBAgICEAAwDQYJKoZIhvcNAQELBQAwUDELMAkGA1UEBhMCVVMxGjAYBgNVBAoM
MIID2zCCAsOgAwIBAgICEAAwDQYJKoZIhvcNAQELBQAwUDELMAkGA1UEBhMCVVMxGjAYBgNVBAoM
MIID2zCCAsOgAwIBAgICEAAwDQYJKoZIhvcNAQELBQAwUDELMAkGA1UEBhMCVVMxGjAYBgNVBAoM
MIID2zCCAsOgAwIBAgICEAAwDQYJKoZIhvcNAQELBQAwUDELMAkGA1UEBhMCVVMxGjAYBgNVBAoM
MIID2zCCAsOgAwIBAgICEAAwDQYJKoZIhvcNAQELBQAwUDELMAkGA1UEBhMCVVMxGjAYBgNVBAoM
MIID2zCCAsOgAwIBAgICEAAwDQYJKoZIhvcNAQELBQAwUDELMAkGA1UEBhMCVVMxGjAYBgNVBAoM
MIID2zCCAsOgAwIBAgICEAAwDQYJKoZIhvcNAQELBQAwUDELMAkGA1UEBhMCVVMxGjAYBgNVBAoM
MIID2zCCAsOgAwIBAgICEAAwDQYJKoZIhvcNAQELBQAwUDELMAkGA1UEBhMCVVMxGjAYBgNVBAoM
MIID2zCCAsOgAwIBAgICEAAwDQYJKoZIhvcNAQELBQAwUDELMAkGA1UEBhMCVVMxGjAYBgNVBAoM
MIID2zCCAsOgAwIBAgICEAAwDQYJKoZIhvcNAQELBQAwUDELMAkGA1UEBhMCVVMxGjAYBgNVBAoM
MIID2zCCAsOgAwIBAgICEAAwDQYJKo==
-----END CERTIFICATE-----
The contents of the ovirt_ca_bundle parameter will come from the contents of the file /etc/pki/ca-trust/source/anchors/ca.pem.
Create Image Template (Optional)
The following will allow you to use a custom image template instead of the default 8GB templates. You may want to create a custom template to create nodes with larger disk sizes, allocate more RAM, and/or allocate more vCPUs per cluster master/worker node.
Read How
Read more about how to do this in the Red Hat documentation (scroll to the heading "Customizing RHCOS template" on page 13): https://access.redhat.com/sites/default/files/attachments/quickstart_guide_for_installing_ocp_on_rhv_1.4.pdf.
See How
In the below video, we start off with the initial template, okd-jnw4r-rhcos, and finish off by creating a new template, ocp-template-50gb.
With the new template, master and worker nodes will have the following:
- 50GB storage.
- 16GB RAM.
- 4 vCPUs.
Make sure to set the new template in the active installation terminal before deploying the cluster.
xxxxxxxxxx
export OPENSHIFT_INSTALL_OS_IMAGE_OVERRIDE=ocp-template-50gb
Deploy Cluster
Run the following:
xxxxxxxxxx
./openshift-install create cluster --dir=install --log-level=debug
If all goes well, when this finishes, you will have a running OpenShift cluster.
Troubleshooting
Cluster Deploy Times Out During Bootstrapping
The following command will add an additional 30 minutes of wait time for the install to complete. You should not need to do this more than once.
xxxxxxxxxx
./openshift-install wait-for install-complete --dir=install --log-level=debug
Running a Clean Installation
Run the following command:
xxxxxxxxxx
./openshift-install destroy cluster --dir=install --log-level=debug
Delete the following directories:
~/.ovirt~/.cache/openshift-installer
In RHVM/Ovirt, delete the following:
- All VMs created in the previous installation.
- All templates created in the previous installation (only if you want to use a new template).
Published at DZone with permission of Ken Lee. See the original article here.
Opinions expressed by DZone contributors are their own.
Comments