DZone
Thanks for visiting DZone today,
Edit Profile
  • Manage Email Subscriptions
  • How to Post to DZone
  • Article Submission Guidelines
Sign Out View Profile
  • Post an Article
  • Manage My Drafts
Over 2 million developers have joined DZone.
Log In / Join
Please enter at least three characters to search
Refcards Trend Reports
Events Video Library
Refcards
Trend Reports

Events

View Events Video Library

Zones

Culture and Methodologies Agile Career Development Methodologies Team Management
Data Engineering AI/ML Big Data Data Databases IoT
Software Design and Architecture Cloud Architecture Containers Integration Microservices Performance Security
Coding Frameworks Java JavaScript Languages Tools
Testing, Deployment, and Maintenance Deployment DevOps and CI/CD Maintenance Monitoring and Observability Testing, Tools, and Frameworks
Culture and Methodologies
Agile Career Development Methodologies Team Management
Data Engineering
AI/ML Big Data Data Databases IoT
Software Design and Architecture
Cloud Architecture Containers Integration Microservices Performance Security
Coding
Frameworks Java JavaScript Languages Tools
Testing, Deployment, and Maintenance
Deployment DevOps and CI/CD Maintenance Monitoring and Observability Testing, Tools, and Frameworks

The software you build is only as secure as the code that powers it. Learn how malicious code creeps into your software supply chain.

Apache Cassandra combines the benefits of major NoSQL databases to support data management needs not covered by traditional RDBMS vendors.

Generative AI has transformed nearly every industry. How can you leverage GenAI to improve your productivity and efficiency?

Modernize your data layer. Learn how to design cloud-native database architectures to meet the evolving demands of AI and GenAI workloads.

Related

  • Building REST API Backend Easily With Ballerina Language
  • An Introduction to Type Safety in JavaScript With Prisma
  • Add Material-UI Table In ReactJS Application
  • CRUD Operations Using ReactJS Hooks and Web API

Trending

  • The End of “Good Enough Agile”
  • SaaS in an Enterprise - An Implementation Roadmap
  • Modern Test Automation With AI (LLM) and Playwright MCP
  • Intro to RAG: Foundations of Retrieval Augmented Generation, Part 2
  1. DZone
  2. Data Engineering
  3. Databases
  4. How To Add AutoComplete Textbox In React Application

How To Add AutoComplete Textbox In React Application

In this article we are going to learn how we add AutoComplete textbox in ReactJS. We use Material UI Autocomplete component in this demo.

By 
Sanwar Ranwa user avatar
Sanwar Ranwa
DZone Core CORE ·
Feb. 06, 20 · Tutorial
Likes (4)
Comment
Save
Tweet
Share
13.1K Views

Join the DZone community and get the full member experience.

Join For Free

Introduction

In this article, we are going to learn how we add the AutoComplete textbox in ReactJS. We use the Material UI Autocomplete component in this demo.

Prerequisites

  • We should have the basic knowledge of React.js and Web API.
  • Visual Studio and Visual Studio Code IDE should be installed on your system.
  • SQL Server Management Studio.
  • Material UI Installed.

You may also like: An Angular Autocomplete From UI to DB

Create a Table in the Database

Open SQL Server Management Studio, create a database named "Autocomplete", and in this database, create a table. Give that table a name like "Tblcountry".

Java


x


1
CREATE TABLE [dbo].[TblCountry](    
2
    [Id] [int] IDENTITY(1,1) NOT NULL,    
3
    [Name] [nvarchar](50) NULL,    
4
 CONSTRAINT [PK_TblCountry] PRIMARY KEY CLUSTERED     
5
(    
6
    [Id] ASC    
7
)WITH (PAD_INDEX = OFF, STATISTICS_NORECOMPUTE = OFF, IGNORE_DUP_KEY = OFF, ALLOW_ROW_LOCKS = ON, ALLOW_PAGE_LOCKS = ON) ON [PRIMARY]    
8
) ON [PRIMARY]    
9
GO  


Now add some demo data in this table.

Create a New Web API project

Open Visual Studio and create a new project.

microsoft visual studios

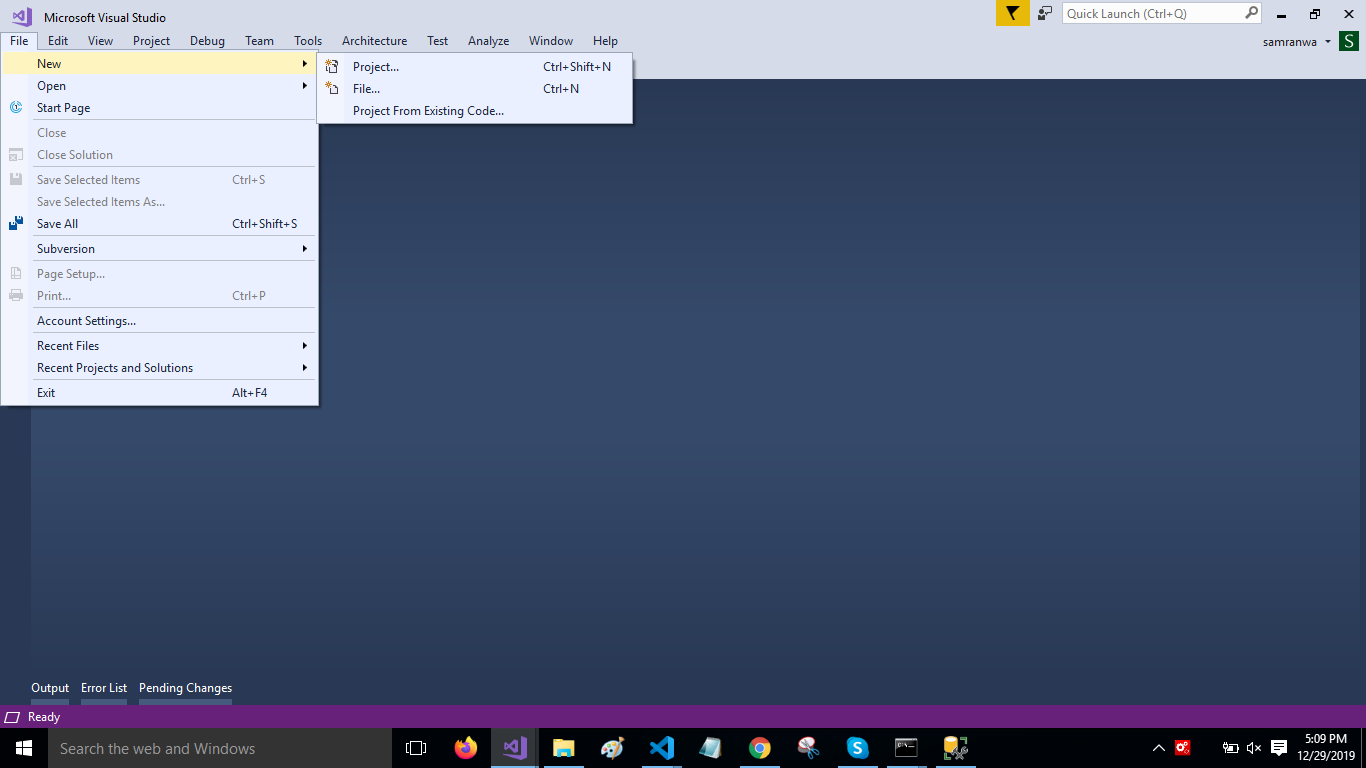
Change the name to Autocomplete. 

microsoft visual studios

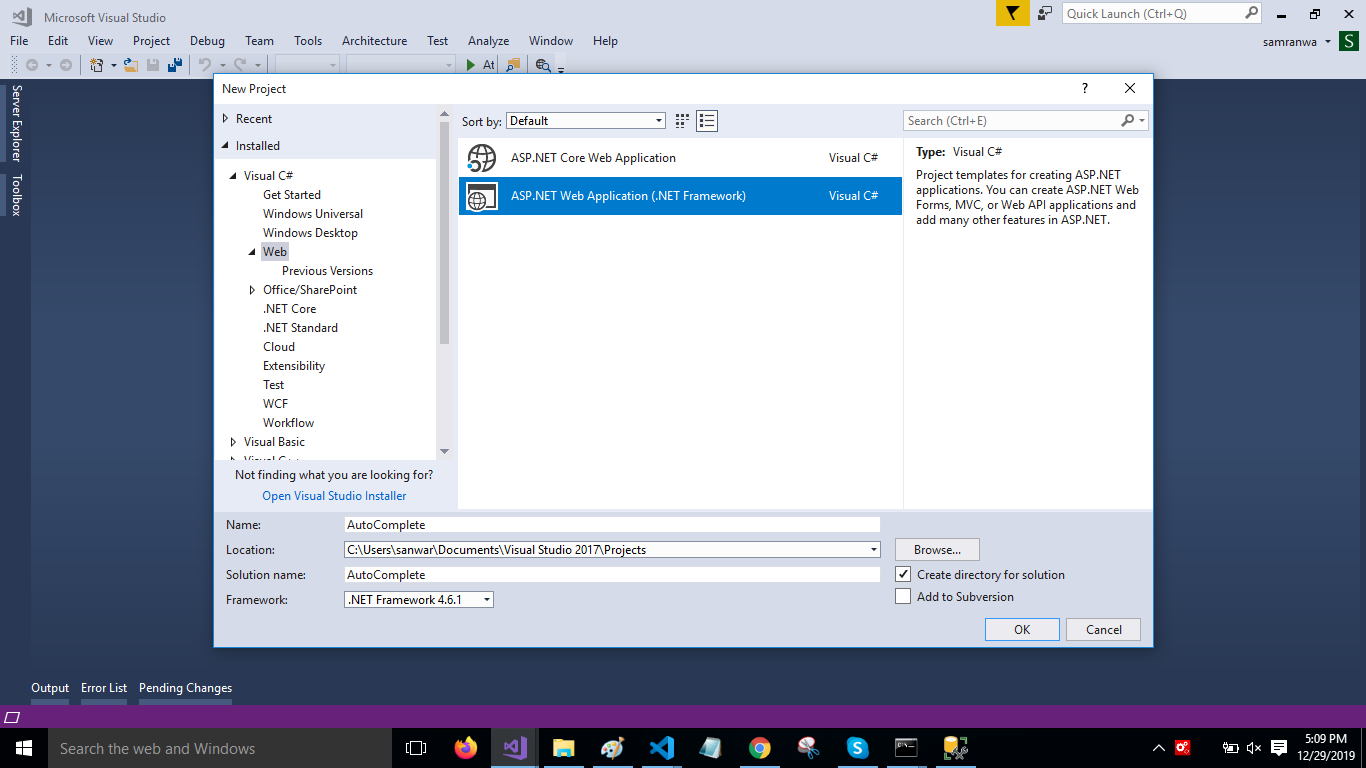
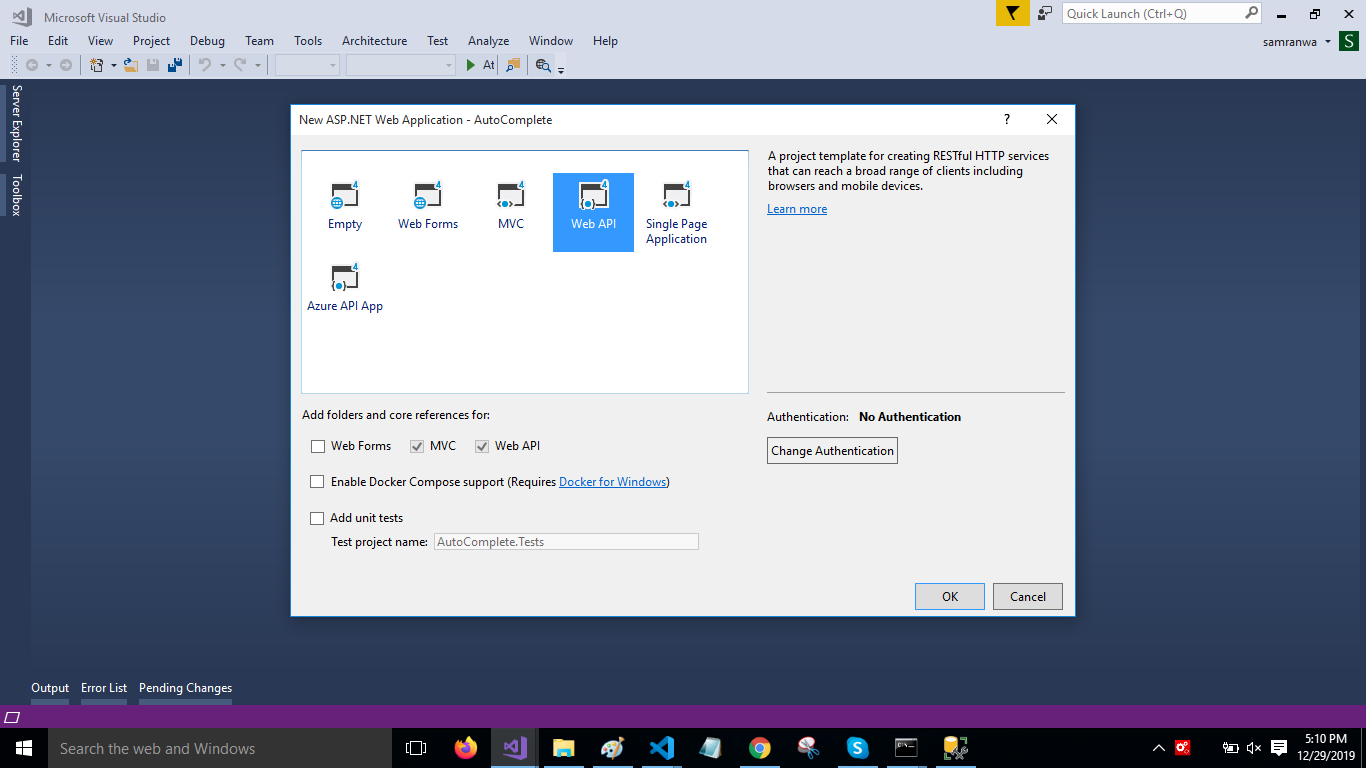
Choose the template as Web API.

microsoft visual studios

Right-click the Models folder from Solution Explorer and go to Add >> New Item >> data.

microsoft visual studios

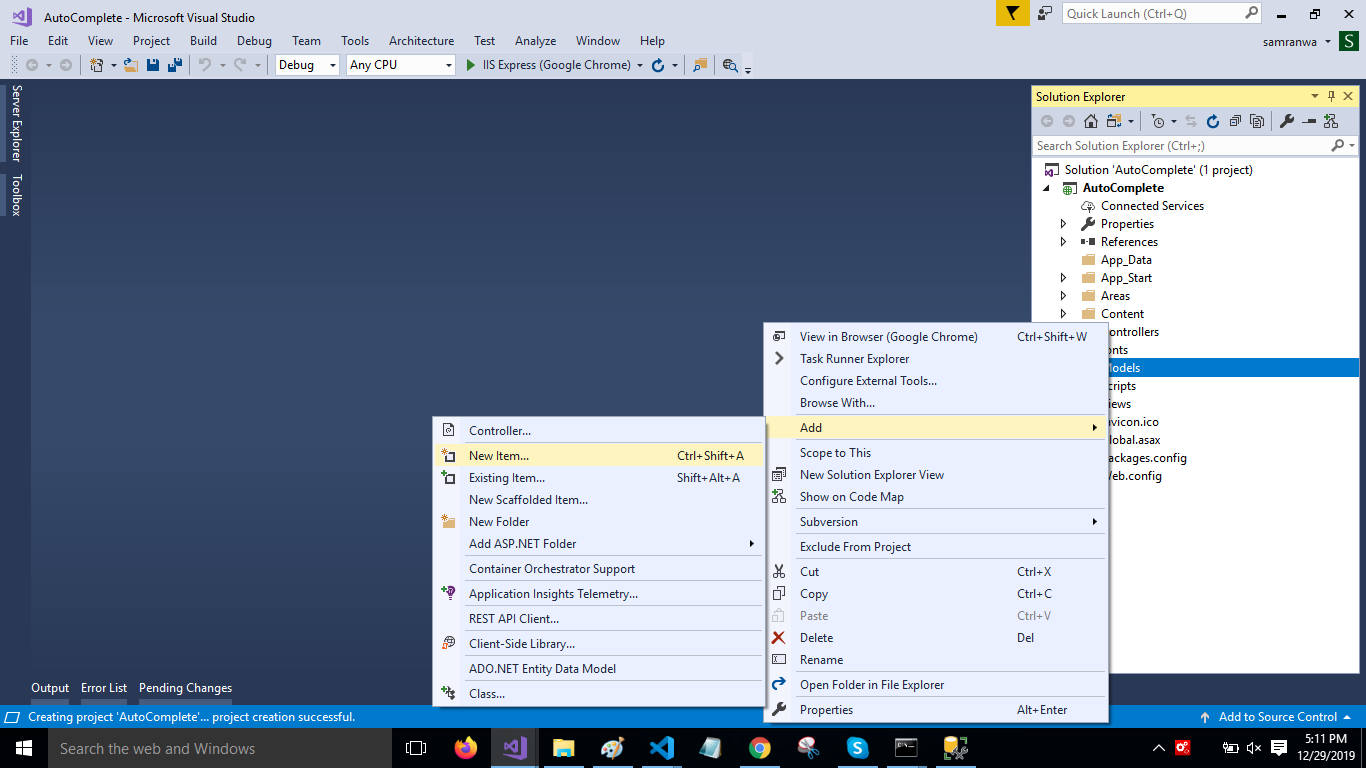
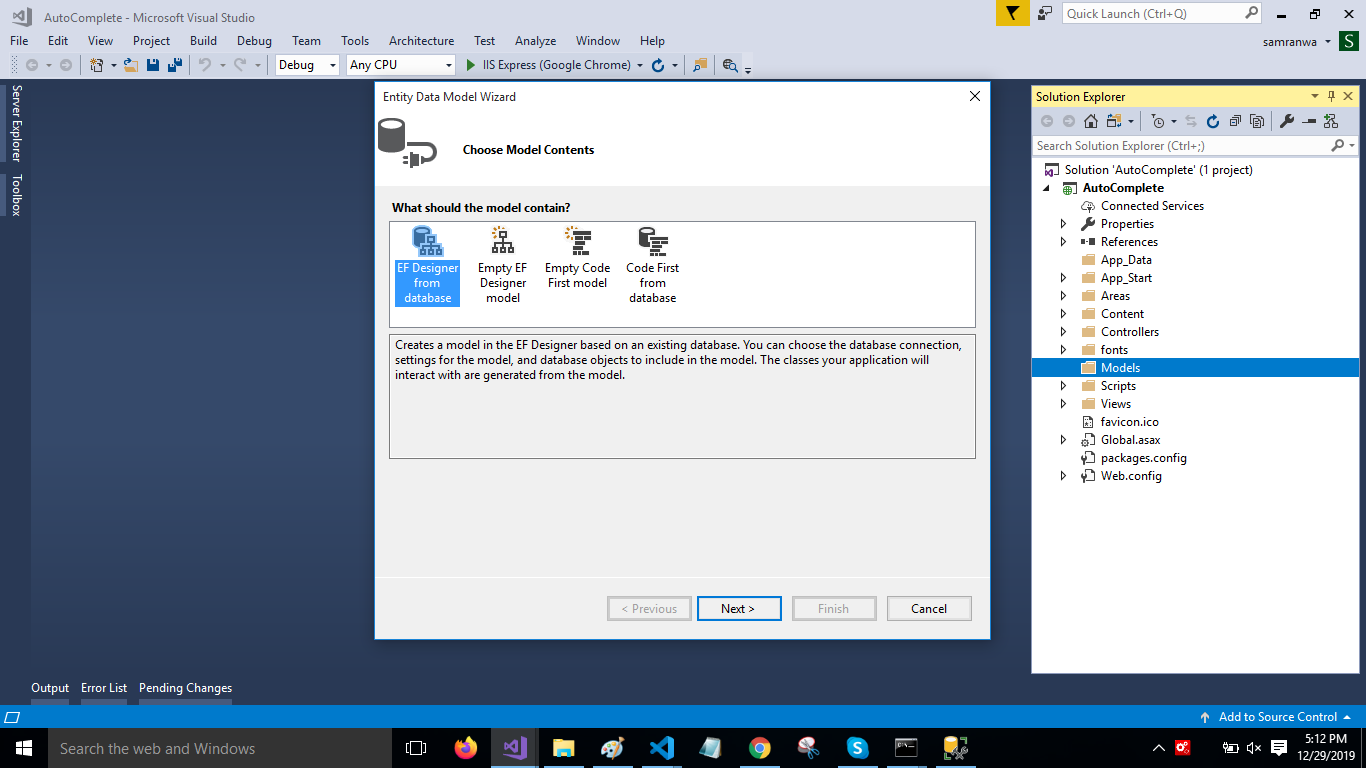
Click on the "ADO.NET Entity Data Model" option and click "Add".

microsoft visual studios

Select EF Designer from the database and click the "Next" button.

microsoft visual studios

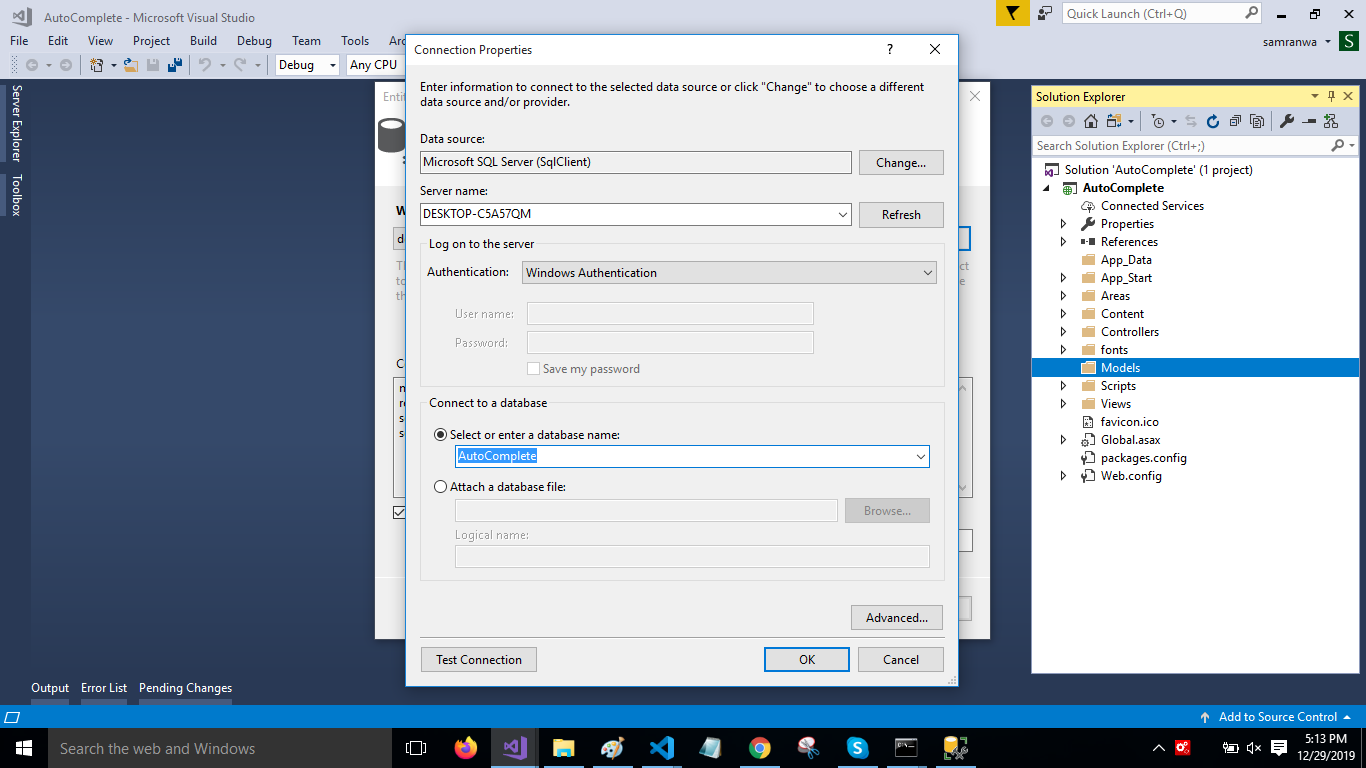
Add the connection properties and select database names on the next page and click OK.

microsoft visual studios

Check the "Table" checkbox. The internal options will be selected by default. Now, click the "Finish" button

microsoft visual studios

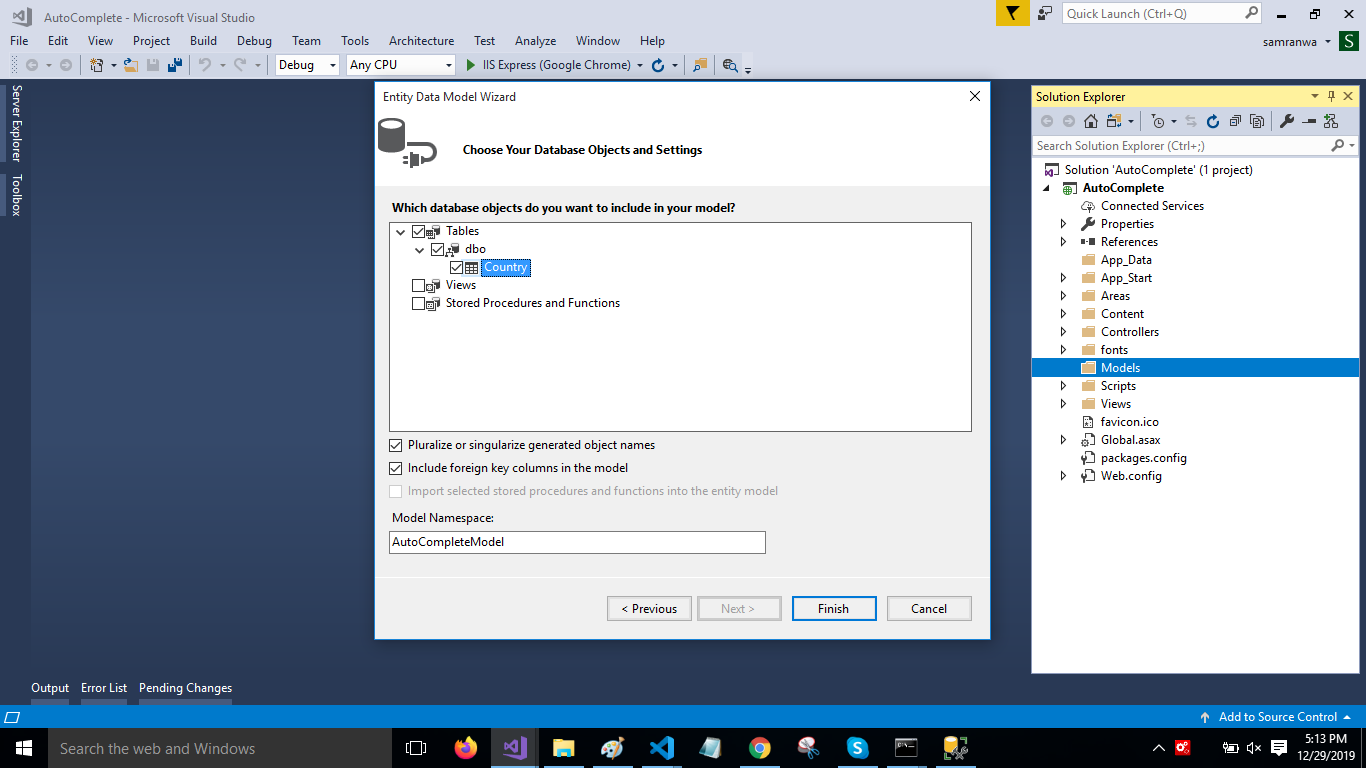
Now, our data model is successfully created.  

Right-click on the Controller folder and add a new controller. Name it as an "Autocomplete controller" and add the following namespace in the Autocomplete controller.

C#


x


1
using AutoComplete.Models;


Now add a method to fetch data from the database.

Java


xxxxxxxxxx
1


1
public object Getrecord()  
2
{  
3
   var data= DB.TblCountries.ToList();  
4
   return data;  
5
}


Complete Autocomplete controller code

C#


xxxxxxxxxx
1
22


1
using System;  
2
using System.Collections.Generic;  
3
using System.Linq;  
4
using System.Net;  
5
using System.Net.Http;  
6
using System.Web.Http;  
7
using AutoComplete.Models;  
8
namespace AutoComplete.Controllers  
9
{  
10
    [RoutePrefix("Api/autoComplete")]  
11
    public class AutoCompleteController : ApiController  
12
    {  
13
          AutoCompleteEntities2 DB = new AutoCompleteEntities2();  
14
            [HttpGet]  
15
            [Route("Countrylist")]  
16
            public object Getrecord()  
17
            {  
18
             var data= DB.TblCountries.ToList();  
19
             return data;  
20
            }  
21
        }  
22
    } 


Now, let's enable CORS. Go to Tools, open NuGet Package Manager, search for CORS and install the "Microsoft.Asp.Net.WebApi.Cors" package. Open Webapiconfig.cs and add the following lines.

Java


xxxxxxxxxx
1


1
EnableCorsAttribute cors = new EnableCorsAttribute("*", "*", "*");          
2
config.EnableCors(cors); 


Create ReactJS Project

 Now let's first create a React application with the following command.

C#


xxxxxxxxxx
1


1
npx create-react-app autocomplete 


Open the newly created project in the Visual Studio Code and install Material-UI. 

Install Material-UI

 Now install Material-UI by using the following command

JavaScript


xxxxxxxxxx
1


1
npm install @material-ui/core --save   


Now install the Axios library by using the following command. Learn more about Axios.

Java


xxxxxxxxxx
1


1
npm install --save axios  


Now go to the src folder and add new components.

Autocomplete.js 

Now open the Autocomplete.js  component and import the required reference.

JavaScript


xxxxxxxxxx
1


1
import Autocomplete from '@material-ui/lab/Autocomplete';  
2
import AppBar from '@material-ui/core/AppBar';  
3
import Toolbar from '@material-ui/core/Toolbar'; 


The following code in this component.

Java


xxxxxxxxxx
1
47


1
import React, { Component } from 'react';  
2
import TextField from '@material-ui/core/TextField';  
3
import Autocomplete from '@material-ui/lab/Autocomplete';  
4
import AppBar from '@material-ui/core/AppBar';  
5
import Toolbar from '@material-ui/core/Toolbar';  
6
import './App.css';  
7
import axios from 'axios';  
8
export class Autocom extends Component {  
9
        constructor(props) {  
10
                super(props)  
11
                this.state = {  
12
                        ProductData: []  
13
  
14
                }  
15
        }  
16
        componentDidMount() {  
17
                axios.get('http://localhost:51983/Api/autoComplete/Countrylist').then(response => {  
18
                        console.log(response.data);  
19
                        this.setState({  
20
                                ProductData: response.data  
21
                        });  
22
                });  
23
        }  
24
        render() {  
25
  
26
                return (  
27
                        <div>  
28
                                <AppBar className="mrg" position="static">  
29
                                        <Toolbar >  
30
                                                Auto Complete  
31
 </Toolbar>  
32
                                </AppBar>  
33
                                <Autocomplete className="pding"  
34
                                        id="combo-box-demo"  
35
                                        options={this.state.ProductData}  
36
                                        getOptionLabel={option => option.Name}  
37
                                        style={{ width: 300 }}  
38
                                        renderInput={params => (  
39
                                                <TextField {...params} label="Auto Complete" variant="outlined" fullWidth />  
40
                                        )}  
41
                                />  
42
                        </div>  
43
                )  
44
        }  
45
  
46
}  
47
export default Autocom  


Now open the app.cs file and add the following code.

Java


xxxxxxxxxx
1


1
 
2
.mrg{  
3
  margin-top: 20px;  
4
  margin-bottom: 20px;  
5
}  
6
.pding  
7
{  
8
  padding-left: 500px;  
9
}  


Now open app.js file and add the following code.

Java


xxxxxxxxxx
1
14


1
import React from 'react';  
2
import logo from './logo.svg';  
3
import './App.css';  
4
import Form from './Form'  
5
import Autocom from './Autoc'  
6
function App() {  
7
  return (  
8
    <div className="App">  
9
      <Autocom/>  
10
    </div>  
11
  );  
12
}  
13
  
14
export default App;


Now run the project by using 'npm start',

Did you find this article helpful? Let us know in the comments!


Further Reading

Create an ASP.NET MVC AutoFill Control, Part 1

Everything React: Tutorials for Beginners and Experts Alike

React (JavaScript library) Database application Visual Studio Code

Opinions expressed by DZone contributors are their own.

Related

  • Building REST API Backend Easily With Ballerina Language
  • An Introduction to Type Safety in JavaScript With Prisma
  • Add Material-UI Table In ReactJS Application
  • CRUD Operations Using ReactJS Hooks and Web API

Partner Resources

×

Comments
Oops! Something Went Wrong

The likes didn't load as expected. Please refresh the page and try again.

ABOUT US

  • About DZone
  • Support and feedback
  • Community research
  • Sitemap

ADVERTISE

  • Advertise with DZone

CONTRIBUTE ON DZONE

  • Article Submission Guidelines
  • Become a Contributor
  • Core Program
  • Visit the Writers' Zone

LEGAL

  • Terms of Service
  • Privacy Policy

CONTACT US

  • 3343 Perimeter Hill Drive
  • Suite 100
  • Nashville, TN 37211
  • support@dzone.com

Let's be friends:

Likes
There are no likes...yet! 👀
Be the first to like this post!
It looks like you're not logged in.
Sign in to see who liked this post!