How to Add Ignite UI to an Existing Angular Project
In this post, we will follow a step-by-step approach in order to add the Ignite UI Angular library to an existing Angular application.
Join the DZone community and get the full member experience.
Join For FreeLet's say that you're already working on an existing Angular project, and you wish to add the Ignite UI for Angular library into the project. In this blog post, we will follow a step-by-step approach to add Ignite UI Angular library into an existing Angular project.
Step 1: Add Ignite UI for Angular library
Begin by adding the Ignite UI Angular library in the project. We can use npm to do this. So, run the command shown below to install Ignite UI for Angular.
npm install igniteui-angular Step 2: Add Hammer.js
Next, you need to install Hammer.js, as Ignite UI for Angular uses Hammer.js for gestures.
npm install Hammerjs
 Step 3: Modify the angular.json File
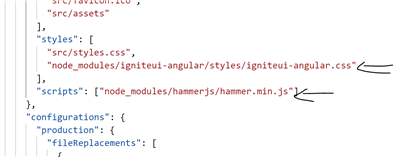
After installing Ignite UI for Angular, make sure that the project references Ignite UI for Angular styles and the Hammer.js library in the angular.json file. Modify the angular.json file as shown below:
"styles": [
   "src/styles.css",
   "node_modules/igniteui-angular/styles/igniteui-angular.css"
 ],
 "scripts": [ "node_modules/hammerjs/hammer.min.js" ]
We have added references in the styles and scripts section, as depicted in the image below:
 Step 4: Modify style.css
Ignite UI for Angular styles uses the Material Icons. Let's import those into the styles.css file, as shown below:
@import url('https://fonts.googleapis.com/icon?family=Material+Icons');Step 5: Import Hammer.js
We have installed Hammer.js and next we need to import Hammer.js into the main.ts file as shown below:
import 'hammerjs';After importing, main.ts should have following imports:

With this step, we have added Ignite UI for Angular into an existing Angular project and configured the required files.
Step 6: Use a Component
We are going to use the Ignite UI for Angular DatePicker component to test whether everything is configured and installed correctly or not.
Add igx-datePicker into the component template, as shown in the below listing:
<igx-datePicker item-width="50%"
                [value]="date" [formatter]="formatter">
</igx-datePicker>
Then add the below code in the component class to configure:
- Day formatter
- Month formatter
public date: Date = new Date(Date.now());
   private dayFormatter = new Intl.DateTimeFormat('en', { weekday: 'long' });
   private monthFormatter = new Intl.DateTimeFormat('en', { month: 'long' });

    public formatter = (_: Date) => {
       return `You selected ${this.dayFormatter.format(_)}, ${_.getDate()} ${this.monthFormatter.format(_)}, ${_.getFullYear()}`;
   }
In addition, to work with the datePicker component, you need to add the following modules.
imports: [
      BrowserModule, BrowserAnimationsModule, IgxDatePickerModule
  ],
Run Application
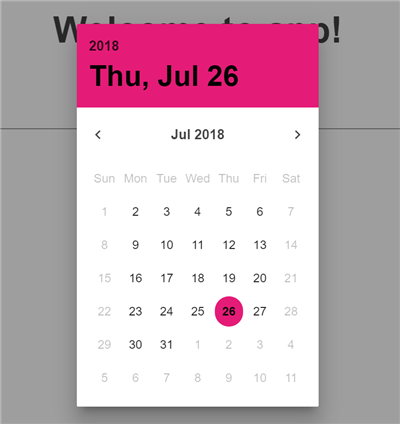
Now, when you run the application, you should see the datePicker component from Ignite UI for Angular added into the application. You can select a date and that will be displayed.
I hope this article will help you in adding the Ignite UI Angular library into an existing Angular project.
Published at DZone with permission of Dhananjay Kumar. See the original article here.
Opinions expressed by DZone contributors are their own.
Comments