Azure Deployment Using FileZilla
In this step-by-step guide, focus on the FileZilla FTP client as a means to publish your Angular UI application to Azure.
Join the DZone community and get the full member experience.
Join For FreeIn today's digital landscape, deploying web applications to the cloud is a common practice. Azure provides various deployment options, including GitHub, Azure DevOps, Bitbucket, FTP, or a local Git repository.
In this step-by-step guide, we will focus on the FileZilla FTP client as a means to publish your Angular UI application to Azure. Follow these steps to make your Angular app accessible to the world.
Prerequisites
- An Angular UI application ready for deployment
- An Azure Web App set up and configured
- FileZilla FTP client installed on your local machine
Step 1: Download and Install FileZilla
Before you can use FileZilla to publish your Angular app to Azure, you need to download and install the FileZilla FTP client.
Follow these steps:
- Visit the official FileZilla website.
- Click on the "Download FileZilla Client" button to access the download page.
- On the download page, you will see versions for different operating systems (Windows, macOS, Linux). Choose the version that corresponds to your operating system and click the download link.
- Once the download is complete, run the installer file you downloaded.
- Follow the installation wizard's prompts to install FileZilla on your computer.
Step 2: Build Your Angular Application
Ensure your Angular application is built for production. Open your terminal/command prompt and navigate to your Angular project's root directory. Run this command:

Visual Studio Code Terminal Window
ng build --prod
This will generate a production-ready build of your Angular app in the dist folder.
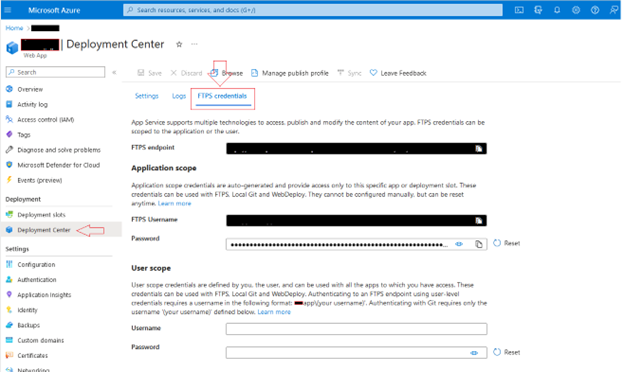
Step 3: Configure Azure FTP Credentials
To connect to your Azure Web App via FTP, obtain FTP credentials:
- Log in to the Azure Portal.
- Navigate to your Azure Web App's "Settings."
- Under "Deployment Center," select the FTPS credentials. Note down the FTP server address(FTPS endpoint), FTPS username, and password.
Step 4: Launch FileZilla
Open the FileZilla FTP client on your computer.
Step 5: Connect to the Azure Web App
Configure FileZilla to connect to your Azure Web App using the FTP credentials obtained in Step 3:
- In FileZilla, go to "File" > "Site Manager."
- Click "New Site" and name it (e.g., "Azure FTP").
- Choose "FTP - File Transfer Protocol" as the protocol.
- In the "Host" field, enter the FTP server address.
- Set the "Encryption" to "Use explicit FTP over TLS if available."
- Enter your FTP username and password.
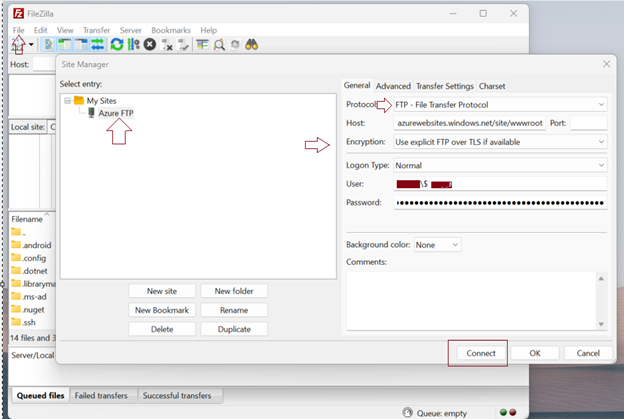
- Click "Connect" to save the site and connect to Azure.
Step 6: Upload Your Angular App
With FileZilla connected to Azure, upload your Angular app:
- In FileZilla, navigate the left pane to your local "dist" folder.
- In the right pane, locate the remote directory on Azure where you want to upload your app (usually something like "/site/wwwroot").
- Select all files and directories within your local "dist" folder and drag them to the remote directory on Azure. FileZilla will start uploading.
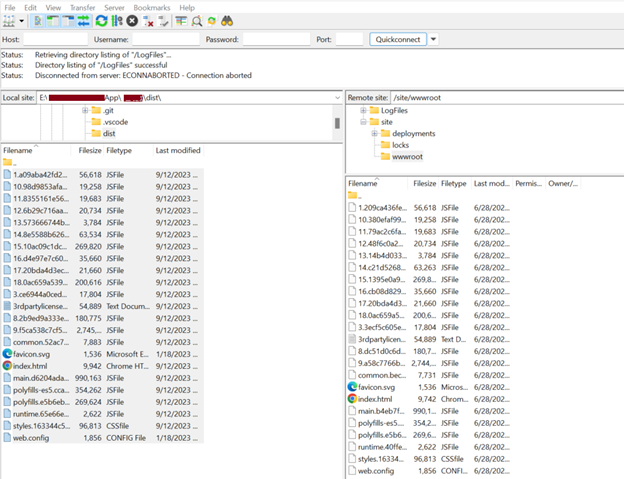
Step 7: Monitor Upload Progress
FileZilla displays upload progress in the "Queued files" section at the bottom of the window. Wait for the upload to complete.
Step 8: Verify Deployment
Once the upload is complete, your Angular app should be published on your Azure Web App. You can access it using the URL provided for your Azure Web App in the Azure Portal.

Conclusion
In this guide, you've learned how to publish an Angular UI application to Azure using FileZilla.
This straightforward process allows you to easily deploy your Angular app to the cloud for public access. Be sure to keep your FTP credentials secure, and remember to update your deployed app as needed to ensure it reflects the latest changes and features.
Opinions expressed by DZone contributors are their own.
Comments