How To Automate CI/CD Pipeline With Walrus and GitLab
This tutorial will demonstrate how to integrate Walrus CLI with GitLab CI and release applications via Walrus file to improve the CI/CD automation.
Join the DZone community and get the full member experience.
Join For FreeWalrus file is a new feature released in Walrus 0.5. It allows you to describe applications and configure infrastructure resources using a concise YAML.
You can then execute walrus apply in the Walrus CLI or import it on the Walrus UI. This will submit the Walrus file to the Walrus server, which will deploy, configure, and manage applications and infrastructure resources. This makes it easy to reuse them across multiple environments.
In this tutorial, we will demonstrate how to integrate Walrus CLI with GitLab CI and release applications via Walrus file to improve CI/CD pipelines.
Prerequisites
Before getting started, please prepare the following:
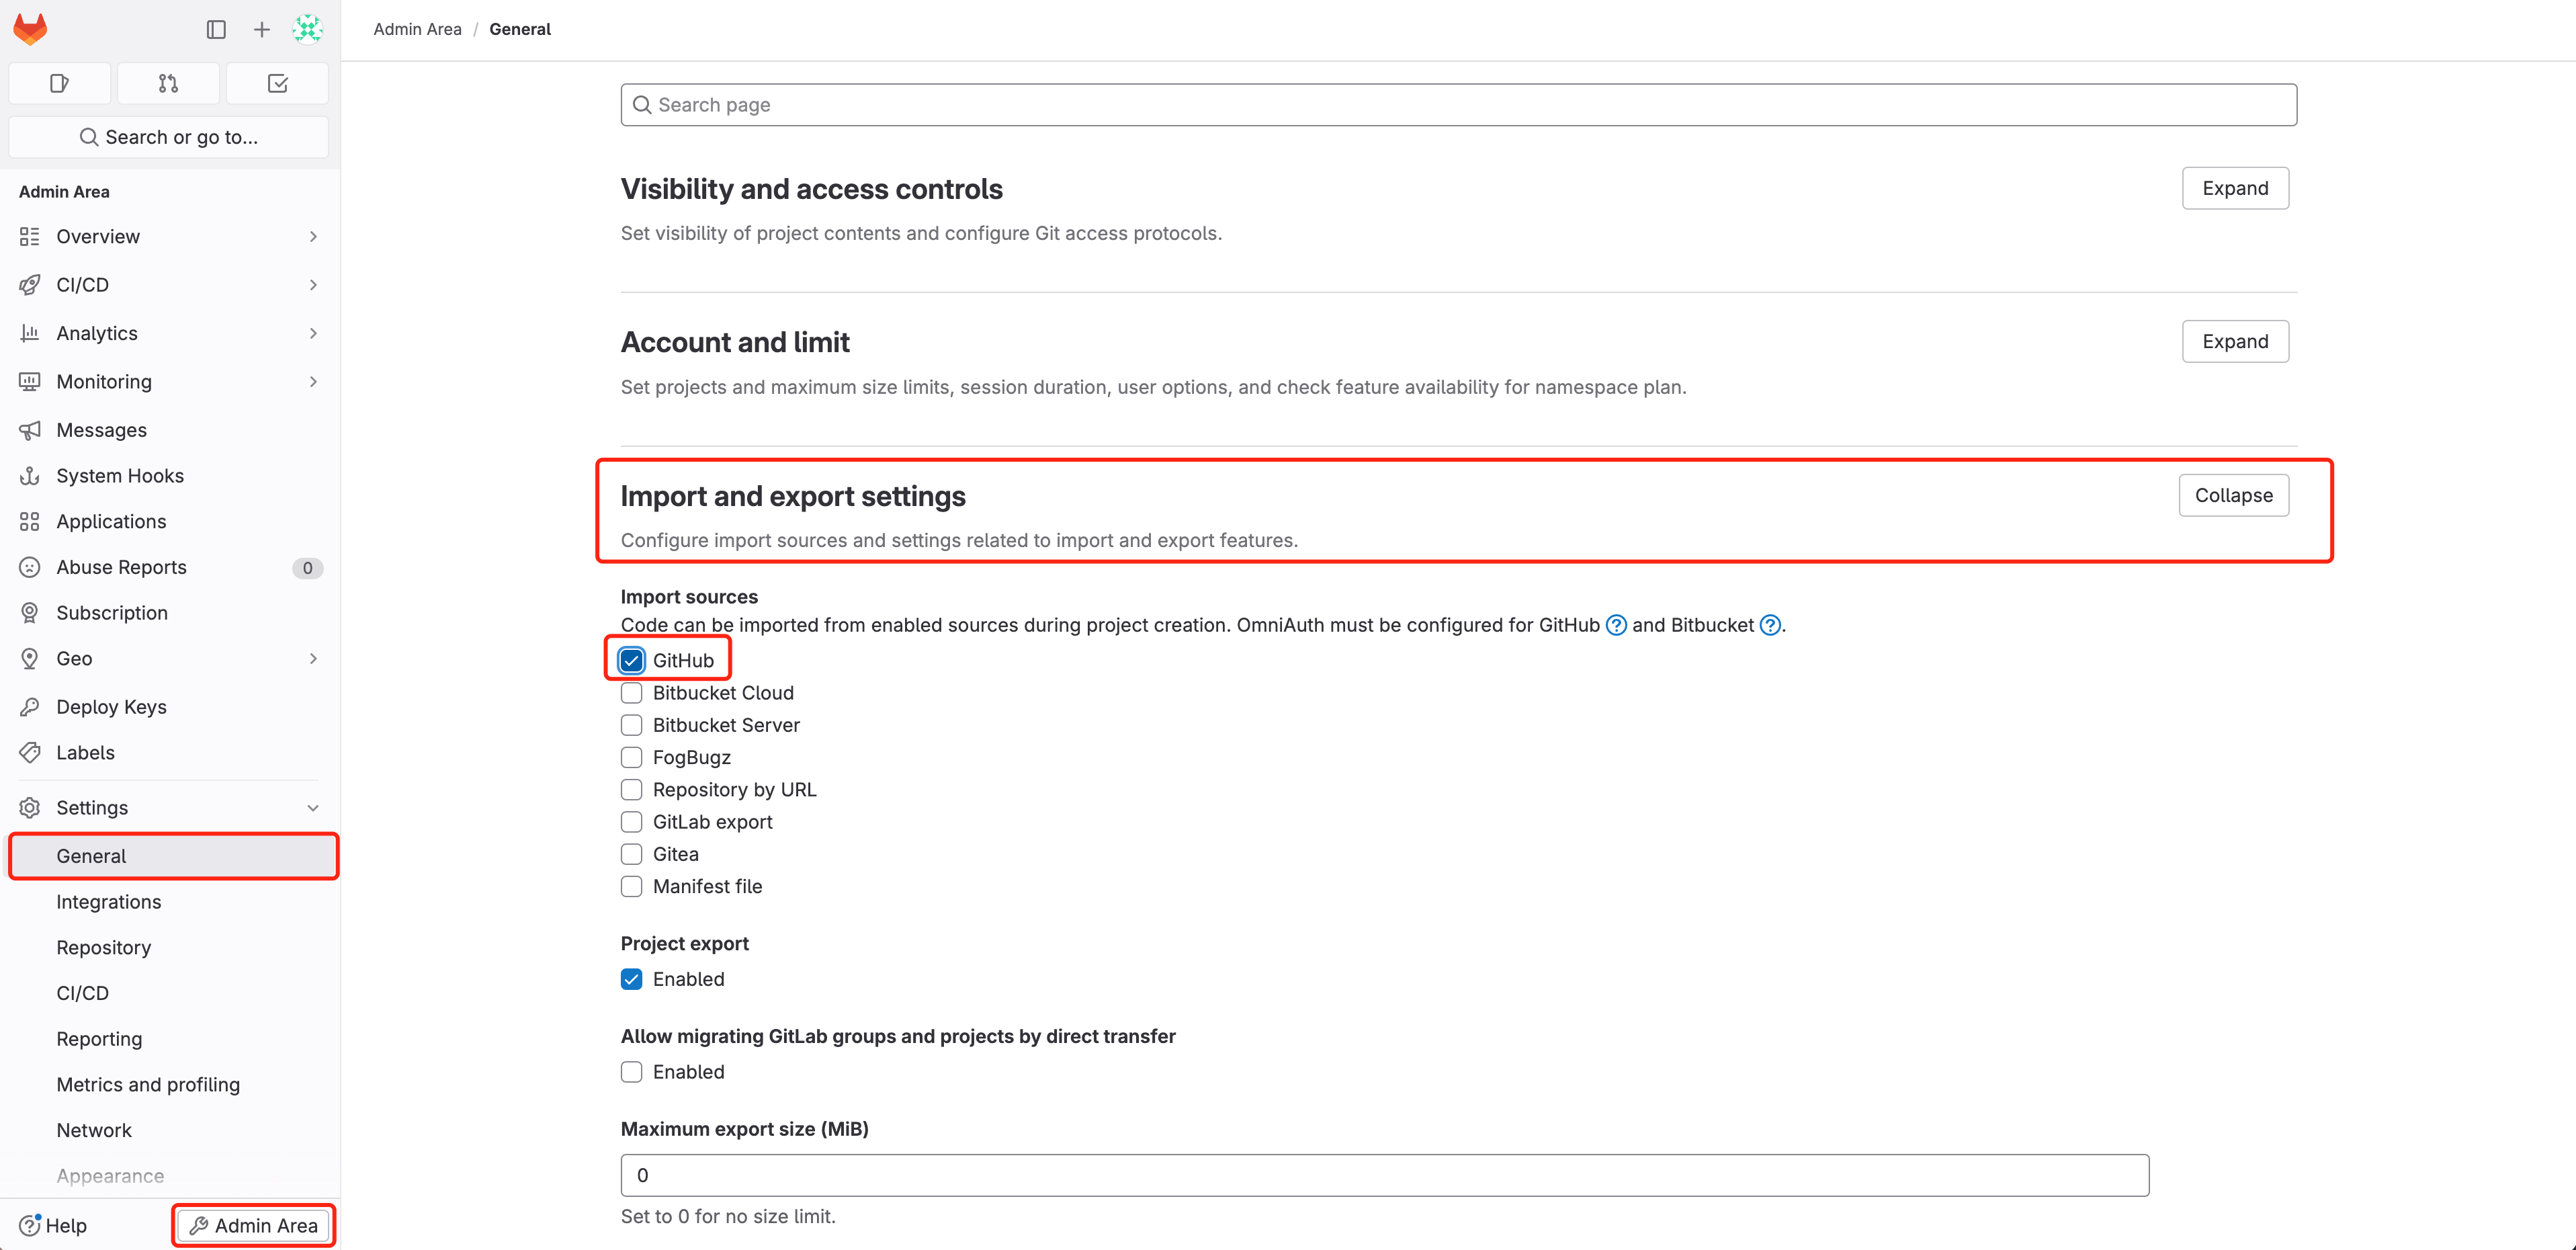
- Create a new project on GitLab and import our demo project into it. First, ensure that you have the GitHub type
Import Projectpermission enabled. If not, refer to the snapshot below and enable it in theAdmin Area.![demo]() Alternatively, you can manually
Alternatively, you can manually git clonethe project and push a new GitLab project into it. - Install Walrus via
docker run, and expose additional ports 30000~30100 for NodePort of built-in k3s cluster workload, for more information: https://seal-io.github.io/docs/deploy/standalone
 Alternatively, you can manually
 sudo docker run -d --privileged --restart=always -p 80:80 -p 443:443 -p 30000-30100:30000-30100 --name walrus sealio/walrus:v0.5.13. Access Walrus. In the latest version, Walrus automatically creates a local environment in the default project and adds built-in K3s or other K8s clusters in the Walrus container as a connector in this environment. For demonstration purposes, this example will use the K3s cluster.
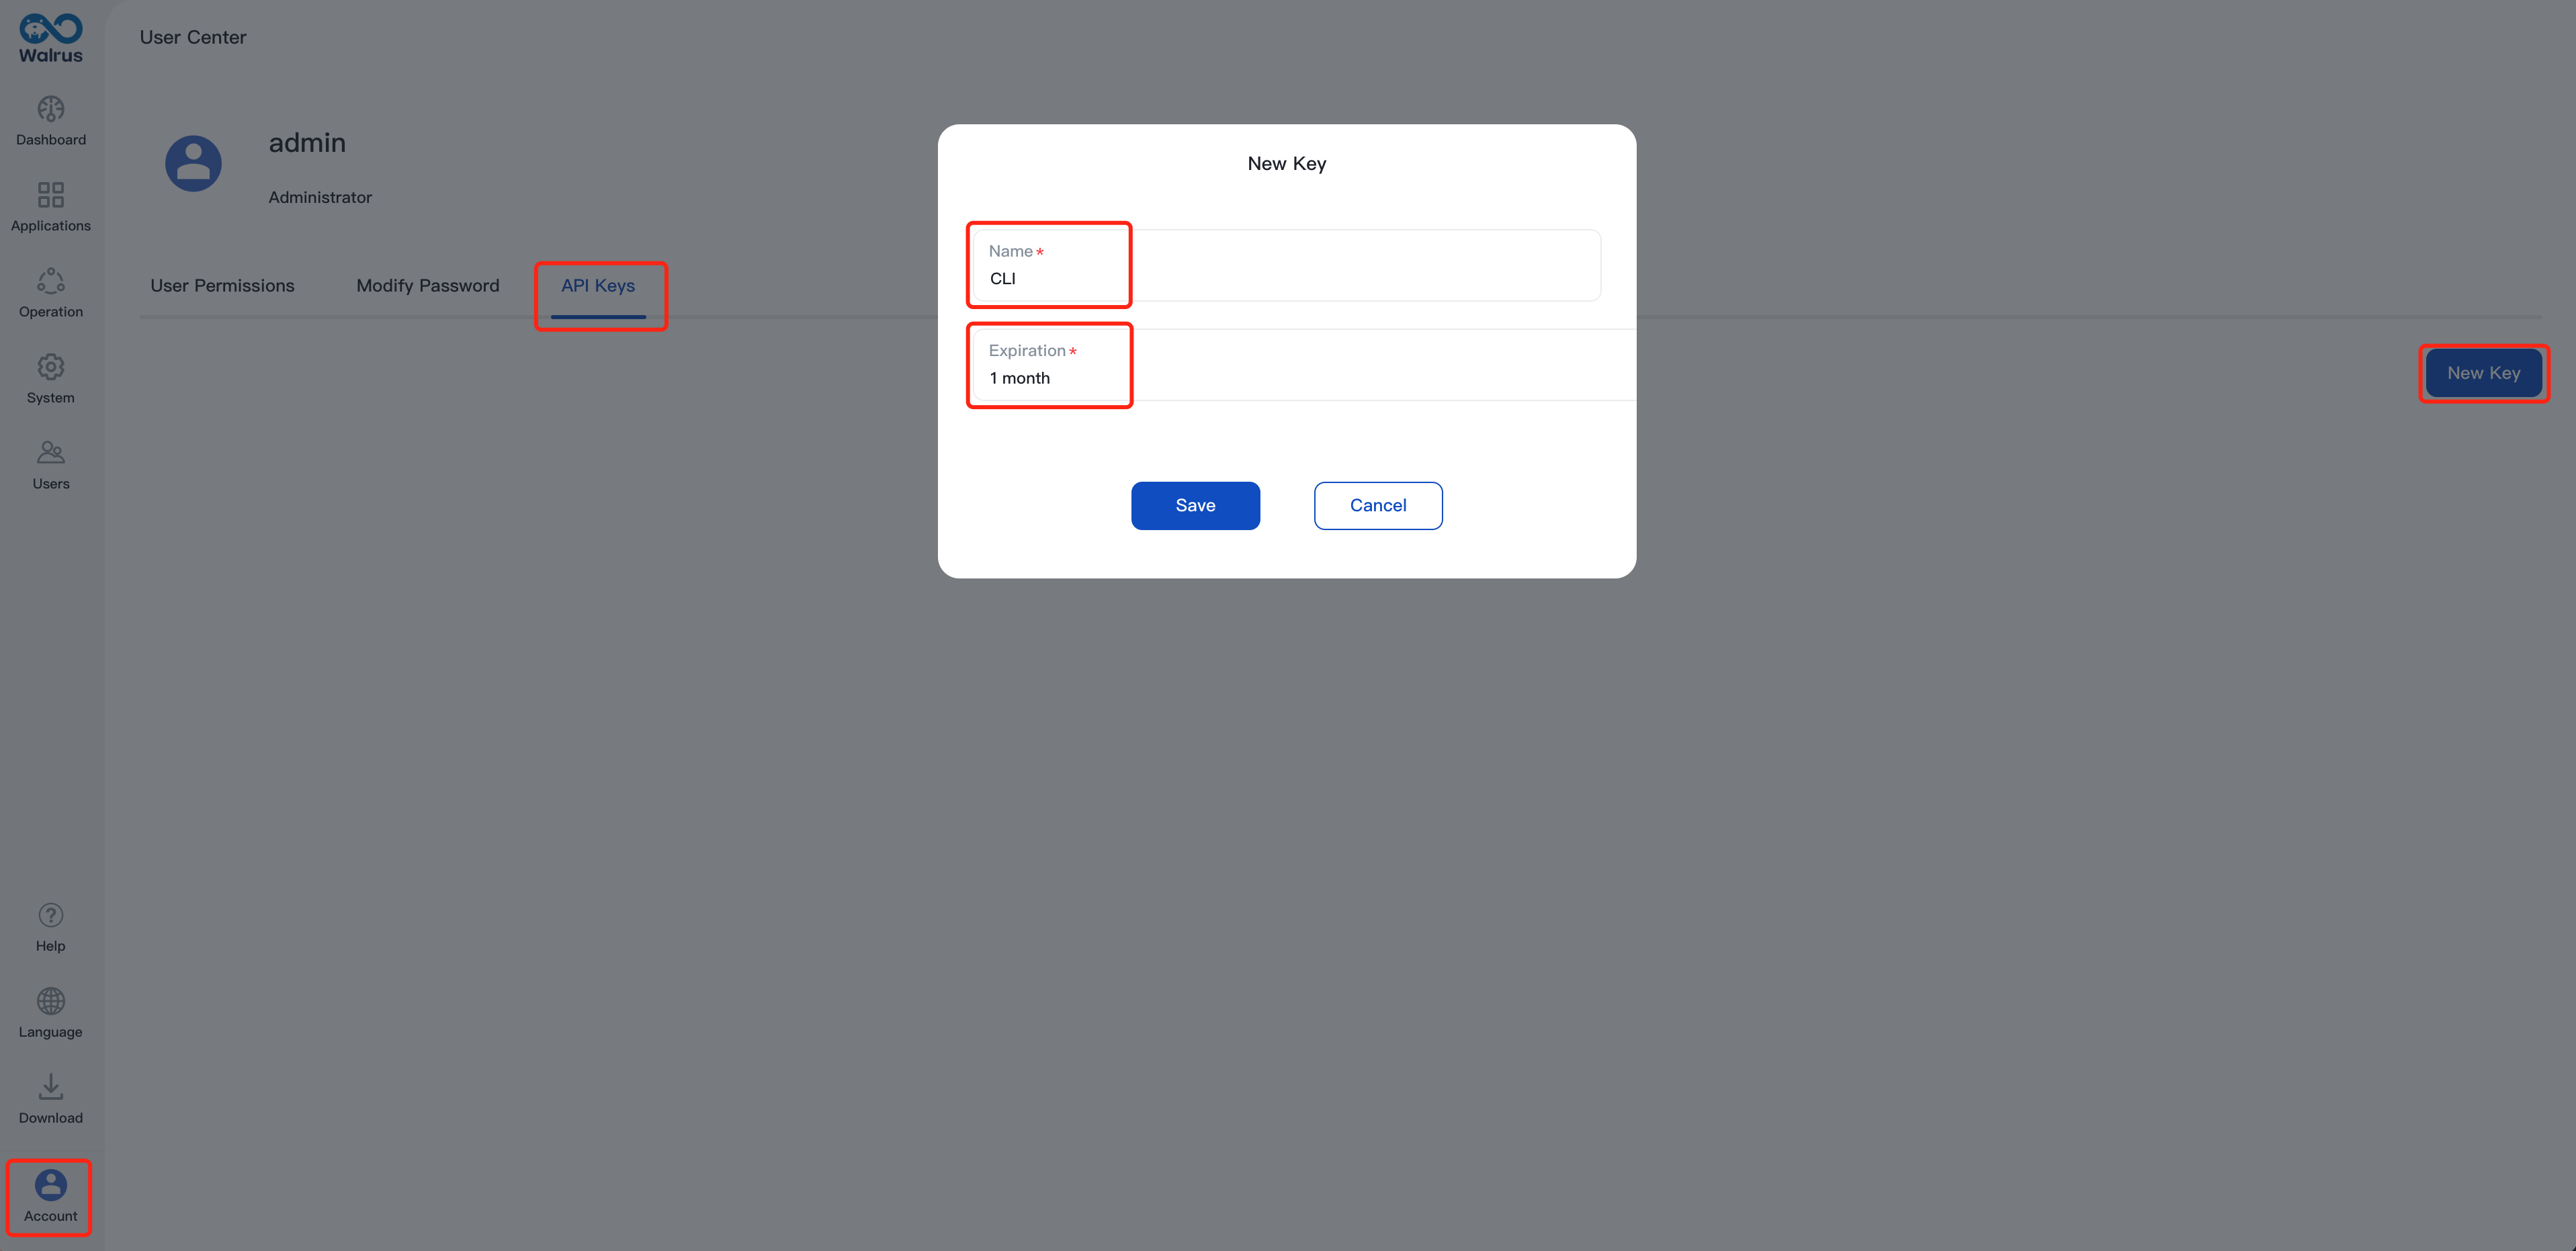
4. Create an API key on Walrus to authenticate for communication between the Walrus CLI and Walrus Server in the following steps. Here is the guidance:
- Navigate to
Account>User center>API Keys - Click
New Key, name it, and set up an expiration - After configuring, copy the generated key and save it. If the key is lost in the future, it can be regenerated for replacement.
Configure Walrus CLI and Integrate It With GitLab CI
In this section, we will demonstrate an example from CI to CD. Follow the steps below to integrate Walrus CLI with GitLab CI:
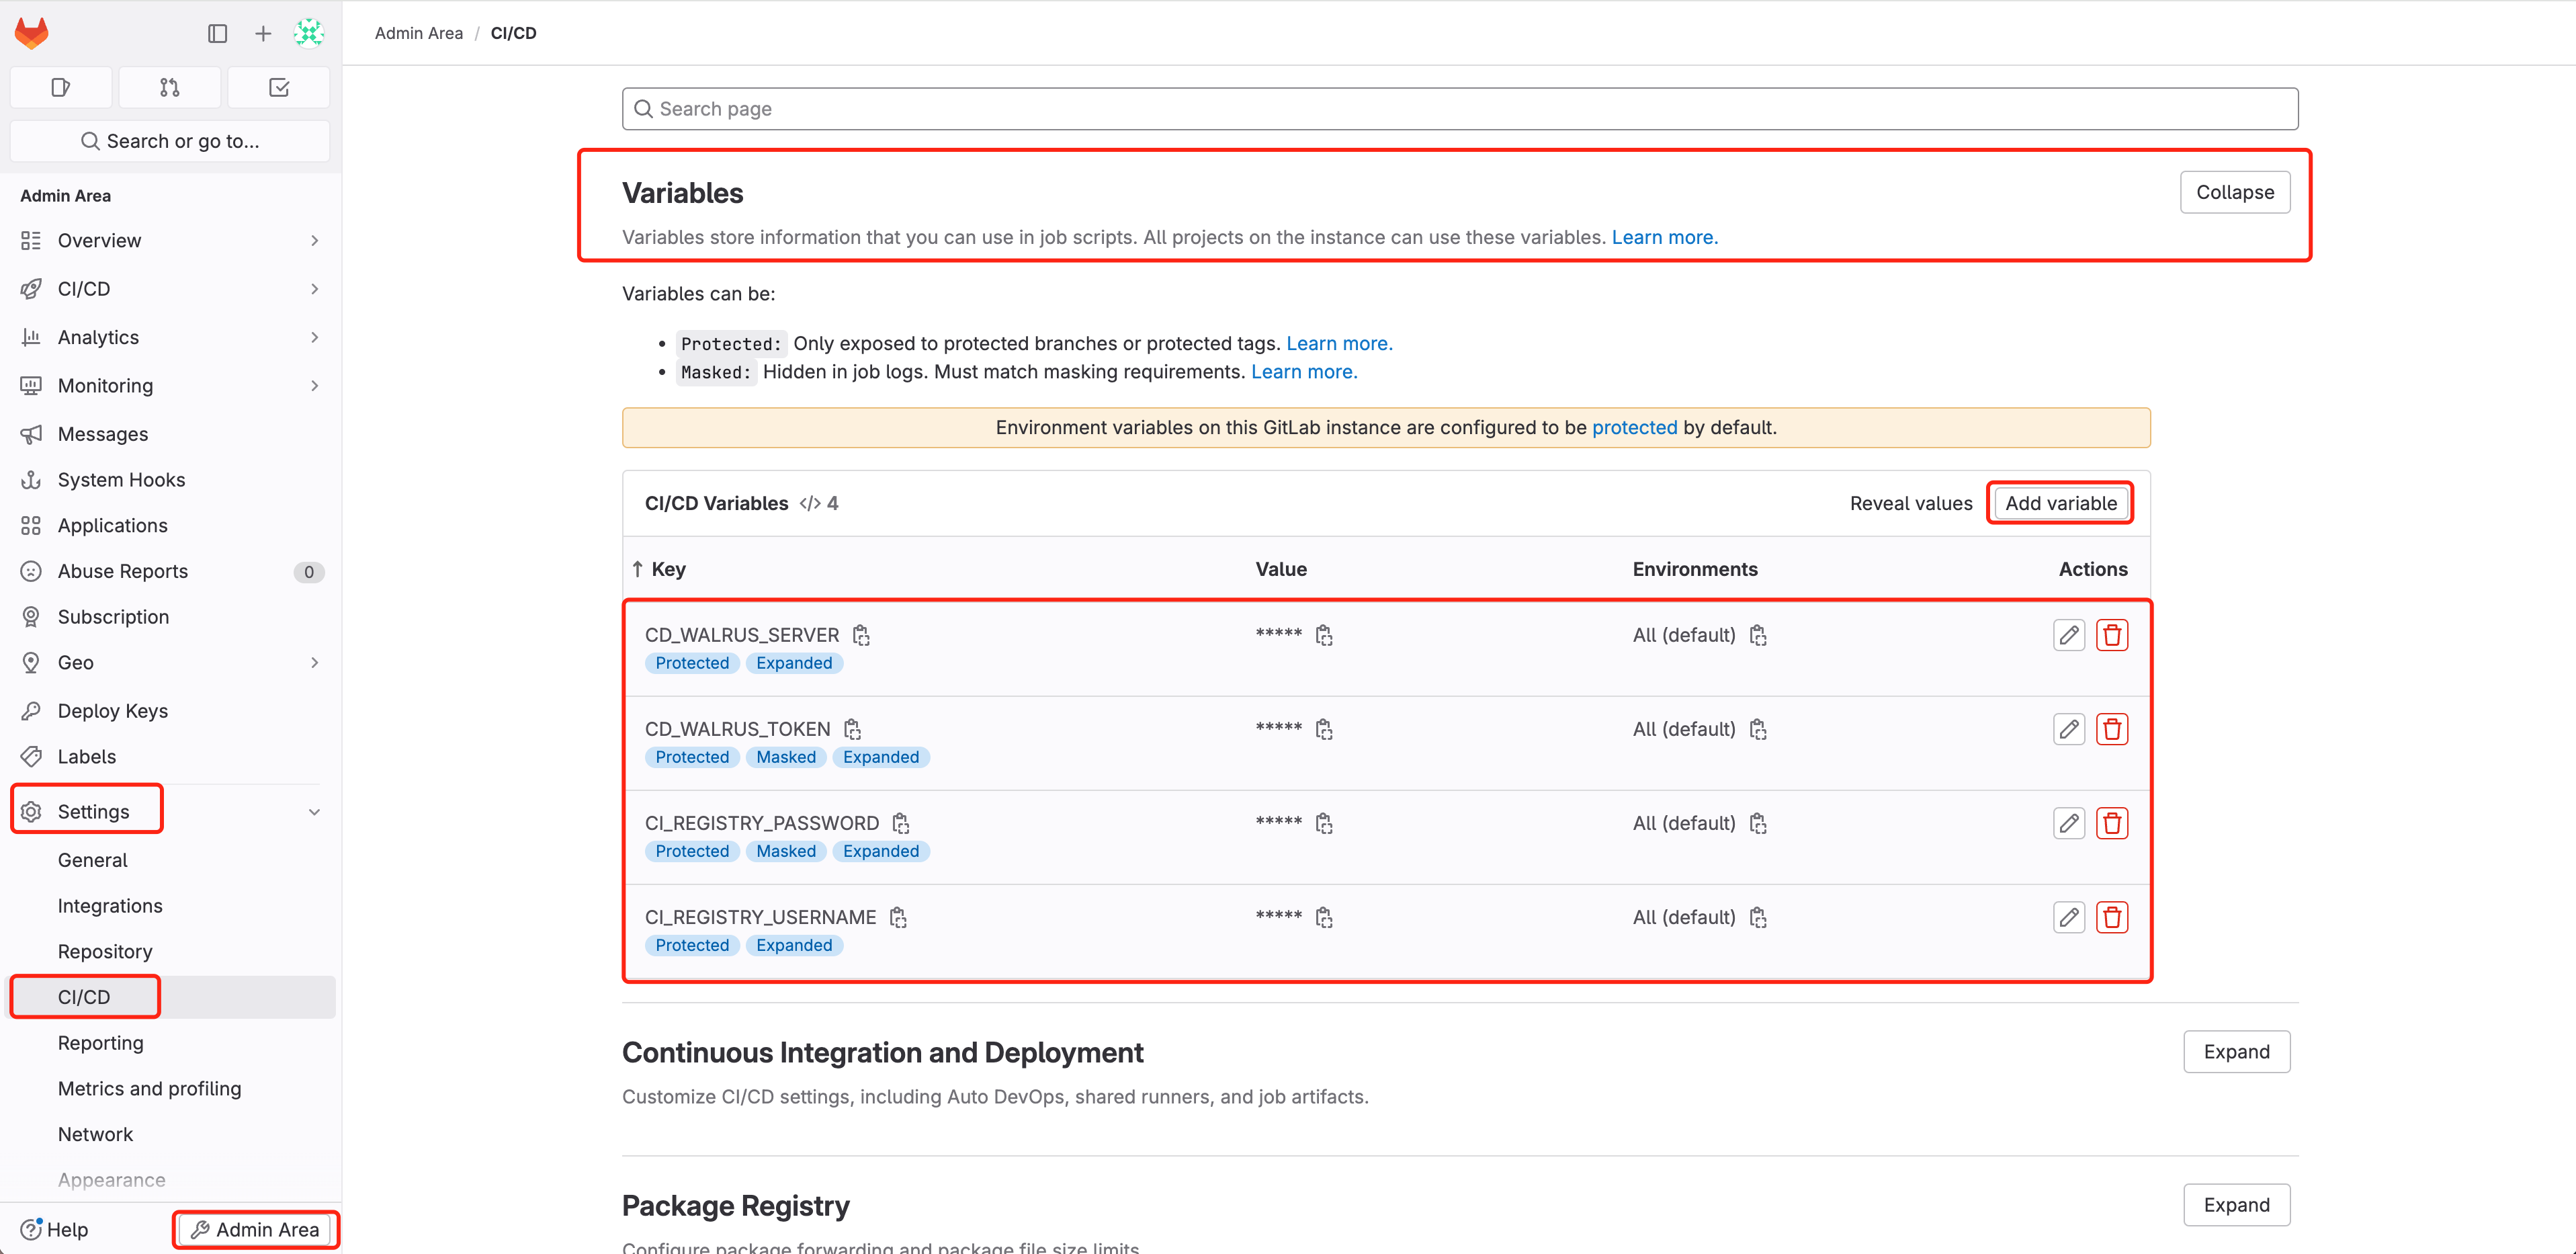
- Access GitLab and navigate to
Admin Area > Settings > CI/CD > Variables - Add the following variables and configure the sensitive information that is required by GitLab CI execution:
CI_REGISTRY_USERNAME: The username of the CI build container image to push to Docker Hub; refer to docker login.CI_REGISTRY_PASSWORD: The password of the CI build container image to push to Docker Hub; refer to docker login.CD_WALRUS_SERVER: The URL that Walrus accesses, whose format is https://domain:port.CD_WALRUS_TOKEN: API Keys of Walrus for authentication.
3. Create .gitlab-ci.yml file in the GitLab project (exists by default in the sample project), which will define your CI/CD workflow. Below is a sample .gitlab-ci.yml file for deploying the sample project Game 2048. You can copy and modify it as needed, such as changing the image sealdemo/game2048 to your own image name.
stages:
- compile
- build
- deploy
variables:
CI_PROJECT_DIR: ./
CI_IMAGE_NAME: sealdemo/game2048
CD_WALRUS_PROJECT: default
CD_WALRUS_PROJECT_ENV: local
compile:
stage: compile
image: maven:3-openjdk-8
artifacts:
paths:
- target/
script:
- mvn clean package
build:
dependencies:
- compile
stage: build
image:
name: gcr.io/kaniko-project/executor:debug
entrypoint: [""]
artifacts:
paths:
- target/
before_script:
- mkdir -p /kaniko/.docker
- echo "{\"auths\":{\"https://index.docker.io/v1/\":{\"auth\":\"$(printf "%s:%s" "${CI_REGISTRY_USERNAME}" "${CI_REGISTRY_PASSWORD}" | base64 | tr -d '\n')\"}}}" > /kaniko/.docker/config.json
script:
- /kaniko/executor
--context "${CI_PROJECT_DIR}"
--dockerfile "${CI_PROJECT_DIR}/Dockerfile"
--destination "${CI_IMAGE_NAME}:${CI_COMMIT_SHORT_SHA}"
deploy:
stage: deploy
image: alpine
before_script:
- wget -O walrus --no-check-certificate "${CD_WALRUS_SERVER}/cli?arch=amd64&os=linux"
- chmod +x ./walrus
script:
- ./walrus login --insecure --server ${CD_WALRUS_SERVER} --token ${CD_WALRUS_TOKEN}
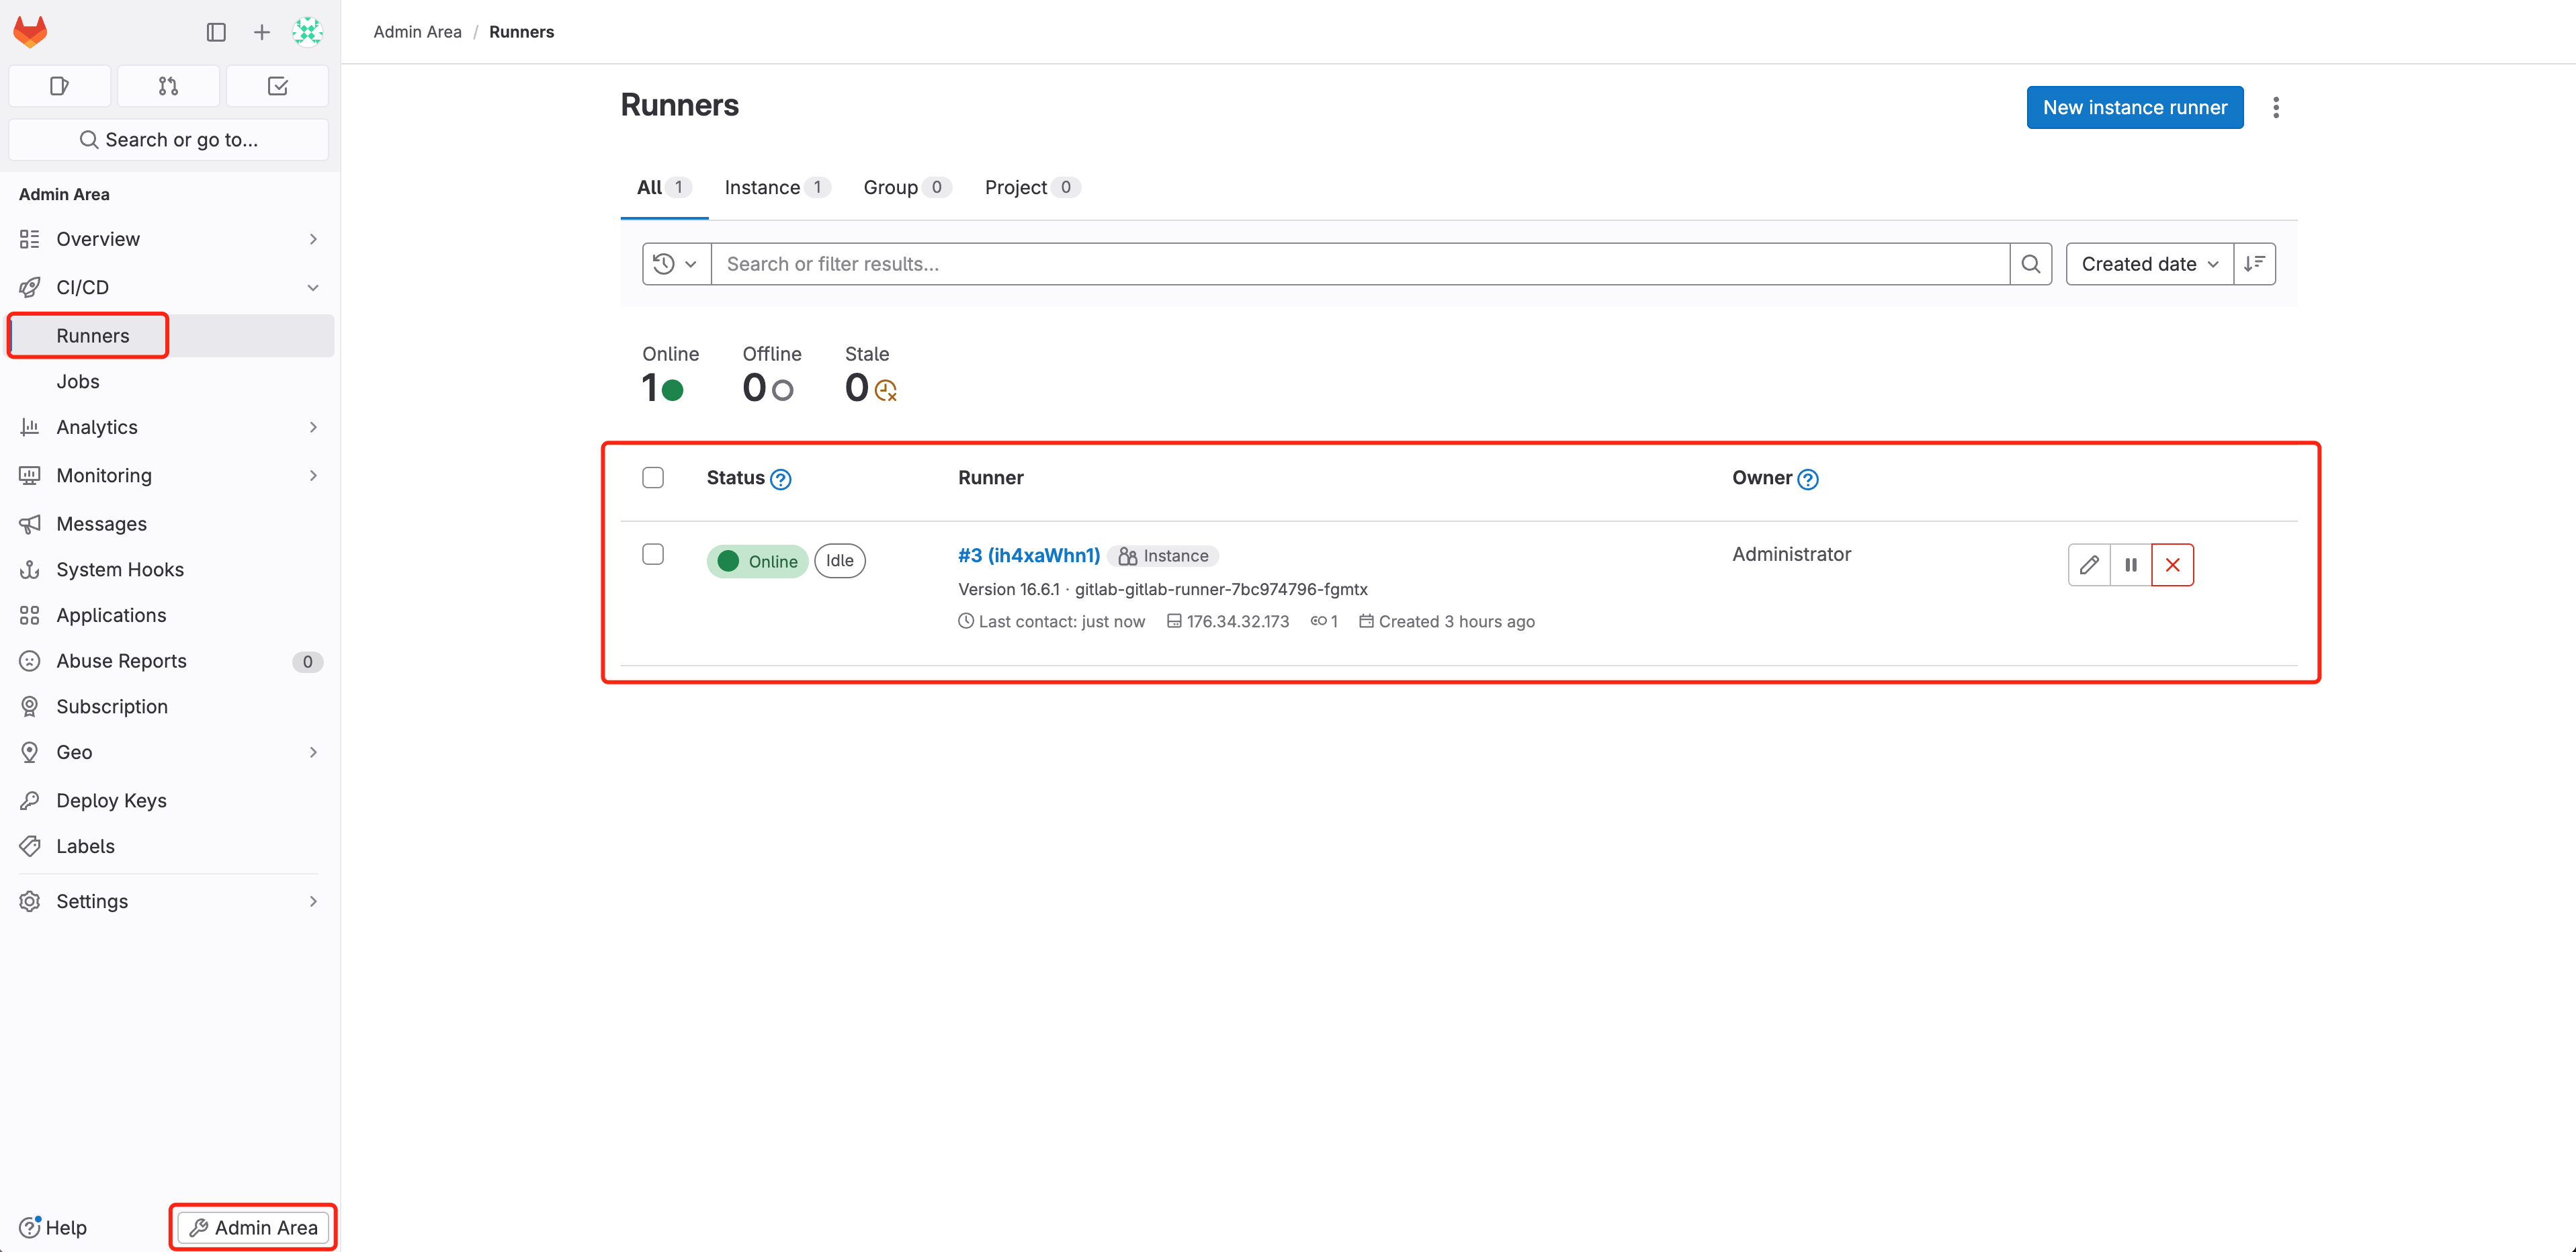
- ./walrus apply -f ./walrus-file.yaml -p ${CD_WALRUS_PROJECT} -e ${CD_WALRUS_PROJECT_ENV} 4. Check out walrus-file.yaml, which Walrus uses to deploy applications (already exists by default in the sample project). Walrus file is a concise YAML structure that describes the application’s deployment configuration. You can make any necessary changes to this file:
version: v1
resources:
- name: game2048
  type: containerservice
  attributes:
    containers:
    - profile: run
      image: ${CI_IMAGE_NAME}:${CI_COMMIT_SHORT_SHA}
      ports:
      - schema: http
        external: 8080
        internal: 8080
        protocol: tcp
      resources:
        cpu: 0.25
        memory: 512
5. Access GitLab, navigate to Admin Area > CI/CD > Runners, check that GitLab Runner is online properly(how to install GitLab Runner), which is used to run the CI/CD pipeline defined by .gitlab-ci.yml:
6. Navigate to 2048 Project > Build > Pipelines, select Run pipeline
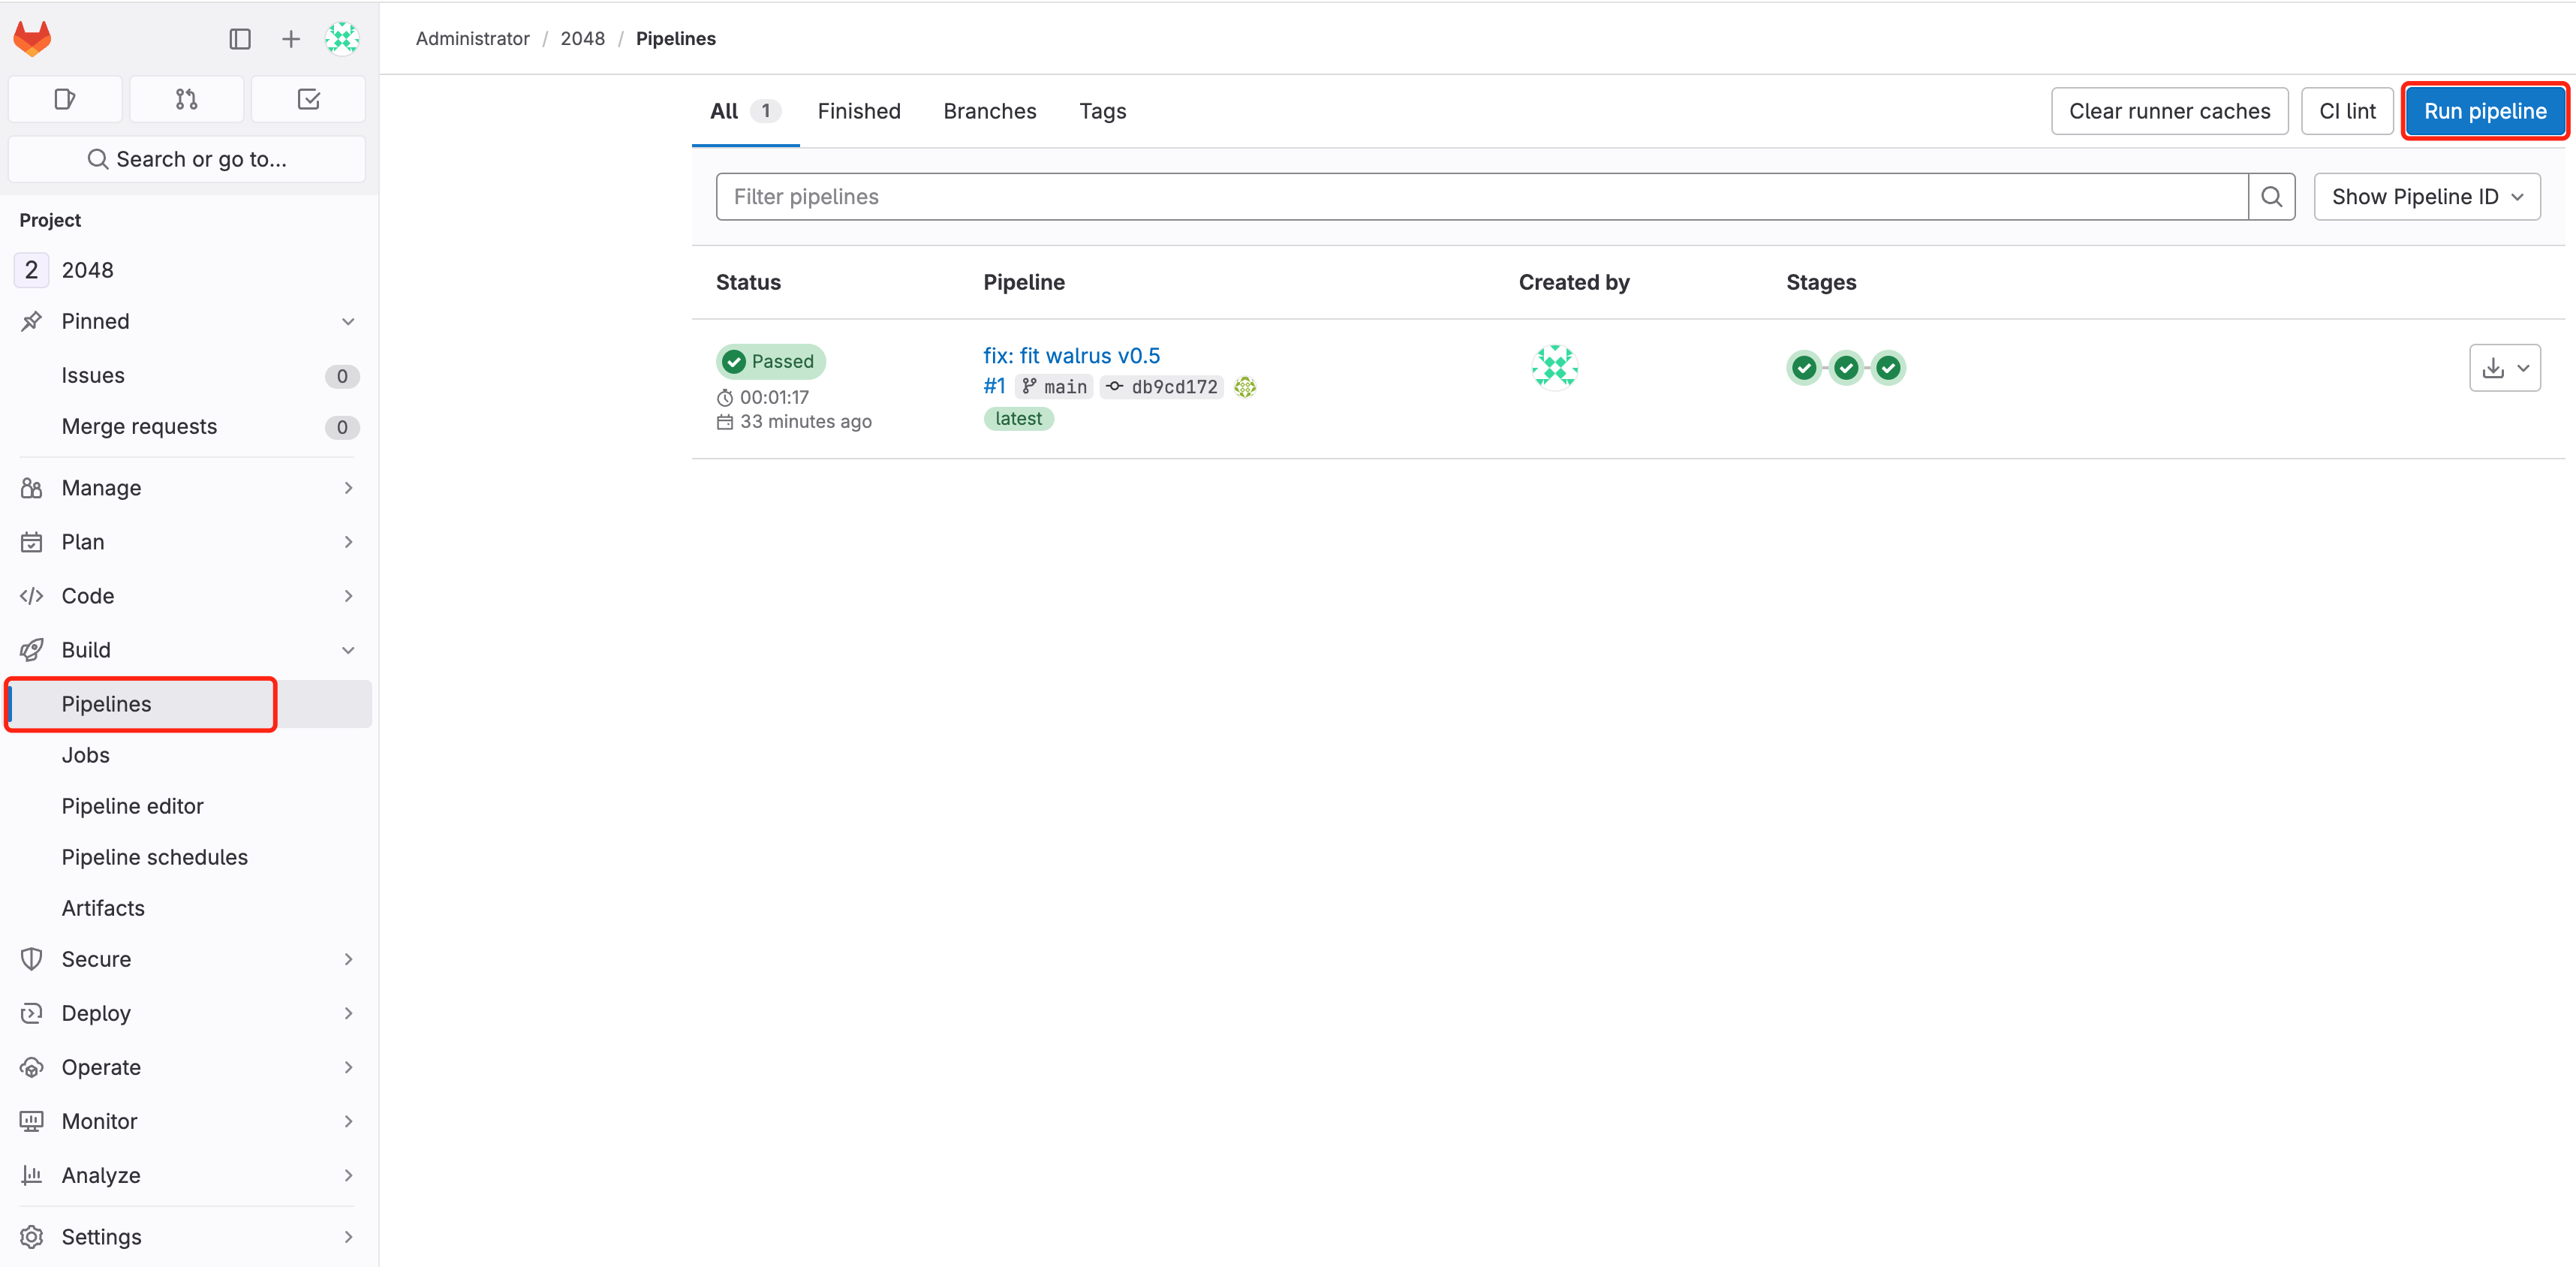
Wait for the pipeline to finish running and check the results of the pipeline run: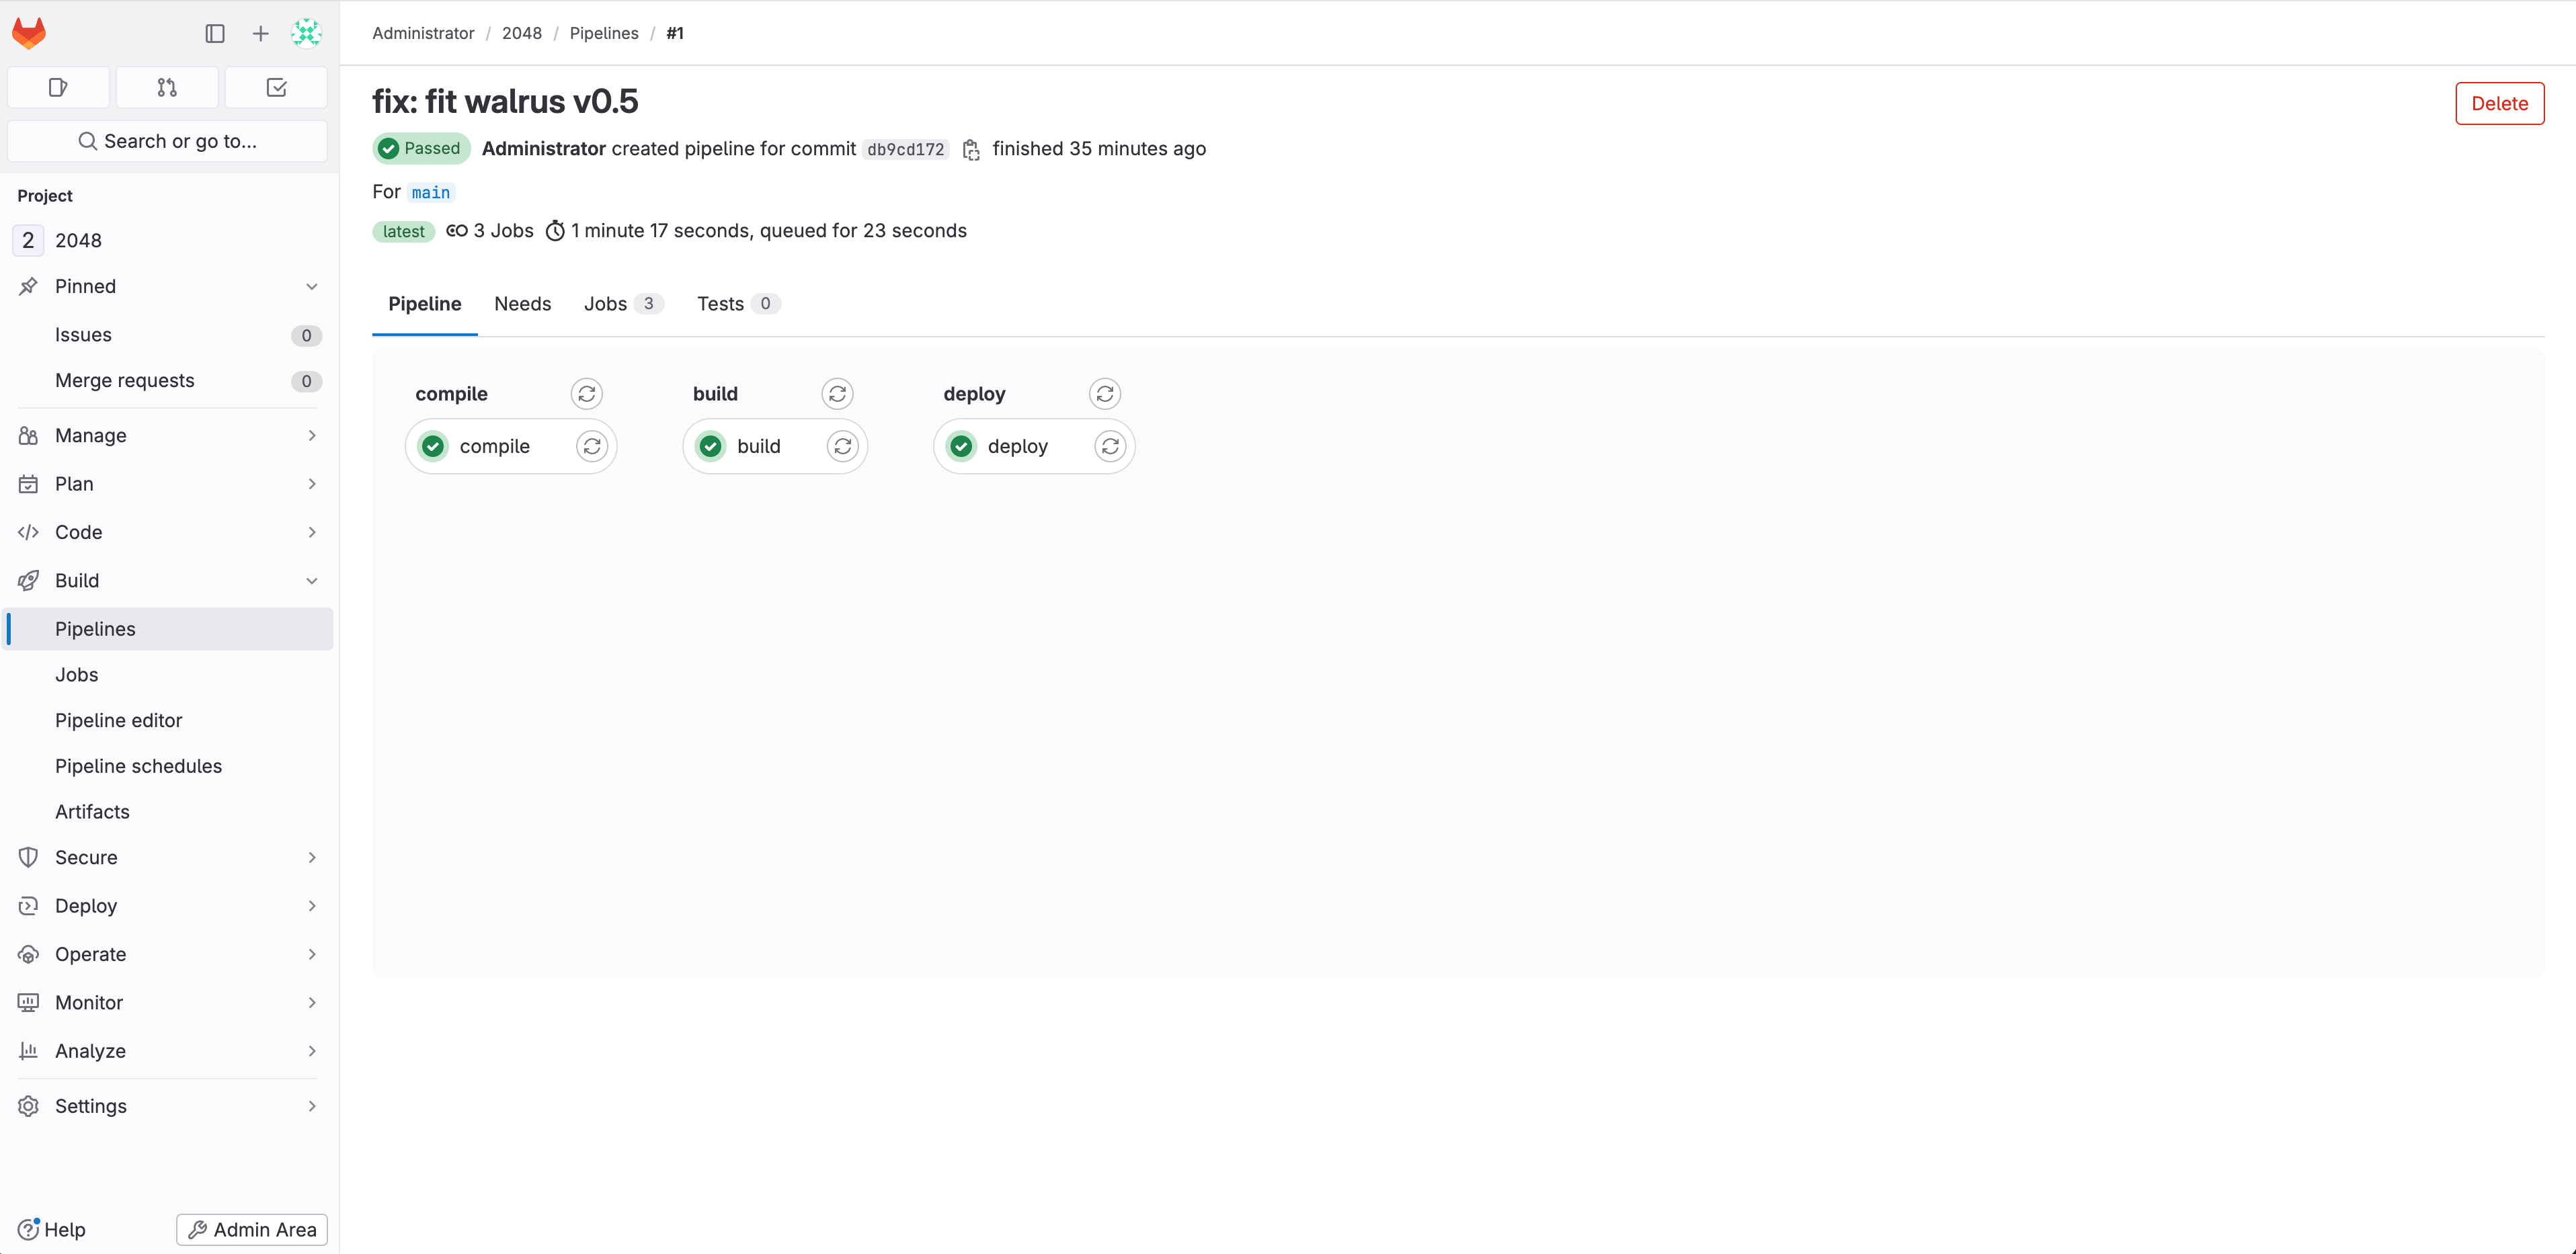
View the pipeline’s running logs:
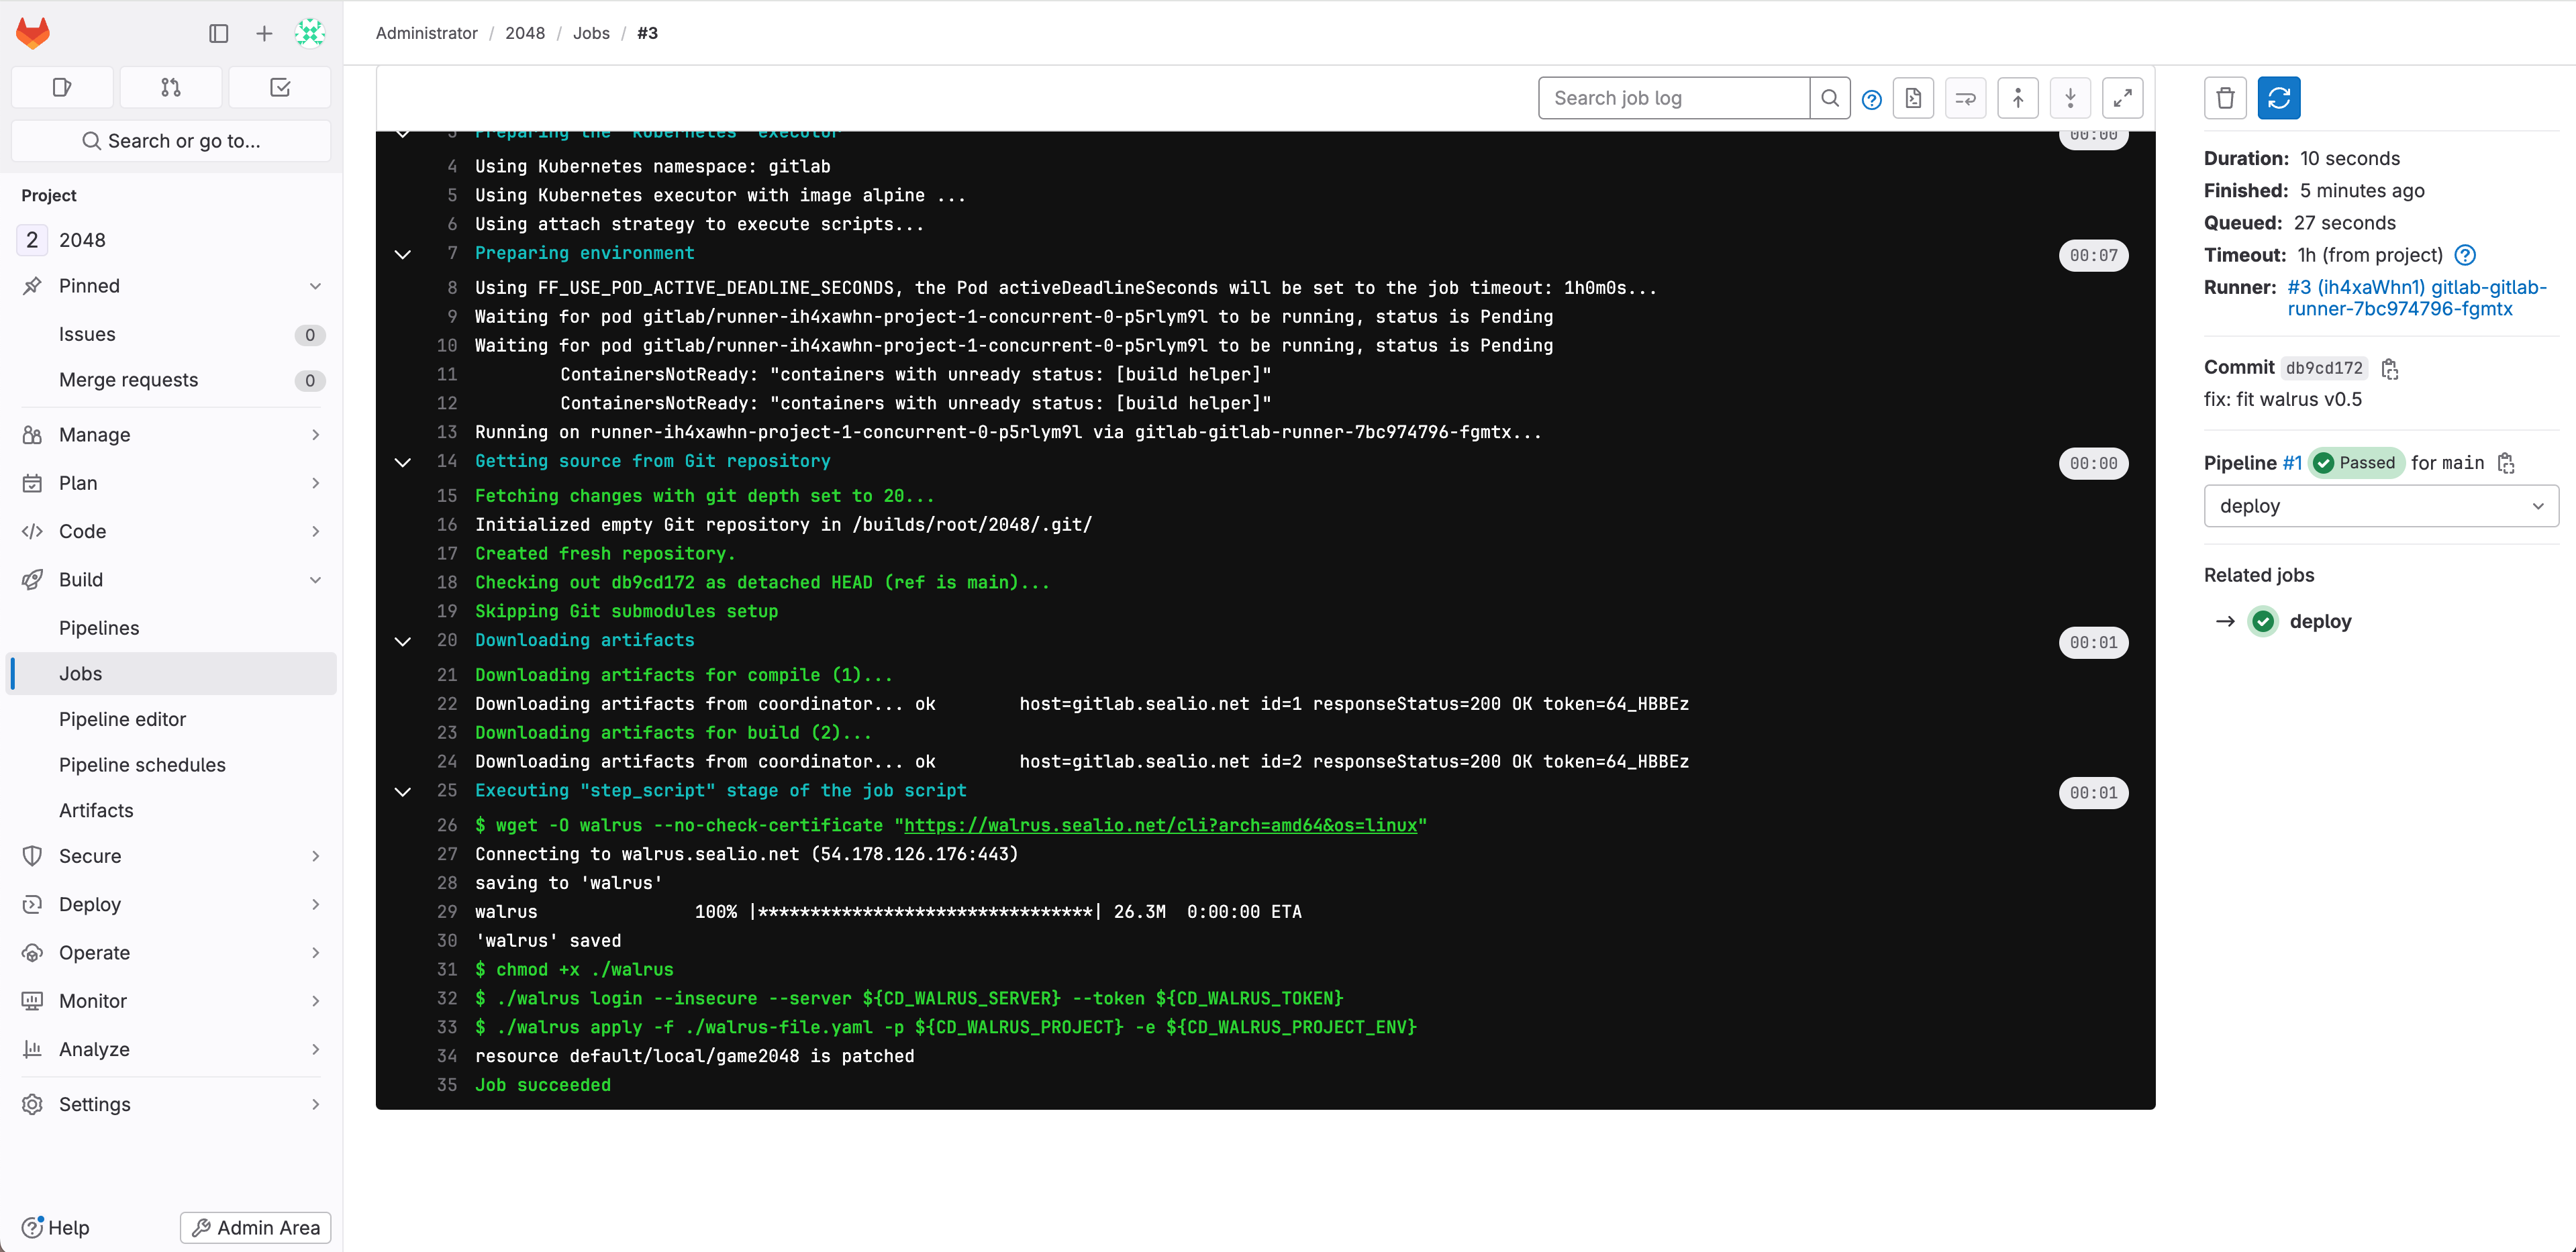
The logs indicate that the pipeline ran successfully. GitLab CI completed the CI/CD steps of Maven build, container image build upload, and application deployment to the K3s cluster using the Walrus CLI in that specific order.
7. After successfully running the pipelines, you can visit Walrus to view the deployed game2048 application!
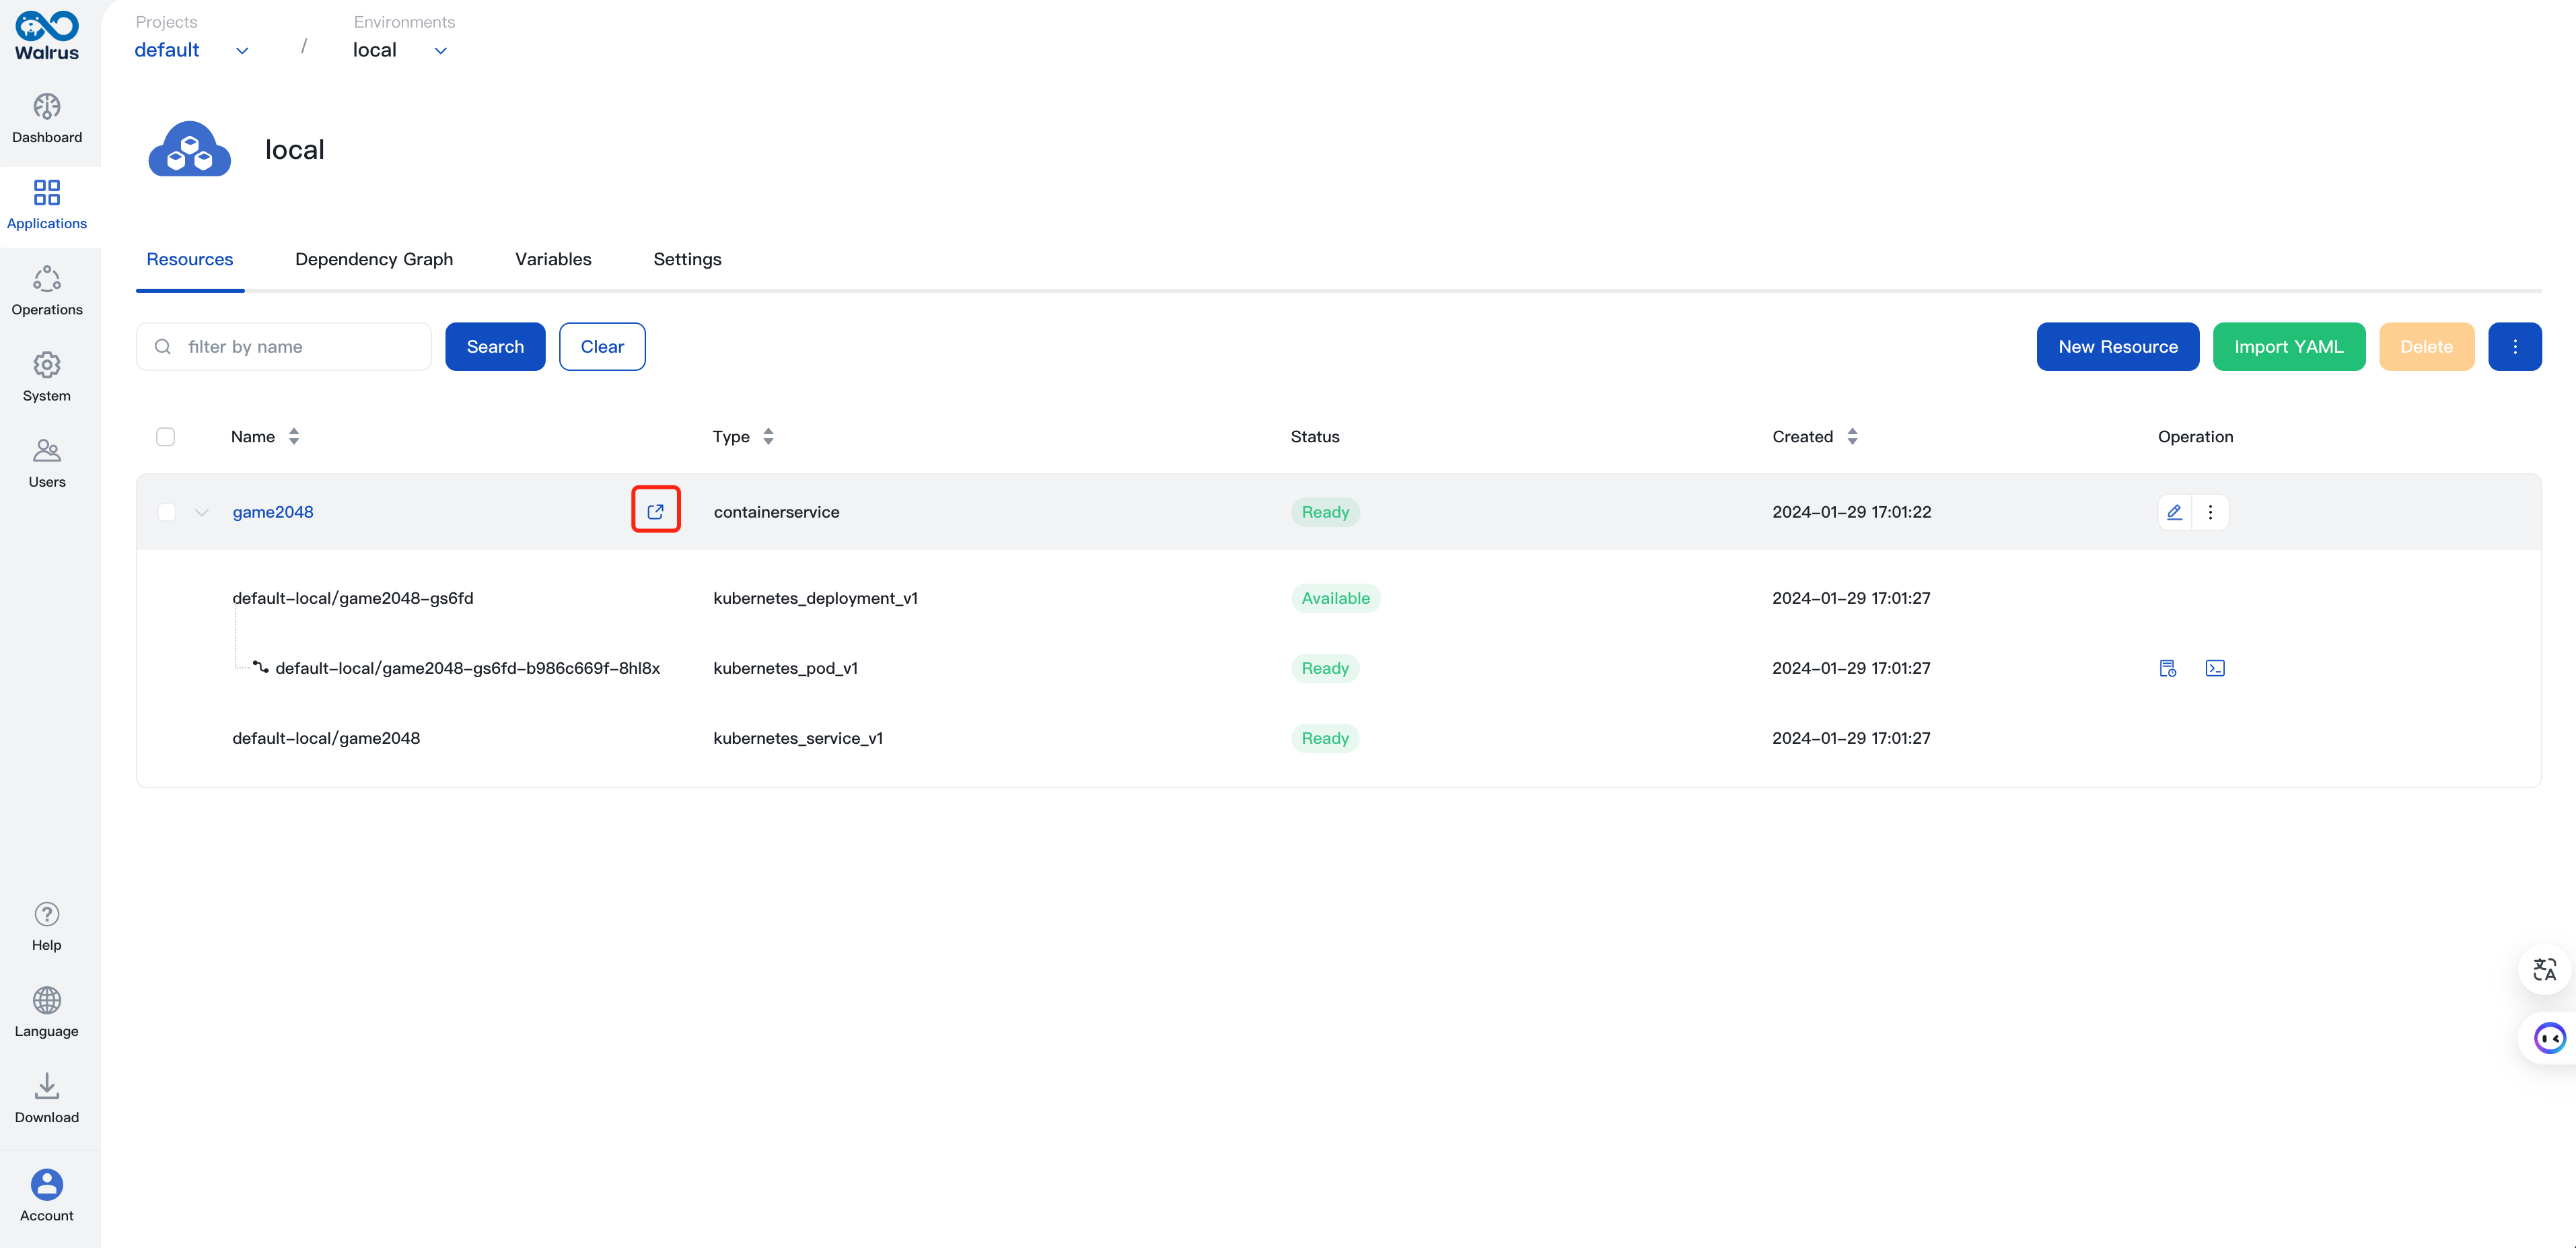
Access the 2048 game by using the automatically recognized endpoints and the /2048 path. Here is the full URL: http://domain:port/2048.

Now, we have successfully integrated Walrus CLI with GitLab CI. By using the Walrus file in Walrus 0.5.x, developers can now automate the deployment of applications in a more user-friendly way when committing application code to GitLab.
With XaC (Everything is Code), Walrus can unify and manage the entire application lifecycle, from the provisioning of infrastructure resources to releasing the upper-tier application.
This tutorial only covers one scenario. If you are interested in learning more, you can explore other scenarios with Walrus, such as provisioning Kubernetes clusters, creating cloud RDS databases, and configuring LB policies.
Published at DZone with permission of Ally Lynn. See the original article here.
Opinions expressed by DZone contributors are their own.
Comments