How To Automate ServiceNow With Selenium
Learn how to test ServiceNow using Selenium WebDriver to ensure the workflows and applications are working as expected, ultimately improving the testing.
Join the DZone community and get the full member experience.
Join For FreeAs businesses grow, there is a need to digitize the processes as manual work becomes tedious.
For example, a company with 5000+ employees must digitize its IT department for different works like Asset management, IT Operations, queries related to software, managing the Software licenses, etc. ServiceNow, a cloud platform, provides service, operations, and business management solutions that organizations use to manage their digital workflows and streamline their business processes. When it comes to testing ServiceNow, Selenium is a popular choice among organizations. Selenium is a widely used open-source automation testing framework that can be used to test ServiceNow workflows and ensure a high-quality user experience. In this blog, we will learn how to test ServiceNow using Selenium WebDriver to ensure the workflows and applications are working as expected, ultimately improving the overall efficiency and quality of the testing process. So, let’s get started!
What Is ServiceNow?
ServiceNow offers a platform for a fast‑changing world. It is a cloud-based platform that helps to manage your day-to-day operations and plays an important role in enhancing the digital experience for users. The platform provides a wide range of tools and capabilities that can help organizations improve their digital workflows, automate and optimize processes, and enhance communication and collaboration. ServiceNow helps digitize and unify organizations to find smarter, faster, better ways to make work flow. Here are some of the figures from the QA 2022 and FY 2022 regarding ServiceNow business: 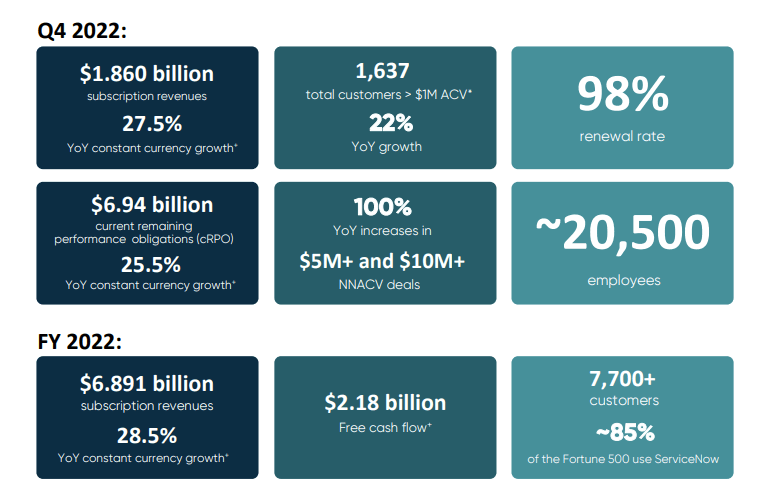
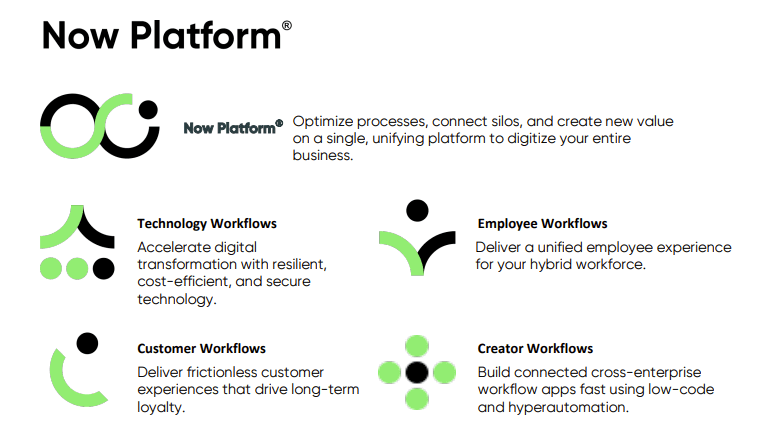
Now Platforms
Now Platform helps digitize your entire business by optimizing the processes and creating values on a single unifying platform. Check out the different Now Platforms provided below:
Tokyo Release
ServiceNow releases are scheduled two times per year. That latest Tokyo release was done in Q4 of 2022. ServiceNow’s next release, Utah, is planned for Q2 2023. Check out the features from Tokyo General Availability release highlights. As per the report, ServiceNow Inc. improved its market share to approximately 0.79 % due to strong revenue growth of 20.12% overall.
What Is ATF (Automated Test Framework)?
ServiceNow testing is performed on supported ServiceNow applications to ensure that the product is free from bugs and all the desired functionalities are working as per the business requirements. ServiceNow has an Automated Test Framework for testing the ServiceNow applications. Automated Test Framework is an out-of-the-box test framework developed by ServiceNow. It helps test the functionalities in ServiceNow, allowing you to create and run automated tests on your ServiceNow instances (Production and non-production). This is done using the special ATF plugin that aids in accessing the application. It is intended to test the changes you make to your instance and not the ServiceNow functionality. Using ATF, we can verify and validate application functionalities, test end-to-end scenarios, server-side scripting tests, configurations, customizations, and many more.
Shortcomings of ATF
While the ATF of ServiceNow provides many benefits to organizations to test their digital workflows and applications, there are some potential drawbacks to consider, including:
- ATF tests ServiceNow workflows in local browsers, but advanced testing requires external automation testing tools. ATF is primarily designed for form testing and might not be suitable for testing other modules, such as testing notifications or service portals.
- ATF also requires monitoring of the tests that are run.
- ATF may require manual intervention to run the next tests in succession instead of running the tests automatically once the current test is completed. This is where open-source frameworks like Selenium can be extremely useful for extensively testing the front-end components.
How To Test ServiceNow Using Selenium WebDriver
After discussing ATF and its drawbacks, let’s consider Selenium WebDriver for testing ServiceNow’s Demo Developer instance website, as Selenium has all the required features for website testing.
Application Under Test (ServiceNow Instance)
ServiceNow’s Demo Developer instance is used for executing the tests (Tokyo Release). You can create the instance by following the below steps:
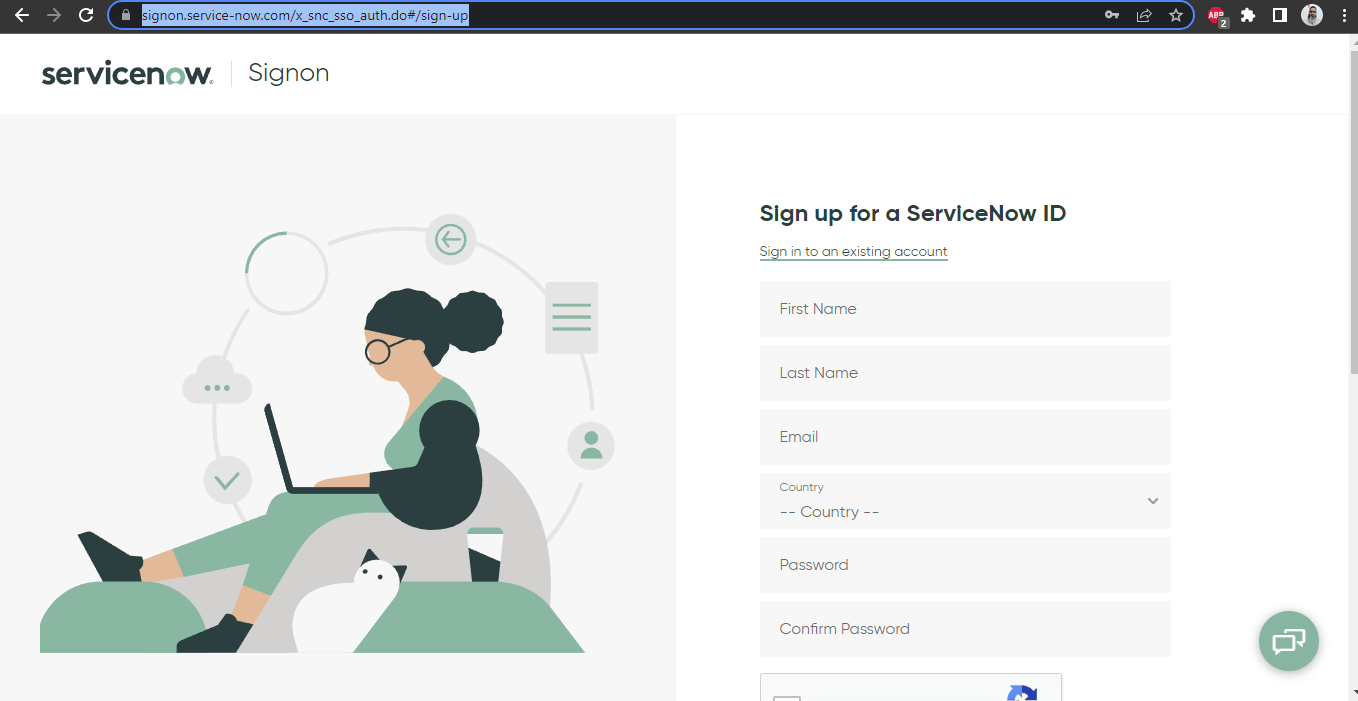
- Sign up on the ServiceNow website.
![Sign up on the ServiceNow]()
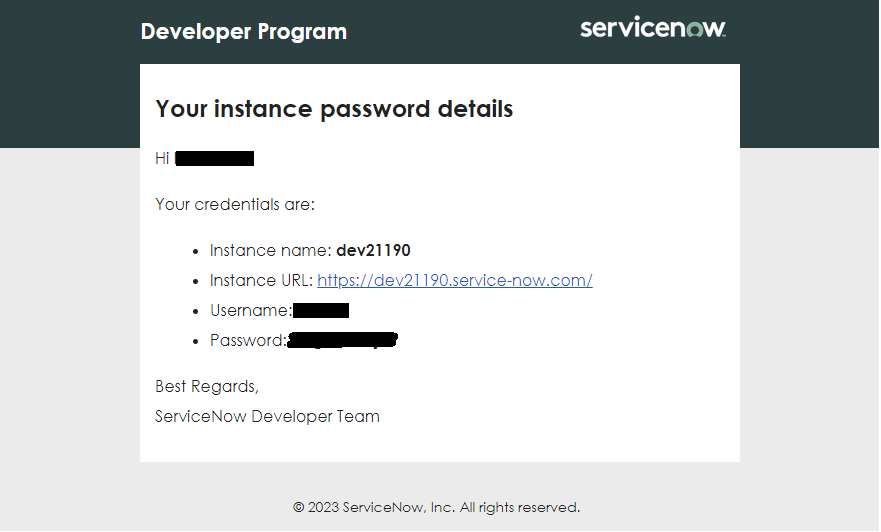
- Once you fill out the form, select the required options displayed after signing up. You should receive an email with the instance link, username, and password.
![servicenow password]()
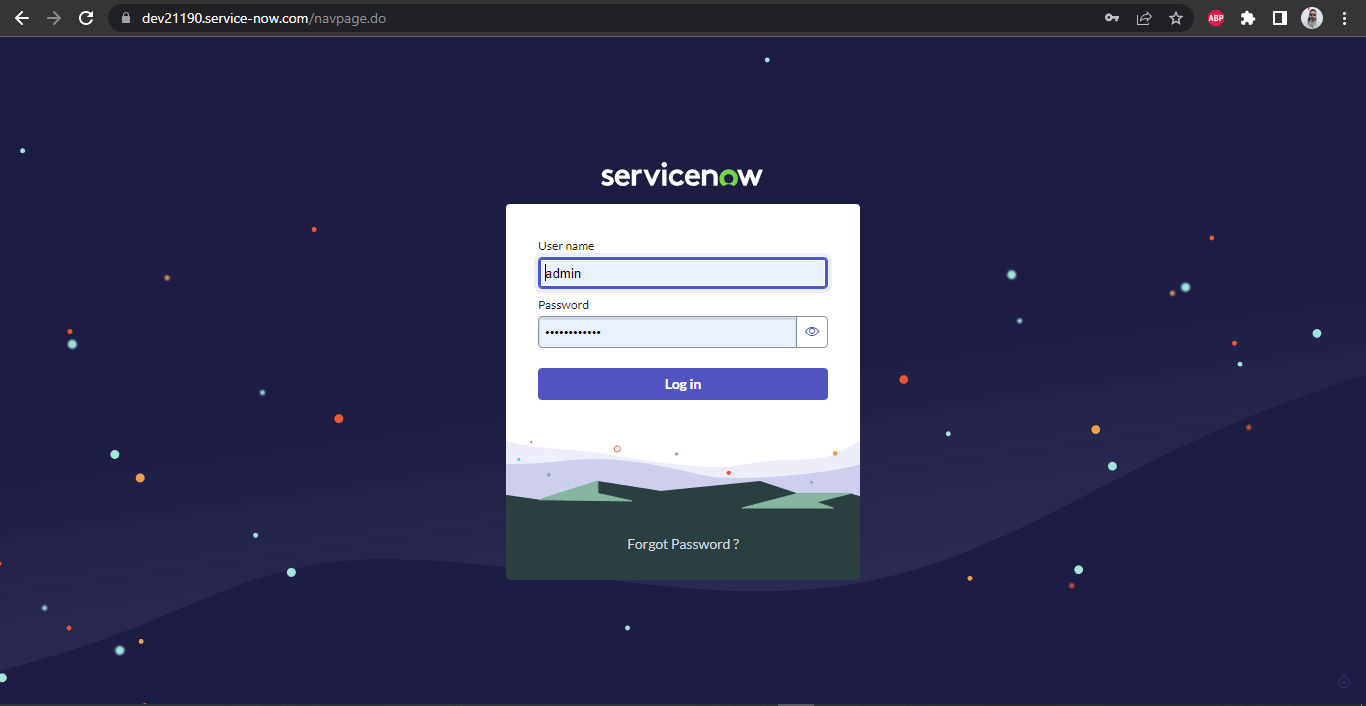
- You can log in and perform the testing using this link and its credentials.
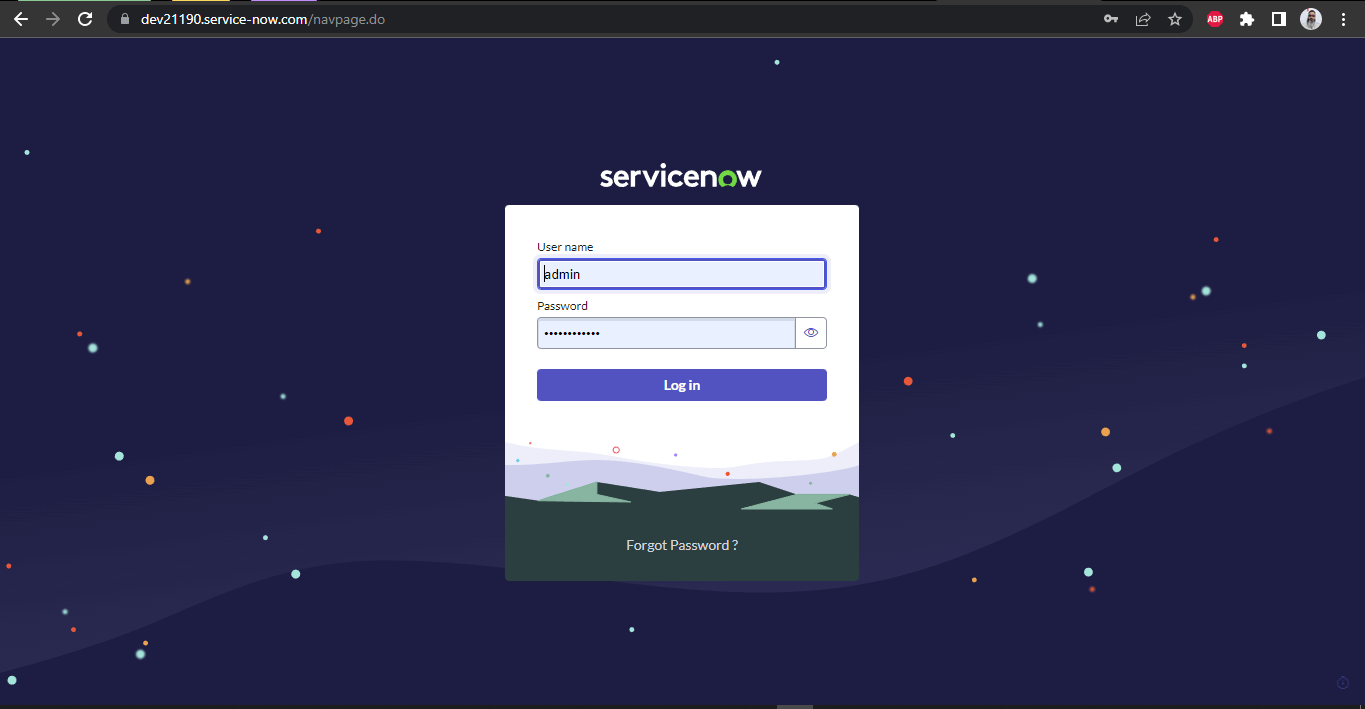
ServiceNow’s Demo Developer Instance: Login Page![servicenow login]()
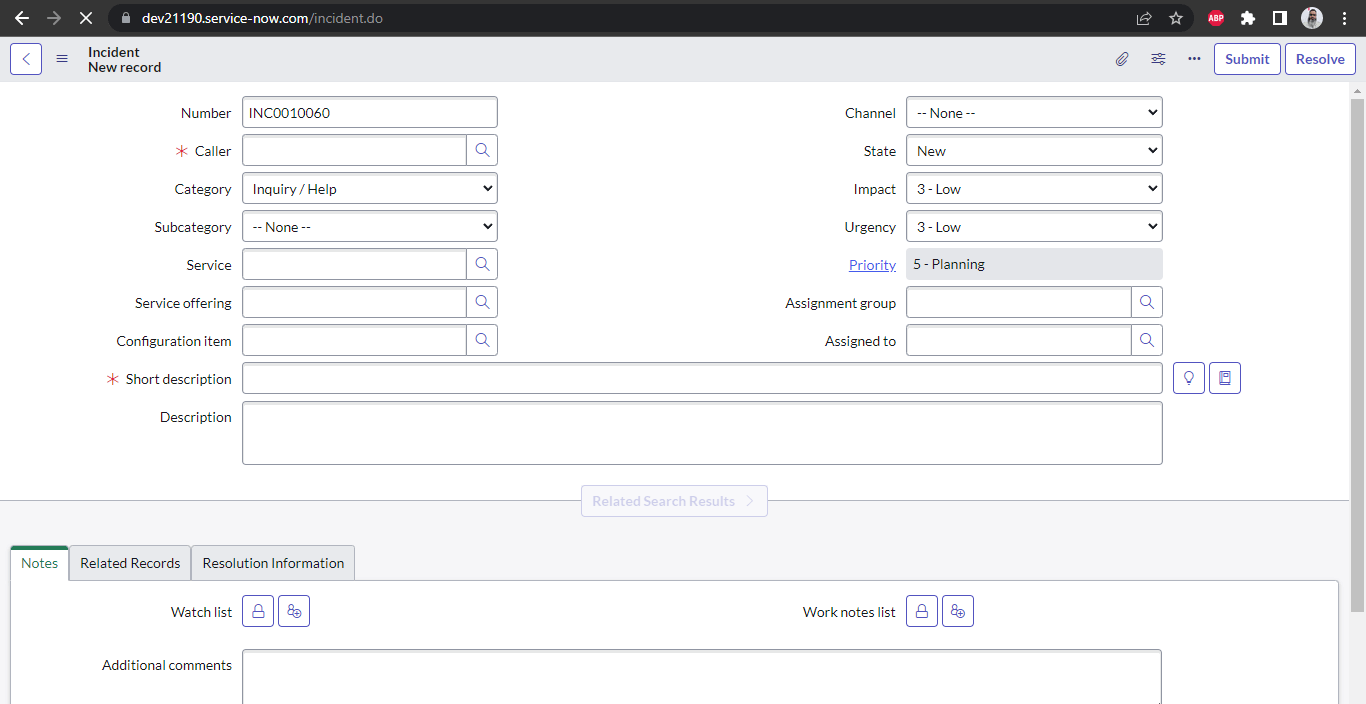
Incident Creation Page![Incident Creation Page]()
Incident List Page

As per the ServiceNow documentation, the instance hibernates after 10 hours, and refreshing it is required by logging into your ServiceNow account.
Getting Started With ServiceNow Testing
The following tools/language has been used in writing and running the tests:
- Programming Language: Java
- Web Automation Tool: Selenium WebDriver (Version 4.8.0)
- Test Runner: TestNG
- Build Tool: Maven
- Cloud Platform to run the tests: LambdaTest
Note: In this blog, we are using Selenium 4, the latest version of Selenium. It offers a number of new features and improvements over previous versions, including improved relative locators, integrated support for Chrome DevTools protocol, enhanced WebDriver APIs, and more.
Test Scenarios
We will target the New Incident Creation page and the Incident List page for automation. However, before we move on to those screens, we need to log into the developer instance. Hence, our first scenario will be to automate the Login Screen. The developer instance link will be different for different users as it is assigned by ServiceNow. It is not a common demo website that can be used by all.
Instance URL was assigned to me after signing up on ServiceNow.
Test Scenario 1
Automate the login page by entering the username and password and clicking the Log in button.

Test Scenario 2
Navigate to the New Incident page and verify the header on the page to validate that we are on the right page before we start creating a new incident. Enter valid values in the Caller Name, Channel, select Service, and finally, click on the Submit button to create a new incident.

Once the new incident is created, it is displayed on the Incident List page.
Test Scenario 3
The third scenario will be to navigate to the Incident List page and verify the values displayed on the first row, checking that whatever values were entered at the time of the creation of the new incident are displayed correctly here.

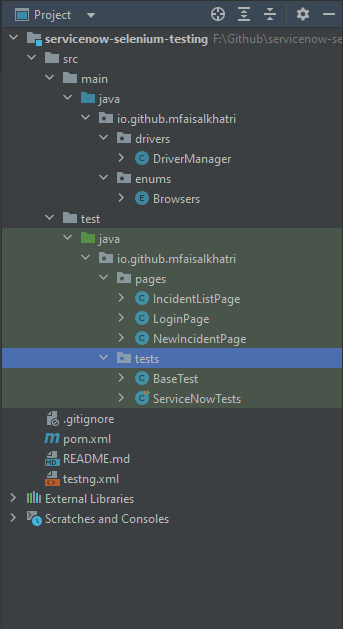
As discussed earlier, this project has been created using Maven.
Project Structure and Packages![project]()
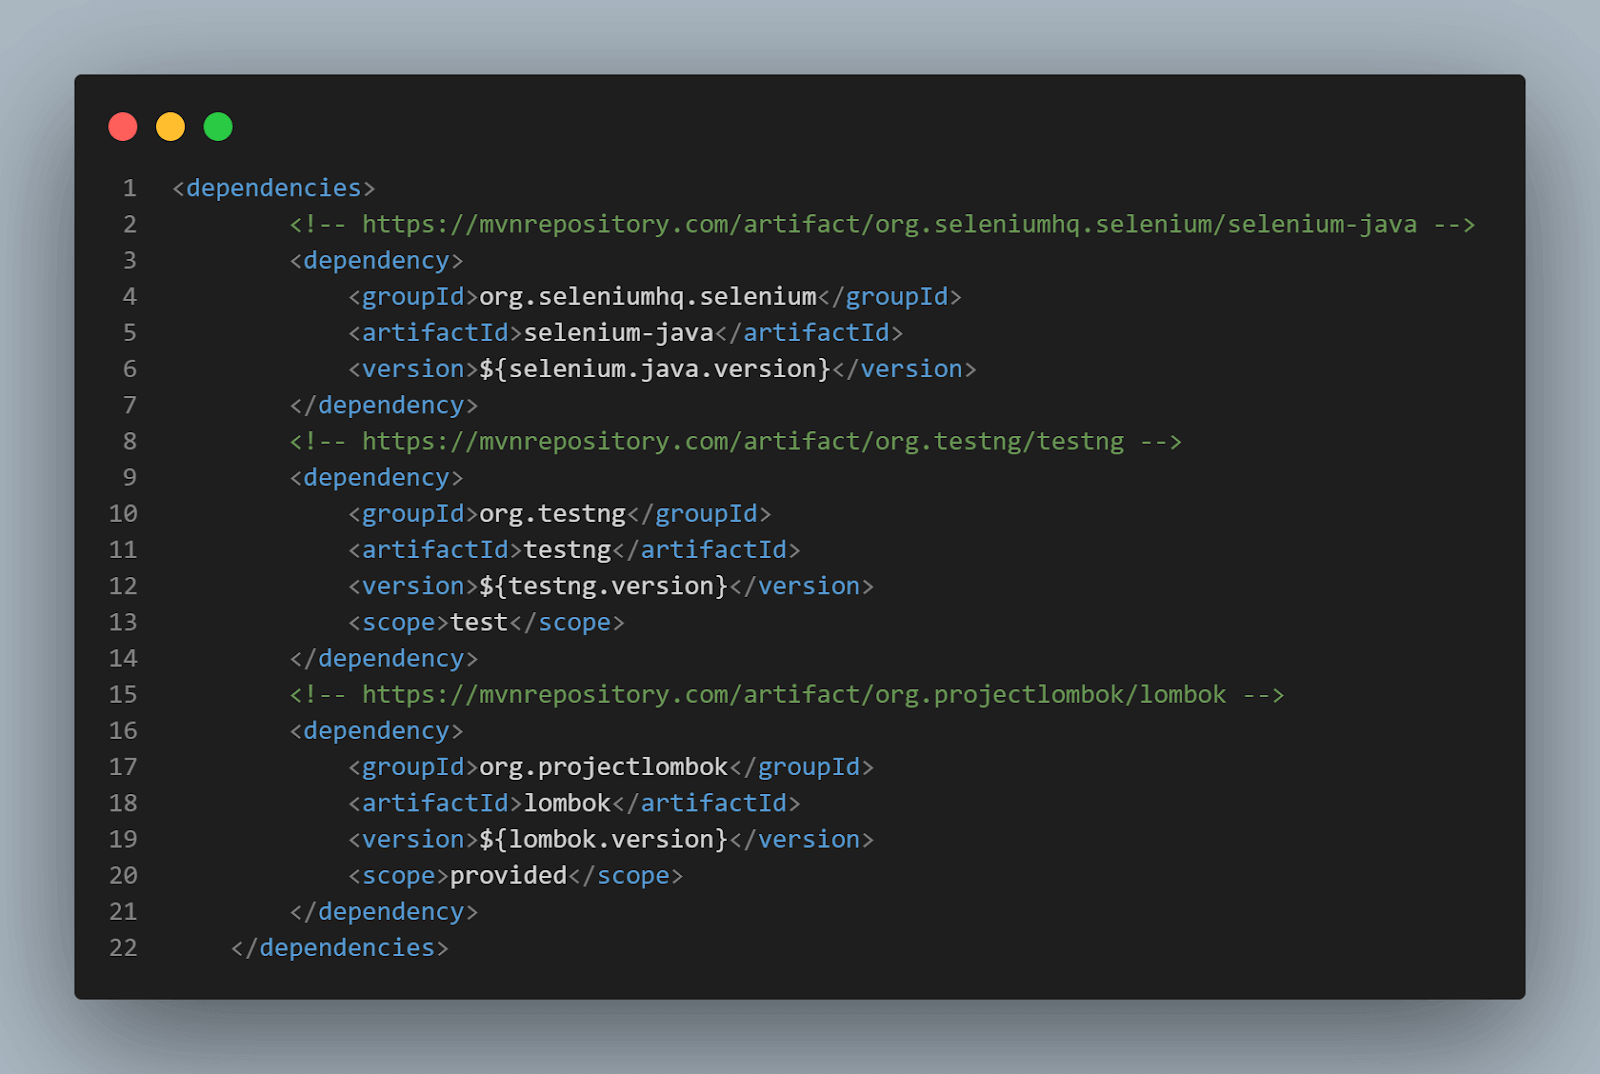
TestNG is used as a test runner. Once the project is created, we need to add the dependency for Selenium WebDriver and TestNG in the `pom.xml` file.
Dependencies in pom.xml
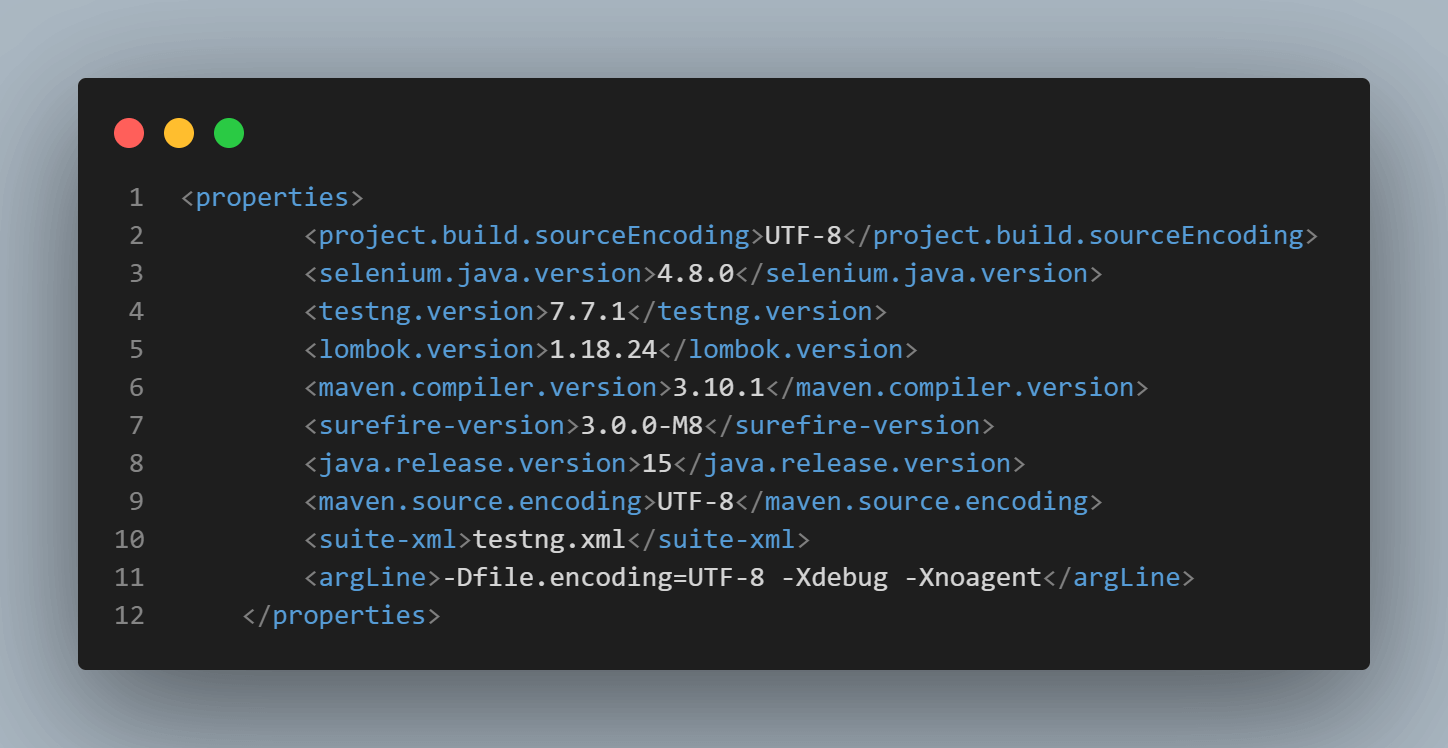
 Versions of the dependencies are set in a separate properties block. This is done for easy maintainability. So, if you need to update the versions, you can do it easily without searching throughout the pom.xml file.
Properties block in pom.xml
Configuration (DriverManager class)
public class DriverManager {
private static final ThreadLocal DRIVER = new ThreadLocal<> ();
private static final String GRID_URL = "@hub.lambdatest.com/wd/hub";
private static final String LT_ACCESS_KEY = System.getProperty ("LT_ACCESS_KEY");
private static final String LT_USERNAME = System.getProperty ("LT_USERNAME");
public static void createDriver (final Browsers browser) {
switch (browser) {
case REMOTE_FIREFOX:
setupFirefoxInCloud ();
break;
case REMOTE_CHROME:
default:
setupChromeInCloud ();
}
setupBrowserTimeouts ();
}
public static WebDriver getDriver () {
return DriverManager.DRIVER.get ();
}
public static void quitDriver () {
if (null != DRIVER.get ()) {
getDriver ().quit ();
DRIVER.remove ();
}
}
private static void setDriver (final WebDriver driver) {
DriverManager.DRIVER.set (driver);
}
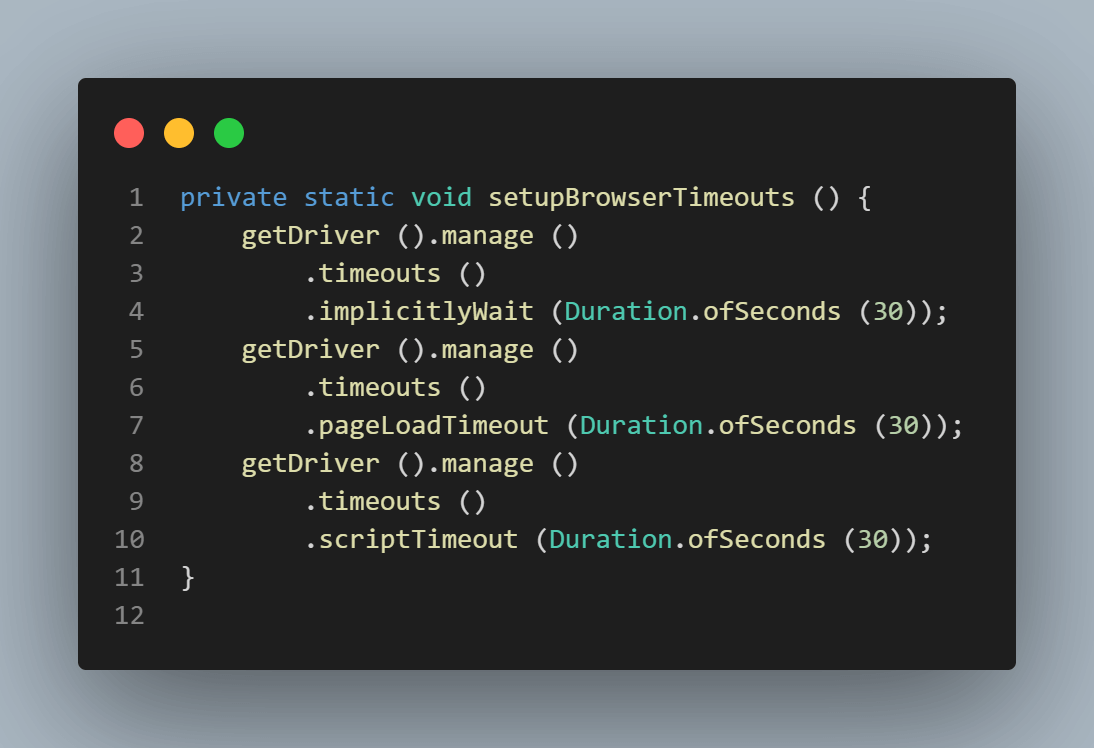
private static void setupBrowserTimeouts () {
getDriver ().manage ()
.timeouts ()
.implicitlyWait (Duration.ofSeconds (30));
getDriver ().manage ()
.timeouts ()
.pageLoadTimeout (Duration.ofSeconds (30));
getDriver ().manage ()
.timeouts ()
.scriptTimeout (Duration.ofSeconds (30));
}
private static void setupChromeInCloud () {
final ChromeOptions browserOptions = new ChromeOptions ();
browserOptions.setPlatformName ("Windows 10");
browserOptions.setBrowserVersion ("108.0");
browserOptions.setCapability ("LT:Options", ltOptions ());
try {
setDriver (
new RemoteWebDriver (new URL (format ("https://{0}:{1}{2}", LT_USERNAME, LT_ACCESS_KEY, GRID_URL)),
browserOptions));
} catch (final MalformedURLException e) {
System.out.print ("Error setting up cloud browser in LambdaTest " + e);
}
}
private static void setupFirefoxInCloud () {
final FirefoxOptions browserOptions = new FirefoxOptions ();
browserOptions.setPlatformName ("Windows 10");
browserOptions.setBrowserVersion ("108.0");
browserOptions.setCapability ("LT:Options", ltOptions ());
try {
setDriver (
new RemoteWebDriver (new URL (format ("https://{0}:{1}{2}", LT_USERNAME, LT_ACCESS_KEY, GRID_URL)),
browserOptions));
} catch (final MalformedURLException e) {
System.out.println ("Error setting up firefox browser in LambdaTest " + e);
}
}
private static HashMap ltOptions () {
final HashMap ltOptions = new HashMap<> ();
ltOptions.put ("username", LT_USERNAME);
ltOptions.put ("accessKey", LT_ACCESS_KEY);
ltOptions.put ("resolution", "2560x1440");
ltOptions.put ("selenium_version", "4.0.0");
ltOptions.put ("build", "ServiceNow Build");
ltOptions.put ("name", "ServiceNow Tests");
ltOptions.put ("w3c", true);
ltOptions.put ("plugin", "java-testNG");
return ltOptions;
}
}Code Walkthrough
Static Variables in the DriverManager class ThreadLocal class is used here for setting the drivers as it is thread-safe and works very well when tests are run in parallel. The main reason behind using ThreadLocal is that two threads run in isolated ways.ThreadLocal variables, even if two threads set different values on the same ThreadLocal object. Next is the GRID_URL, which must be set for running tests on the LambdaTest platform.
Similarly, LT_USERNAME and LT_ACCESS_KEY are required to authenticate and start new sessions on the LambdaTest platform. You can set these capabilities from the LambdaTest Capabilities Generator.
Coming back to the LambdaTest Capabilities Generator, it helps you to generate desired capabilities for your Selenium tests in a set of key-value pairs that define the desired behavior of the browser or device under tests, such as browser name, version, platform, screen resolution, and more. The parameter `Browsers` used in the createDriver() method is an enum (An enum type is a special data type that enables a variable to be a set of predefined constants), which is used to declare the Browser names on which we are planning to run the tests.
Configuration (Browsers(enum)
@Getter
public enum Browsers {


    REMOTE_FIREFOX,
    /**
     * LambdaTest Chrome browser.
     */
    REMOTE_CHROME


}
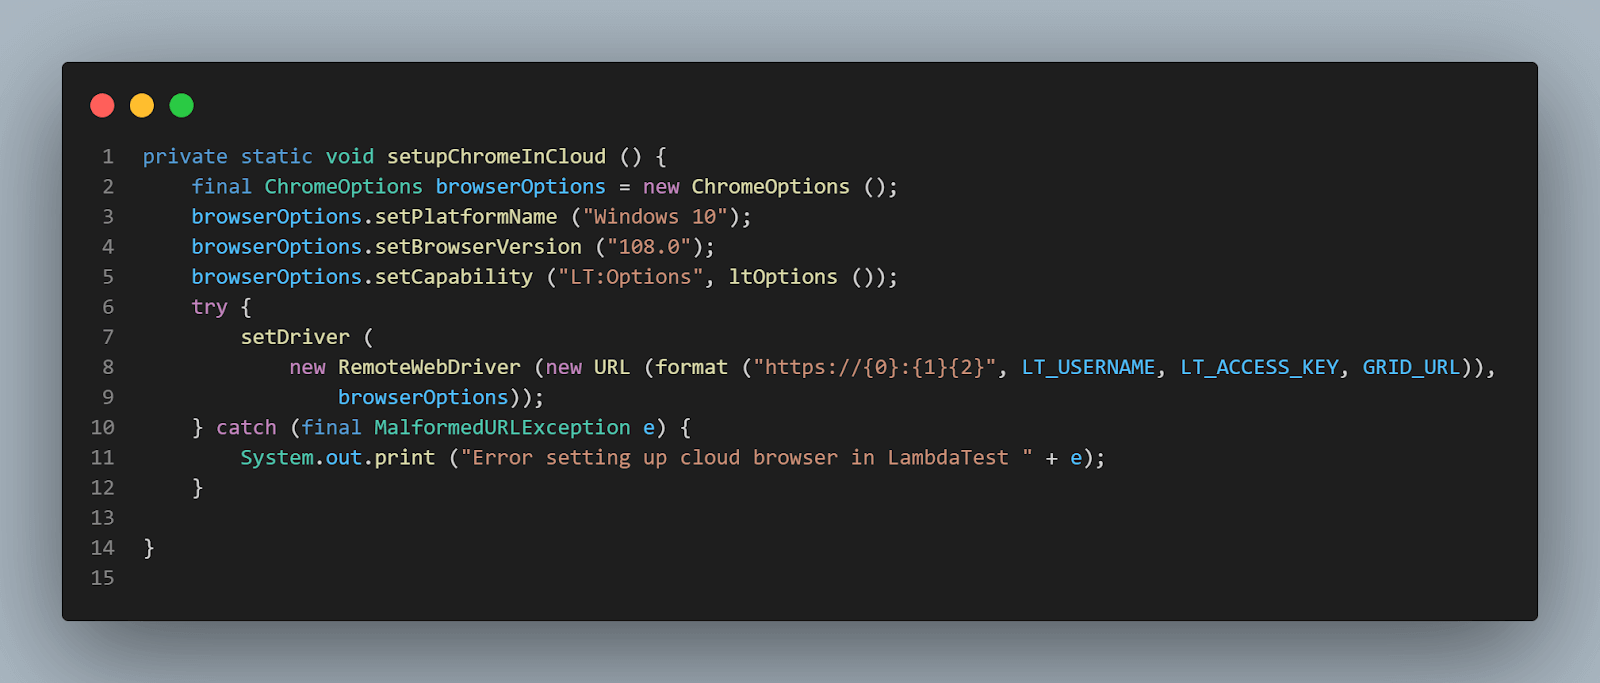
Notice the @Getter annotation above enum is imported from Lombok dependency and has to set the Getters for the variables set inside the enum on runtime, helping us to save time and effort by not writing the code for Getter methods inside this class. Setting the Chrome and Firefox drivers in Cloud Next important methods to note are setupChromeInCloud() and setupFirefoxInCloud(). These methods help set up Chrome and Firefox browsers in the LamdaTest cloud platform and help run the tests.
setupChromeInCloud() method
setupFirefoxInCloud() method
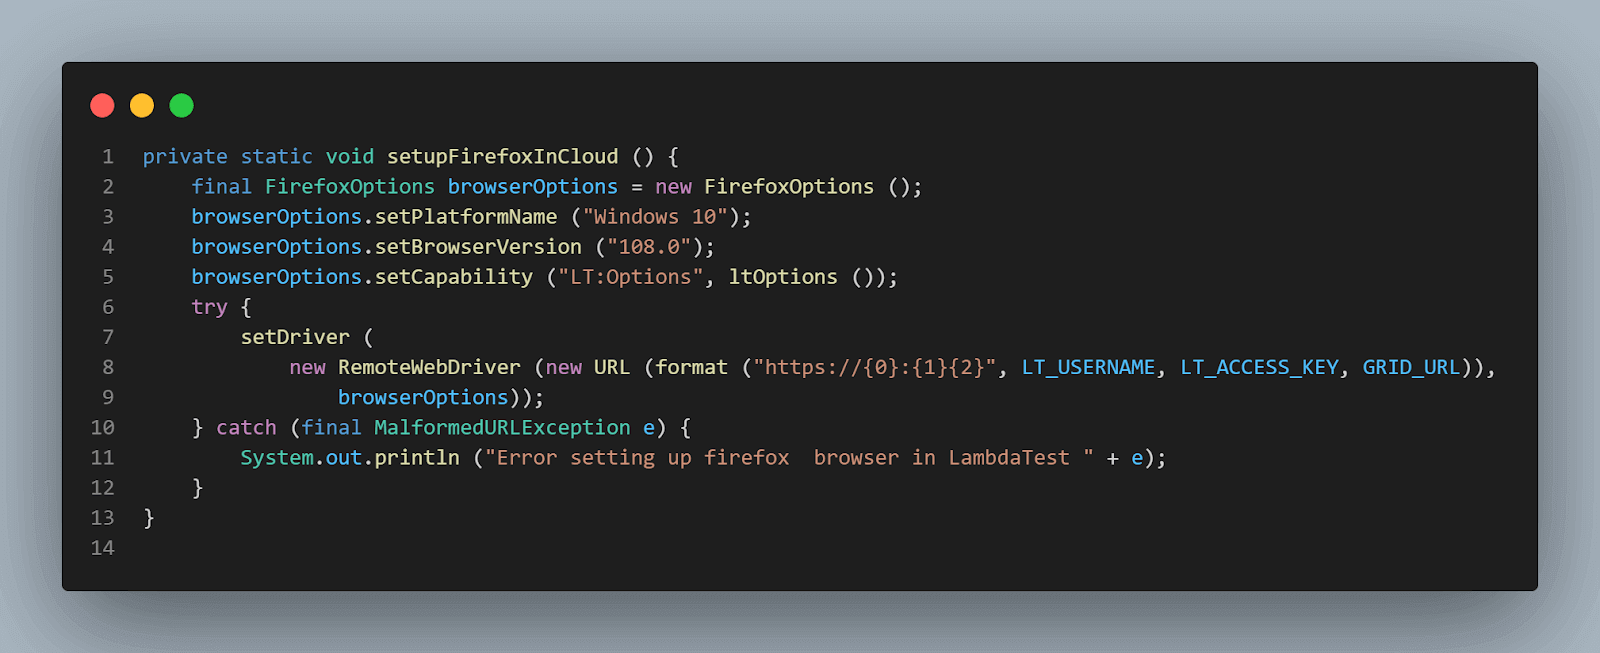
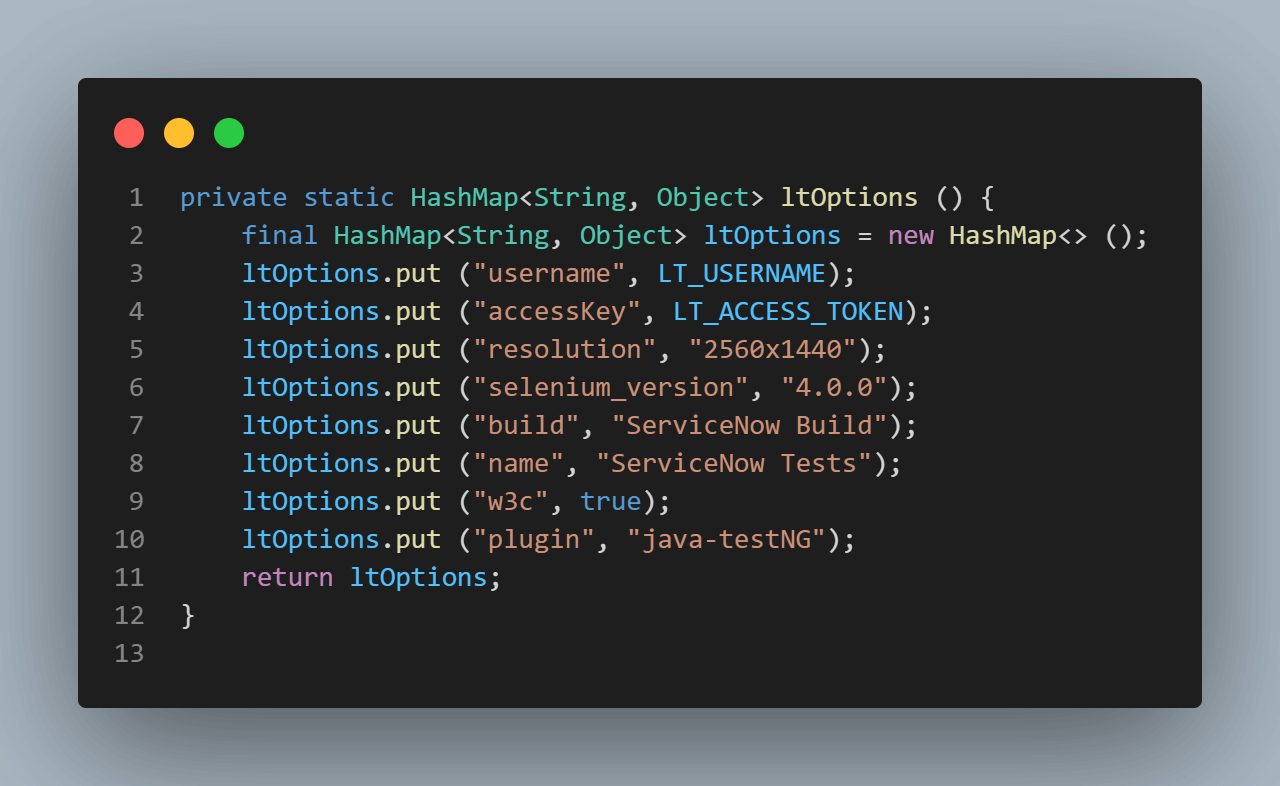
These methods have one thing in common — ltOptions, which are required to set the Configurations related to LambdaTest platforms in W3C format since Selenium 4 is W3C compliant. As both methods for setting up browsers need these ltOptions, a common method ltOptions() is created to set the respective configs.
ltOptions() method
How To Write Automated Tests for ServiceNow Workflows
First, we write the base tests where the common configuration, like starting and quitting the drivers, will be set up, and this base test will be extended to the Test Class, where actual tests will be written.
BaseTest class
public class BaseTest {


    @Parameters ("browser")
    @BeforeClass (alwaysRun = true)
    public void setupTest (final String browser) {
        createDriver (Browsers.valueOf (browser.toUpperCase ()));
    }


    @AfterClass (alwaysRun = true)
    public void tearDown () {
        quitDriver ();
    }


}
@Parameters annotation in TestNG is used to set the browser parameter from testng.xml. So, if we need to run the tests on different browsers, we don’t have to change the code every time. The browser name could be updated in the testng.xml, and the test could be run accordingly. CreateDriver() method from the DriverManager class is called here to set the Drivers as per the Browser value passed.
createDriver() method (DriverManager class)
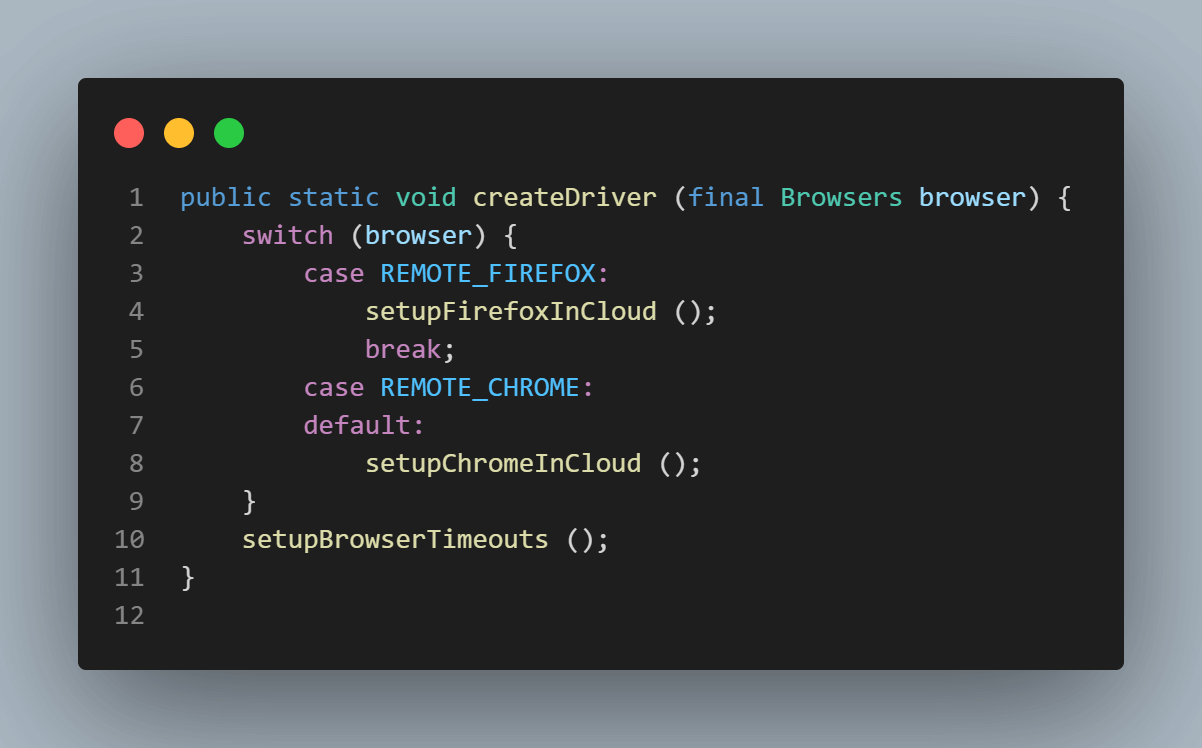
setupBrowserTimeouts() method is called for setting the browser timeouts after the driver is set.
setupBrowserTimeouts() method
 All our configurations are now set, and we are ready to write the tests. Let’s jump into the Scenarios that we discussed earlier and write tests.
Implementation
Here is the test that covers all three scenarios discussed in the test automation strategy.
ServiceNowTests class
public class ServiceNowTests extends BaseTest {
private static final String CALLER_NAME = "John Adams";
private static final String CHANNEL = "Phone";
private static final String SHORT_DESCRIPTION = "New incident created from automated test!";
@BeforeClass
public void setup () {
getDriver ().navigate ()
.to ("https://dev21190.service-now.com/");
}
@Test
public void testNewIncident () {
LoginPage loginPage = new LoginPage ();
loginPage.performLogin ();
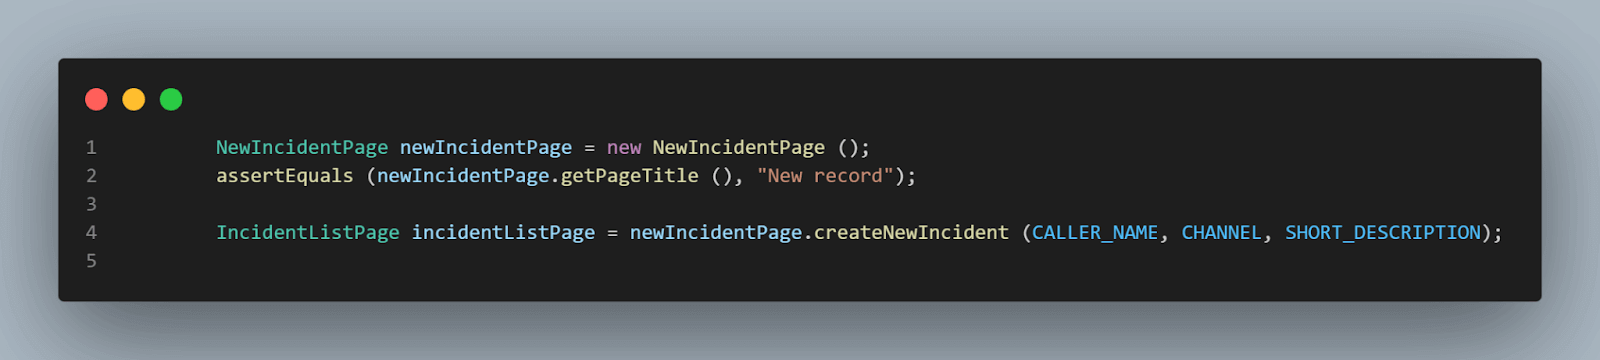
NewIncidentPage newIncidentPage = new NewIncidentPage ();
assertEquals (newIncidentPage.getPageTitle (), "New record");
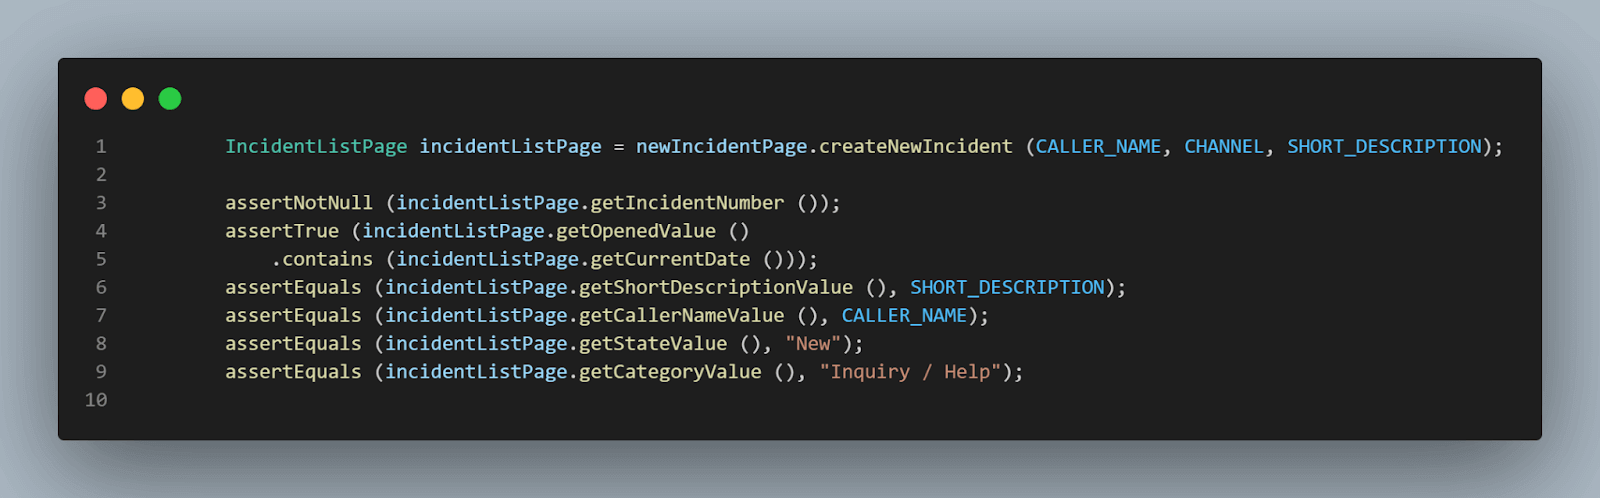
IncidentListPage incidentListPage = newIncidentPage.createNewIncident (CALLER_NAME, CHANNEL, SHORT_DESCRIPTION);
assertNotNull (incidentListPage.getIncidentNumber ());
assertTrue (incidentListPage.getOpenedValue ()
.contains (incidentListPage.getCurrentDate ()));
assertEquals (incidentListPage.getShortDescriptionValue (), SHORT_DESCRIPTION);
assertEquals (incidentListPage.getCallerNameValue (), CALLER_NAME);
assertEquals (incidentListPage.getStateValue (), "New");
assertEquals (incidentListPage.getCategoryValue (), "Inquiry / Help");
}
}Page Object Model is followed while writing the tests, and since we have three different pages to test, namely, Login Page, Incident Page, and IncidentList Page. Hence, three Page Object classes are created. Implementation (Test Scenario 1) As discussed in the automation testing strategy, let's implement the Login Scenario, where the valid user will log in in the instance.
LoginPage class
public class LoginPage {


    private String userName = System.getProperty ("website_username");
    private String password = System.getProperty ("website_password");


    private WebElement userNameField () {
        return getDriver ().findElement (By.id ("user_name"));
    }


    private WebElement passwordField () {
        return getDriver ().findElement (By.id ("user_password"));
    }


    private WebElement loginBtn () {
        return getDriver ().findElement (By.id ("sysverb_login"));
    }


    public NewIncidentPage performLogin () {
        userNameField ().sendKeys (userName);
        passwordField ().sendKeys (password);
        loginBtn ().click ();
        getDriver ().navigate ()
            .to ("https://dev21190.service-now.com/incident.do");
        return new NewIncidentPage ();
    }
}
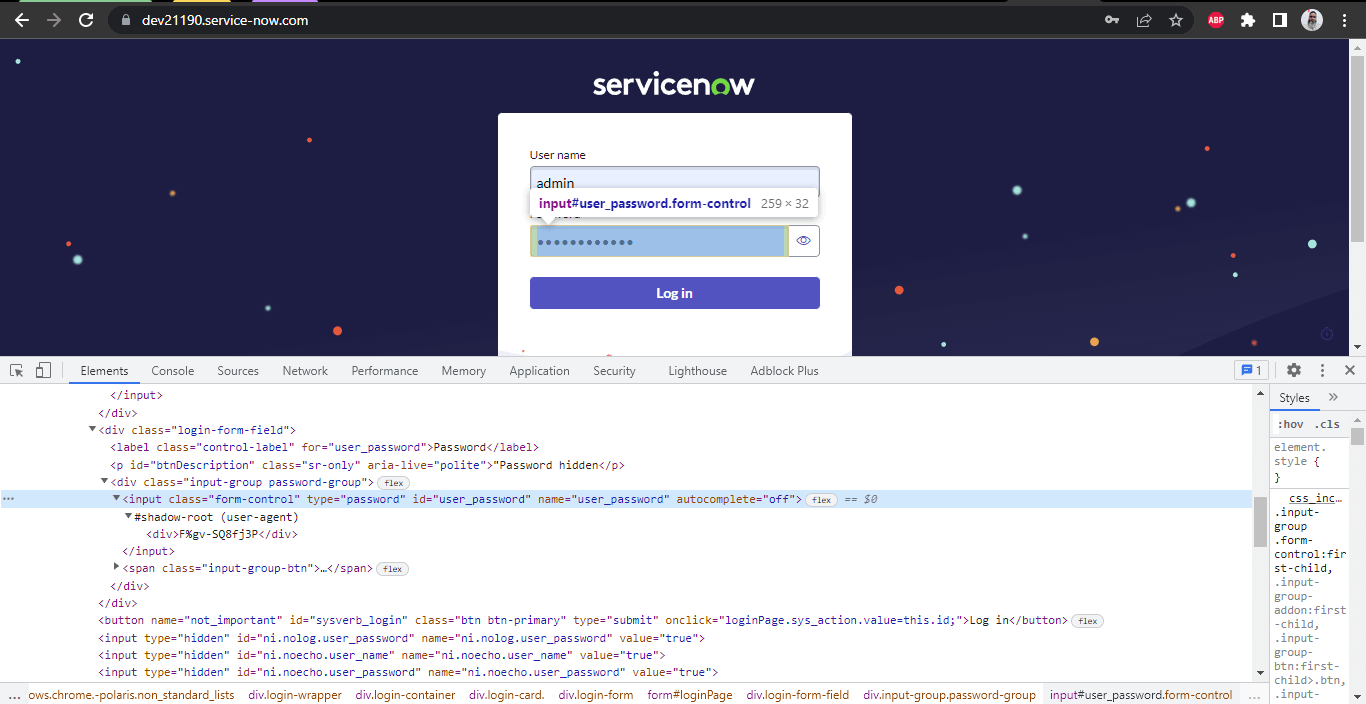
Login Page has all the locators for the Login Screen, which has fields like User name, Password, and the Log in button.
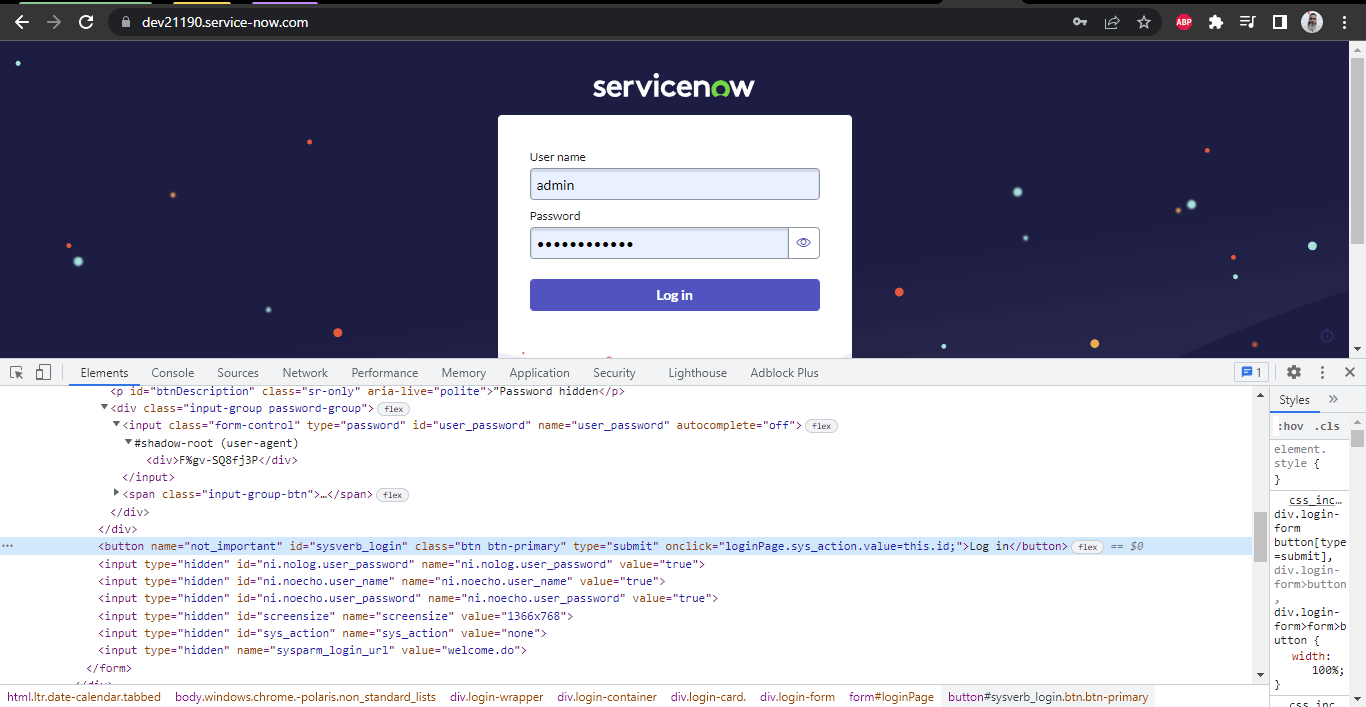
Locating the User Name Field
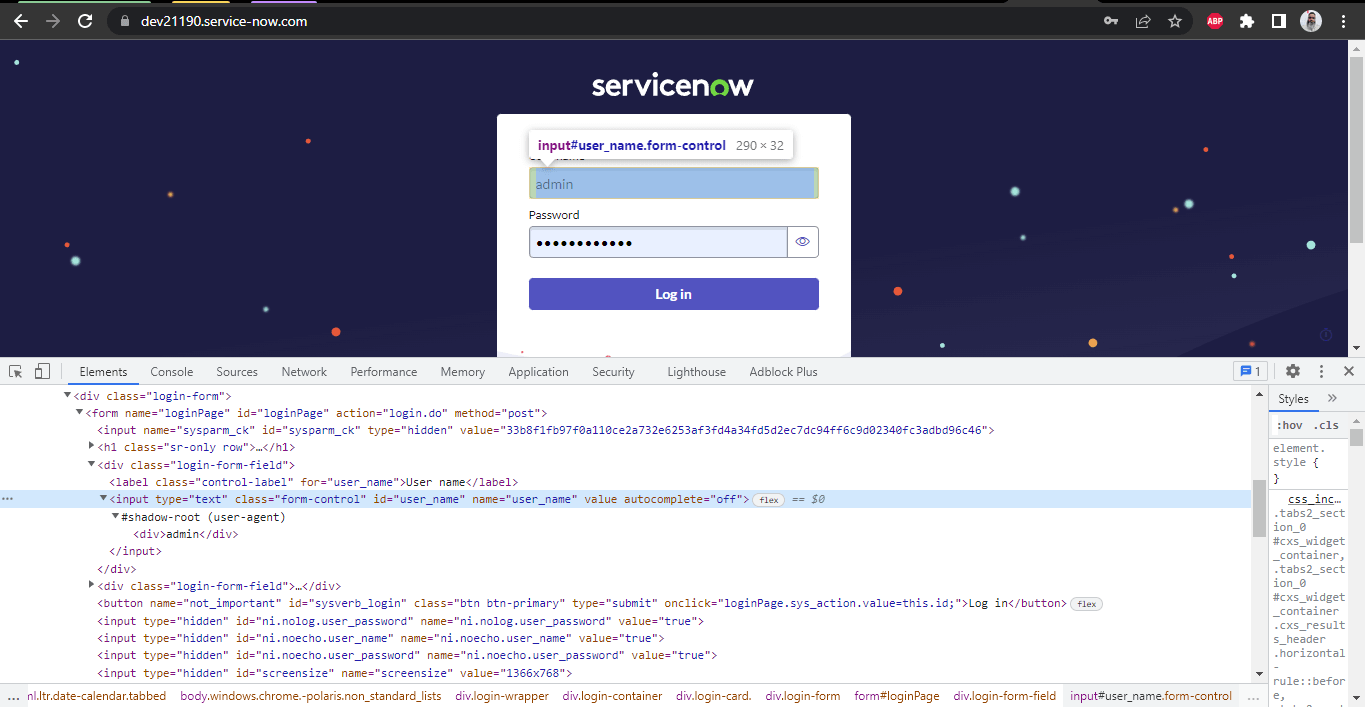 The username field has the ID locator in the DOM, which can be used to locate the field. Similarly, the Password Field and Login buttons can be located using the appropriate locator strategies (e.g., Name, id, link text, etc.)
Locating the Password Field
Locating the Login Button
performLogin() method helps to login into the website. Here, we are not passing the username and password values in the method parameter. Instead, we get it using the System.getProperty() method. This is done to ensure that we don’t expose the Username and Password secret values while testing. The values in the fields are entered using sendKeys() in Selenium WebDriver.
performLogin() method

Once the login is successful, we will navigate to the new incident creation page using its respective URL and return a new instance of NewIncidentPage. Implementation (Test Scenario 2) In Scenario 2, we discussed creating a new Incident by checking the page header first and then moving ahead to create a new incident.
New Incident Creation Page

Test for Creating a New Incident
NewIncidentPage class is created for locating the fields required to create a new incident. createNewIncident() method performs the action required to create a new Incident.
NewIncidentPage class
public class NewIncidentPage {
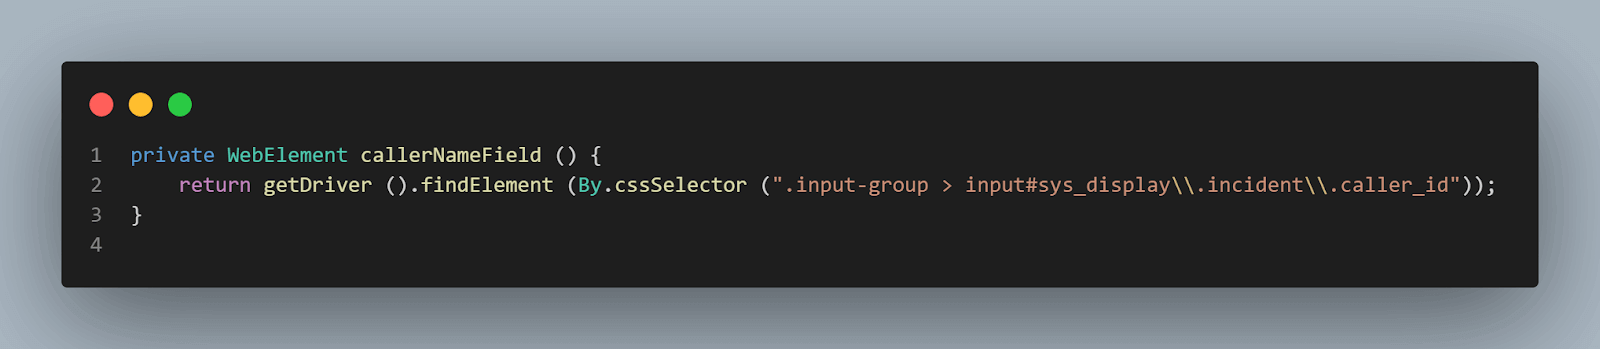
private WebElement callerNameField () {
return getDriver ().findElement (By.cssSelector (".input-group > input#sys_display\\.incident\\.caller_id"));
}
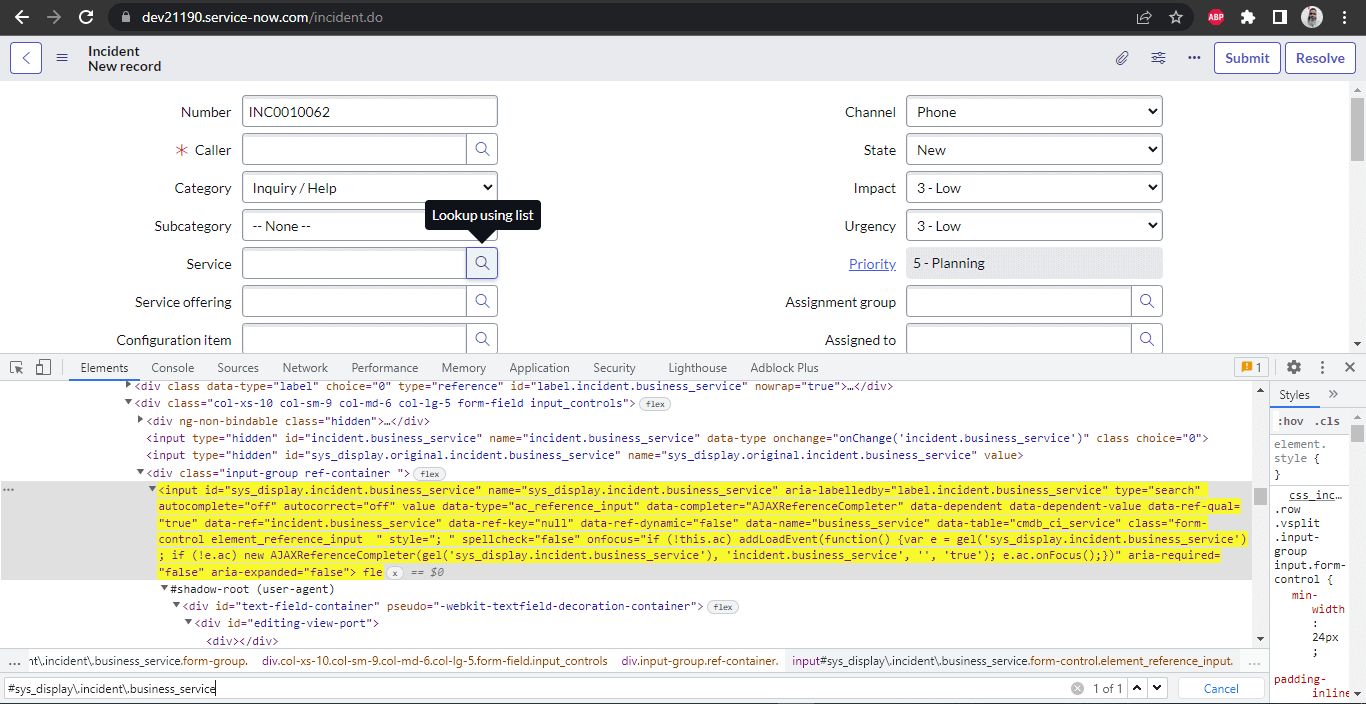
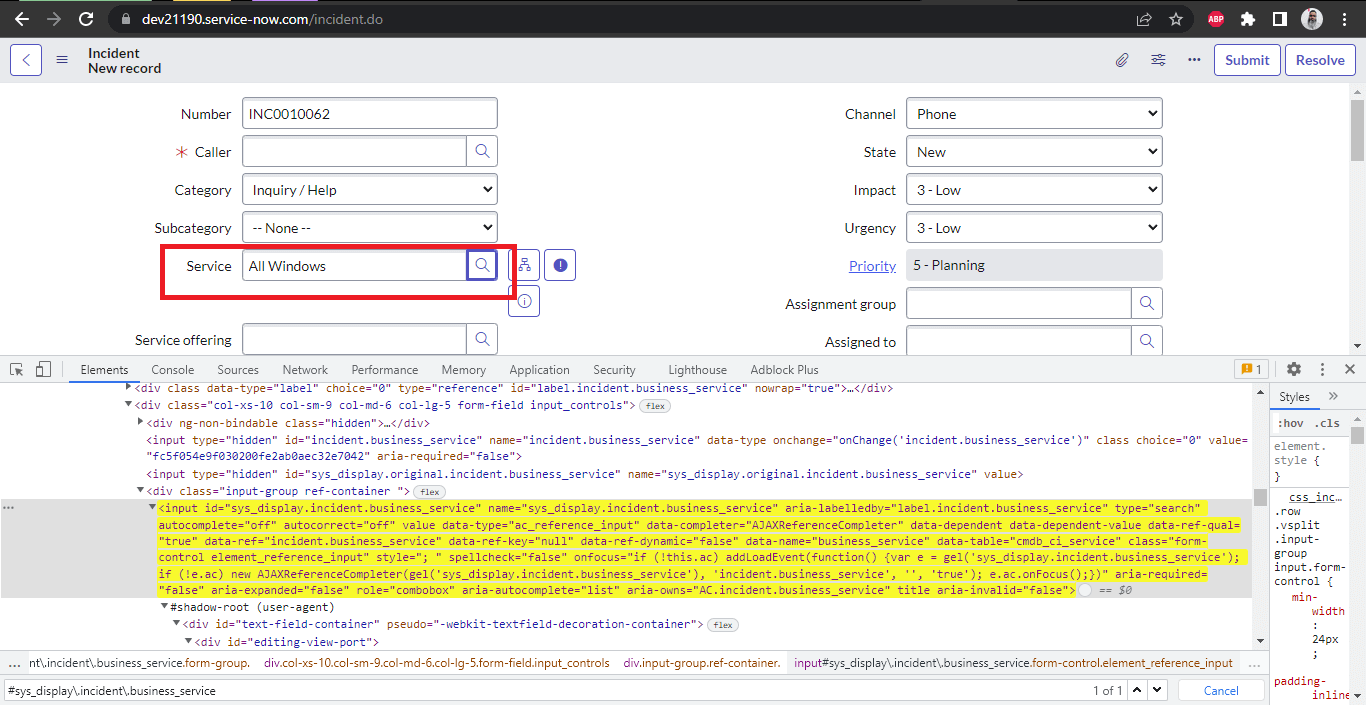
private WebElement serviceField () {
return getDriver ().findElement (
By.cssSelector (".input-group > input#sys_display\\.incident\\.business_service"));
}
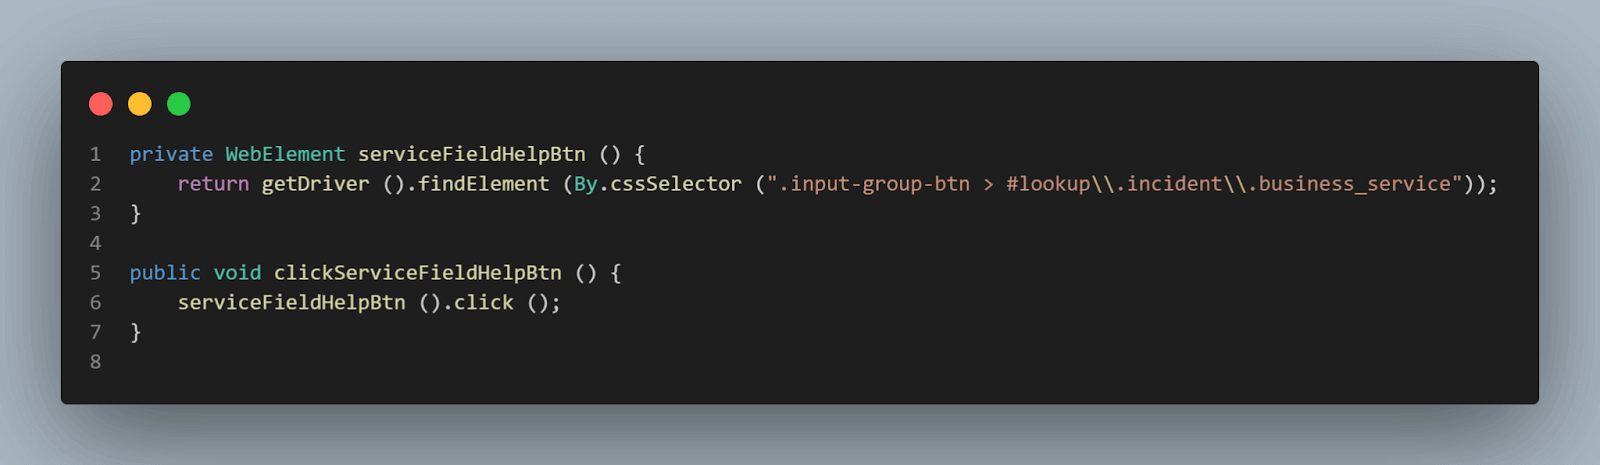
private WebElement serviceFieldHelpBtn () {
return getDriver ().findElement (By.cssSelector (".input-group-btn > #lookup\\.incident\\.business_service"));
}
public void clickServiceFieldHelpBtn () {
serviceFieldHelpBtn ().click ();
}
private Select channelField () {
return new Select (getDriver ().findElement (By.cssSelector (".form-group select#incident\\.contact_type")));
}
public void selectChannelByVisibleText (String channelName) {
channelField ().selectByVisibleText (channelName);
}
private WebElement shortDescriptionField () {
return getDriver ().findElement (By.cssSelector (".form-group > div input#incident\\.short_description"));
}
private WebElement submitBtn () {
return getDriver ().findElement (By.id ("sysverb_insert_bottom"));
}
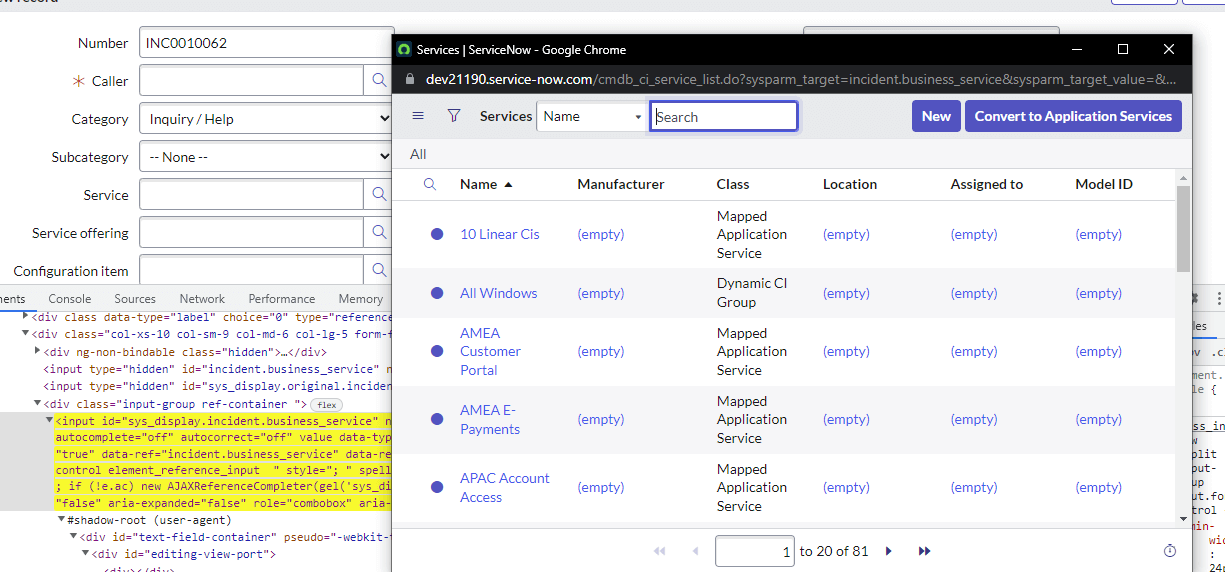
private WebElement selectServicesLink () {
return getDriver ().findElement (By.cssSelector (
"#cmdb_ci_service > #cmdb_ci_service_table > tbody > tr:nth-child(2) > td:nth-child(3) > a"));
}
public void selectServices () {
WebDriverWait wait = new WebDriverWait (getDriver (), Duration.ofSeconds (30));
final String originalWindow = getDriver ().getWindowHandle ();
wait.until (ExpectedConditions.numberOfWindowsToBe (2));
for (final String windowHandle : getDriver ().getWindowHandles ()) {
if (!originalWindow.contentEquals (windowHandle)) {
getDriver ().switchTo ()
.window (windowHandle);
selectServicesLink ().click ();
break;
}
}
getDriver ().switchTo ()
.window (originalWindow);
}
public String getPageTitle () {
return getDriver ().findElement (By.cssSelector ("h1 > div > div.navbar-title-display-value"))
.getText ();
}
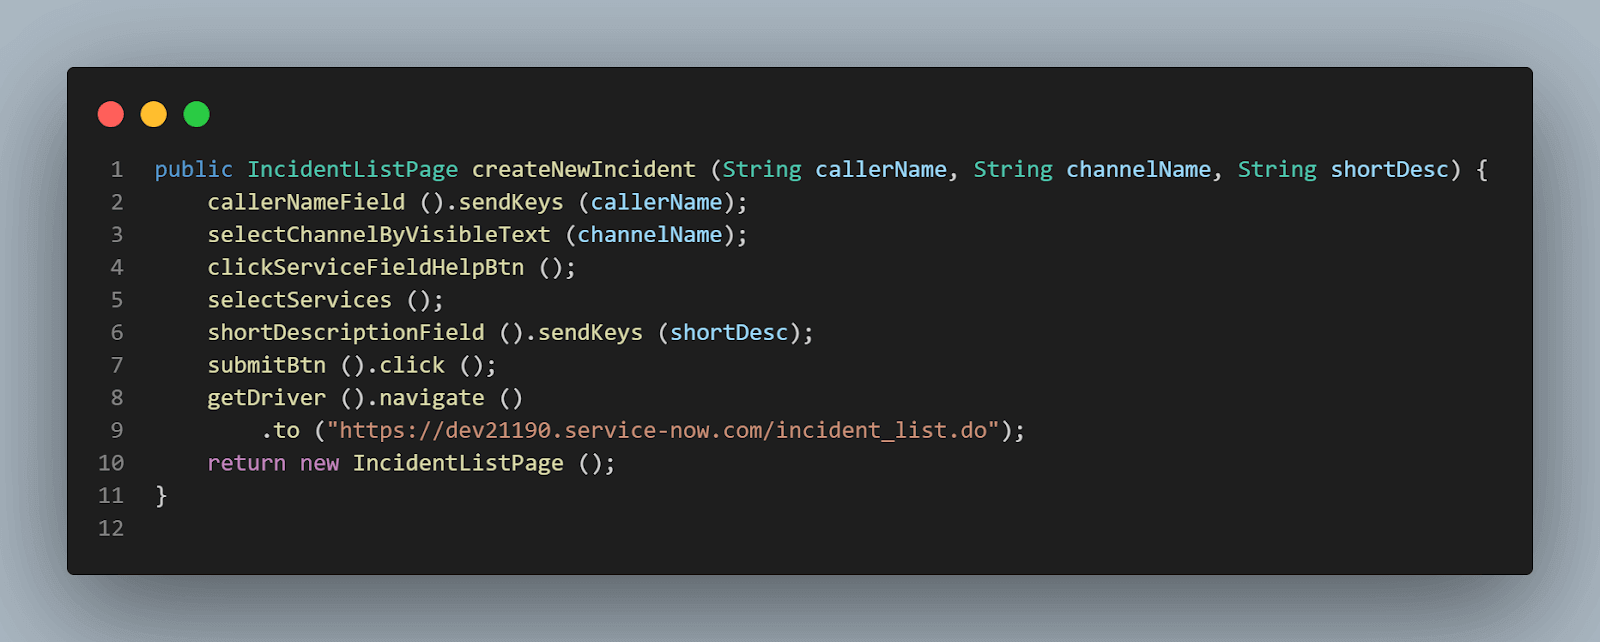
public IncidentListPage createNewIncident (String callerName, String channelName, String shortDesc) {
callerNameField ().sendKeys (callerName);
selectChannelByVisibleText (channelName);
clickServiceFieldHelpBtn ();
selectServices ();
shortDescriptionField ().sendKeys (shortDesc);
submitBtn ().click ();
getDriver ().navigate ()
.to ("https://dev21190.service-now.com/incident_list.do");
return new IncidentListPage ();
}
}Let's dive deep into the createNewIncident() method. This method accepts three parameters, namely, callerName, channelName, and shortDesc, which will help us to generate a new entry for the incident.
The Caller Name field is an input text field. Let's locate this field using Chrome DevTools.
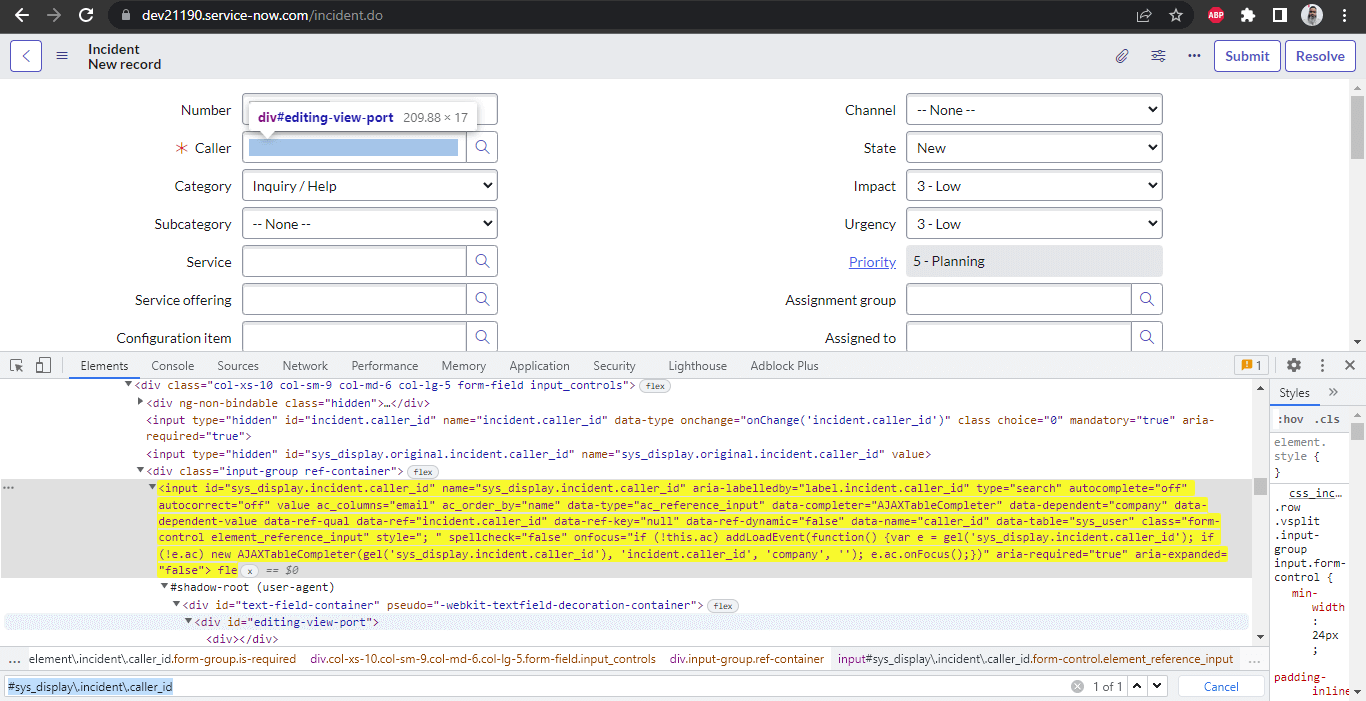
If you look closely, the id to locate the field in the DOM is “sys_display.incident.caller_id". However, when it comes to locating the field, the value for id is given as “#sys_display\.incident\.caller_id” (Notice the “\” in between the names before the. “”) “\” is used as an escape character here, as in CSS Selector,. “” is used for class names.
However, since we need to pass on dots for full id value, we must pass the “\” as an escape character. In Java, “ \ ” is used for escape characters to pass the actual “\” for the String value. Hence, for the CSS Selector value “ \\ ” is passed.
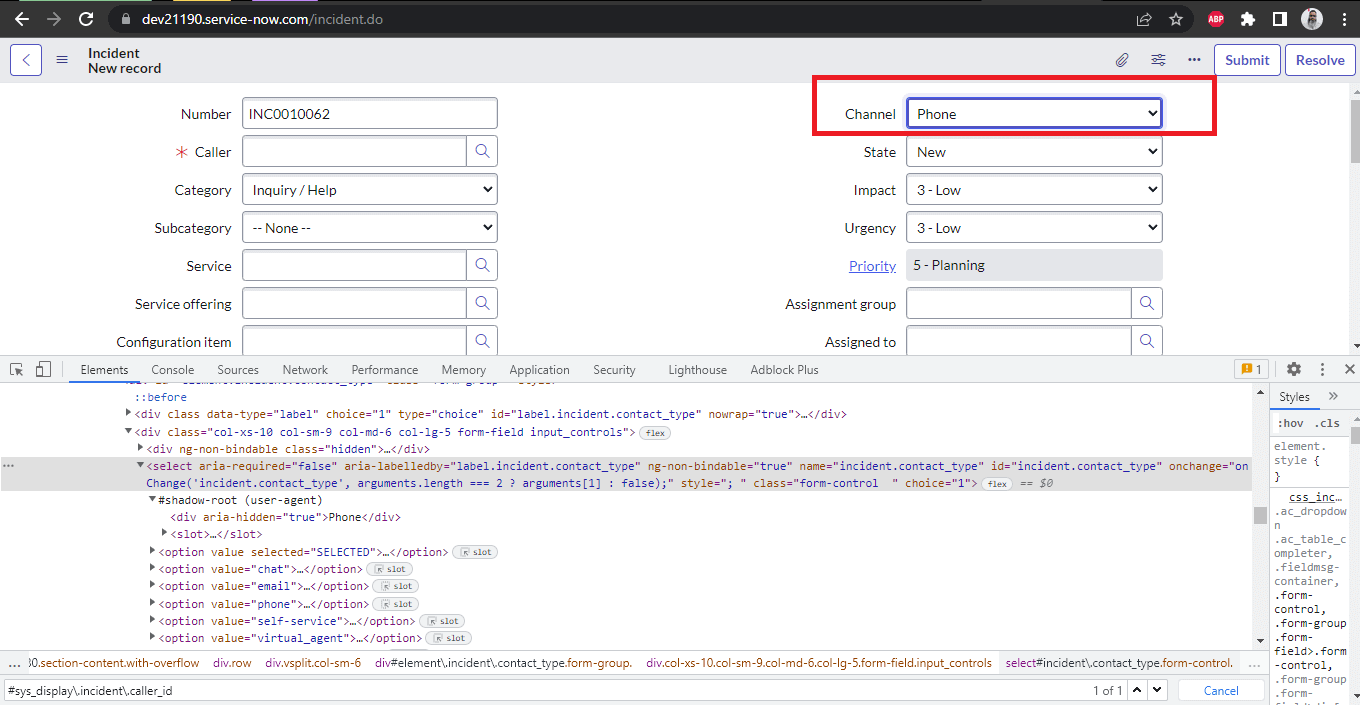
The Channel field is a single select dropdown list. In the DOM, we can see that it has the < Select > tag, which makes it easier to locate the field and use Selenium’s Select class to select the desired option and handle the drop-down in Selenium.
Code To Select the Value From the Channel Field
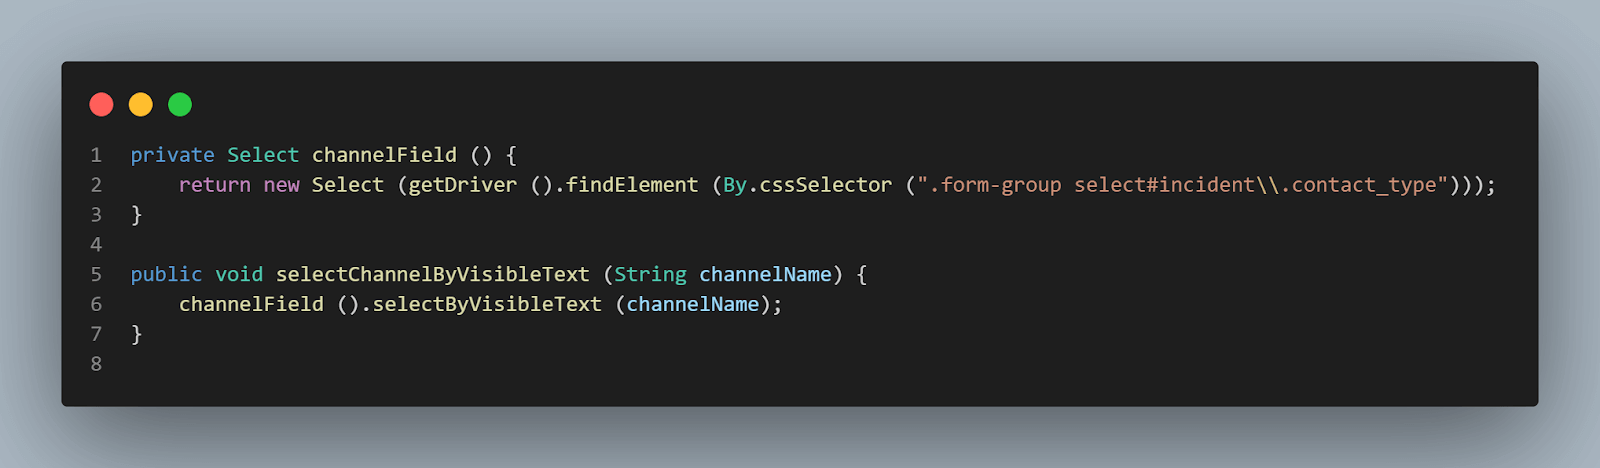
ChannelchannelField() method. selectChannelByVisibleText()Service field
Service
Search ServiceSearchNewIncidentPageServiceHelp
Search ServiceService
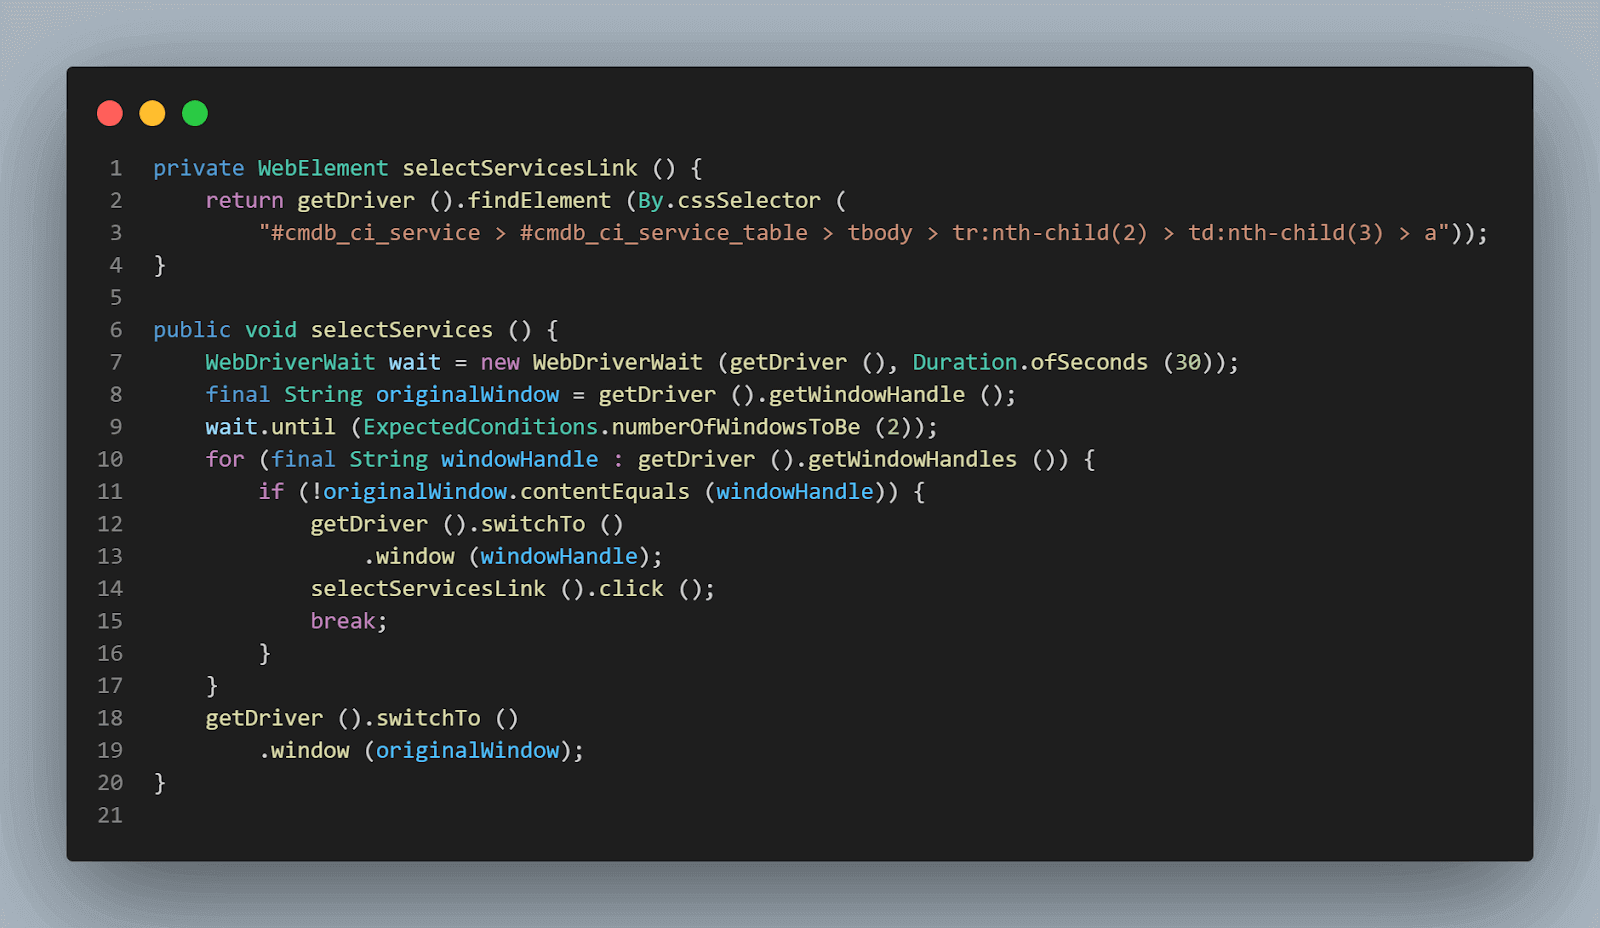
selectServices()The Second Service name from the Services list in the window is selectedgetWindowHandles()
getDriver ().switchTo ().window (originalWindow);Next, the Short Description field is located, and text is entered in it as it is a mandatory field. After that, the Submit button will be clicked and using the below statement, we will navigate to the IncidentList Page.
getDriver ().navigate ()
            .to ("https://dev21190.service-now.com/incident_list.do");
        return new IncidentListPage ();
Assertions are the core of the test. With TestNG assertions, we will ensure that whatever data we have entered in the system using the New Incident Page is displayed correctly on the Incident List Page.
New Incident PageIncident List Page Implementation (Test Scenario 3)IncidentListPageIncidentListPage class
public class IncidentListPage {


    public String getOpenedValue () {
        return getDriver ().findElement (By.cssSelector ("#incident_table >tbody > tr:nth-child(1) > td:nth-child(4)"))
            .getText ();
    }


    public String getShortDescriptionValue () {
        return getDriver ().findElement (By.cssSelector ("#incident_table >tbody > tr:nth-child(1) > td:nth-child(5)"))
            .getText ();
    }


    public String getCallerNameValue () {
        return getDriver ().findElement (By.cssSelector ("#incident_table >tbody > tr:nth-child(1) > td:nth-child(6)"))
            .getText ();
    }


    public String getStateValue () {
        return getDriver ().findElement (By.cssSelector ("#incident_table >tbody > tr:nth-child(1) > td:nth-child(8)"))
            .getText ();
    }


    public String getCategoryValue () {
        return getDriver ().findElement (By.cssSelector ("#incident_table >tbody > tr:nth-child(1) > td:nth-child(9)"))
            .getText ();
    }


    public String getIncidentNumber () {
        return getDriver ().findElement (By.cssSelector ("#incident_table >tbody > tr:nth-child(1) > td:nth-child(3)"))
            .getText ();
    }


    public String getCurrentDate () {
        DateTimeFormatter dateTimeFormatter = DateTimeFormatter.ofPattern ("yyyy-MM-dd");
        LocalDateTime now = LocalDateTime.now (ZoneId.of ("America/Los_Angeles"));
        return dateTimeFormatter.format (now);
    }
}
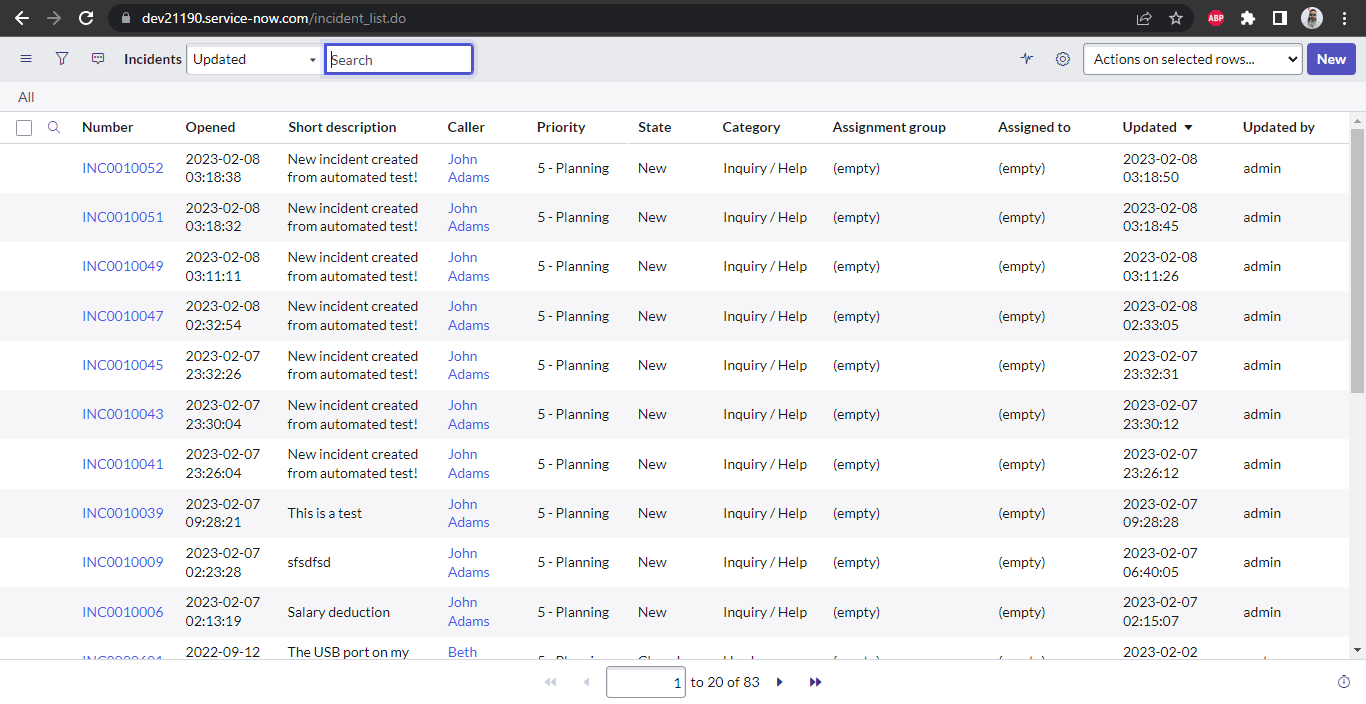
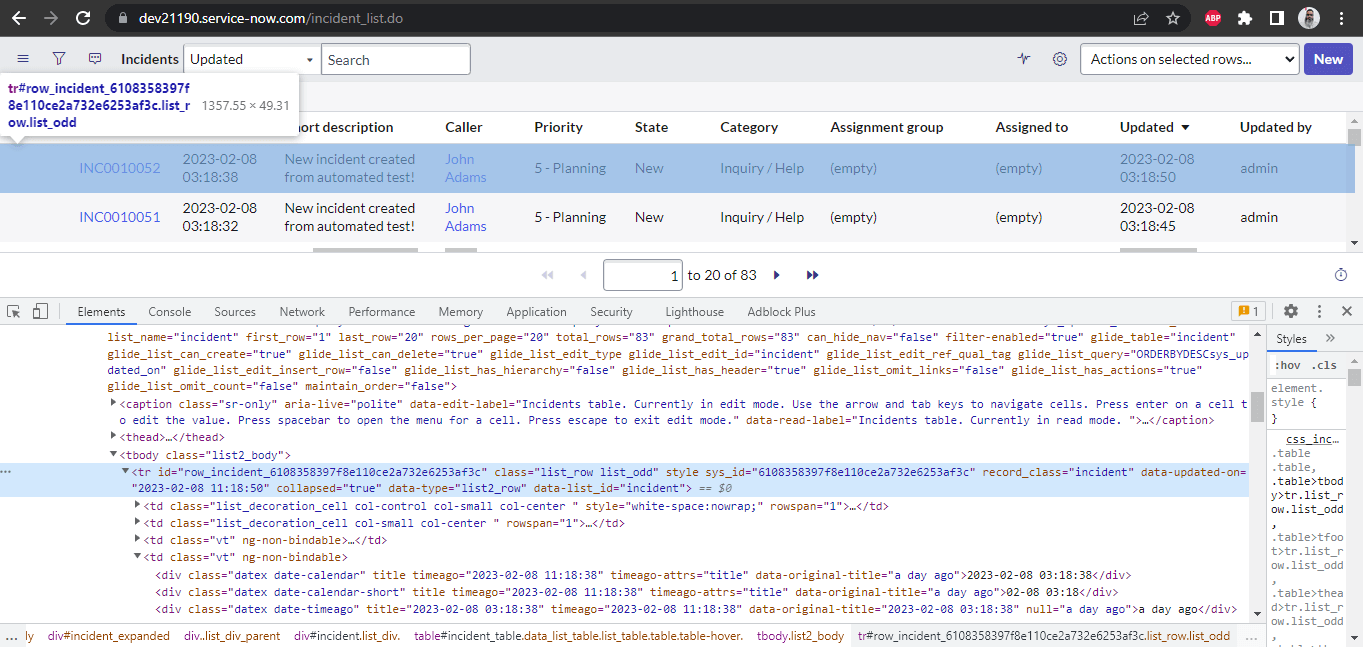
If you observe the Incident List Page Screen, it can be seen that it is a table, and values are respectively presented in rows and columns.
Incident List Page Screen With Locators
You will find that most of the locators are located using the CSS Selectors, and the CSS Selectors are almost the same; only the respective child is changed at the end.
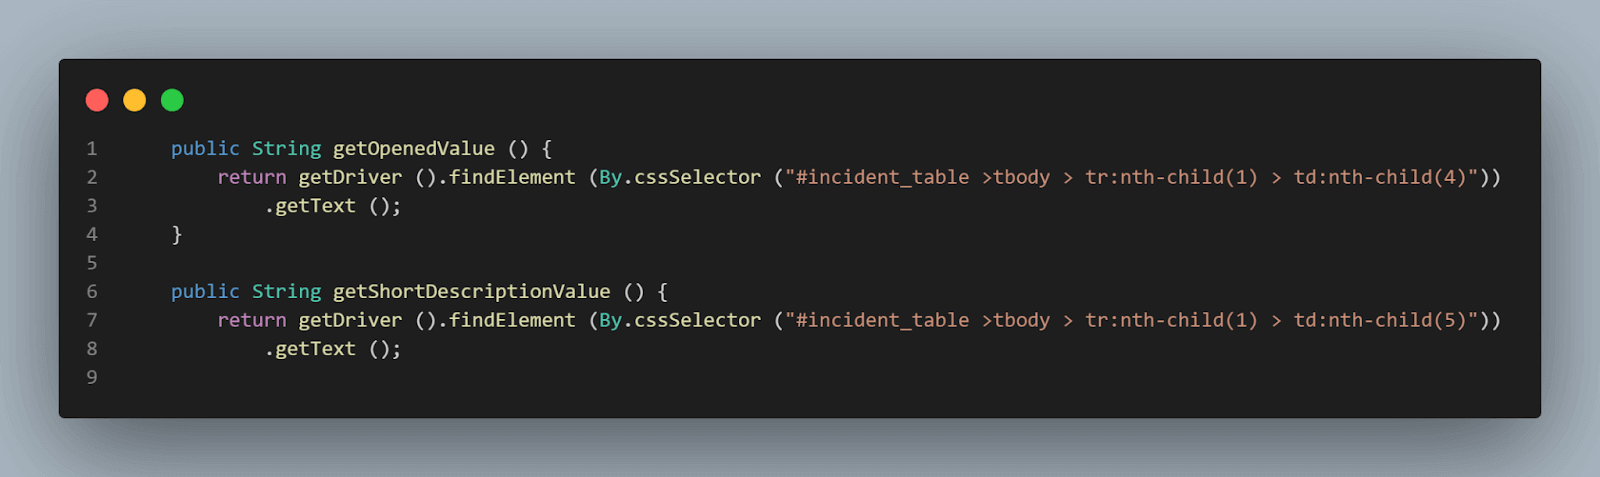
For example, CSS Selector for Opened Column and Short Description column are #incident_table > tbody > tr:nth-child(1) > td:nth-child(4) for opened Column.
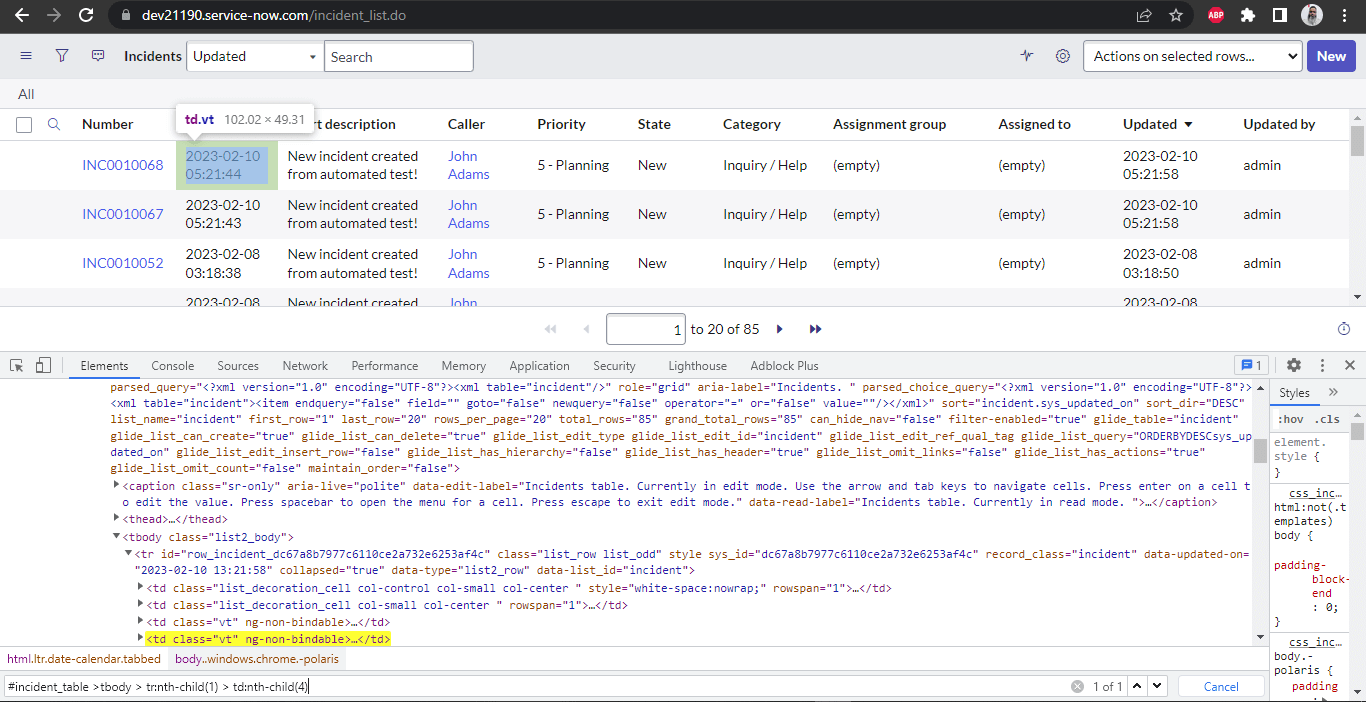
#incident_table > tbody > tr:nth-child(1) > td:nth-child(5) for Short Description Column
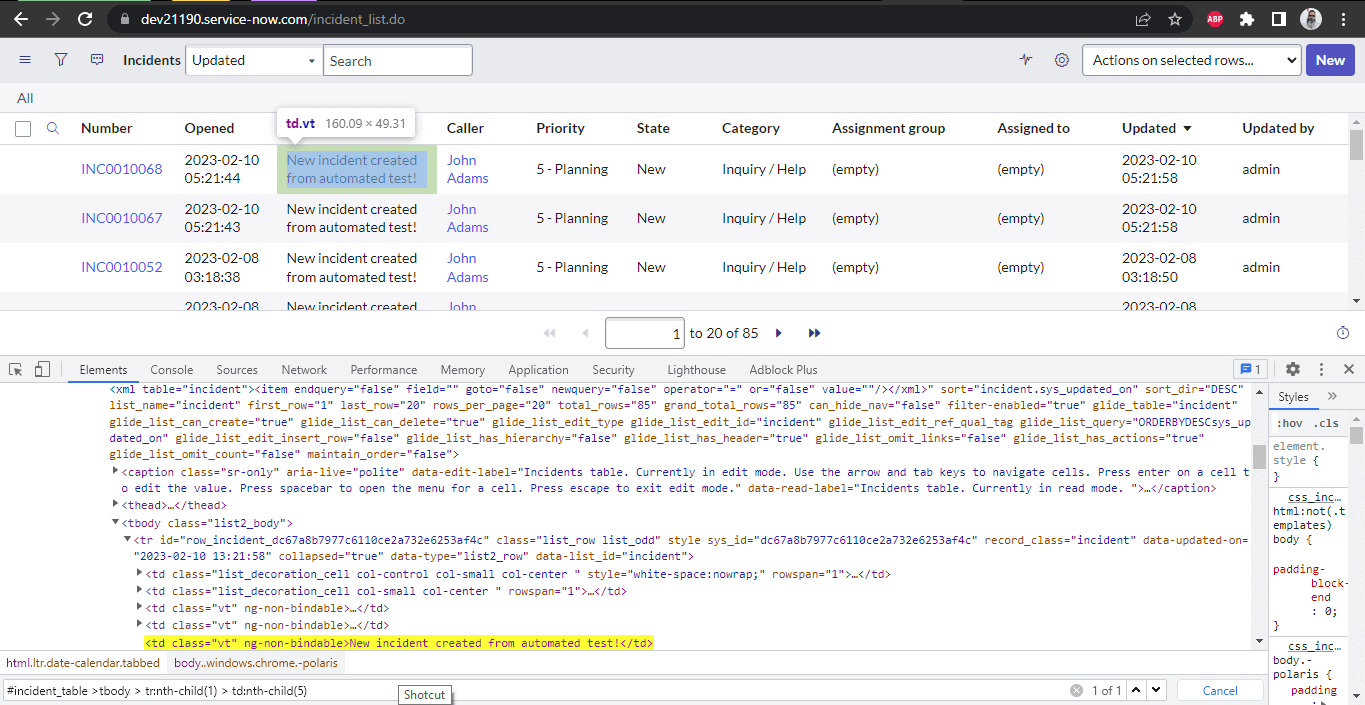
nth-child matches every element that is the nth child of its parent. And since the Incident List Page has a table, we can just update the child reference, locate the required column, and get its value. Now, coming to assertions in the test, in the test, the respective column value will be compared with the expected value that we used while creating a new incident.
Test Execution
There are two ways to run the tests for verifying functionalities on the ServiceNow dashboard:
- From the IDE using TestNG.
- From the CLI using Maven.
Using TestNG
TestNG is used as a test runner; hence testng.xml has been created. Tests can be run by right-clicking on the file and selecting the option Run ‘…\testng.xml’. The following four values need to be supplied as per the Test Configurations otherwise, the tests won’t run:
- LambdaTest Username
- LambdaTest Access Key
- ServiceNow’s Demo Developer Website Username
- ServiceNow’s Demo Developer WebSite Password
These values can be passed as “-Dwebsite_username=< servicenow_username > -Dwebsite_password=< servicenow_password > -DLT_USERNAME=< LambdaTest Username > -DLT_ACCESS_KEY=< LambdaTest Access Key >”
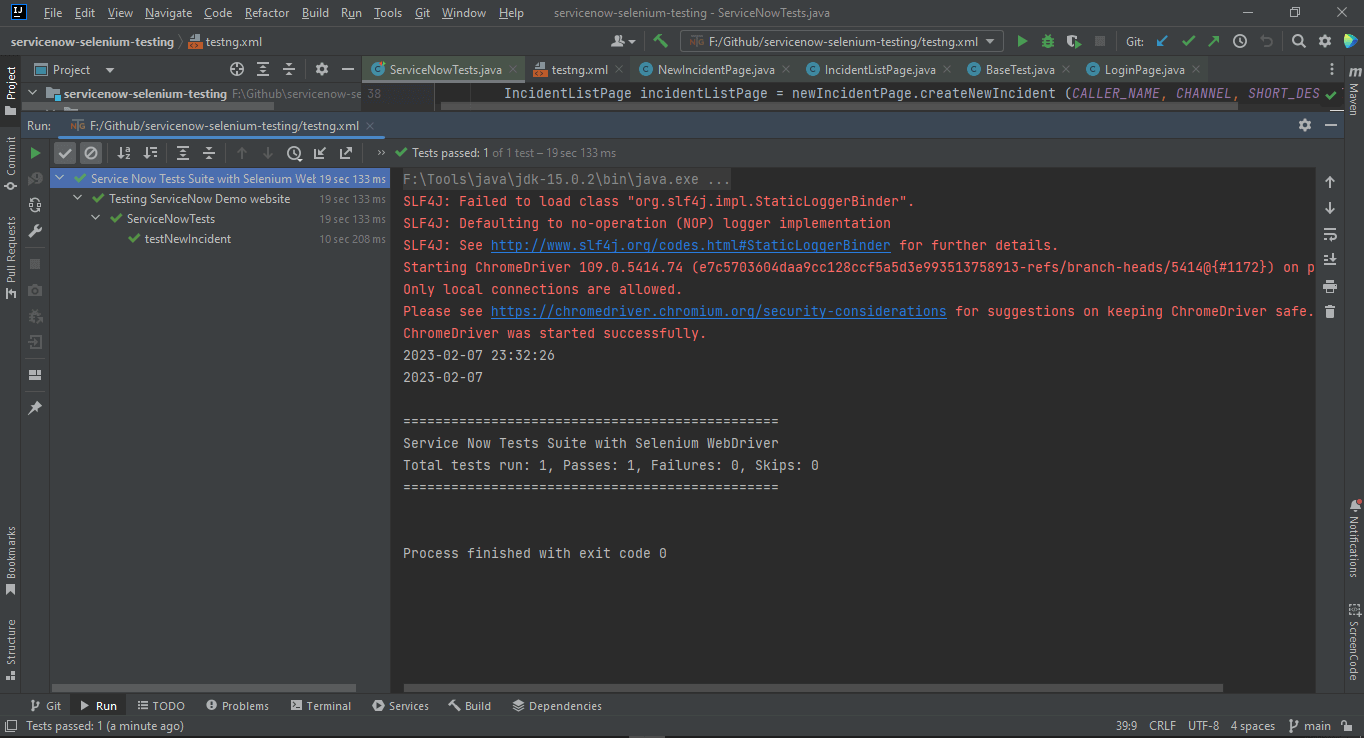
Screenshot of the Test Run Locally Using Intellij IDE
Parallel Execution of the Tests
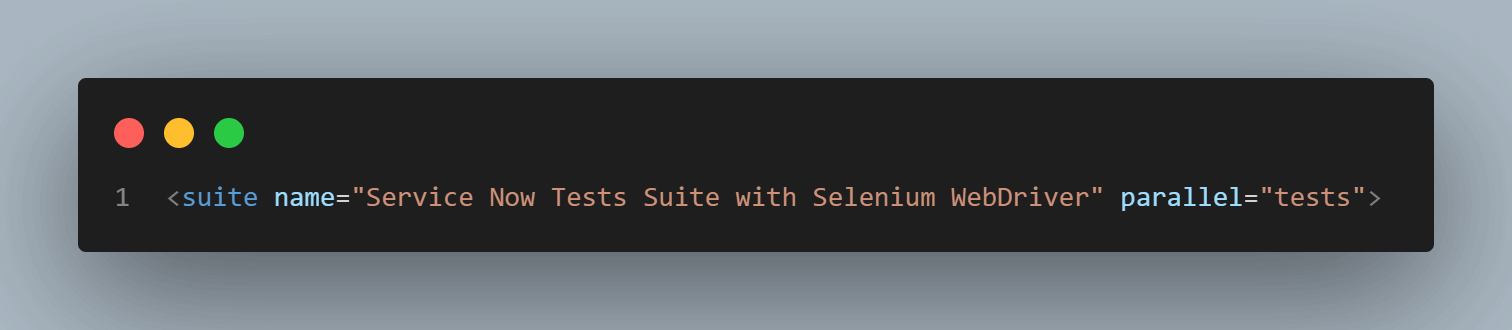
The tests we just ran using TestNG were executed in parallel. In sequential execution, we have to wait for the first test to finish, and then only the next test gets executed. Parallel execution saves time in test execution as all the tests are run in parallel at the same time. For performing parallel testing in TestNG, we need to mention `parallel=”tests”` in testng.xml. Here, all the test blocks updated in testng.xml will start executing in parallel. We have already used the ThreadLocal class in our code. Hence, our execution will be thread-safe, so we don't have to worry about things like test sessions overlapping, etc.
Using Maven
To run the tests using Maven, the following steps need to be run:
- Open command Prompt/Terminal.
- Navigate to the root folder of the project.
- Type the command on the terminal:
mvn clean test -Dwebsite_username=< servicenow_username > -Dwebsite_password=< servicenow_password > -DLT_USERNAME=< LambdaTest Username > -DLT_ACCESS_KEY=< LambdaTest Access Key >
Screenshot of the Test Results Run Using Maven![Screenshot of the test results run using Maven]()

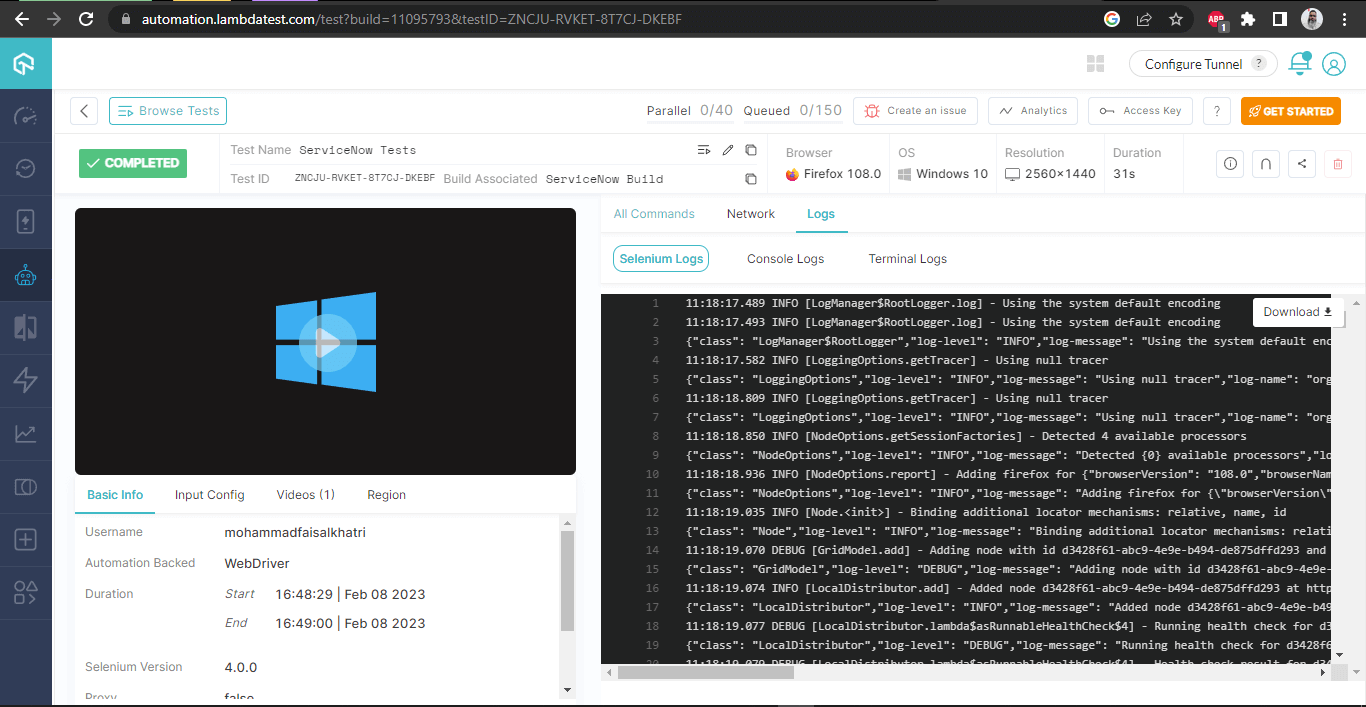
Once the tests are run successfully, we can check out the LambdaTest Dashboard and view all the video recordings, screenshots, device logs, and step-by-step granular details of the test run in the Analytics. Check out the screenshots below, which will give you a fair idea of the dashboard for automated app tests.
LambdaTest Dashboard
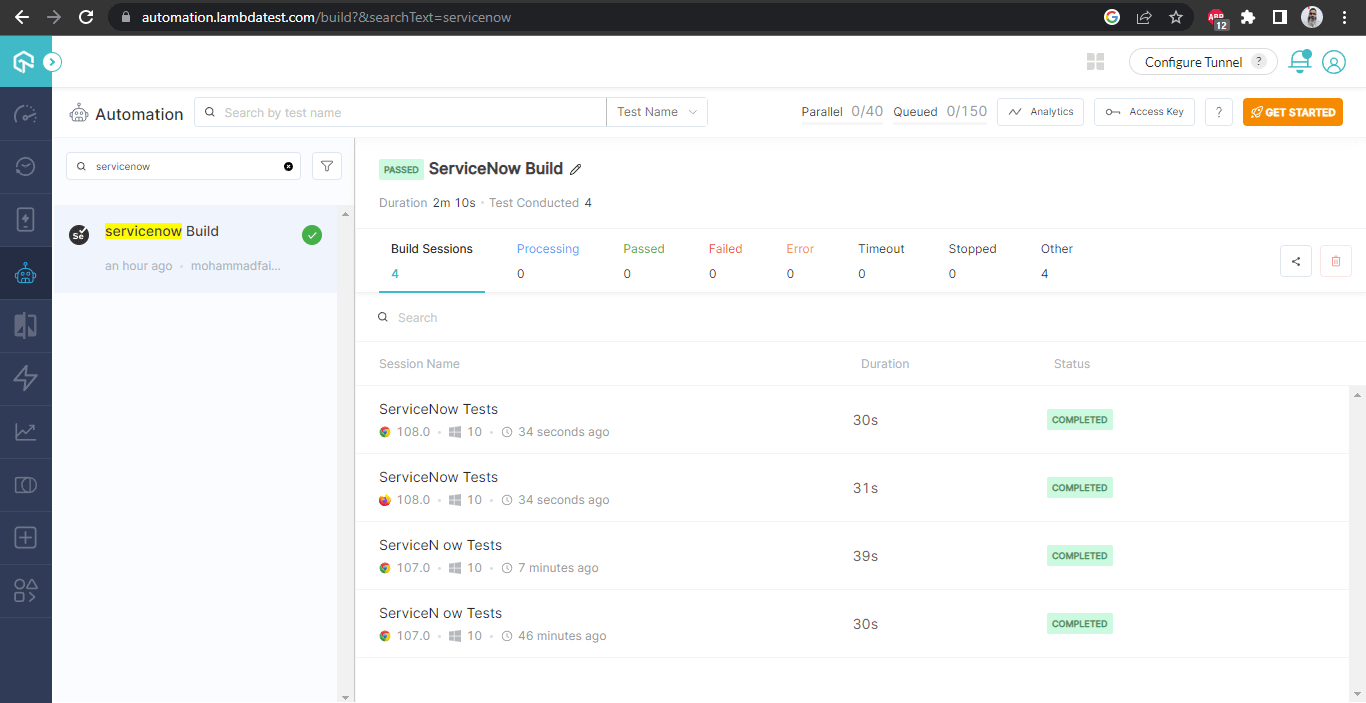
The following screenshots show the details of the build and the tests that were run. Again, the test name, browser name, browser version, OS name, respective OS version, and screen resolution are all correctly visible for each test. It also has the video of the test that was run, giving a better idea about how tests were run on the device.
LambdaTest Build Details: Chrome Browser

LambdaTest Build Details: Firefox Browser![LambdaTest Build Details - Firefox Browser]()
Conclusion
In this blog, we discussed what ServiceNow is. We looked into the Now Platform and Automated Test Framework(ATF) created by ServiceNow. Selenium WebDriver, as an external tool, was used to demonstrate how automated testing of the ServiceNow application can be performed over the Chrome and Firefox browsers using a ServiceNow Cloud Testing Platform like LambdaTest. I hope you enjoyed reading this blog and learned something from it. Happy Testing!
Published at DZone with permission of Faisal Khatri. See the original article here.
Opinions expressed by DZone contributors are their own.
Comments