How to Build a NestJS MVC App With YugabyteDB
Learn how to build an application following a common architecture (MVC) by using NestJS and Yugabyte.
Join the DZone community and get the full member experience.
Join For FreeThe article is the second in a series of posts investigating ways to build applications with NestJS. In Part 1, linked here, we built a two-factor authentication app with NestJS.
In this article, we'll learn more about the model view controller (MVC) architecture by building a NestJS MVC application with YugabyteDB. We will code an eBook store demo project. The code for this tutorial is available on my GitHub repository. Feel free to clone it as you follow the steps. Let's begin!
Model View Controller Design
MVC is an architectural paradigm that divides an application into three basic logical components - model, view, and controller. Each of these components is designed to handle particular parts of an application's development. MVC is a popular industry-standard web development framework for creating scalable and flexible projects.
The three logical components of MVC are as follows:
- Model: Compared to the View and Controller, this level is regarded as the lowest. It represents the data that is transferred between the View and Controller components and determines the storage of all data items in the application.
- View: This component is in charge of the application's user interface. It also manages the end-display user's data as well as communication between the user and the controller.
- Controller: The controller completes the loop by receiving user input, transforming it into appropriate messages, passing them on to the views, and managing request handlers.
The MVC pattern has the following benefits:
- It allows for easy organization of large web applications
- It makes it easy to modify any part of the application without necessarily affecting other parts of the application
- It simplifies the code testing process
- It allows for easy collaboration between teams of developers
- It helps developers create easily maintained code
- It allows developers to create and use their preferred view engines
Prerequisites
This tutorial is a hands-on demonstration. To follow along, ensure you have installed the following:
The code for this tutorial is available on my GitHub repository. Feel free to clone it as you follow the steps.
What is NestJS?
NestJS is a Node.js framework for creating fast, testable, scalable, loosely coupled server-side applications that use TypeScript. It takes advantage of powerful HTTP server frameworks such as Express or Fastify. Nest adds a layer of abstraction to Node.js frameworks and exposes their APIs to developers. It supports database management systems like PostgreSQL, MySQL, and in this tutorial - YugabyteDB. NestJS also offers dependency injections out of the box.
Why use NestJS?
NestJS has been one of the most popular Node.JS frameworks since its release in 2017. Some of the reasons why developers use Nestjs are as follows:
- It is highly scalable and easy to maintain
- It has a large developer community and support system
- Nest has found a unique intersection of front-end and middleware programming that many languages have struggled to discover
- NestJS's TypeScript support ensures that it will remain relevant in the continuously evolving JavaScript world and provides developers with fewer context shifts.
- It has comprehensive documentation
- Easy unit testing
- It is built for large-scale enterprise applications
- Nest provides an out-of-the-box application architecture that allows developers and teams to create highly testable, scalable, loosely coupled, and easily maintainable applications
Project Setup
Before we dive into coding, let's set up our NestJS project and set up our project structure. We'll start by creating the project folder. Open your terminal and run the following command:
mkdir nestmvcapp && cd nestmvcappThen install the NestJS CLI with the command below:
npm i -g @nestjs/cliWhen the installation is complete, run the command below to scaffold a NestJS project.
nest new bookapiChoose your preferred npm package manager. For this tutorial, we'll use npm and wait for the necessary packages to be installed. Once the installation is completed, let's proceed by creating our database table with Arctype.
Set Up a YugabyteDB Database
To start using the Yugabyte database in our application, we need to have it installed on our machine. Let's see how to do this, step-by-step. First, verify you have Python.
# Ubuntu 20.04
sudo apt install python-is-python3
Then, verify you have wget installed. You can do this with the command below.
sudo apt install wgetNext, download and extract the Yugabyte Database:
# download
wget https://downloads.yugabyte.com/releases/2.11.2.0/yugabyte-2.11.2.0-b89-linux-x86_64.tar.gz

# extract
tar xvfz yugabyte-2.11.2.0-b89-linux-x86_64.tar.gz && cd yugabyte-2.11.2.0/
Then, configure YugabyteDB with the command below.
./bin/post_install.shLastly, start your Yugabyte database.
./bin/yugabyted startNow, we'll connect Arctype to Yugabyte. Open Arctype click on the YugabyteDB tab, and connect to the Yugabyte database by completing the information as shown in the screenshot below:
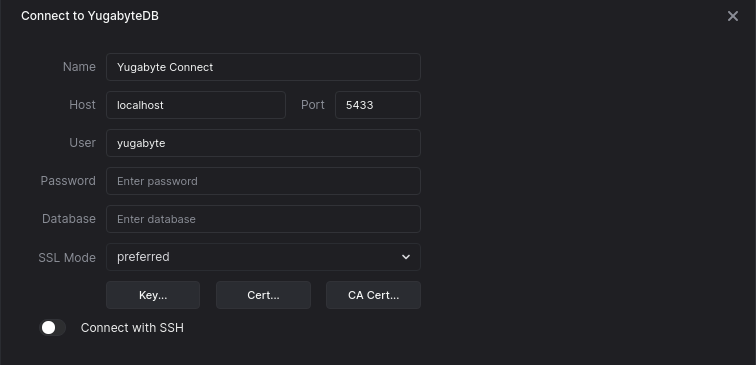
Notice that in the above screenshot, we left the database input empty. This is because we don't have any created yet. So, let's create one. Click on the New Query button and run the SQL command below:
CREATE DATABASE books_db;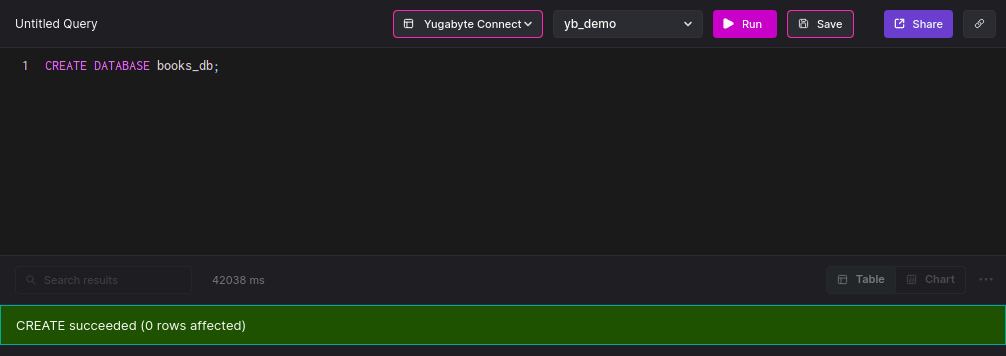
Install Dependencies
With our Yugabyte database setup, let's install the dependencies for our application. Install typeorm, pg, and ejs with the command below:
npm install --save @nestjs/typeorm typeorm pg ejsThis will take a little bit of time to install, so wait for it to finish. Then, we can proceed with creating our application.
Create Books Module
A module is a class that has been annotated with the @Module() decorator. Nest uses the metadata provided by the @Module() decorator to arrange the application structure. We’ll create a books module with the command below:
nest generate module booksThe above command will create a books folder in the src folder with a books.module.ts file, and register it in the root app module (app.module.ts) file.
Create a Books Model Class
With our books module created, let's make a model to create and read data from our database.
Create a book model class with the command below:
nest generate class /books/model/book --flatThe above command will create model/book.ts file in the books module directory. The --flat flag ensures the Nest will not generate a folder for the books model.
Next, let's define our database model using Typeorm. We need an id, title, author, quantity, description, and createdAt fields for our books model. We'll use the typeorm Entity decorator, to define our model class, Column decorator to define our fields, PrimaryGeneratedColumn to create randomly generated IDs for our books using uuid, and the CreatedDateColumn decorator to save the current date-time when a book was created. Open the model/book.ts file, and add the code snippet below:
import { Entity, Column, PrimaryGeneratedColumn, PrimaryColumn, CreateDateColumn } from 'typeorm';

@Entity()
export class Book {

   @PrimaryGeneratedColumn("uuid")
   id: number;

   @Column()
   title: string;

   @Column()
   author: string;

   @Column()
   quantity: number

   @Column()
   description: String

   @CreateDateColumn()
   createdAt: Date;
}
When we run our application, Typeorm will generate the SQL equivalent of the model, to create a book table in our Yugabyte database.
Next, we’ll connect our application to our Yugabyte database in the src/app.module.ts file. First, import the Nest TypeOrmModule module, and the Books model class with the code snippet below:
import { TypeOrmModule } from '@nestjs/typeorm'
import { Book } from './movie/model/book';
Then, connect to the database using the forRoot method with our database credentials with the code snippet below:
imports: [
   …
   TypeOrmModule.forRoot({
     type: 'postgres',
     host: 'localhost',
     username: 'yugabyte',
     port: 5433,
     password: '',
     database: 'books_db',
     entities: [Book],
     synchronize: true,
   }),
 ],
We also need to export our Books model class in our books.module.ts file, to make it accessible. First, we'll import the TypeOrmModule module, and the Books model class.
import { TypeOrmModule } from '@nestjs/typeorm';
import { Book } from './model/book';
Then we'll make the Book model class available using the TypeOrmModule forFeature method.
…
@Module({
 imports: [TypeOrmModule.forFeature([Book])],
 …
Create Views
With our books model defined, let's create the view for our application. Create a Views folder in the books module directory. We'll create the view templates for our application, and we'll use ejs, which we have installed in a previous section, as our template engine. To get started, let's delta the boilerplate code in our main.ts file and the code below to configure our template engine and static files directory.
import { NestFactory } from '@nestjs/core';
import { NestExpressApplication } from '@nestjs/platform-express';
import { join } from 'path';
import { AppModule } from './app.module';

async function bootstrap() {
 const app = await NestFactory.create<NestExpressApplication>(
   AppModule,
 );
 app.useStaticAssets(join(__dirname, '..', '/src/public'));
 app.setBaseViewsDir(join(__dirname, '..', '/src/books/views'));
 app.setViewEngine('ejs');

 await app.listen(3000);
}
bootstrap();
Now, we can create our template files. We'll start with the header.ejs and the footer.ejs, which will be created in the books/views/partials folder. Then will create the books.ejs, and book-detail.ejs file in the books/views folder. Open the header.ejs template and add the code snippet below:
<html lang="en">
  <head>
    <!-- Required meta tags -->
    <meta charset="utf-8" />
    <meta name="viewport" content="width=device-width, initial-scale=1" />

    <!-- Bootstrap CSS -->
    <link
      href="https://cdn.jsdelivr.net/npm/[email protected]/dist/css/bootstrap.min.css"
      rel="stylesheet"
      integrity="sha384-EVSTQN3/azprG1Anm3QDgpJLIm9Nao0Yz1ztcQTwFspd3yD65VohhpuuCOmLASjC"
      crossorigin="anonymous"
    />
    <title>Hello, world!</title>
  </head>
  <body>
    <nav class="navbar navbar-light bg-light">
      <div class="container-fluid">
        <a class="navbar-brand">Book Store</a>
        <% if (page ==="book"){ %>
        <form class="d-flex">
          <input
            class="form-control me-2"
            type="search"
            placeholder="Search"
            aria-label="Search"
          />
          <button class="btn btn-outline-success" type="submit">Search</button>
        </form>
        <button
          type="button"
          class="btn btn-primary"
          data-bs-toggle="modal"
          data-bs-target="#staticBackdrop"
        >
          Add New
        </button>
        <% } %>
      </div>
    </nav>
  </body>
</html>
Our headers template will look the screenshot below:

Then, open the footer.ejs template and reference our javascript file, and the bootstrap CDN with the code snippet below:
<script
src="https://cdn.jsdelivr.net/npm/[email protected]/dist/js/bootstrap.bundle.min.js"
integrity="sha384-MrcW6ZMFYlzcLA8Nl+NtUVF0sA7MsXsP1UyJoMp4YLEuNSfAP+JcXn/tWtIaxVXM"
crossorigin="anonymous"
></script>
<script src="/js/app.js"></script>
</body>
</html>
The views we created in the header.ejs and footer.ejs templates will be included in our books.ejs and book-detail.ejs templates.
Next, our books will have an HTML form modal to add new books to the database, and the list of all the books in our database. In the books template, we'll have an input form to send a request to our backend to save a book to the database. We'll also include the header and footer templates in our books template. Open the books.ejs template and add the code snippet below.
<%- include('partials/header.ejs') %>

<div class="container-fluid mt-3">
 <h4>Book Store</h4>
 <ol class="list-group list-group-numbered">
   <% books.forEach(data=>{ %>

   <li
     class="list-group-item d-flex justify-content-between align-items-start"
   >
     <div class="ms-2 me-auto">
       <div class="fw-bold">
         <a href="book/<%= data.id %>"><%= data.title %></a>
       </div>
     </div>
     <span class="badge bg-primary rounded-pill"><%= data.quantity %></span>
   </li>
   <% }) %>
 </ol>
</div>
<!-- Modal -->
<div
 class="modal fade"
 id="staticBackdrop"
 data-bs-backdrop="static"
 data-bs-keyboard="false"
 tabindex="-1"
 aria-labelledby="staticBackdropLabel"
 aria-hidden="true"
>
 <div class="modal-dialog">
   <div class="modal-content">
     <div class="modal-header">
       <h5 class="modal-title" id="staticBackdropLabel">Add Book</h5>
       <button
         type="button"
         class="btn-close"
         data-bs-dismiss="modal"
         aria-label="Close"
       ></button>
     </div>
     <div class="modal-body">
       <form action="" id="createForm" method="post" action="/movie">
         <div class="mb-3">
           <label for="title" class="form-label">Title</label>
           <input
             required
             type="text"
             class="form-control"
             id="title"
             placeholder="Javascript Cookbook"
             name="title"
           />
         </div>
         <div class="mb-3">
           <label for="author" class="form-label">Author</label>
           <input
             required
             type="text"
             class="form-control"
             id="author"
             name="author"
             placeholder="Nelson Doe"
           />
         </div>
         <div class="mb-3">
           <label for="quantity" class="form-label">Quantity</label>
           <input
             required
             type="number"
             class="form-control"
             id="quantity"
             name="quantity"
             placeholder="40"
           />
         </div>
         <div class="mb-3">
           <label for="description" class="form-label">Description</label>
           <textarea
             class="form-control"
             id="description"
             name="description"
             required
             rows="3"
           ></textarea>
         </div>
         <button type="submit" class="btn btn-primary">Add</button>
       </form>
     </div>
   </div>
 </div>
</div>
<%- include('partials/footer.ejs') %>
The books template will look like the screenshot below:

Next, our book-detail template will also have a html form modal to update a book, and a delete button to delete a book from the database. We'll also include the header, and the footer template in our book-detail template. Then we dynamically display the details of each book in our database.
Add the code snippet below to the book-detail template:
<%- include('partials/header.ejs') %>
<div class="container-fluid">
<table class="table">
<thead>
<tr>
<th scope="col">Item</th>
<th scope="col">Details</th>
<th scope="col">Action</th>
</tr>
</thead>
<tbody>
<tr>
<td>Title</td>
<td colspan="2"><%= book.title %></td>
</tr>
<tr>
<td>Author</td>
<td colspan="2"><%= book.author %></td>
</tr>
<tr>
<td>Quantity</td>
<td colspan="2"><%= book.quantity %></td>
</tr>
<tr>
<td>Description</td>
<td colspan="2"><%= book.description %></td>
</tr>
<tr>
<td colspan="2"></td>
<td>
<button
type="button"
class="btn btn-primary"
data-bs-toggle="modal"
data-bs-target="#update"
>
Update
</button>
<button
type="button"
class="btn btn-danger"
onclick="deleteBook('<%= book.id %>')"
>
Delete
</button>
</td>
</tr>
</tbody>
</table>
<div
class="modal fade"
id="update"
data-bs-backdrop="static"
data-bs-keyboard="false"
tabindex="-1"
aria-labelledby="staticBackdropLabel"
aria-hidden="true"
>
<div class="modal-dialog">
<div class="modal-content">
<div class="modal-header">
<h5 class="modal-title" id="update">Update Book</h5>
<button
type="button"
class="btn-close"
data-bs-dismiss="modal"
aria-label="Close"
></button>
</div>
<div class="modal-body">
<div
class="alert alert-success alert-dismissible fade show"
role="alert"
hidden
>
<strong>Succcess!</strong> Record Updated!.
<button
type="button"
class="btn-close"
data-bs-dismiss="alert"
aria-label="Close"
></button>
</div>
<form action="" id="form">
<div class="mb-3">
<label for="title" class="form-label">Title</label>
<input
type="text"
class="form-control"
id="title"
name="title"
value="<%= book.title %>"
/>
</div>
<div class="mb-3">
<label for="author" class="form-label">Author</label>
<input
type="text"
class="form-control"
id="author"
name="author"
value="<%= book.author %>"
/>
</div>
<div class="mb-3">
<label for="quantity" class="form-label">Quantity</label>
<input
type="text"
class="form-control"
id="quantity"
name="quantity"
value="<%= book.quantity %>"
/>
</div>
<div class="mb-3">
<label for="description" class="form-label">Description</label>
<textarea
class="form-control"
id="description"
name="description"
rows="3"
>
<%= book.description %></textarea
>
</div>
<input type="hidden" class="" name="id" value="<%= book.id %>" />
<button type="submit" class="btn btn-primary">Add</button>
</form>
</div>
</div>
</div>
</div>
</div>
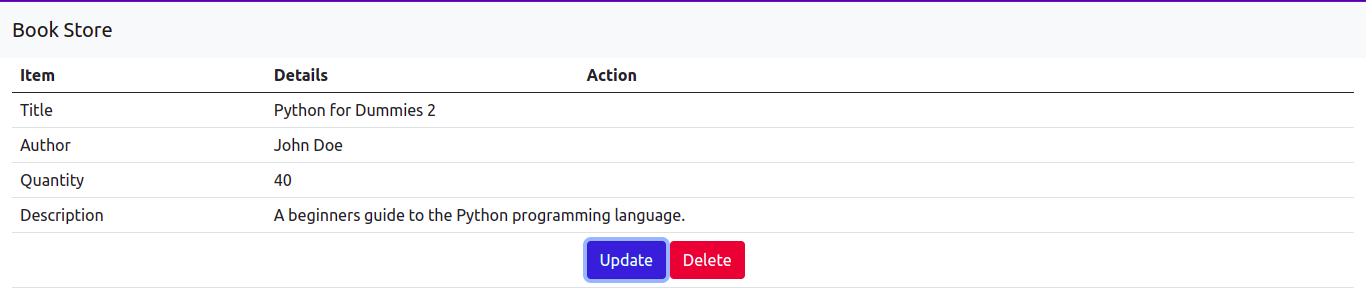
<%- include('partials/footer.ejs') %>Our book-detail template will look like the screenshot below:
Now, let’s create our static files folder to save our static (CSS, JS, and image) files. For this tutorial, we’ll only create a JS folder for our javascript code. So, create a public folder in the src directory, and create js/app.js file in the public folder. Then add the code snippet below to the app.js file.
function updateBook() {
 const createForm = document.getElementById('form');
 createForm.addEventListener('submit', async (e) => {
   e.preventDefault();
   const id = createForm['id'].value;
   await fetch(`http://localhost:3000/book/${id}`, {
     method: 'Put',
     headers: {
       'Content-Type': 'application/json',
     },
     body: JSON.stringify({
       title: createForm['title'].value,
       author: createForm['author'].value,
       quantity: createForm['quantity'].value,
       description: createForm['description'].value,
     }),
   })
     .then((data) => data.json())
     .then((res) => {
       if (res) {
         document.querySelector('.alert').removeAttribute('hidden');
         setTimeout(() => {
           window.location.reload();
         }, 3000);
       }
     });
 });
}

async function deleteBook(id) {
 console.log(id);
 await fetch(`http://localhost:3000/book/${id}`, {
   method: 'DELETE',
 }).then(() => (window.location.href = '/book'));
}

updateBook();
In the above code snippet, we created two functions to update and delete a book from our database. In these functions, we'll use the Fetch API to send a request to our backend endpoint, which we'll create later.
Create Controller
Let's proceed with our controllers. Generate a Nest controller with the command below:
nest generate controller /books/controller/book --flatThe above command will create a controller/book.controller.ts file in the books module folder with some boilerplate code. Open the controller/book.controller.ts file and import the necessary Nest decorators needed for our routes, import our Book model class, and the BookService class, which we'll be creating later. Then create our BookController constructor method and bind our BookService class to make it accessible in other methods.
import { Controller, Render, Get, Post, Put, Delete, Param, Body, Res } from '@nestjs/common';
import { Book } from '../model/book';
import { BookService } from '../service/book.service'

@Controller('book')
export class BookController {
   constructor(private readonly bookService: BookService) {}
...
Next, we'll create our allBook route which will listen to GET request, to render our book template using the @Render decorator with our books list from the database with code snippet below:
…
@Get()
   @Render('book')
   async allBook(): Promise<object> {
       const books = await this.bookService.getAllBook();
       return { books, page: "book" }
   }
…
Next, we’ll create our createBook route. We’ll use the @Body decorator to get the user's input from the request body, and the data from the request body must match the schema of the book. Then, we’ll redirect the user to the same page using the @Res redirect method.
…
@Post()
   async createBook(@Body() book: Book, @Res() res): Promise<any> {
       await this.bookService.createBook(book);
       return res.redirect('/book')
   }
…
Next, we'll create the getBook, updateBook, and deleteBook routes. We'll get the book's id from the request parameters using the @Param decorator, and fetch, update, or delete the record using the id. On the updateBook route, we'll also use the @Body decorator to get the new book details from the request body.
…
@Get(':id')
   @Render('book-detail')
   async getBook(@Param() params): Promise<object> {
       const book = await this.bookService.getBook(params.id)
       return { book, page: "detail" }
   }
   @Put(':id')
   async updateBook(@Param() params, @Body() book: Book): Promise<Book> {
       return this.bookService.updateBook(params.id, book);
   }

   @Delete(':id')
   async deleteBook(@Param() params): Promise<Book> {
       return this.bookService.deleteBook(params.id)
   }
}
Create Service
At this point, our controller is set. Let's set up our app service by running the command below:
nest generate service /books/service/book --flatThe above command will create a service/book.service.ts file in our books module folder. Now let's create our route handler functions in the service file. First, we'll import the following dependencies:
- Injectable: To make our BookService available in other files in our project.
- HttpException: To create custom HTTP Errors
- HttpStatus: To send custom status code
- InjectRepository: To inject our Book model class to our BookService.
We'll also import our book model class. Do this with the code snippet below:
import { Injectable, HttpException, HttpStatus } from '@nestjs/common';
import { InjectRepository } from '@nestjs/typeorm'
import { Repository } from 'typeorm'
import { Book } from '../model/book';
Next, we'll add a constructor method to our BookService class. Inject our Book model with code snippet below:
...
constructor(@InjectRepository(Book) private readonly bookRepository: Repository<Book>) { }
...
Then, we'll create the getAllBooks, and createBooks handler functions. The getAllBooks handler will query the database for all the books in the database and return them in descending order to our controller. While the createBook handler will create a new with the data in the book object using the save method.
…
async getAllBook(): Promise<Book[]> {
       return await this.bookRepository.find({ order: { createdAt: "DESC" } })
   }

   async createBook(book: Book): Promise<Book> {
       return await this.bookRepository.save(book)
   }
…
Last, we’ll create the getBook, updateBook, and deleteBook handlers with code snippet below. These handlers will use the id of the book to get, update or delete a book from our database.
…
async getBook(id: string): Promise<Book> {
       return await this.bookRepository.findOne(id);
   }
   async updateBook(id: string, book: Book): Promise<Book> {
       const updateBook = await this.bookRepository.update(id, book)
       if (!updateBook) {
           throw new HttpException('Book id not found', HttpStatus.NOT_FOUND)
       }
       return await this.bookRepository.findOne(id);
   }
   async deleteBook(id: string): Promise<any> {
       if (await this.bookRepository.delete(id)) {
           return null
       }
       throw new HttpException('Book not found', HttpStatus.NOT_FOUND)
   }
Conclusion
Through this tutorial, you've learned how to structure a NestJS MVC application with a Yugabyte database by building a book store demo project. You've learned what the MVC architecture is, how to set up a NestJS application, and how to set up and create a Yugabyte database. For further reading, you can also read more about NestJS and YugabyteDB. For an extra challenge, you can extend the application by protecting the delete and update routes. What will you build next?
Published at DZone with permission of Ekekenta Odionyenfe. See the original article here.
Opinions expressed by DZone contributors are their own.
Comments