How To Build a Node.js API Proxy Using http-proxy-middleware
Learn how to build a Node.js API proxy to handle incoming requests using the http-proxy-middleware package to route the requests.
Join the DZone community and get the full member experience.
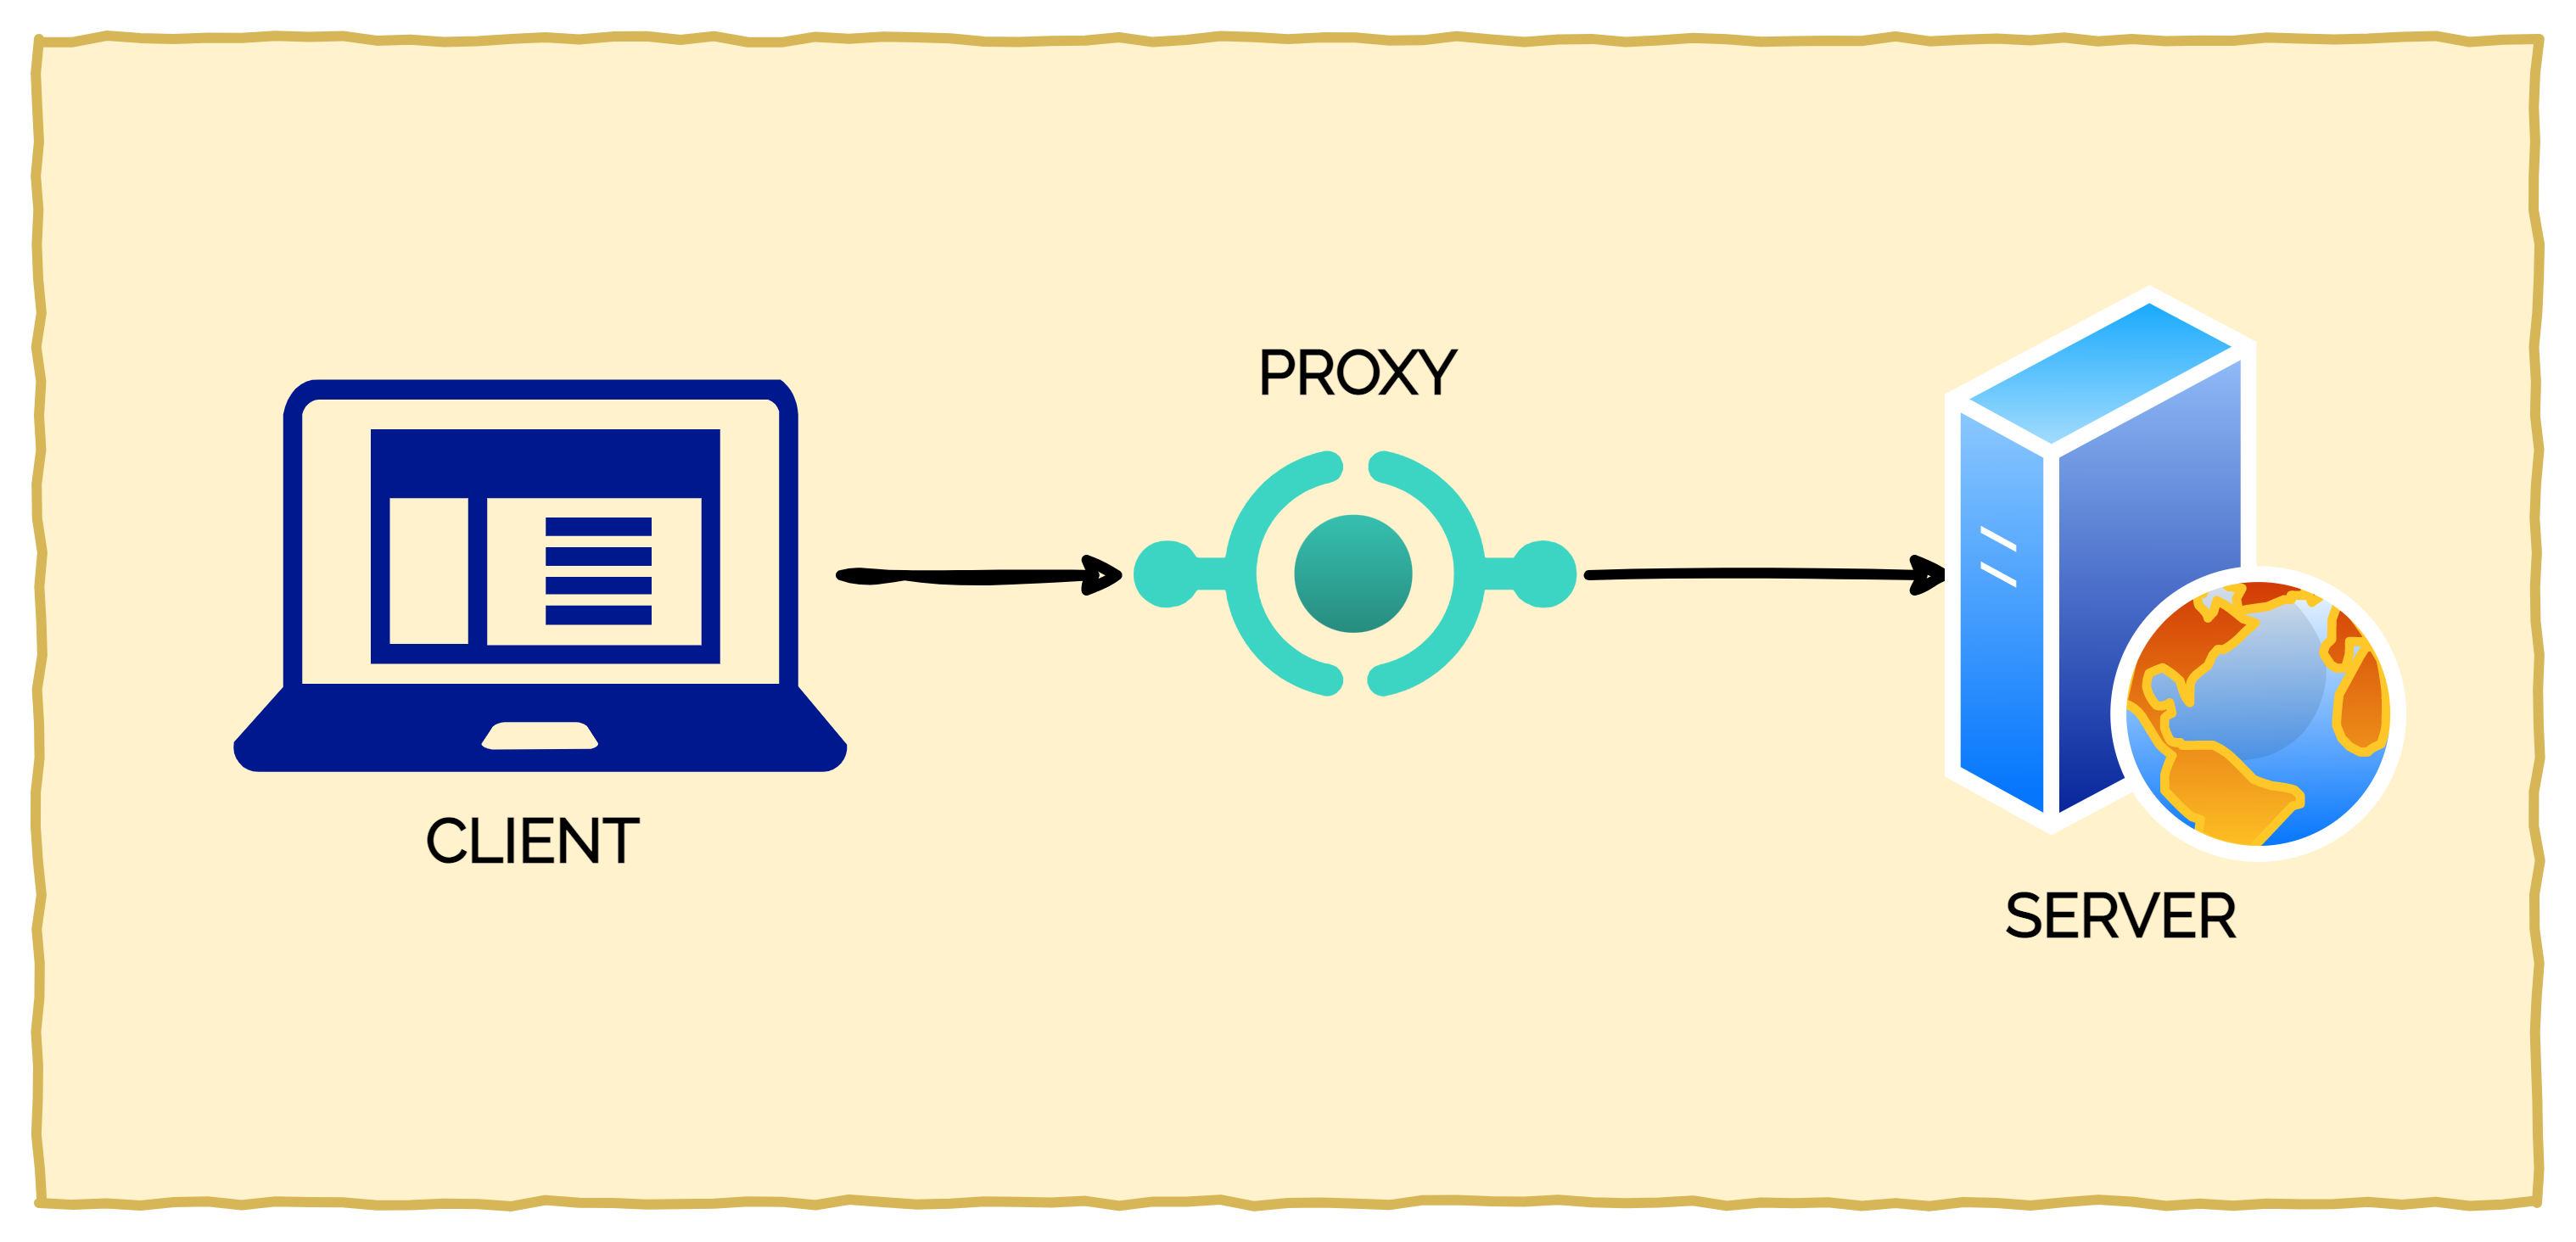
Join For FreeA proxy is something that acts on behalf of something else. Your best friend giving your attendance in the boring lecture you bunked during college is a real-life example of proxying.
When it comes to API development, a proxy is an interface between the client and the API server. The job of the interface is to proxy incoming requests to the real server.
But why might you need an API proxy in the first place?
- It could be possible that the real API server is external to your organization and unstable. A proxy can provide a more stable interface to the client
- The response from the API server might not be compatible with the client’s expectations and you want to modify the response in some form (for example, converting XML to JSON).
- The real API server may be a temporary arrangement and you don’t want the clients to get impacted by any future changes
There are several uses of API proxy depending on the situation.
In this post, you will learn how to build a Node.js API Proxy using the http-proxy-middleware package. Just to make things clear, API Proxy is different from a Forward Proxy.
1. Node.js API Proxy Project Setup
First, you need to initialize the project by executing the below command in a project directory:
$ npm init -y
This will generate a basic package.json file with meta-data information about the project such as name, version, author and scripts.
Next, install a couple of packages for developing the Node.js API proxy.
$ npm install --save express http-proxy-middleware
expressis a minimalistic web framework you can use to build API endpoints.http-proxy-middlewareis a simple Node.js package to create an API proxy
After the package installation, define a start command for the project within the package.json file. You can use this command to start the application.
Your project’s package.json should look similar to the below example.
{
  "name": "express-proxy-demo",
  "version": "1.0.0",
  "description": "Demo Application for Proxy Implementation in Node.js",
  "main": "index.js",
  "scripts": {
    "start": "node index.js"
  },
  "author": "Saurabh Dashora",
  "license": "ISC",
  "dependencies": {
    "express": "^4.18.2",
    "http-proxy-middleware": "^2.0.6"
  }
}
2. Creating a Node.js Proxy Using http-proxy-middleware
Time to create the actual application.
The example application will proxy incoming requests to an API hosted elsewhere. For demonstration purposes, I recommend using the fake APIs hosted at JSONPlaceholder.
See the below illustration:
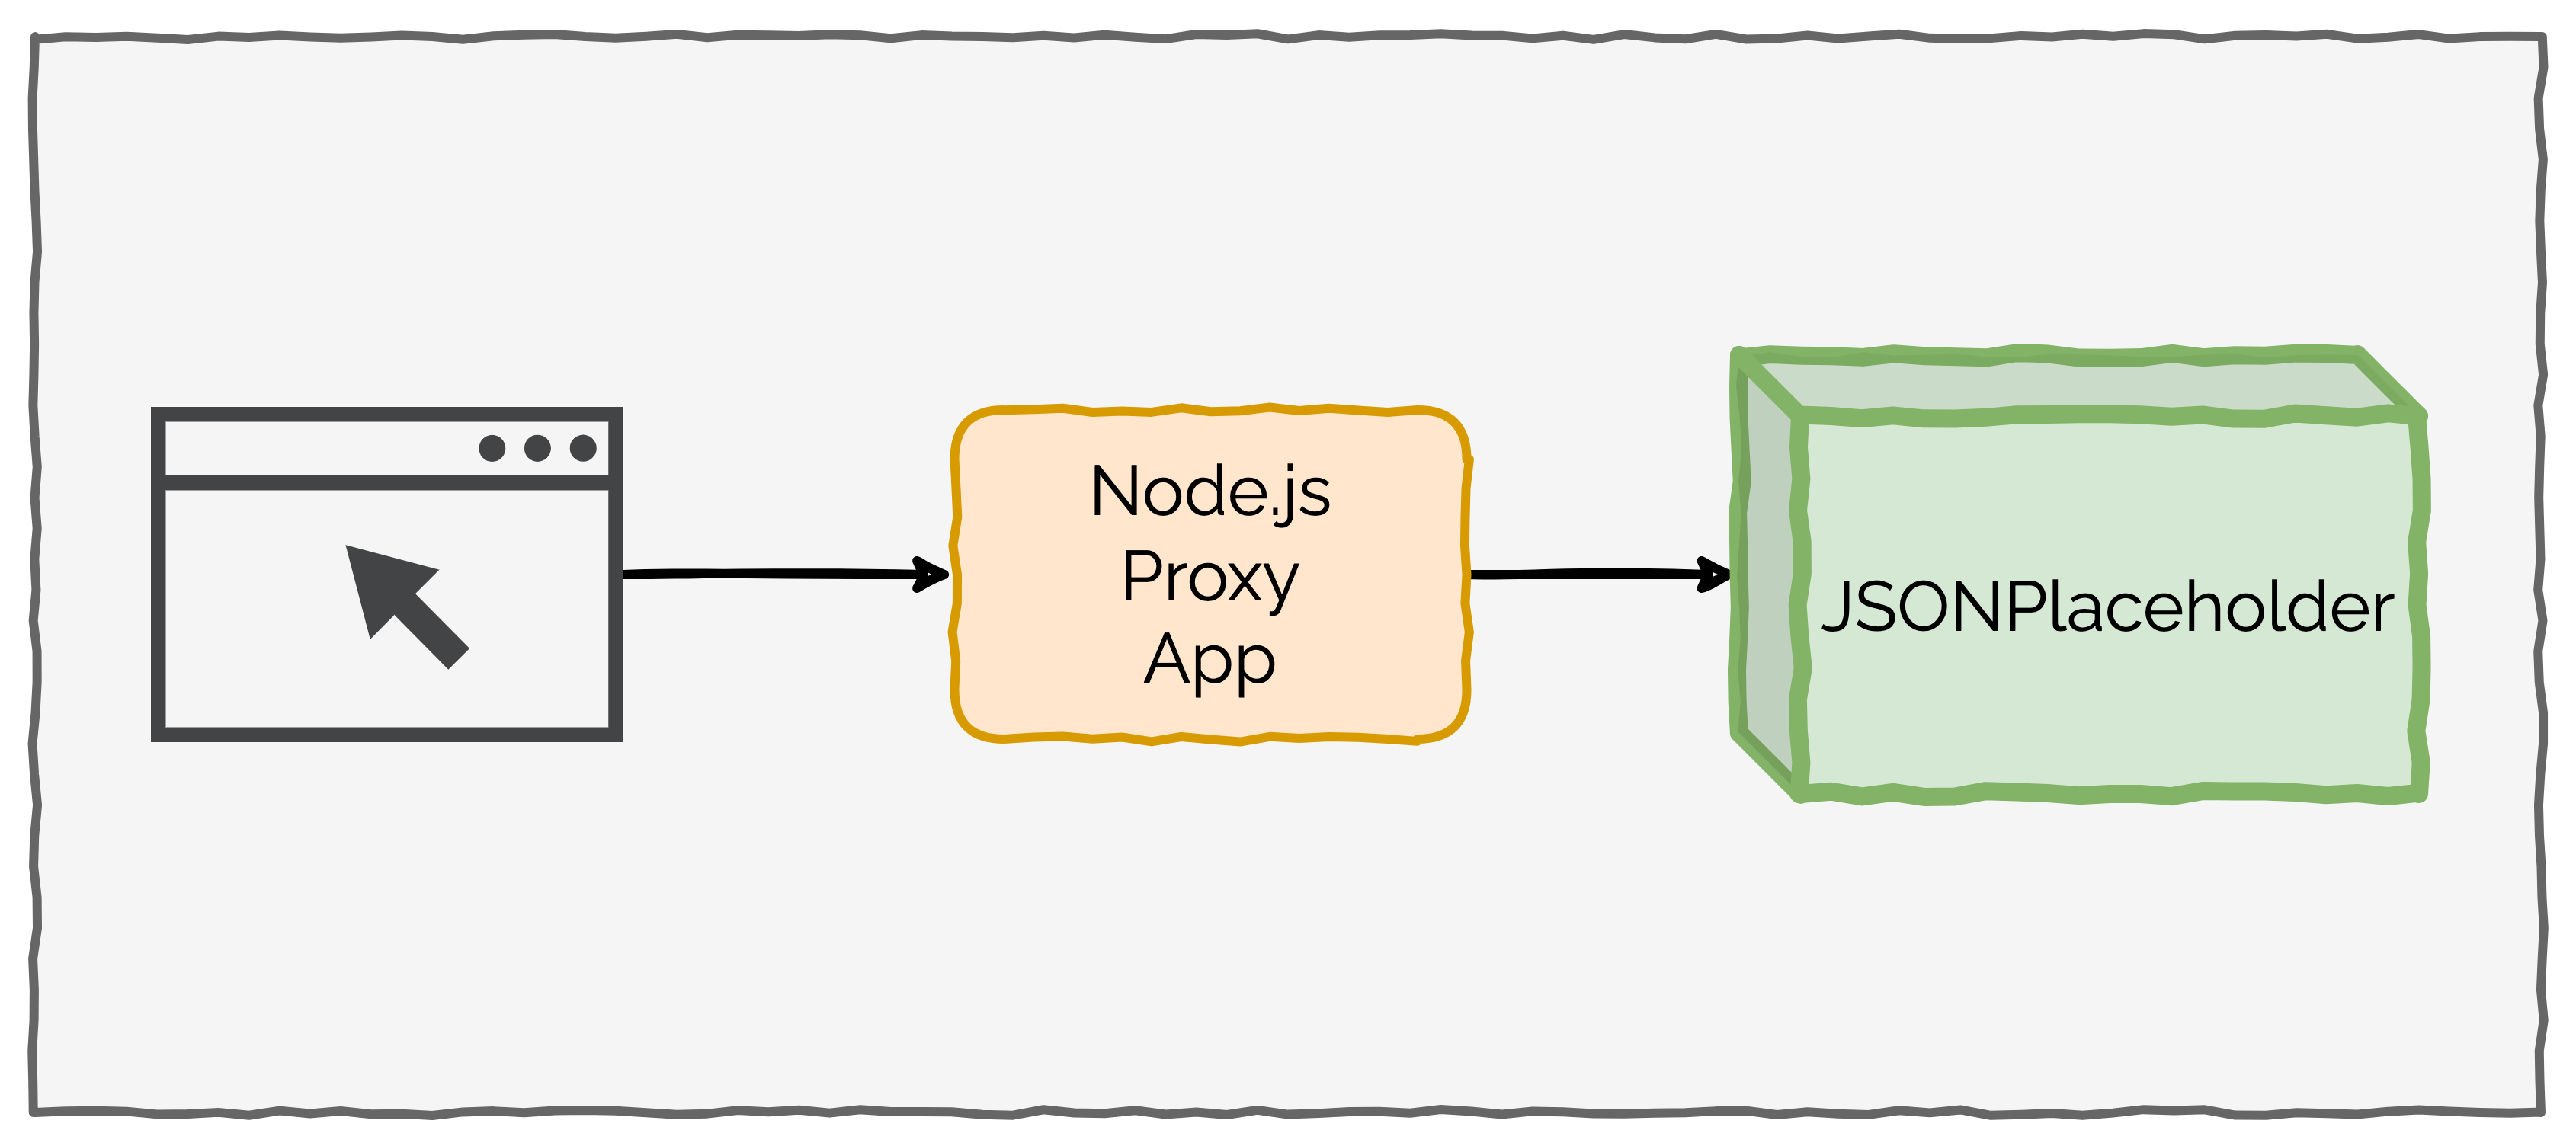
Node.js Proxy Setup
Check the below code from the index.js file that contains the logic for proxying requests.
const express = require('express');
const { createProxyMiddleware } = require('http-proxy-middleware');

const app = express();

const PORT = 3000;
const HOST = "localhost";

const API_URL = "<https://jsonplaceholder.typicode.com>";

app.get("/status", (req, res, next) => {
    res.send('This is a proxy service');
});

const proxyOptions = {
    target: API_URL,
    changeOrigin: true,
    pathRewrite: {
        [`^/api/posts`]: '/posts',
    },
}

const proxy = createProxyMiddleware(proxyOptions);

app.use('/api/posts', proxy)

app.listen(PORT, HOST, () => {
    console.log(`Proxy Started at ${HOST}:${PORT}`)
});
Let’s understand each step in the above program:
Step 1: The first segment of the code contains the import statements for express and http-proxy-middleware.
Step 2: The next statement creates an application instance using the call to express() function followed by declaring a few important constants such as PORT, HOST and API_URL.
Step 3: Implement an endpoint /status to describe the role of the application. This endpoint has nothing to do with proxying requests and provides a way to test our application.
Step 4: Next, declare an object proxyOptions. This is a configuration object for our API proxy. It contains a few important properties
target- It defines the target host where you want to proxy requests. In our case, this is the[<https://jsonplaceholder.typicode.com>](<https://jsonplaceholder.typicode.com>)changeOrigin- This is set to true since we are proxying to a different origin.pathRewrite- This is a very important property where you define the rules for rewriting the path. For example, the expression [^/api/posts]: '/posts' routes all incoming requests direct at/api/poststo just/posts. In other words, this will remove the/apiprefix from the path.
Step 5: After declaring the configuration object, create the proxy object by calling createProxyMiddleware() function with the proxyOptions object as input.
Step 6: Next, create a request handler for the path /api/posts and pass the proxy object as handler for the incoming request.
Step 7: At the very end, start the Node.js API Proxy server to listen on the port and host already declared earlier.
You can start the application using the command npm run start.
> express-proxy-demo@1.0.0 start
> node index.js

[HPM] Proxy created: /  -> <https://jsonplaceholder.typicode.com>
[HPM] Proxy rewrite rule created: "^/api/posts" ~> "/posts"
Proxy Started at localhost:3000
Messages about the proxy setup indicate that the proxy is configured properly. If you visit the URL [<http://localhost:3000/api/posts/1>](<http://localhost:3000/api/posts/1>) in the browser, you will get the response from the JSONPlaceholder APIs as below:
{
  "userId": 1,
  "id": 1,
  "title": "sunt aut facere repellat provident occaecati excepturi optio reprehenderit",
  "body": "quia et suscipit\\nsuscipit recusandae consequuntur expedita et cum\\nreprehenderit molestiae ut ut quas totam\\nnostrum rerum est autem sunt rem eveniet architecto"
}
This means that the Node.js API Proxy is doing its job by proxying requests to the mock APIs hosted by JSONPlaceholder.
3. Node.js API Proxy Context Matching
The http-proxy-middleware uses the path for proxying requests. For example, in the request http://localhost:3000/api/posts?title=test, the section /api/posts is the actual path.
According to the official documentation of the http-proxy-middleware package, there are various ways in which the context matching for the path takes place:
Path Matching
createProxyMiddleware({...})matches all paths. This means all requests will be proxied.createProxyMiddleware('/', {...})also matches all paths.createProxyMiddleware('/api', {...})only matches paths starting with/api.
Multiple Path Matching
createProxyMiddleware(['/api', '/test', '/otherpath'], {...})can be used to match multiple paths to a particular proxy configuration
Wildcard Path Matching
- For more fine grained control, you can also use wildcards to match paths.
createProxyMiddleware('**', {...})matches any path and all requests are proxied.createProxyMiddleware('**/*.html', {...})matches any path which ends with.html.createProxyMiddleware('/api/**/*.html', {...})matches requests ending with.htmlwithin the overall path/api.
- For more fine grained control, you can also use wildcards to match paths.
Custom Path Matching
For even greater control, you can also provide a custom function to match the path for the API Proxy. See below example:
const filter = function (pathname, req) {
  return pathname.match('^/api') && req.method === 'GET';
};

const apiProxy = createProxyMiddleware(filter, {
  target: '<https://jsonplaceholder.typicode.com>',
});
In the above example, only GET requests to the path /api are proxied.
Conclusion
With this post, you have built a very simple version of the Node.js API proxy. You can extend it further based on specific requirements.
The http-proxy-middleware is a simple but powerful library to build a Node.js API Proxy server. The library provides several configurable properties to handle the proxy functionalities. However, there are many more options that you can leverage for your needs.
The code for this demo is available on GitHub.
If you found the post useful, consider sharing it with friends and colleagues. In case of any queries, write them in the comments section below.
Published at DZone with permission of Saurabh Dashora. See the original article here.
Opinions expressed by DZone contributors are their own.
Comments