How to Create a Custom Layout in Android by Extending ViewGroup Class
Learn to create a custom Layout manager class to display a list of tags.
Join the DZone community and get the full member experience.
Join For FreeIntroduction to ViewGroup
A ViewGroup in Android is a special view that can contain other Views. A ViewGroup can contain one or multiple children. All other standard layout managers such as LinearLayout, FrameLayout, and RelativeLayout are specialized sub-classes of ViewGroup class that lay out their child in a specific format. For example, LinearLayout layout its child one adjacent to another either vertically or horizontally.
Sometimes, due to the specific nature of the requirement, the standard layout managers are not enough. You need to extend the ViewGroup class to create your own custom layout manager.
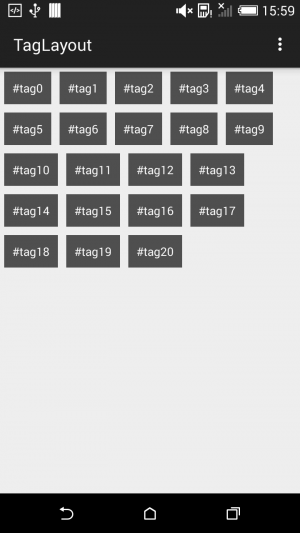
This post will help you to deal with creating a custom Layout manager class TagLayout that will be used to display the list of tags as shown in the following screenshot.
You have to perform the following steps while creating a custom Layout manager.
- Extend your class from
ViewGroupclass. - You must override the
onLayout()method. This method is used to place child views. - Override
onMeasure()method. The onMeasure() method will be used for parents to determine the size of the view group based on calculating the child's view size. - The onMeasure() and onLayout() methods, will contain the logic to organize the child views within the parent layout.
You can measure each of the child view height and width by callinggetMeasuredWidth() and getMeasuredHeight() methods.
Creating Custom ViewGroup
public class TagLayout extends ViewGroup {
    int deviceWidth;

    public TagLayout(Context context) {
        this(context, null, 0);
    }

    public TagLayout(Context context, AttributeSet attrs) {
        this(context, attrs, 0);
    }

    public TagLayout(Context context, AttributeSet attrs, int defStyleAttr) {
        super(context, attrs, defStyleAttr);
        init(context);
    }

    private void init(Context context) {
        final Display display = ((WindowManager) context.getSystemService(Context.WINDOW_SERVICE)).getDefaultDisplay();
        Point deviceDisplay = new Point();
        display.getSize(deviceDisplay);
        deviceWidth = deviceDisplay.x;
    }

    @Override
    protected void onLayout(boolean changed, int l, int t, int r, int b) {
        final int count = getChildCount();
        int curWidth, curHeight, curLeft, curTop, maxHeight;

        //get the available size of child view
        final int childLeft = this.getPaddingLeft();
        final int childTop = this.getPaddingTop();
        final int childRight = this.getMeasuredWidth() - this.getPaddingRight();
        final int childBottom = this.getMeasuredHeight() - this.getPaddingBottom();
        final int childWidth = childRight - childLeft;
        final int childHeight = childBottom - childTop;

        maxHeight = 0;
        curLeft = childLeft;
        curTop = childTop;

        for (int i = 0; i < count; i++) {
            View child = getChildAt(i);

            if (child.getVisibility() == GONE)
                return;

            //Get the maximum size of the child
            child.measure(MeasureSpec.makeMeasureSpec(childWidth, MeasureSpec.AT_MOST), MeasureSpec.makeMeasureSpec(childHeight, MeasureSpec.AT_MOST));
            curWidth = child.getMeasuredWidth();
            curHeight = child.getMeasuredHeight();
            //wrap is reach to the end
            if (curLeft + curWidth >= childRight) {
                curLeft = childLeft;
                curTop += maxHeight;
                maxHeight = 0;
            }
            //do the layout
            child.layout(curLeft, curTop, curLeft + curWidth, curTop + curHeight);
            //store the max height
            if (maxHeight < curHeight)
                maxHeight = curHeight;
            curLeft += curWidth;
        }
    }

    @Override
    protected void onMeasure(int widthMeasureSpec, int heightMeasureSpec) {
        int count = getChildCount();
        // Measurement will ultimately be computing these values.
        int maxHeight = 0;
        int maxWidth = 0;
        int childState = 0;
        int mLeftWidth = 0;
        int rowCount = 0;

        // Iterate through all children, measuring them and computing our dimensions
        // from their size.
        for (int i = 0; i < count; i++) {
            final View child = getChildAt(i);

            if (child.getVisibility() == GONE)
                continue;

            // Measure the child.
            measureChild(child, widthMeasureSpec, heightMeasureSpec);
            maxWidth += Math.max(maxWidth, child.getMeasuredWidth());
            mLeftWidth += child.getMeasuredWidth();

            if ((mLeftWidth / deviceWidth) > rowCount) {
                maxHeight += child.getMeasuredHeight();
                rowCount++;
            } else {
                maxHeight = Math.max(maxHeight, child.getMeasuredHeight());
            }
            childState = combineMeasuredStates(childState, child.getMeasuredState());
        }

        // Check against our minimum height and width
        maxHeight = Math.max(maxHeight, getSuggestedMinimumHeight());
        maxWidth = Math.max(maxWidth, getSuggestedMinimumWidth());

        // Report our final dimensions.
        setMeasuredDimension(resolveSizeAndState(maxWidth, widthMeasureSpec, childState),
                resolveSizeAndState(maxHeight, heightMeasureSpec, childState << MEASURED_HEIGHT_STATE_SHIFT));
    }
}
Add Custom ViewGroup on Activity Layout
Now that we are ready with the view group, let us add it to the activity layout.
<RelativeLayout xmlns:android="http://schemas.android.com/apk/res/android"
    android:layout_width="match_parent"
    android:layout_height="match_parent">

    <com.javatechig.taglayout.TagLayout
        android:id="@+id/tagLayout"
        android:layout_width="wrap_content"
        android:layout_height="wrap_content"
        android:background="#ffff00"/>

</RelativeLayout>
Define Child View Layout
You may have noticed from the layout above, we will create a custom layout for the view group child. In this case the tagged item.
<?xml version="1.0" encoding="utf-8"?>
<LinearLayout xmlns:android="http://schemas.android.com/apk/res/android"
    android:layout_width="wrap_content"
    android:layout_height="wrap_content">

    <TextView
        android:id="@+id/tagTextView"
        android:layout_width="wrap_content"
        android:layout_height="wrap_content"
        android:layout_margin="5dp"
        android:background="#a000"
        android:padding="10dp"
        android:textColor="#fff" />

</LinearLayout>
Adding Child View to Custom ViewGroup
Here is what it goes in my activity. For the sake of simplicity, I am inflating 20 child views from inside for loop. You may have some complex logic to get the data from some other source.
import android.support.v7.app.AppCompatActivity;
import android.os.Bundle;
import android.view.LayoutInflater;
import android.view.View;
import android.widget.TextView;

public class MainActivity extends AppCompatActivity {

    @Override
    protected void onCreate(Bundle savedInstanceState) {
        super.onCreate(savedInstanceState);
        setContentView(R.layout.activity_main);

        TagLayout tagLayout = (TagLayout) findViewById(R.id.tagLayout);
        LayoutInflater layoutInflater = getLayoutInflater();
        String tag;
        for (int i = 0; i <= 20; i++) {
            tag = "#tag" + i;
            View tagView = layoutInflater.inflate(R.layout.tag_layout, null, false);

            TextView tagTextView = (TextView) tagView.findViewById(R.id.tagTextView);
            tagTextView.setText(tag);
            tagLayout.addView(tagView);
        }
    }
}Published at DZone with permission of Nilanchala Panigrahy. See the original article here.
Opinions expressed by DZone contributors are their own.
Comments