How To Develop a Cross-Platform Barcode Reader Application by Hybridizing .NET MAUI and Blazor
This article demonstrates how to create a cross-platform barcode reader application with Dynamsoft Barcode Reader, .NET MAUI, and Blazor.
Join the DZone community and get the full member experience.
Join For Free.NET Multi-platform App UI (MAUI) is a cross-platform UI framework for building native and modern applications in C#. It allows developers to create a single codebase for multiple platforms. Blazor is a web UI framework for building interactive client-side web applications with .NET. It allows developers to write C# code that runs in the browser through the use of WebAssembly. When used together, .NET MAUI and Blazor provide a powerful combination for building cross-platform applications that can run on multiple platforms, including desktop, web, and mobile. In this article, we will demonstrate how to create a Blazor Hybrid app with Dynamsoft Barcode SDK. The app will be able to scan linear and two-dimensional barcodes on Windows, macOS, iOS, and Android.
Prerequisites
Getting Started With Blazor WebAssembly
Since Blazor UI components can be shared between Blazor WebAssembly and .NET MAUI Blazor projects, we will start by creating a Blazor WebAssembly project. To do this, open Visual Studio 2022 and create a new Blazor WebAssembly App project.
To save time on writing the code for web barcode reader and scanner, we will utilize the repository. This repository features examples that have been built using Dynamsoft JavaScript Barcode SDK.
The steps to integrate the JavaScript Barcode SDK into the Blazor WebAssembly project are as follows:
Create two Razor components in the Pages folder: Reader.razor and Scanner.razor.
- Copy the HTML5 UI code from the examples to the Razor components.
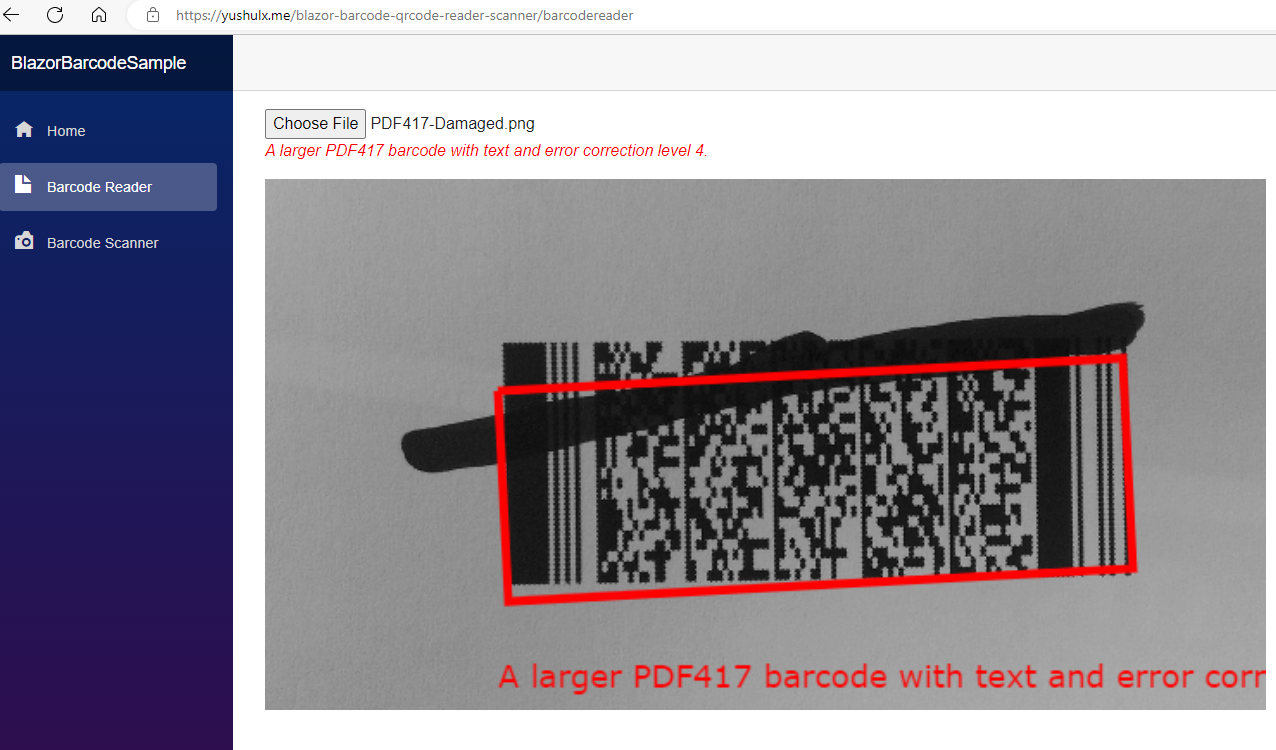
- Reader.razor: Load an image file via the InputFile component and display the image in the img element. The canvas element is used to draw the barcode location and the barcode text. The element is used to display the barcode text.
C#
@page "/barcodereader" @inject IJSRuntime JSRuntime <InputFile OnChange="LoadImage" /> <p class="p-result">@result</p> <div id="imageview"> <img id="image" /> <canvas id="overlay"></canvas> </div> @code { String result = ""; private DotNetObjectReference objRef; private async Task LoadImage(InputFileChangeEventArgs e) { result = ""; var imageFile = e.File; var jsImageStream = imageFile.OpenReadStream(1024 * 1024 * 20); var dotnetImageStream = new DotNetStreamReference(jsImageStream); await JSRuntime.InvokeAsync("jsFunctions.setImageUsingStreaming", objRef, "overlay", "image", dotnetImageStream); } protected override void OnInitialized() { objRef = DotNetObjectReference.Create(this); } [JSInvokable] public void ReturnBarcodeResultsAsync(String text) { result = text; StateHasChanged(); } public void Dispose() { objRef?.Dispose(); } } - Scanner.razor: The select element is used to select the video source. The div element is used to display the video stream. The canvaselement is used to draw the barcode location and the barcode text.
C#
@page "/barcodescanner"

@inject IJSRuntime JSRuntime


<div class="select">
    <label for="videoSource">Video source: </label>    <select id="videoSource"></select>
</div>

<div id="videoview">    <div class="dce-video-container" id="videoContainer"></div>
    <canvas id="overlay"></canvas>
</div>

@code {
    String result = "";
    private DotNetObjectReference objRef;

    protected override async Task OnAfterRenderAsync(bool firstRender)
    {
        if (firstRender)
        {
            objRef = DotNetObjectReference.Create(this);
            await JSRuntime.InvokeAsync("jsFunctions.initScanner", objRef, "videoContainer", "videoSource", "overlay");
        }
    }


    [JSInvokable]
    public void ReturnBarcodeResultsAsync(String text)
    {
        result = text;
        StateHasChanged();
    }

    public void Dispose()
    {
        objRef?.Dispose();
    }
}
- Reader.razor: Load an image file via the InputFile component and display the image in the img element. The canvas element is used to draw the barcode location and the barcode text. The element is used to display the barcode text.
- Copy the JavaScript code from the examples to the wwwroot/jsInterop.jsfile.
JavaScript
window.jsFunctions = {
     setImageUsingStreaming: async function setImageUsingStreaming(dotnetRef, overlayId, imageId, imageStream) {
         const arrayBuffer = await imageStream.arrayBuffer();
         const blob = new Blob([arrayBuffer]);
         const url = URL.createObjectURL(blob);
         document.getElementById(imageId).src = url;
         document.getElementById(imageId).style.display = 'block';
         initOverlay(document.getElementById(overlayId));
         if (reader) {
             reader.maxCvsSideLength = 9999
             decodeImage(dotnetRef, url, blob);
         }

     },
     initSDK: async function () {
         if (reader != null) {
             return true;
         }
         let result = true;
         try {
             reader = await Dynamsoft.DBR.BarcodeReader.createInstance();
             await reader.updateRuntimeSettings("balance");
         } catch (e) {
             console.log(e);
             result = false;
         }
         return result;
     },
     initScanner: async function(dotnetRef, videoId, selectId, overlayId) {
         let canvas = document.getElementById(overlayId);
         initOverlay(canvas);
         videoSelect = document.getElementById(selectId);
         videoSelect.onchange = openCamera;
         dotnetHelper = dotnetRef;

         try {
             scanner = await Dynamsoft.DBR.BarcodeScanner.createInstance();
             await scanner.setUIElement(document.getElementById(videoId));
             await scanner.updateRuntimeSettings("speed");

             let cameras = await scanner.getAllCameras();
             listCameras(cameras);
             await openCamera();
             scanner.onFrameRead = results => {
                 showResults(results);
             };
             scanner.onUnduplicatedRead = (txt, result) => { };
             scanner.onPlayed = function () {
                 updateResolution();
             }
             await scanner.show();

         } catch (e) {
             console.log(e);
             result = false;
         }
         return true;
     },
 };
These JavaScript functions can be called from the Razor components. The
dotnetRefparameter is used to call .NET methods in the Razor component. - In the
index.htmlfile, add the following code to load the Dynamsoft JavaScript Barcode SDK and the jsInterop.jsfile.HTML<script data-fr-src="https://cdn.jsdelivr.net/npm/[email protected]/dist/dbr.js"></script> <script data-fr-src="jsInterop.js"></script> Afterward, you can run the Blazor Web Barcode Reader application.
![run the Blazor Web Barcode Reader application]()
To deploy the project to GitHub Pages, you can use the following workflow file:
YAMLname: blazorwasm on: push: branches: [ master ] pull_request: branches: [ master ] workflow_dispatch: jobs: build: runs-on: ubuntu-latest steps: - uses: actions/checkout@v3 - name: Setup .NET Core SDK uses: actions/setup-dotnet@v2 with: dotnet-version: '6.0.x' include-prerelease: true - name: Publish .NET Core Project run: dotnet publish BlazorBarcodeSample.csproj -c Release -o release --nologo - name: Change base-tag in index.html from / to blazor-barcode-qrcode-reader-scanner run: sed -i 's///g' release/wwwroot/index.html - name: copy index.html to 404.html run: cp release/wwwroot/index.html release/wwwroot/404.html - name: Add .nojekyll file run: touch release/wwwroot/.nojekyll - name: Commit wwwroot to GitHub Pages uses: JamesIves/[email protected] with: GITHUB_TOKEN: $ BRANCH: gh-pages FOLDER: release/wwwrootPlease modify
BlazorBarcodeSample.csprojandblazor-barcode-qrcode-reader-scanneraccording to your project and repository names.
Migrating Blazor WebAssembly to .NET MAUI Blazor
To create a new .NET MAUI Blazor project, follow these steps:
- Compare the project structure of .NET MAUI Blazor with that of Blazor WebAssembly to understand the similarities.
- Copy the
wwwrootandPagesfolders from the Blazor WebAssembly project to the new .NET MAUI Blazor project to get it up and running quickly.
It’s important to note that, unlike web apps, .NET MAUI Blazor apps are native apps that are sandboxed and require user permission to access the camera. Therefore, you must add the following C# code to the Scanner.razor file to request permission to access the camera.
protected override async Task OnAfterRenderAsync(bool firstRender)
{
    if (firstRender)
    {
        var status = await Permissions.CheckStatusAsync();
        if (status == PermissionStatus.Granted)
        {
            isGranted = true;
        }
        else
        {
            status = await Permissions.RequestAsync();
            if (status == PermissionStatus.Granted)
            {
                isGranted = true;
            }
        }

        if (isGranted)
        {
            StateHasChanged();
            objRef = DotNetObjectReference.Create(this);
            await JSRuntime.InvokeAsync("jsFunctions.initScanner", objRef, "videoContainer", "videoSource", "overlay");
        }
    }
}
The next step is to address certain platform-specific considerations. As we work with Windows, Android, iOS, and macOS, it’s important to note that each may exhibit distinct behaviors.
Request Camera Permissions in .NET MAUI Blazor
Windows
No additional work is required.
Android
- Create a custom
WebChromeClientclass in thePlatforms/Android/MyWebChromeClient.csfile:C#using Android.Content; using Android.Webkit; namespace BarcodeScanner.Platforms.Android { public class MyWebChromeClient : WebChromeClient { private MainActivity _activity; public MyWebChromeClient(Context context) { _activity = context as MainActivity; } public override void OnPermissionRequest(PermissionRequest request) { try { request.Grant(request.GetResources()); base.OnPermissionRequest(request); } catch (Exception ex) { Console.WriteLine(ex); } } public override bool OnShowFileChooser(global::Android.Webkit.WebView webView, IValueCallback filePathCallback, FileChooserParams fileChooserParams) { base.OnShowFileChooser(webView, filePathCallback, fileChooserParams); return _activity.ChooseFile(filePathCallback, fileChooserParams.CreateIntent(), fileChooserParams.Title); } } }You must override the
OnPermissionRequestandOnShowFileChoosermethods. TheOnPermissionRequestmethod is used to grant the camera access permission. TheOnShowFileChoosermethod is used to start an activity to select a file. - In the
MainActivity.csfile, add the following code to receive the returned image file and trigger the callback method:C#public class MainActivity : MauiAppCompatActivity { private IValueCallback _filePathCallback; private int _requestCode = 100; protected override void OnActivityResult(int requestCode, Result resultCode, Intent data) { if (_requestCode == requestCode) { if (_filePathCallback == null) return; Java.Lang.Object result = FileChooserParams.ParseResult((int)resultCode, data); _filePathCallback.OnReceiveValue(result); } } public bool ChooseFile(IValueCallback filePathCallback, Intent intent, string title) { _filePathCallback = filePathCallback; StartActivityForResult(Intent.CreateChooser(intent, title), _requestCode); return true; } } Create a
MauiBlazorWebViewHandler.csfile to set the custom web view:C#namespace BarcodeScanner.Platforms.Android { public class MauiBlazorWebViewHandler : BlazorWebViewHandler { protected override global::Android.Webkit.WebView CreatePlatformView() { var view = base.CreatePlatformView(); view.SetWebChromeClient(new MyWebChromeClient(this.Context)); return view; } } }- Register the
MauiBlazorWebViewHandlerin theMauiProgram.csfile:C#using BarcodeScanner.Platforms.Android; #endif namespace BarcodeScanner; public static class MauiProgram { public static MauiApp CreateMauiApp() { var builder = MauiApp.CreateBuilder(); builder .UseMauiApp() .ConfigureFonts(fonts => { fonts.AddFont("OpenSans-Regular.ttf", "OpenSansRegular"); }).ConfigureMauiHandlers(handlers => { #if ANDROID handlers.AddHandler(); #endif }); builder.Services.AddMauiBlazorWebView(); #if DEBUG builder.Services.AddBlazorWebViewDeveloperTools(); #endif return builder.Build(); } }
iOS
- Name the
BlazorWebViewtowebView:XML<?xml version="1.0" encoding="utf-8" ?> <ContentPage xmlns="http://schemas.microsoft.com/dotnet/2021/maui" xmlns:x="http://schemas.microsoft.com/winfx/2009/xaml" xmlns:local="clr-namespace:BarcodeScanner" x:Class="BarcodeScanner.WebContentPage" Title="WebContentPage" BackgroundColor="{DynamicResource PageBackgroundColor}"> <BlazorWebView x:Name="webView" HostPage="wwwroot/index.html"> <BlazorWebView.RootComponents> <RootComponent Selector="#app" ComponentType="{x:Type local:WebContent}" /> </BlazorWebView.RootComponents> </BlazorWebView> </ContentPage> - Configure
WKWebViewproperties in the corresponding C# file:C#public partial class WebContentPage : ContentPage { public WebContentPage() { InitializeComponent(); webView.BlazorWebViewInitializing += WebView_BlazorWebViewInitializing; } private void WebView_BlazorWebViewInitializing(object sender, BlazorWebViewInitializingEventArgs e) { #if IOS || MACCATALYST e.Configuration.AllowsInlineMediaPlayback = true; e.Configuration.MediaTypesRequiringUserActionForPlayback = WebKit.WKAudiovisualMediaTypes.None; #endif } }
macOS
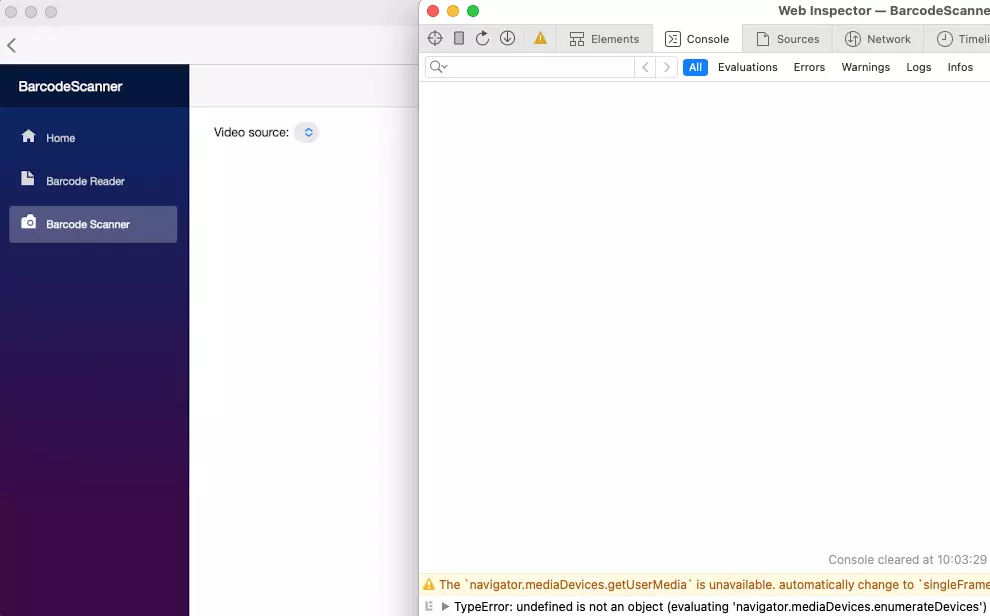
As of now, accessing the camera is not possible in the .NET MAUI Blazor app on macOS due to the lack of support for getUserMedia() in WKWebView.
Creating a Hybrid Barcode Scanner App With .NET and Web Barcode SDK
We have successfully developed a cross-platform barcode scanner app using .NET MAUI Blazor. However, the barcode scanning logic is implemented in JavaScript, which may have an impact on performance. In order to optimize performance, it is recommended to use a .NET native barcode SDK unless there are specific features that are not supported by the SDK, such as camera stream APIs for image-processing scenarios.
For Windows .NET MAUI apps, decoding barcodes from image files can be done using a MAUI content page, while decoding barcodes from camera streams can be achieved using a Blazor webview.
Here are the steps to create a hybrid barcode scanner app:
Get the existing .NET MAUI example project here. The project supports decoding barcodes from image files and camera streams using BarcodeQRCodeSDK, which is a .NET native barcode SDK. The project cannot scan barcodes from camera streams on Windows due to the lack of .NET MAUI camera APIs.
Modify the
*.csprojfile by comparing .NET MAUI Blazor project:XML- <Project Sdk="Microsoft.NET.Sdk"> + <Project Sdk="Microsoft.NET.Sdk.Razor"> + <EnableDefaultCssItems>false</EnableDefaultCssItems>- Change the
MauiProgram.csfile to addBlazorWebViewsupport:C#using Microsoft.Maui.Controls.Compatibility.Hosting; using SkiaSharp.Views.Maui.Controls.Hosting; using Microsoft.AspNetCore.Components.WebView.Maui; namespace BarcodeQrScanner; public static class MauiProgram { public static MauiApp CreateMauiApp() { var builder = MauiApp.CreateBuilder(); builder.UseSkiaSharp() .UseMauiApp() .ConfigureFonts(fonts => { fonts.AddFont("OpenSans-Regular.ttf", "OpenSansRegular"); fonts.AddFont("OpenSans-Semibold.ttf", "OpenSansSemibold"); }).UseMauiCompatibility() .ConfigureMauiHandlers((handlers) => { #if ANDROID handlers.AddCompatibilityRenderer(typeof(CameraPreview), typeof(BarcodeQrScanner.Platforms.Android.CameraPreviewRenderer)); #endif #if IOS handlers.AddHandler(typeof(CameraPreview), typeof(BarcodeQrScanner.Platforms.iOS.CameraPreviewRenderer)); #endif }); builder.Services.AddMauiBlazorWebView(); #if DEBUG builder.Services.AddBlazorWebViewDeveloperTools(); #endif return builder.Build(); } } - Copy
wwwroot,Pages,Sharedfolders from the .NET MAUI Blazor project to the .NET MAUI project. - In your .NET MAUI Blazor project, rename
Main.razortoWebContent.razorand update the code:XML<Router AppAssembly="@typeof(WebContent).Assembly"> <Found Context="routeData"> <RouteView RouteData="@routeData" DefaultLayout="@typeof(MainLayout)" /> <FocusOnNavigate RouteData="@routeData" Selector="h1" /> </Found> <NotFound> <LayoutView Layout="@typeof(MainLayout)"> <p role="alert">Sorry, there's nothing at this address.</p> </LayoutView> </NotFound> </Router>Rename
MainPage.xamltoWebContentPage.xamland update the code:XML<?xml version="1.0" encoding="utf-8" ?> <ContentPage xmlns="http://schemas.microsoft.com/dotnet/2021/maui" xmlns:x="http://schemas.microsoft.com/winfx/2009/xaml" xmlns:local="clr-namespace:BarcodeQrScanner" x:Class="BarcodeQrScanner.WebContentPage" Title="WebContentPage" BackgroundColor="{DynamicResource PageBackgroundColor}"> <BlazorWebView x:Name="webView" HostPage="wwwroot/index.html"> <BlazorWebView.RootComponents> <RootComponent Selector="#app" ComponentType="{x:Type local:WebContent}" /> </BlazorWebView.RootComponents> </BlazorWebView> </ContentPage> - Copy
WebContent.razor,WebContentPage.xaml, andWebContentPage.xaml.csto the .NET MAUI project. - In the
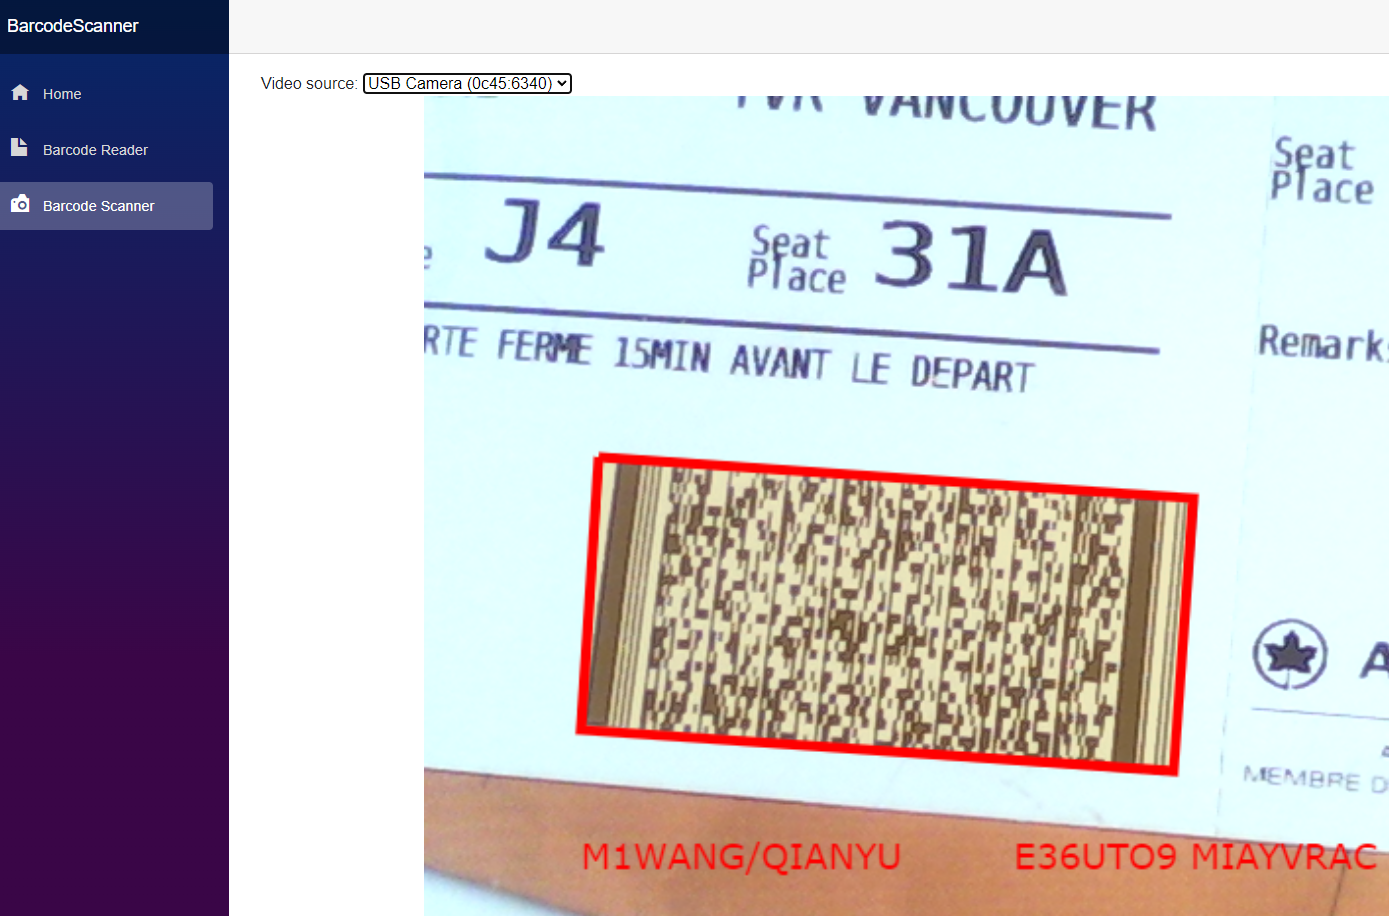
MainPage.xaml.csfile, add the following code to navigate to theWebContentPage:C#async void OnTakeVideoButtonClicked(object sender, EventArgs e) { if (DeviceInfo.Current.Platform == DevicePlatform.WinUI || DeviceInfo.Current.Platform == DevicePlatform.MacCatalyst) { await Navigation.PushAsync(new WebContentPage()); return; } var status = await Permissions.CheckStatusAsync(); if (status == PermissionStatus.Granted) { await Navigation.PushAsync(new CameraPage()); } else { status = await Permissions.RequestAsync(); if (status == PermissionStatus.Granted) { await Navigation.PushAsync(new CameraPage()); } else { await DisplayAlert("Permission needed", "I will need Camera permission for this action", "Ok"); } } } Now the Windows .NET MAUI app can decode barcodes from image files and camera streams using .NET and web APIs, respectively.
![Now the Windows .NET MAUI app can decode barcodes from image files and camera streams using .NET and web APIs, respectively]()
Source Code
Published at DZone with permission of Xiao Ling. See the original article here.
Opinions expressed by DZone contributors are their own.
Comments