How to Implement Geolocation Features in Apache Server
This article will guide you on how to add geolocation features in Apache Server and get to know the geolocation of your visitor.
Join the DZone community and get the full member experience.
Join For FreeGeolocation, a technology is allowing you to find out where your visitor’s location by using an IP address, is a ubiquitous solution that has been used in many industries. For example, if you are using Google Analytics or Matomo to track your visitors, you are using the geolocation solution. If you embed a cool widget to automatically fill the country or region information, you are using the geolocation solution. To name a few.
There are many reasons to implement geolocation, such as to better serve your audiences, to tailor make a better browsing experience, to monitor the buying pattern, to combat fraud, and so on. In this article, I’m going to show you how to implement the geolocation features in an Apache server and touch base on some usage scenarios. Here, I will use the IP2Location geolocation library for Apache, PHP programming language, and Debian OS.
The Web Server Modules
Web server is the software to handle the HTTP/HTTPS requests so that the visitor can view and access your websites. This would be the first layer of processing before the request is sent over to your PHP program for further processing. This is also a logically good place to place your control or logic, such as to redirect, block, or deliver a response back to the caller. For example, to block the users coming from a specific country that you do not have the business present or services or to redirect the Korean viewers to your Korean-translated pages.
Prerequisite
In this tutorial, I will use Apache 2.4.54 in Debian 11 for the explanation. And I will assume you have this environment set up to follow the below sequences.
Also, please make sure you have the unzip and wget packages installed.
The Apache
In order to use the geolocation feature in the Apache environment, you will need to build and install the module into the Apache server. You will need to install the development tools, which are different from your standard Apache installation, to build the module. You can run the below command to set up the development environment.
sudo apt install apache2-devThe IP2Location Apache Module
The IP2Location Apache module is built using IP2Location C Library. Before you can build the module, you will need to download and install the C library. I will create a folder called ip2location for this building process.
mkdir ip2location && cd ip2locationInside the ip2location folder, we will download the IP2Location C library by running the below command.
wget  https://github.com/chrislim2888/IP2Location-C-Library/archive/master.zip
unzip master.zip && rm master.zip
Besides we will also download the IP2Location Apache module by running the below command:
wget https://github.com/ip2location/ip2location-apache/archive/refs/heads/master.zip
unzip master.zip && rm master.zip
You should see both the IP2Location-C-Library-master and ip2location-apache-master inside the ip2location folder.

Next, we are going to build and install the IP2Location C library. Execute the below commands:
cd IP2Locatoin-C-Library-master
autorecof -i -v --force
./configure
make
make install
You should see the below screenshot if the commands are running successfully.
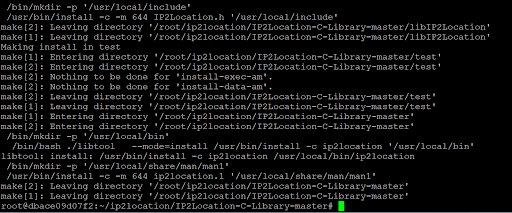
Please execute the ldconfig command to reload the shared library in Debian.
Then, go into the ip2location-apache-master folder.
cd ../ip2location-apache-master/Build the IP2Location Apache module by running the below command:
apxs2 -i -a -L ../IP2Location-C-Library-master/libIP2Location/ -I ../IP2Location-C-Library-master/libIP2Location/ -l IP2Location -c mod_ip2location.cYou should see the below screen if the module was built successfully.

Restart the Apache server to activate the module.
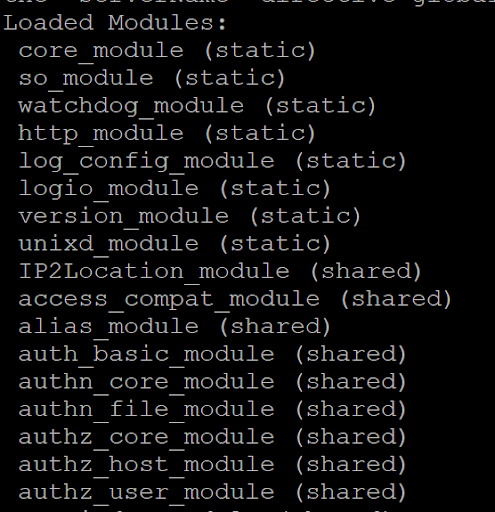
service apache2 restartThen, run the following command to confirm if the module has been enabled inside Apache Server.
apache2ctl -MIf the above procedures were done correctly, you should see the IP2Location_module (shared) entry as shown in the following screenshot.
Now, we have the module ready. Let’s explore how to use the module.
Redirect Users to a Specific URL
You can redirect the users to a specific URL at the Apache server before the request routes to your PHP page. Why do we want to do so? It’s because this approach could give you a faster response time and low CPU usage, as the request does not need to be sent to PHP for extra processing. In this example, I will show you how to do so using the .htaccess file.
First of all, you must enable the rewrite module that allows you to perform the rewrite operation to the incoming URL. Run the following command to enable the rewrite module (It comes with Apache server installation. Therefore, no additional installation would be necessary.)
a2enmod rewriteThen, restart your Apache Server to activate the changes. Once restart, run the below commands to make sure the rewrite module has been enabled.
apachectl -M
Then, we need to add the IP2Location Apache configuration into the apache2.conf file. You can locate the file at the /etc/apache2 folder. Please add the following lines into the apache2.conf file.
<IfModule mod_ip2location.c>
IP2LocationEnable ON
IP2LocationDetectProxy OFF
IP2LocationSetmode ALL
IP2LocationDBFile \var\www\html\DB1.BIN
</IfModule>
You may refer to the information in GitHub to learn more about the settings. In this tutorial, you just need to paste the above and make sure the IP2LocationDBFile was pointed to where you downloaded the BIN data file. You may download it from lite if you do not have one.
Inside the apache2.conf file, please ensure that the AllowOverride is set to All to allow the rewrite action. The settings inside the .htacess file:
<Directory /var/www/>
  Options Indexes FollowSymLinks
  AllowOverride All
  Require all denied
</Directory>
You can now go to /var/www/HTML (the root directory of your domain) and create the .htaccess file and enter the following:
RewriteEngine On
RewriteCond %{ENV:IP2LOCATION_COUNTRY_SHORT} ^US$
RewriteRule ^(.*)$ https://www.google.com [L]
The above will redirect the traffic coming from the United States to Google.
Instead, if you would like to block the visitors by returning a 404 page, you can do so as the following:
RewriteEngine On
RewriteCond %{ENV:IP2LOCATION_COUNTRY_SHORT} ^US$
RewriteRule ^(.*)$ - [R=404]
The [R=404] flag will instruct the web server to return the default 404 status back to the caller.
How to Use the Geolocation in PHP
Once you have the Apache module installed, you do not need to explicitly import a third party geolocation library. The geolocation information is automatically made available via the environment variables and ready to use anywhere in your PHP project. A simple code below will return the country short name, region name, and city name of the visitor’s IP address. Please note that you have to use DB3 BIN data in order to retrieve the region and city information.
<?php
echo $_SERVER[IP2LOCATION_COUNTRY_SHORT];
echo $_SERVER[IP2LOCATION_REGION];
echo $_SERVER[IP2LOCATION_CITY];
?>
Conclusion: Pros and Cons
Every approach has its pros and cons, and it’s just a matter of what fits your environment the best. The above approach provides you with an easy and faster way to retrieve the geolocation that you could use throughout all your PHP projects hosted under the same Apache server. One setup for all. Also, it provides you with a faster and more efficient way to perform redirection/blocking at the web server level. However, the main concern I can think of is the BIN file update. As you are aware that the BIN path was configured inside the apache2.conf and will only be loaded during the Apache loading process. Therefore, during the regular BIN data update, usually once a month, you have no choice but to restart the entire Apache server for the new BIN data to take effect. Having said that, if you are not running a mission-critical website, and are okay with the restart activity, then that would be no problem at all.
Happy coding.
Published at DZone with permission of camimi Morales. See the original article here.
Opinions expressed by DZone contributors are their own.
Comments