How to Load Test Flex and AMF Protocol Apps with JMeter
This in-depth tutorial will show you how JMeter can load test applications that use the AMF protocol, as well as serializing and deserializing messages.
Join the DZone community and get the full member experience.
Join For FreeIn this article, we will discuss how to load test applications that are based on the Flex Framework, with Apache JMeter. Because Flex uses the AMF protocol, the steps covered here will show how to test this protocol with JMeter and can be implemented for any app that uses it.
The AMF protocol is used to transfer data between a Flash application and a server. AMF is a relatively new binary messaging protocol, loosely based on SOAP and supporting RPC. This means that the data is presented as an XML message that contains the name of the procedure that will be executed on the server, and its parameters. Next, before sending, this data is serialized and we get a binary AMF message that is sent to the server, where it will be deserialized and the corresponding procedure will be called.
Flex uses two variations of the AMF protocol. AMF0 is used in Flex applications written in ActionScript 1.0 and 2.0, and AMF3 in apps written in ActionScript 3.0.
In this blog post we will present 2 examples: the first example tests getting a message in AMF format and its deserialization to a readable form. The second example is a Flash application that uses the AMF format for communication between the client and the server. In this example, we will demonstrate performance testing the sending and serialization of messages.
First, we need to read outgoing and incoming decoded AMF requests. For this, we can use proxy applications that support the AMF format. You can choose one of these:
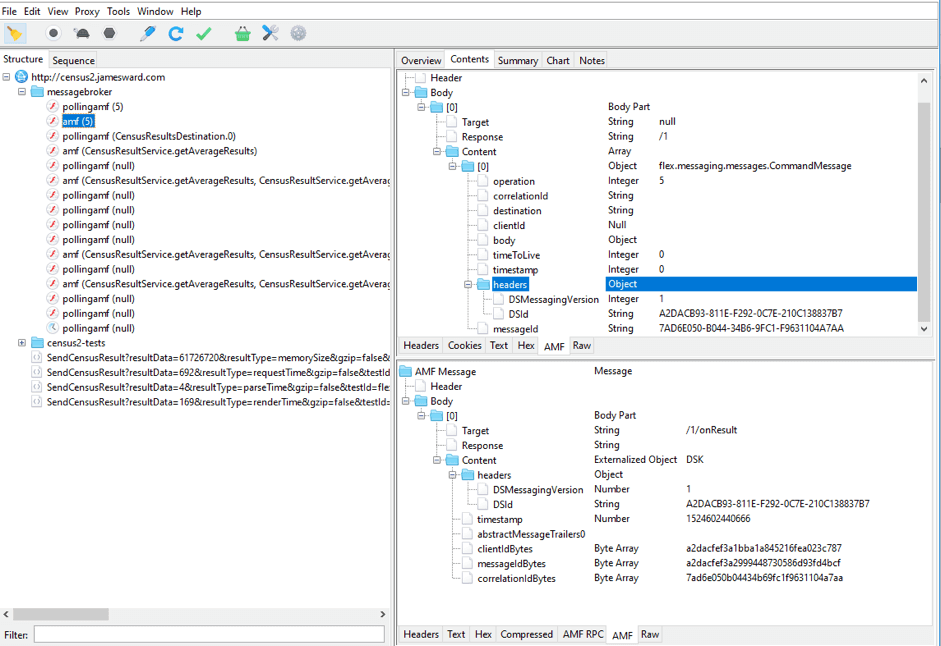
1. Charles - a debugging proxy that supports the AMF messages format, but is commercial (has a demo period). In the screenshot below you can see a deserialized SWF request file. To get the body of an AMF request as a file, right click on AMF Message and use the Save Request option.
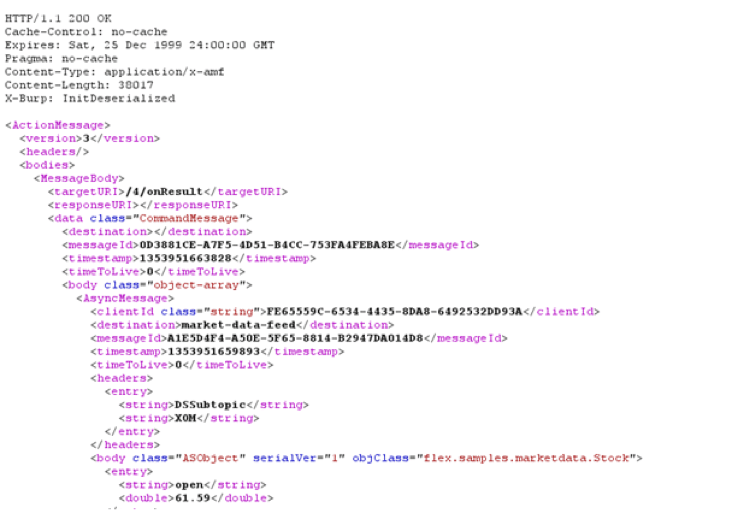
2. BurpSuite is a proxy application too, but with a free version. To work with AMF you need to install the AMF Deserialize Burp plugin, but it works only with responses. Below is the deserialized server response in XML format.
Now let us move on to work with AMF in JMeter.
There may be two situations:
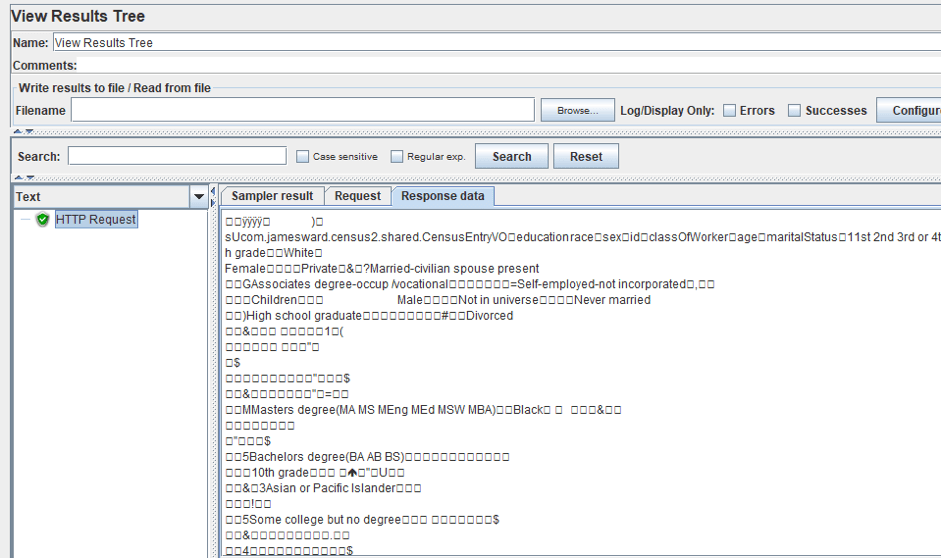
1. You send a simple HTTP GET request and in response, you get an encoded AMF response (our first example). Therefore, to create a load, we only need an HTTP Request Sampler. But, we will not be able to read the answer. It is binary and looks like this:
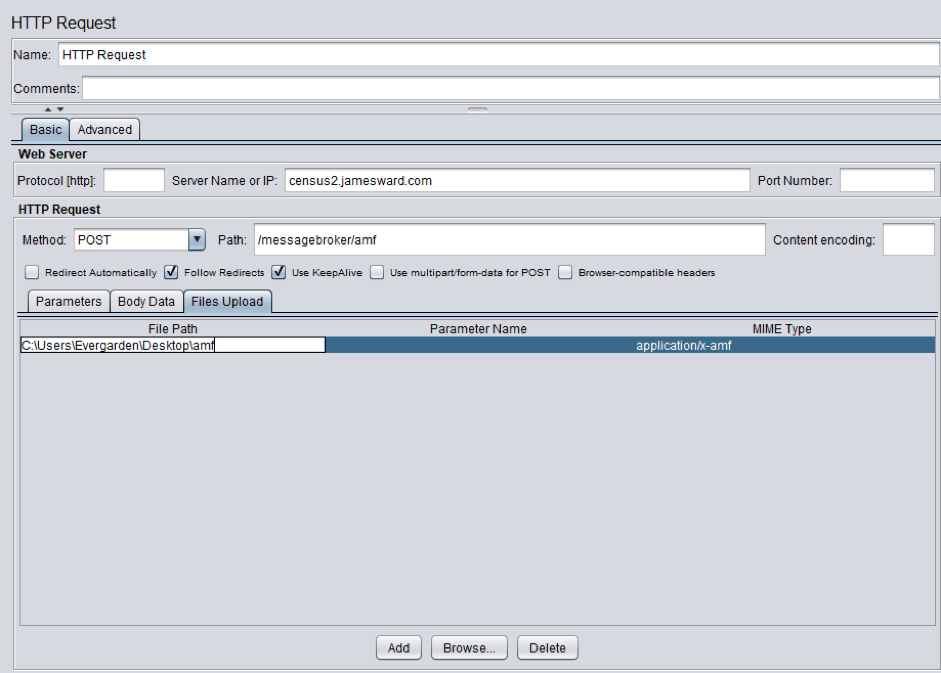
2. You send an HTTP POST Request with an AMF message in request body (Our second example). One of the solutions is using the HTTP Request Sampler with the already written and serialized AMF files and Files Upload Tab with application-x/amf MIME type. (It is the same thing as an HTTP POST Request with an AMF message in the body).
But then we lose the possibility of parameterizing the requests, and we cannot read the answers again. Besides, in some cases, there may be a situation, which we have in the second example, when the message contains the clientId, which is allocated strictly to one connected SWF file and is saved in the binary file. As a result, it will be possible to run only one thread, which is absolutely not suitable for load testing.
Therefore we need the ability to read and change AMF messages.
We can extend this solution using the following library and the JSR223 PostProcessor. This way we can deserialize the response and display it in String format. After that, we can do whatever we want with the answer.
The code for the JSR223 PostProcessor:
import flex.messaging.io.MessageDeserializer;import flex.messaging.io.SerializationContext;import flex.messaging.io.amf.*import org.apache.commons.lang.builder.ToStringBuilder;import org.apache.commons.lang.builder.ToStringStyle;//deserializebyte[] response = new byte[1024];response = ctx.getPreviousResult().getResponseData();ActionContext actionContext = new ActionContext();SerializationContext serializationContext = new SerializationContext();serializationContext.createASObjectForMissingType = true;ByteArrayInputStream bin = new ByteArrayInputStream(response);ActionMessage message = new ActionMessage();MessageDeserializer deserializer = new AmfMessageDeserializer();deserializer.initialize(serializationContext, bin, null);deserializer.readMessage(message, actionContext);//outputfor (int i = 0; i < message.getBodyCount(); i++) { ctx.getPreviousResult().setResponseData(ToStringBuilder.reflectionToString( message.getBody(i).getData(), ToStringStyle.SHORT_PREFIX_STYLE ));}First, we extract the response from the HTTP Request Sampler in a binary format, then we process it using the blazeds library, and at the end we save it to the response field again. As a result, we get a readable response from the server which we can work with further.
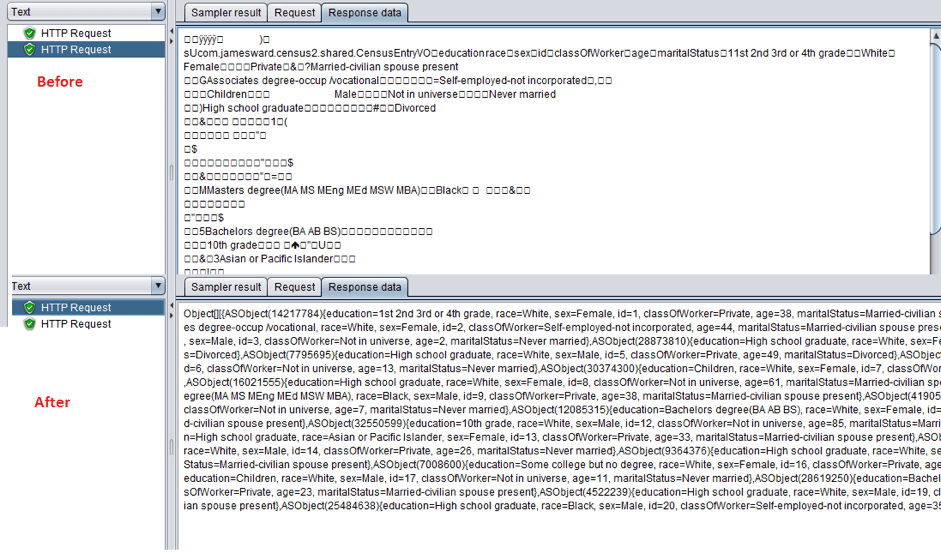
Using the same library and the JSR223 Preprocessor we can open file with the AMF message and modify the request:
import flex.messaging.io.MessageDeserializer;import flex.messaging.io.MessageSerializer;import flex.messaging.io.SerializationContext;import flex.messaging.io.amf.*import org.apache.commons.lang.builder.ToStringBuilder;import org.apache.commons.lang.builder.ToStringStyle;import java.io.*;import flex.messaging.messages.CommandMessage;import java.nio.file.Files;import flex.messaging.util.UUIDUtils; //deserialization byte[] response = Files.readAllBytes(new File("C:\\Users\\Evergarden\\Desktop\\amf").toPath()); ActionContext actionContext = new ActionContext(); SerializationContext serializationContext = new SerializationContext(); serializationContext.createASObjectForMissingType = false; ByteArrayInputStream bin = new ByteArrayInputStream(response); ActionMessage message = new ActionMessage(); MessageDeserializer deserializer = new AmfMessageDeserializer(); deserializer.initialize(serializationContext, bin, null); deserializer.readMessage(message, actionContext); //changing Object [] all = new Object[1]; for (int i = 0; i < message.getBodyCount(); i++) { message.getBody(i).getDataAsMessage().setHeader("DSId", UUIDUtils.createUUID()); message.getBody(i).getDataAsMessage().setMessageId(UUIDUtils.createUUID()); all[0] = message.getBody(i).getData(); message.getBody(i).setData(all); } //serialization ByteArrayOutputStream out = new ByteArrayOutputStream(); MessageSerializer serializer = new AmfMessageSerializer(); serializer.initialize(serializationContext, out, null); serializer.writeMessage(message); vars.put("bdy", new String(out.toByteArray(), "ISO-8859-1"));We take the AMF file from the AMF request of the second example. Then, we modify the MessageID and DSid by using the UUID generator, serialize the message and put it in the JMeter variable that we used in the body of the HTTP request sampler.
Now, we can create more than one thread.

Here you can download the JMeter script with both examples. To work with it, you need to put blazeds-common.jar, blazeds-core.jar into the /lib folder.
Note:If you get the following error when you decode the message using the code above or the JMeter AMF Plugin, it means that your server is sending you a type of data that you do not know anything about and you need to write your own serialization scheme.

Charles displays this data in the following way:
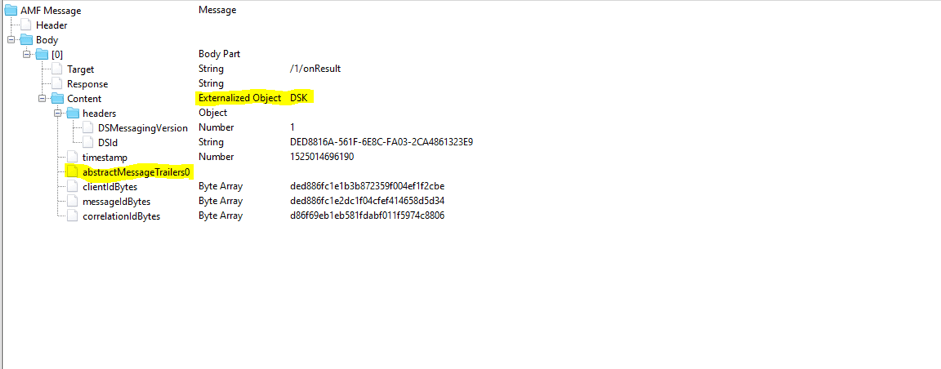
In our example, it is information about people (maybe something else), and we can not deserialize it because we know nothing about the server implementation. But if you still want to deserialize the rest of the message, you can add these 4 rows before deserialization to our code:
import flex.messaging.io.ClassAliasRegistry;import flex.messaging.messages.AcknowledgeMessageExt;ClassAliasRegistry aliases = ClassAliasRegistry.getRegistry();aliases.registerAlias("DSK", AcknowledgeMessageExt.class.getName());As a result, we got all that we can deserialize:

We can avoid working with post processors and programming by using the JMeter AMF plugin. But here, too, there is a small drawback: if you do not modify the source code of the plugin, it will work only on version 2.6 of JMeter, because the libraries underwent some changes in versions 3+ of JMeter.
1. Compile the project and after that copy JMeter-AMF.jar to jmeter/lib/ext.
2. Copy blazeds-common.jar and blazeds-core.jar to the /lib folder too.
3. Add the AMF Proxy Server element to the Test Plan. The principle of working with it is similar to working with the HTTP Proxy element.
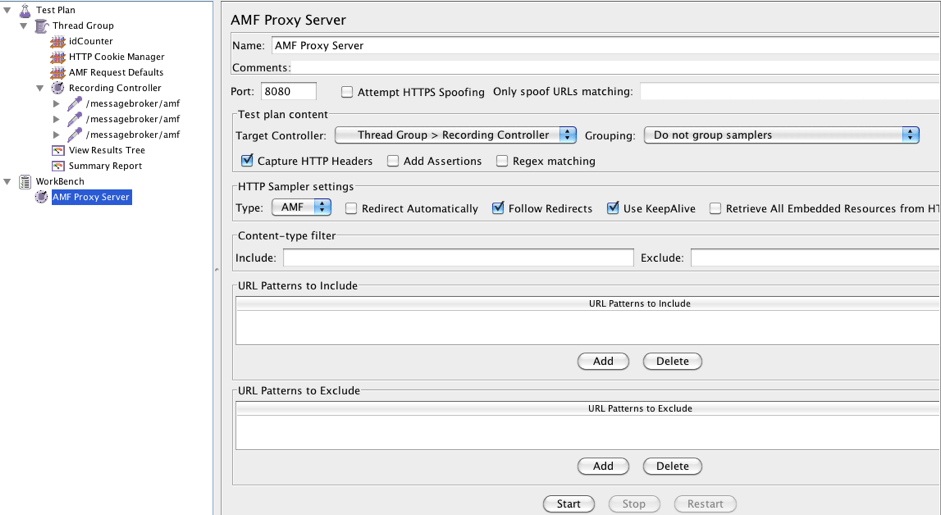
4. Record the requests. As you can see in the screenshot below, the requests are decoded as XML.
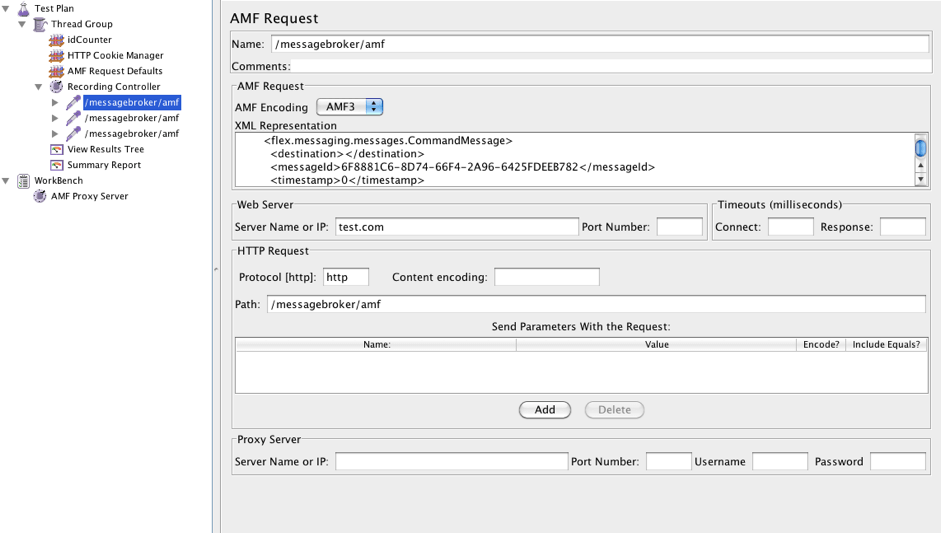
5. Now you can modify the required parameter using JMeter Variables and JMeter Functions.
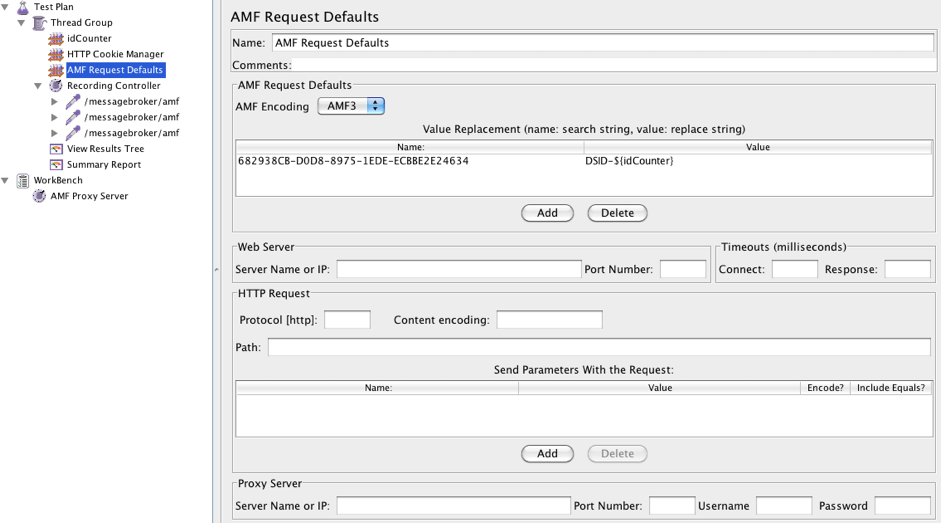
6. And after that, we can delete the Recording Controller and use the recorded AMF Request Samplers in your Thread Group.
The last option is a commercial plugin from Ubik Ingénierie, which will definitely run on the latest version of JMeter without any modifications. The functionality of this plug-in is similar: recording of requests, their modification and reading their responses.
After creating your script in JMeter, you can analyze the results in real-time on BlazeMeter, or after a few months to see changes in your performance.
Monitor KPIs like response time, error rate and hits in interactive graphs that are simple to use and easy to understand, and share results with team members, managers and non-technical audiences.
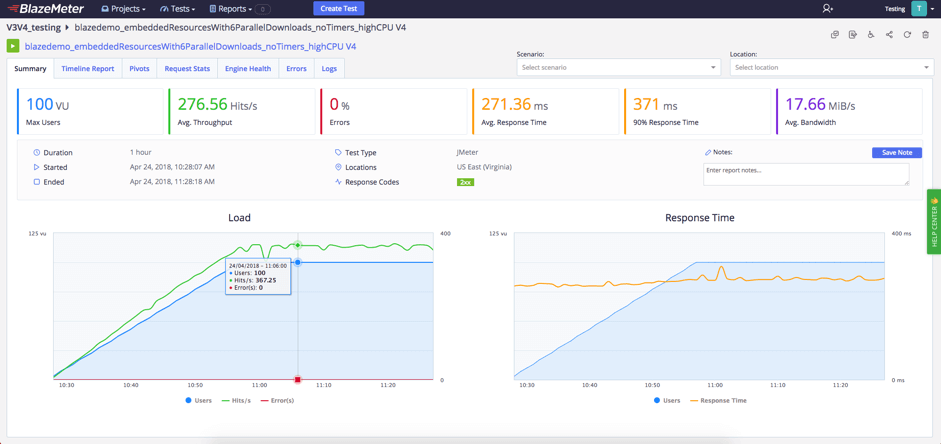
To try out BlazeMeter, request a demo, or put your URL in the box below and your test will start in minutes.
Published at DZone with permission of , DZone MVB. See the original article here.
Opinions expressed by DZone contributors are their own.

Comments