How to Load Test SSE Services With JMeter
There are two ways you can load test SSE services with JMeter.
Join the DZone community and get the full member experience.
Join For FreeNearly everyone who browses the Internet nowadays has come across notifications that appear on their desktop browsers, desktop applications, or mobile devices. New updates from favorite websites, chat messages, messages, and social networks, as well as stock exchange data, prices, and many more, can be delivered to you with push notifications. The basis for these push notifications is the SSE (Server-Sent Events) technology. In this blog post, we will learn to run an Apache JMeter load test for SSE.
We will show you two ways to load test SSE with JMeter: by using Groovy or a Java Sampler.
What Is SSE?
SSE is the technology for transferring data from a server to clients. Clients can be desktops or mobile devices with running applications and services or web applications open in client's browsers. When a client subscribes for a stream from the server, they will receive a notification when an event occurs. After the subscription, a one-way connection is opened between the server and the client and the server sends data to the application when it is required (push notifications).
SSE is handled directly on the client side, with the client listening to the channel. However, the connection also consumes server resources. As a result, a number of clients subscribed to a stream create a considerable load to the service, especially when notifications are massively sent. This is why it’s necessary to load test these types of services.
Load Testing SSE With JMeter
As server-sent events are transmitted over HTTP, there’s no need to implement a specific protocol or service for load testing. In addition, SSE supports reconnection, event IDs, and arbitrary events. There is a w3c specification dedicated to the EventSource interface of SSE, over which notifications are sent from a server to a client. The specification can be found here. Both reconnection time and event id can be used to imitate clients behavior in the JMeter script.
Creating Your JMeter Script
JMeter is the best choice among load generator tools for performance testing such services, as the client behavior can be easily imitated by JMeter script. Although JMeter doesn’t have out-of-the-box SSE components or plugins, the script can be implemented in two different ways: with the application of a JSR223 sampler and Groovy code or with the application of a Java sampler.
To simulate a server sending notifications, there are many open-source libraries, written in different languages, you can choose from. For the implementation of the JMeter script for this article, we have selected the OKHTTP event source library. Just download the corresponding jar files and drop them to the /lib/ext directory of the JMeter.
Our JMeter script will provide regular performance metrics that are always collected in performance testing and a few metrics specific to the SSE services. These metrics are: the number of reconnections and retrying reconnections for the same event.
Load Testing SSE With JSR223 Sampler and Groovy
1. Add a Thread Group.
2. Define the variables that you want to parameterize in your script. This can be done either in the variable section of the test plan or in the user variable component, which, in this case, has to be added to the script.
In the example for this article, the defined variables are serverURL, reconnectionTime, and lengthOfWork.

.png)
3. Add a JSR223 Sampler
For the demonstration of the work of JMeter script in this blog post, the wikimedia.org server is used, which sends push notifications in the JSON format. TheserverURL variable contains the URL of this server.
The JSR223 sampler will receive all the notifications from the server. Lest the script runs infinitely, the lengthOfWork variable is used to regulate script running time. If the time of work monitored in the JSR223 script is reached or exceeds the lengthOfWork value, the JMeter script finishes.
The serverURL, reconnectionTime, andlengthOfWork variables are defined in the user variables section of the test plan and are passed in the parameters field of the JSR223 sampler to the Groovy script.
4. The Groovy code of the JSR223 sampler is shown below.
import com.launchdarkly.eventsource.EventSource;
import com.launchdarkly.eventsource.EventHandler;
import com.launchdarkly.eventsource.MessageEvent;
import java.net.URI;
import java.io.StringReader;
import java.util.concurrent.TimeUnit;
import java.util.ArrayList;
import javax.json.Json;
import javax.json.JsonObject;
import javax.json.JsonReader;
import javax.json.JsonValue;

public class SimpleEventHandler implements EventHandler {

public List<String> respList = new ArrayList<String>();

public void onOpen() throws Exception{
log.info("The connection has been opened");
}

public void onClosed() throws Exception{
log.info("The connection has been closed");
}

public void onMessage(String Event, MessageEvent messageEvent) throws Exception{
respList.add(messageEvent.getData());
}

public void onComment(String comment) throws Exception{
log.info(comment);
}

public void onError(Throwable t){
log.info("Error "+t);
}
}

EventHandler eH = new SimpleEventHandler();

String responseList="";

EventSource.Builder builder = new EventSource.Builder(eH, URI.create(args[0]));

EventSource eventSource = builder.build();
eventSource.setReconnectionTimeMs(Integer.parseInt(args[1]));
eventSource.start();
TimeUnit.SECONDS.sleep(Integer.parseInt(args[2]));
eventSource.close();

for(String respRecord:eH.respList){
JsonReader jsonReader = Json.createReader(new StringReader(respRecord));
JsonObject jsonObject = jsonReader.readObject();
JsonValue title = jsonObject.getValue(args[3]);
JsonValue changeType = jsonObject.getValue(args[4]);
responseList = responseList + changeType.toString()+" : "+title.toString()+"\n";
}

SampleResult.setResponseData(responseList,"866");
The code logic includes:
- The establishment of the connection to the server, which generates notifications
- Receiving notifications
- Parsing received notifications
- Filtering specific ones and outputting them to the result data section of the JSR223 sampler so that filtered notifications can be viewed in the View Results Tree listener
JMeter receives all the notifications from the server, which are saved in the array list. Notifications from the server ‘wikimedia.org’ are represented in JSON format. The Groovy code in the JSR223 Sampler filters the data by extracting only the notifications that are passed under certain keys of the JSON structure. The names of the keys are set in the variables section in the option1 and option2 variables and are passed as parameters to the Groovy script.
5. Add a View Results Tree Listener and run your script.
.png)
The script can be downloaded from here together with the OKHTTP and JSON libraries.
Load Testing SSE With the Java Sampler
Another version of this script can be created with the Java request sampler. The logic of establishing a connection to the service and receiving notifications from the server takes place in the Java request.
To do this, first, we need to implement the Java class for the Java Request Sampler. To implement a Java class for the Java request sampler to receive notifications, follow the steps below:
- In any IDE tool (Idea Eclipse), create a project and implement an application that receives notifications from a server. For our example, use the code shown below. Debug and compile the code.
- Place the jar file with the compiled code to the /lib/ext folder of the JMeter installation directory.
- Restart JMeter, add a Thread group and add a Java request sampler under the thread group.
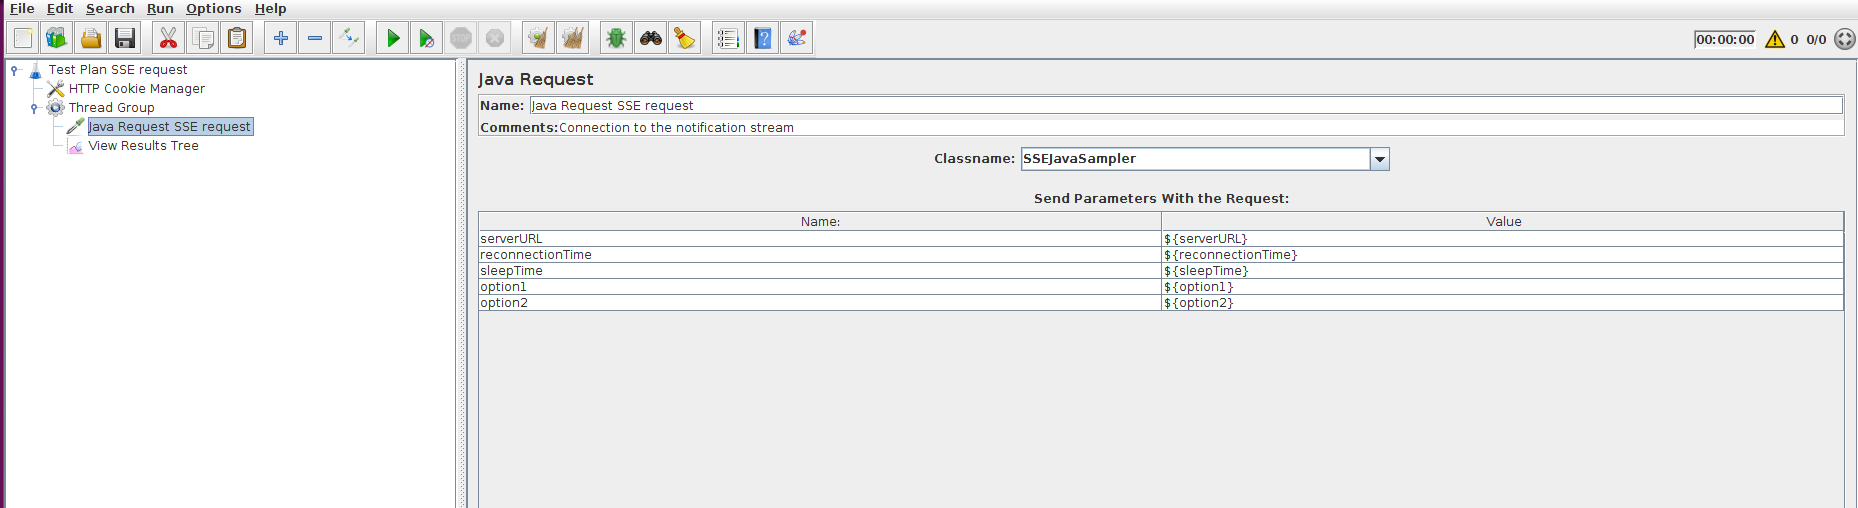
- In the pull-down list ‘classname’ of the Java request sampler, select the name of the main class of the Java project you compiled in step 1. It should appear in the pull-down list. The list of parameters that you determined in the
getDefaultParametersmethod will be displayed in the ‘Send parameters with request table’ of the Java request sample. - Define the parameters and add a View Results Tree listener for demonstration purposes.
- Launch the script. If the server URL is the same, as it is in the first script example (where we used the JSR223 Sampler), the Java sampler data in the View Results Tree listener will be displayed in the same format as it is in the first implementation.
Here is the Java code to process the Java Request Sampler. Add it to the IDE in three separate files, compile it, and then put in JMeter’s /lib/ext folder (steps 1-2). You can create your own code.
SSEJavaSampler is the implementation of the JavaSamplerClient interface. This class should appear in the pull-down list ‘Classname’ of the Java request sampler. The Java code of this class is shown below.
import org.apache.jmeter.config.Arguments;
import org.apache.jmeter.protocol.java.sampler.AbstractJavaSamplerClient;
import org.apache.jmeter.protocol.java.sampler.JavaSamplerContext;
import org.apache.jmeter.samplers.SampleResult;

public class SSEJavaSampler extends AbstractJavaSamplerClient {
   @Override
   public void setupTest(JavaSamplerContext context){
       super.setupTest(context);
   }

   @Override
   public Arguments getDefaultParameters(){
       Arguments args = new Arguments();
       args.addArgument("serverURL", "${serverURL}");
       args.addArgument("reconnectionTime", "${reconnectionTime}");
       args.addArgument("sleepTime", "${sleepTime}");
       args.addArgument("option1", "${option1}");
       args.addArgument("option2","${option2}");
       return args;
   }

   @Override
   public SampleResult runTest(JavaSamplerContext jSC){

       SampleResult result = new SampleResult();
       boolean success = true;
       String[] sseParameters = new String[5];
       sseParameters[0] = jSC.getParameter("serverURL");
       sseParameters[1] = jSC.getParameter("reconnectionTime");
       sseParameters[2] = jSC.getParameter("sleepTime");
       sseParameters[3] = jSC.getParameter("option1");
       sseParameters[4] = jSC.getParameter("option2");

       SSERequest sseRequest = new SSERequest(sseParameters);

       result.sampleStart();
       result.sampleEnd();
       try {
           sseRequest.makeRequest(sseParameters);
           result.setSuccessful(success);
           result.setSamplerData(sseParameters[3]+":"+sseParameters[4]);
           result.setResponseData(sseRequest.respList,"866");
       }
       catch (InterruptedException iE){
           System.out.println("Interrupted exception " +iE);
       }
       return result;
   }

   @Override
   public void teardownTest(JavaSamplerContext context){
       super.teardownTest(context);
}}
The SSERequest Java class creates an instance of the SimpleEventHandler class and configures a connection to the server, which sends notifications, starts and stops receiving notifications, and processes them. The code of this class is shown below.
import com.launchdarkly.eventsource.EventSource;
import com.launchdarkly.eventsource.EventHandler;
import javax.json.Json;
import javax.json.JsonObject;
import javax.json.JsonReader;
import javax.json.JsonValue;
import java.io.StringReader;
import java.net.URI;
import java.util.concurrent.TimeUnit;

public class SSERequest {

   private String sURL = "";
   private Integer rTime = new Integer(0);
   private Integer sTime = new Integer(0);
   private String opt1 = "";
   private String opt2 = "";

   public String respList = "";

   SSERequest(String[] sseParameters){
       sURL = sseParameters[0];
       rTime = Integer.parseInt(sseParameters[1]);
       sTime = Integer.parseInt(sseParameters[2]);
       opt1 = sseParameters[3];
       opt2 = sseParameters[4];
   }

   public void makeRequest(String[] args) throws InterruptedException{
       EventHandler eventHandler = new SimpleEventHandler();
       String url = sURL;
       EventSource.Builder builder = new EventSource.Builder(eventHandler, URI.create(url));

       EventSource eventSource = builder.build();
       eventSource.setReconnectionTimeMs(rTime);
       eventSource.start();
       TimeUnit.SECONDS.sleep(sTime);
       eventSource.close();
       System.out.println("Filtered output: \n");

       for(String respRecord:((SimpleEventHandler) eventHandler).respList) {
           JsonReader jsonReader = Json.createReader(new StringReader(respRecord));
           JsonObject jsonObject = jsonReader.readObject();
           JsonValue title = jsonObject.getValue(opt1);
           JsonValue chType = jsonObject.getValue(opt2);
           respList = respList +chType.toString() + " : " + title.toString()+"\n";
       }
   }
}
The SimplerEventHandler class implements EventHandler interface, which is responsible for establishing the connection to the server and receiving notifications. The code of the SimpleEventHandler class is shown below:
import com.launchdarkly.eventsource.MessageEvent;
import com.launchdarkly.eventsource.EventHandler;
import java.util.ArrayList;

public class SimpleEventHandler implements EventHandler{
   public ArrayList<String> respList = new ArrayList<String>();

   @Override
   public void onOpen() throws Exception{
       System.out.println("The connection has been opened");
   }

   @Override
   public void onClosed() throws Exception{
       System.out.println("The connection has been closed");
   }

   @Override
   public void onMessage(String Event, MessageEvent messageEvent) throws Exception{
       respList.add(messageEvent.getData());
       System.out.println(messageEvent.getData());
   }

   @Override
   public void onComment(String comment) throws Exception{
       System.out.println(comment);
   }

   @Override
   public void onError(Throwable t ){
       System.out.println("Error "+t);
   }
}
The jar file itself and the Java source code are located together with this version of the JMeter script and can be downloaded from here. The JMeter script and Java request samplers are shown in the screenshot below. You can now run your test.
That’s it! You are now ready to run your own load test for SSE services.
Load Testing SSE in BlazeMeter
After creating your JMeter script, upload it to BlazeMeter. Now, you can scale your test to over 56 geo-locations and run your test for thousands or millions of users. To try out BlazeMeter, put your URL in the box below and your test will start in minutes!

Published at DZone with permission of Konsantine Firsanov. See the original article here.
Opinions expressed by DZone contributors are their own.
Comments