How to Make a Picture-in-Picture Feature in iOS App Using AVFoundation
Learn how to place a video over another video during playback with native iOS functionality and Swift. Emulates a TikTok "duet" feature.
Join the DZone community and get the full member experience.
Join For FreeAVFoundation works on Apple’s entire product line. With this framework, you can add recording, editing, and playback features to your apps. In this article, I will show how to place one video over another and thus enable a picture-in-picture (“duet”) mode – one of the most popular TikTok-like features. We are going to use only the native tools for this job.
Building Blocks
This is what we need for this task:
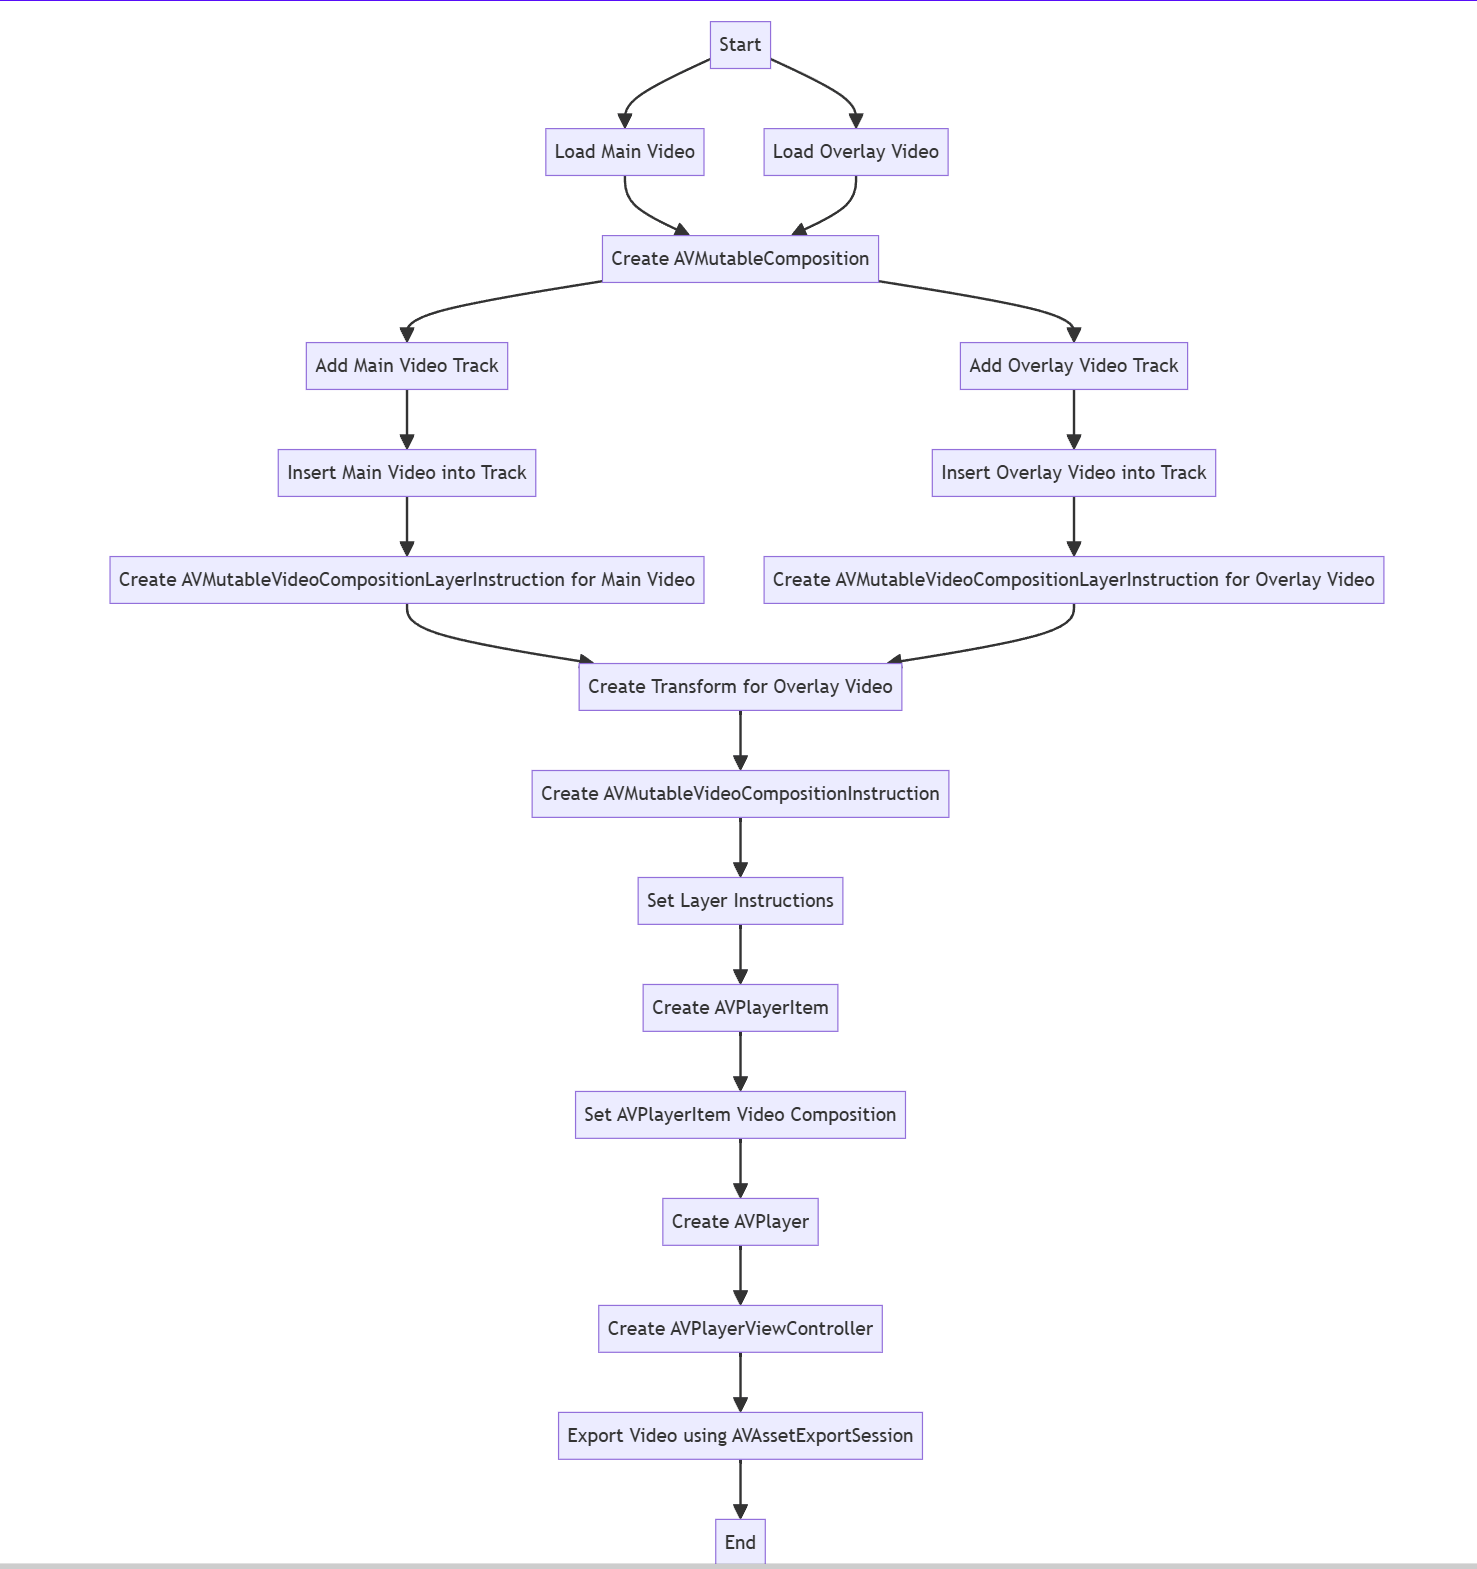
AVPlayerViewControllerlets you play the videos and has the UI and standard controls.AVAssetExportSessionlets you set the format for video export. With this, your app will save the final clip to the device’s storage.AVMutableCompositionwill be used to manage and modify video/audio tracks.AVMutableVideoCompositionwill define the way the tracks mix for each frame of the resulting video.AVMutableVideoCompositionInstructionlets you set the instructions for the changes of the layers in the output video.AVMutableVideoCompositionLayerInstructionallows changing the opacity of a certain video track. It also allows cropping and resizing the video – just what we need to make the overlay clip small and place it at the location we want.
In this example, we will use two videos. The main video asset is the one that will be placed behind the other one and played in full size. The overlay video asset will be placed in the foreground, over the main video asset.

Step By Step
Start by loading the videos. Let’s assume that they are both located inside the application bundle as resources:
let mainVideoUrl = Bundle.main.url(forResource: "main", withExtension:

"mov")!

let overlayVideoUrl = Bundle.main.url(forResource: "overlay",

withExtension: "mov")!

let mainAsset = AVURLAsset(url: mainVideoUrl)

let overlayAsset = AVURLAsset(url: overlayVideoUrl)
There are two videos, so make two blank tracks in AVMutableComposition and the appropriate composition:
let mutableComposition = AVMutableComposition()

guard let mainVideoTrack =

mutableComposition.addMutableTrack(withMediaType: AVMediaType.video,

preferredTrackID: kCMPersistentTrackID_Invalid),

let overlayVideoTrack =

mutableComposition.addMutableTrack(withMediaType: AVMediaType.video,

preferredTrackID: kCMPersistentTrackID_Invalid) else {

// Handle error

return

}
The next step is to place the tracks from AVURLAsset into the composition tracks:
let mainAssetTimeRange = CMTimeRange(start: .zero, duration:

mainAsset.duration)

let mainAssetVideoTrack = mainAsset.tracks(withMediaType:

AVMediaType.video)[0]

try mainVideoTrack.insertTimeRange(mainAssetTimeRange, of:

mainAssetVideoTrack, at: .zero)

let overlayedAssetTimeRange = CMTimeRange(start: .zero, duration:

overlayAsset.duration)

let overlayAssetVideoTrack = overlayAsset.tracks(withMediaType:

AVMediaType.video)[0]

try overlayVideoTrack.insertTimeRange(overlayedAssetTimeRange, of:

overlayAssetVideoTrack, at: .zero)
Then make two instances of AVMutableVideoCompositionLayerInstruction:
let mainAssetLayerInstruction =

AVMutableVideoCompositionLayerInstruction(assetTrack: mainVideoTrack)

let overlayedAssetLayerInstruction =

AVMutableVideoCompositionLayerInstruction(assetTrack: overlayVideoTrack)
Now use the setTransform method to shrink the overlay video and place it where you need it to be. In this case, we will make it 50% smaller than the main video in both dimensions, so we will use identity transform scaled by 50%. Using the transform, we will also adjust the position of the overlay.
let naturalSize = mainAssetVideoTrack.naturalSize

let halfWidth = naturalSize.width / 2

let halfHeight = naturalSize.height / 2

let topLeftTransform: CGAffineTransform = .identity.translatedBy(x: 0, y: 0).scaledBy(x: 0.5, y: 0.5)

let topRightTransform: CGAffineTransform = .identity.translatedBy(x: halfWidth, y: 0).scaledBy(x: 0.5, y: 0.5)

let bottomLeftTransform: CGAffineTransform = .identity.translatedBy(x: 0, y: halfHeight).scaledBy(x: 0.5, y: 0.5)

let bottomRightTransform: CGAffineTransform = .identity.translatedBy(x: halfWidth, y: halfHeight).scaledBy(x: 0.5, y: 0.5)

overlayedAssetLayerInstruction.setTransform(topRightTransform, at: .zero)
Note that in this example, both videos are in the 1920x1080. If the resolutions differ, the calculations need to be adjusted.
Now create AVMutableComposition and AVMutableVideoComposition. You will need them to play and export the video.
let instruction = AVMutableVideoCompositionInstruction()

instruction.timeRange = mainAssetTimeRange

instruction.layerInstructions = [overlayedAssetLayerInstruction,

mainAssetLayerInstruction]

mutableComposition.naturalSize = naturalSize

mutableVideoComposition = AVMutableVideoComposition()

mutableVideoComposition.frameDuration = CMTimeMake(value: 1, timescale:

30)

mutableVideoComposition.renderSize = naturalSize

mutableVideoComposition.instructions = [instruction]
The output video with the picture-in-picture mode enabled will be played through AVPlayerViewController. First, create a new instance of AVPlayer and pass it as a reference to AVPlayerItem that will use AVMutableVideoComposition and AVMutableComposition that you made earlier.
If you get the "Cannot find 'AVPlayerViewController' in scope" error, you forgot to import the AVKit framework in your source file.
let playerItem = AVPlayerItem(asset: mutableComposition)

playerItem.videoComposition = mutableVideoComposition

let player = AVPlayer(playerItem: playerItem)

let playerViewController = AVPlayerViewController()

playerViewController.player = player
Now that you have the player, you have two options:
- Fullscreen mode: Use
UIViewControllermethods likepresent(). - In line with other views: Use APIs like
addChild()anddidMove(toParent:).
And finally, we need to export the video with AVAssetExportSession:
guard let session = AVAssetExportSession(asset: mutableComposition,

presetName: AVAssetExportPresetHighestQuality) else {

// Handle error

return

}

let tempUrl =

FileManager.default.temporaryDirectory.appendingPathComponent("\

(UUID().uuidString).mp4")

session.outputURL = tempUrl

session.outputFileType = AVFileType.mp4

session.videoComposition = mutableVideoComposition

session.exportAsynchronously {

// Handle export status

}
This is what you should get in the end:

You can also modify the final video, e.g. round out the edges, add shadow, or a colored border. To do that, create a custom compositor class for the AVVideoCompositing protocol and a corresponding instruction for AVVideoCompositionInstructionProtocol.
Opinions expressed by DZone contributors are their own.

Comments